- Products

- Developers
- User stories
- Blog
- Pricing

Build a chat app for a live event with Node.js, MySQL and Pusher Channels Part 1: Building the login page
- Introduction
- Pusher user concept
- Requirements
- Implementation steps
- Step 1: Set up Pusher Channels
- Create an app
- Step 2: Enable client events
- Step 3: Get App Keys
- Step 4: Set up the codebase
- Check dependencies
- Create project subdirectories
- Setup MySQL database
- Application credentials
- Setup Express and Pusher
- Step 5: Build the login page
- Creating the CSS for the Login Form
- Create login template with HTML
- Add login logic with Node.js
Introduction
In this two-part tutorial we'll build a simple chat room that can be featured alongside a live event. We'll take advantage of the user concept in Pusher to build strong authentication and moderation features, and offer your users a safer and more enjoyable chat experience.
The backend is built using Node.js and Express while we've used JavaScript for the frontend and Pusher Channels.
Pusher user concept
The Pusher User classifies users as a distinct concept in the Pusher system. It helps automate user-driven development, for example, to identify connected users and address them individually or terminate connections based on malicious behavior.
Requirements
Before you can start implementing this tutorial, you need the following:
- An IDE of your choice, e.g. Visual Studio Code.
- NMP
- Node.js (version >= 10.x) installed on your computer. Download Node.js
- MySQL database
Implementation steps
Here is the step-to-step implementation guide.
Part 1 of this tutorial covers steps 1 to 5 - from how to set up Pusher Channels, enable client events, get App Keys, set the code base, and build the login page.
Part 2 continues with steps 6 to 8 on how to build and test the homepage with a chat widget, build the admin dashboard, run the app and see it all in action.
Step 1: Set up Pusher Channels
This section explains how to set up Pusher Channels.
Create an app
- Navigate to pusher.com and sign up for a free account. If you already have an account, sign in.
NOTE: Pusher's free sandbox plan comes with 200,000 messages per day and 100 concurrent connections (total number of simultaneous connections across your app) so it will be more than sufficient for this tutorial app.
Once signed in, navigate to Channels and click Create app.
Configure your app by proving the following information:
- App name - A name is for your reference and you can change it later.
- Cluster - The physical location of the servers that handle requests from your Channels app. It's not possible to change the cluster afterward.
- Tech stack you intend to integrate Pusher with for a better setup experience (optional).
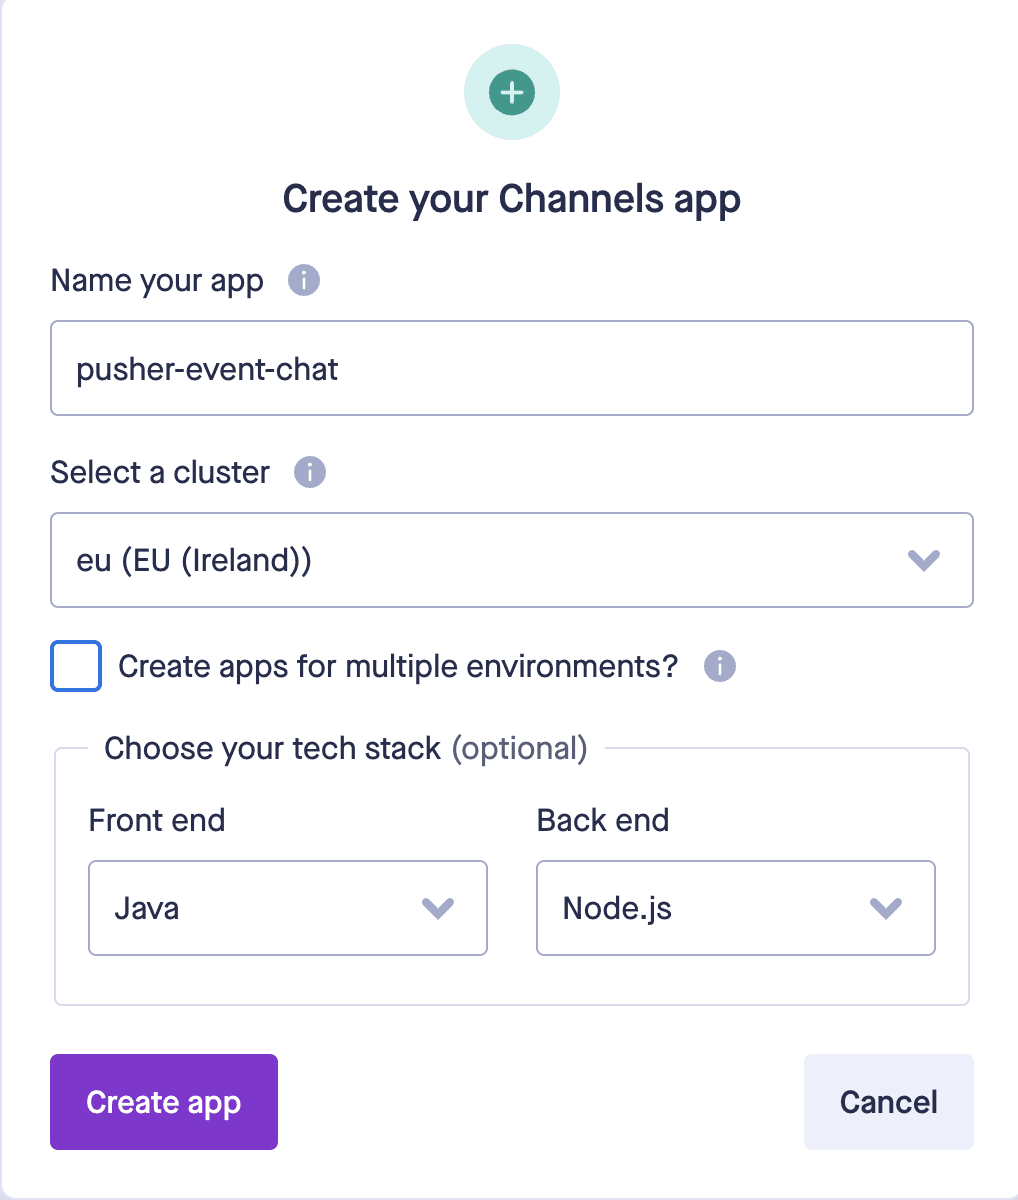
- Click Create app to continue.
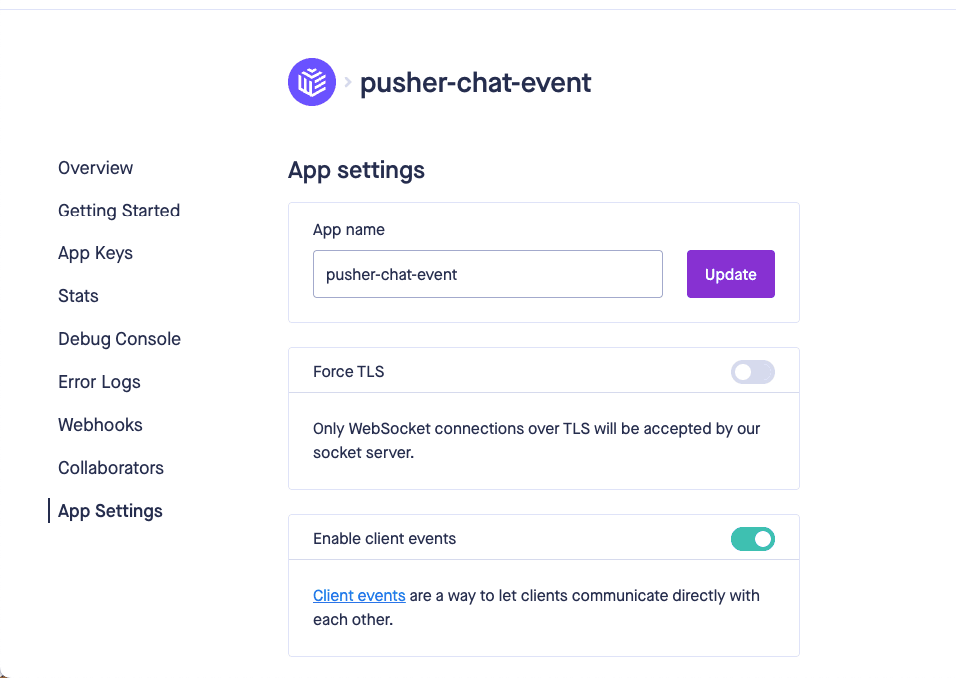
Step 2: Enable client events
For Pusher to trigger events from the client (browser), you need to use Presence channels. It will enable chat participants to securely chat with one another without having to send messages through the backend server first.
Here’s how to enable client events:
Navigate to your channel app > App Settings > toggle the Enable client events option.
Step 3: Get App Keys
To use Pusher channels, you need App Keys for your app.
Go to your app, from the side navigation, click App Keys.
Step 4: Set up the codebase
To create a new application, create a new directory:
mkdir pusher-event-chat
Now, go ahead and change the directory into the newly created folder:
cd pusher-event-chat
Check dependencies
To go through the tutorial seamlessly, install the following dependencies:
- Pusher
NodeJS SDK dotenvfor parsing the variable.env fileexpressto configure and manage an HTTP serverexpress-sessionfor providing an Express middlewarebody-parserfor providing body parsing middlewaremysqlfor connecting with the databasejs-sha512for hashing user passwordsjsdomfor emulating a subset of a web browser
Get those dependencies by running:
npm install pusher dotenv express express-session body-parser mysql js-sha512 jsdom -- save
Create project subdirectories
In the pusher-event-chat directory, create directories called server and public.
1mkdir server 2mkdir public
Create nested directories:
1mkdir public/admin 2mkdir public/landing 3mkdir public/login
Setup MySQL database
NOTE: Make sure you have the MySQL server installed and running on your machine. You can use the following command to check this:
mysqladmin -u root -p ping
Because we're trying to build the webpage to manage the event, we need a mechanism to store users' data to determine which users can be part of the event. For this, we'll need a database to connect to.
Let’s start by creating the event database and the table of accounts for tickets with an association with the users who have registered them.
Execute the following SQL statement either with the preferred MySQL Editor or with the command line. The tutorial follows the CLI approach.
- Enter the
serverdirectory by
cd server
- Create the
eventdb.sqlfile by running:
touch eventdb.sql
- Paste in the following contents to the newly created file:
1/* pusher-event-chat/server/eventdb.sql */ 2 ALTER USER 'root'@'localhost' IDENTIFIED WITH mysql_native_password BY ''; 3 FLUSH PRIVILEGES; 4 CREATE DATABASE IF NOT EXISTS `eventdb` DEFAULT CHARACTER SET utf8 COLLATE utf8_general_ci; 5 USE `eventdb`; 6 CREATE TABLE IF NOT EXISTS `accounts` ( 7 `id` int(11) NOT NULL AUTO_INCREMENT, 8 `username` varchar(50) NOT NULL, 9 `ticket` varchar(255) NOT NULL, 10 `email` varchar(100) NOT NULL, 11 `fullname` varchar(255) NOT NULL, 12 PRIMARY KEY (`id`) 13 ) ENGINE=InnoDB AUTO_INCREMENT=2 DEFAULT CHARSET=utf8; 14 INSERT INTO `accounts` (`id`, `username`, `ticket`, `email`, `fullname`) VALUES (1, 'admin', 'c7ad44cbad762a5da0a452f9e854fdc1e0e7a52a38015f23f3eab1d80b931dd472634dfac71cd34ebc35d16ab7fb8a90c81f975113d6c7538dc69dd8de9077ec', 'admin@demo.com', 'admin'); /* admin */ 15 INSERT INTO `accounts` (`id`, `username`, `ticket`, `email`, `fullname`) VALUES (2, 'john', 'b7fcc6e612145267d2ffea04be754a34128c1ed8133a09bfbbabd6afe6327688aa71d47343dd36e719f35f30fa79aec540e91b81c214fddfe0bedd53370df46d', 'john@demo.com', 'John Smith'); /* john */ 16 INSERT INTO `accounts` (`id`, `username`, `ticket`, `email`, `fullname`) VALUES (3, 'mike', 'a91d24d7eab7683bc73b857d42dfc48a9577c600ccb5e7d7adabab54eebc112232f3de2539208f22a560ad320d1f2cda5a5f1a127baf6bf871b0e282c2b85220', 'mike@demo.com', 'Mike Wilson'); /* mike */
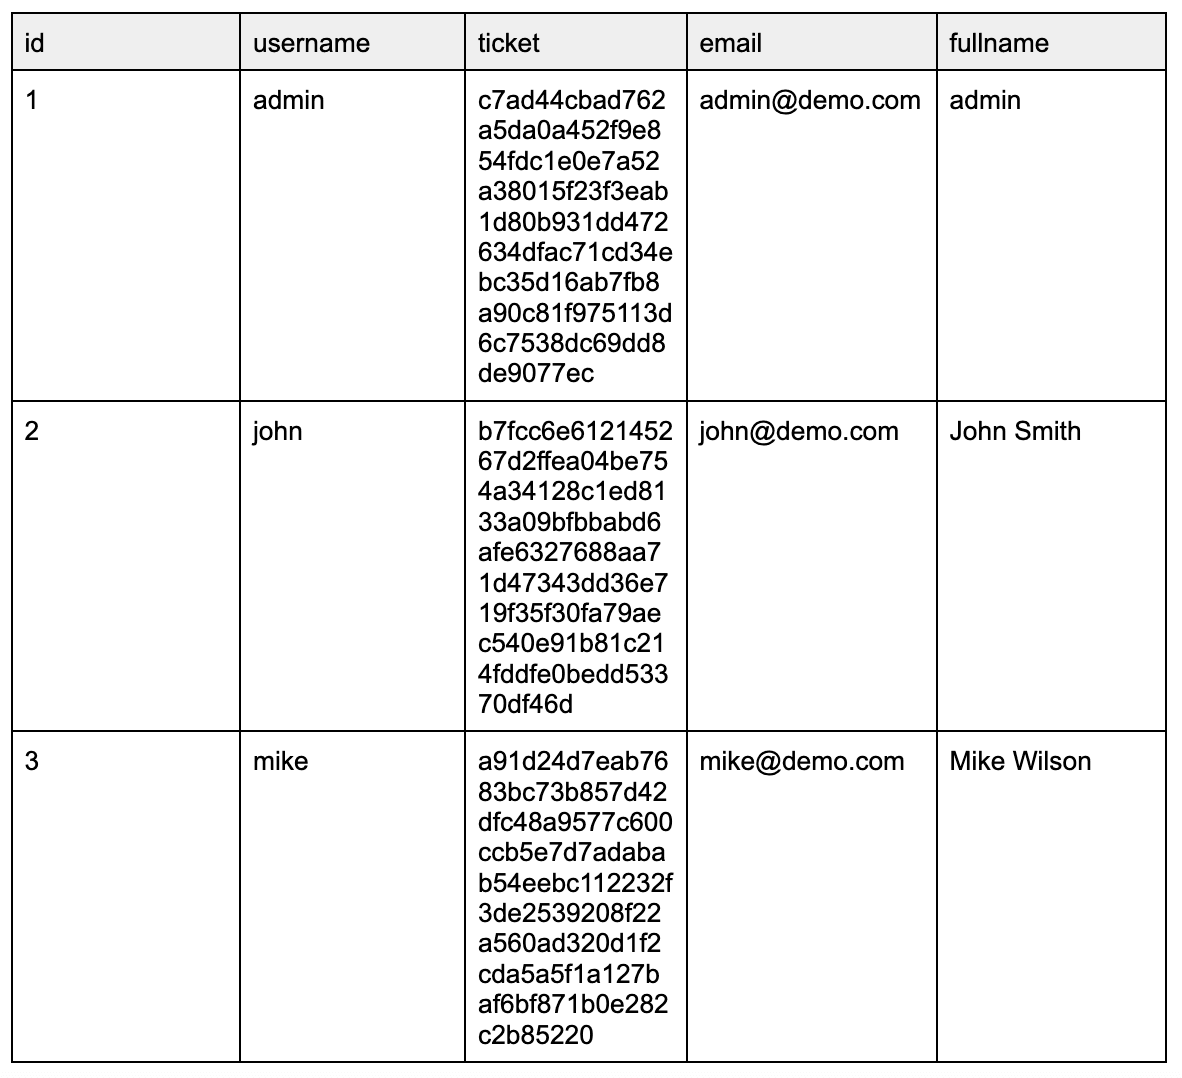
The above SQL statement will create the database eventdb and create the accounts table. In addition, it will insert test accounts that we can use for demo purposes.
- Use the following command to connect to your MySQL database server:
In this tutorial, we're using the default MySQL server configuration and connect as a root user with no password.
NOTE: This is done for demonstration purposes only and must be changed for the production environment.
- Execute queries from the
eventdb.sqlby running:
mysql> \. /full/path/to/the/pusher-event-chat/server/eventdb.sql
- Verify if data is available in the
accountstable by executing:
mysql> select * from eventdb.accounts;
- The result of this query should be:
- Exit MySQL client:
mysql> quit
Application credentials
Now you need to save Pusher App credentials.
- Create the .env file in the
./serverdirectory:
touch variable.env
- Paste in the following contents to the newly created file, and update values with your app credentials obtained from the dashboard. Refer back to Step 3 - Get App Keys.
1// pusher-event-chat/server/variable.env 2 PUSHER_APP_ID="YOUR_PUSHER_APP_ID" 3 PUSHER_APP_KEY="YOUR_PUSHER_APP_KEY" 4 PUSHER_APP_SECRET="YOUR_PUSHER_APP_SECRET" 5 PUSHER_APP_CLUSTER="YOUR_PUSHER_APP_CLUSTER"
Setup Express and Pusher
Let’s start fleshing the server.
- Run command to create a new file
server.jsin theserverdirectory:
touch server.js
- Open the newly created file and paste the code below into it:
1// pusher-event-chat/server/server.js 2 require('dotenv').config({ 3 path: 'variable.env' 4 }); 5 const express = require('express'); 6 const path = require('path'); 7 const bodyParser = require('body-parser'); 8 const session = require('express-session'); 9 const Pusher = require('pusher'); 10 const mysql = require('mysql'); 11 const sha512 = require('js-sha512').sha512; 12 var jsdom = require("jsdom"); 13 14 const pusher = new Pusher({ 15 appId: process.env.PUSHER_APP_ID, 16 key: process.env.PUSHER_APP_KEY, 17 secret: process.env.PUSHER_APP_SECRET, 18 cluster: process.env.PUSHER_APP_CLUSTER, 19 forceTLS: true, 20 });
Here, we create a Pusher instance. As you can see, we’re loading our Pusher app credentials from environment variables in the variable.env file we created earlier.
- Create a basic Express server and enable some middleware that the server will use. The session middleware will allow us to save a user’s details in session for later use. The body-parser middleware will allow us to get form data. Then we serve static files from the public directory.
1const app = express(); 2 app.use(session({ 3 secret: 'somesecrethere', 4 resave: true, 5 saveUninitialized: true 6 })) 7 8 app.use(bodyParser.json()); 9 app.use(bodyParser.urlencoded({ 10 extended: false 11 })); 12 app.use(express.static(path.join(__dirname, '/../public')));
- Start the server on port 3000.
1app.listen(3000, () => { 2 console.log('Server is up on 3000') 3 });
Step 5: Build the login page
In this section, we will be operating on two files. This is server.js and login.html. We additionally will create login.css to make the login form more appealing.
Creating the CSS for the Login Form
- Navigate to
public/logindirectory and createlogin.cssfile:
1cd ../public/login 2 touch login.css
- Edit the
login.cssfile and add:
1/* pusher-event-chat/public/login/login.css */ 2 * { 3 box-sizing: border-box; 4 font-family: -apple-system, BlinkMacSystemFont, "segoe ui", roboto, oxygen, ubuntu, cantarell, "fira sans", "droid sans", "helvetica neue", Arial, sans-serif; 5 font-size: 16px; 6 } 7 body { 8 background-color: #435165; 9 } 10 .login { 11 width: 400px; 12 background-color: #ffffff; 13 box-shadow: 0 0 9px 0 rgba(0, 0, 0, 0.3); 14 margin: 100px auto; 15 } 16 .login h1 { 17 text-align: center; 18 color: #5b6574; 19 font-size: 24px; 20 padding: 20px 0 20px 0; 21 border-bottom: 1px solid #dee0e4; 22 } 23 .login form { 24 display: flex; 25 flex-wrap: wrap; 26 justify-content: center; 27 padding-top: 20px; 28 } 29 .login form label { 30 display: flex; 31 justify-content: center; 32 align-items: center; 33 width: 50px; 34 height: 50px; 35 background-color: #3274d6; 36 color: #ffffff; 37 } 38 .login form input[type="password"], .login form input[type="email"] { 39 width: 310px; 40 height: 50px; 41 border: 1px solid #dee0e4; 42 margin-bottom: 20px; 43 padding: 0 15px; 44 } 45 .login form input[type="submit"] { 46 width: 100%; 47 padding: 15px; 48 margin-top: 20px; 49 background-color: #3274d6; 50 border: 0; 51 cursor: pointer; 52 font-weight: bold; 53 color: #ffffff; 54 transition: background-color 0.2s; 55 } 56 .login form input[type="submit"]:hover { 57 background-color: #2868c7; 58 transition: background-color 0.2s; 59 }
The stylesheet file consists of properties that are associated with HTML elements.
Create login template with HTML
The login form consists of an HTML form element and input elements. This enables the user to enter their details and submit.
- Create
login.htmlfile in the/public/logindirectory:
touch login.html
- And edit by adding the code:
1<!-- pusher-event-chat/public/login/login.html --> 2 <!DOCTYPE html> 3 <html> 4 <head> 5 <meta charset="utf-8"> 6 <meta name="viewport" content="width=device-width,minimum-scale=1"> 7 <title>Login</title> 8 <!-- the form awesome library is used to add icons to our form --> 9 <link rel="stylesheet" href="https://use.fontawesome.com/releases/v5.7.1/css/all.css" > 10 <link href="./login/login.css" rel="stylesheet" type="text/css"> 11 </head> 12 <body> 13 <div class="login"> 14 <h1>Login</h1> 15 <form action="/login" method="post"> 16 <label for="email"> 17 <i class="fas fa-user"></i> 18 </label> 19 <input type="email" name="email" placeholder="email" id="email" required> 20 <label for="password"> 21 <i class="fas fa-lock"></i> 22 </label> 23 <input type="password" name="ticket" placeholder="your ticket number" id="ticket" required> 24 <input type="submit" value="Login"> 25 </form> 26 </div> 27 </body> 28 </html>
The template enables users to submit their details. We'll be using a POST request to capture the data, which we can then handle in our Node.js login route.
Add login logic with Node.js
Now that we have all our login frontend finished, we can start developing the server-side with Node.js.
- Go back to the
./server/server.jsfile and add the initial route which will render a login template:
1app.get('/', function(request, response) { 2 if (request.session.loggedin) { 3 if (request.session.isadmin) { 4 return response.sendFile(path.join(__dirname + '/../public/admin/admin.html')); 5 } else { 6 return response.sendFile(path.join(__dirname + '/../public/landing/index.html')); 7 } 8 } else { 9 response.sendFile(path.join(__dirname + '/../public/login/login.html')); 10 } 11 });
At this point, our code has pretty straightforward logic. After a new client’s connection to the server is established, the login.html file is displayed. If the user is already logged in, they will have a different view.
- Now we need to add user authenticatication to our site. Authenticatication, in this case, requires verification if the user has registered the ticket. If the data the user provided is correct, we will create a browser session. Therefore, we need to create a database connection first. Continue editing the
server.jsfile by pasting in the following code:
1const connection = mysql.createConnection({ 2 host : '127.0.0.1', 3 port : '3306', 4 user : 'root', 5 password : '', 6 database : 'eventdb' 7 });
- Add a new route that will authenticate the user:
1app.post('/login', function(request, response) { 2 let email = request.body.email; 3 let ticket = request.body.ticket; 4 if (email && ticket) { 5 connection.query('SELECT * FROM accounts WHERE email = ? AND ticket = ?', [email, sha512(ticket)], function(error, result, fields) { 6 if (error) throw error; 7 if (result.length > 0) { 8 request.session.loggedin = true; 9 request.session.email = result[0].email; 10 request.session.username = result[0].username; 11 request.session.fullname = result[0].fullname; 12 if (request.session.username === 'admin') { 13 request.session.isadmin = true 14 } 15 return response.redirect('/'); 16 } else { 17 return response.send('Incorrect input data provided!'); 18 } 19 }); 20 } else { 21 return response.send('Please enter username, email and ticket number!'); 22 } 23 });
Let's narrow down what the code will do. The above code creates the authentication route using the POST method, which will capture input fields when the user submits the login form. The code verifies whether the email and ticket fields are filled in.
NOTE: This tutorial uses a ticket number as a password. This is done for demo purposes only and must be changed for the production environment. However, even for quick demo purposes, we don’t store passwords as plain text in the database. Safety first!
After the input verification code selects the desired account from our MySQL database.
The user is successfully authenticated and redirected to the landing page if the account exists. You may have noticed that we store some information about the user in the session. we'll come back to that shortly, in part 2 of this tutorial.
Continue building your live chat room with Part 2: Add chat functionality and Admin dashboard.
mysql -uproot -p


© 2025 Pusher Ltd. All rights reserved.
Pusher Limited is a company registered in England and Wales (No. 07489873) whose registered office is at MessageBird UK Limited, 3 More London Riverside, 4th Floor, London, United Kingdom, SE1 2AQ.