- Products

- Developers
- User stories
- Blog
- Pricing

Build a live blog in Kotlin with push notifications
Introduction
Introduction
We are definitely in the era of realtime everything. We demand that all our tools and apps we use daily should be able to update in realtime. With a lot of realtime applications springing up, the football scene is not an exception. You see popular soccer reporting bodies adopting this strategy.
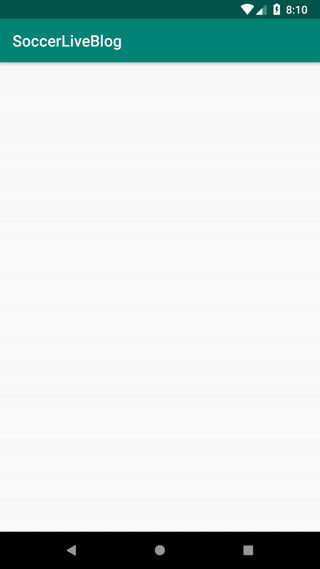
In this article, you will learn how to build a live soccer blog mobile app. Here is what your app will look like after this post:
Prerequisites
For you to move on smoothly with this tutorial, it is expected that you have the following:
- Android Studio (>= v3.0) installed on your machine. Download here.
- A basic knowledge of Android development and an ability to use Android Studio.
- A basic knowledge of Kotlin programming language. See the official docs.
- Node.js and NPM installed on your machine. Check here for the latest releases.
Building your live blog app
Creating your Android app
To get started, open Android Studio and create a new basic activity project. Android Studio provides a wizard for this to guide you. While creating your app, be sure to enable Kotlin support since that is what you will use.
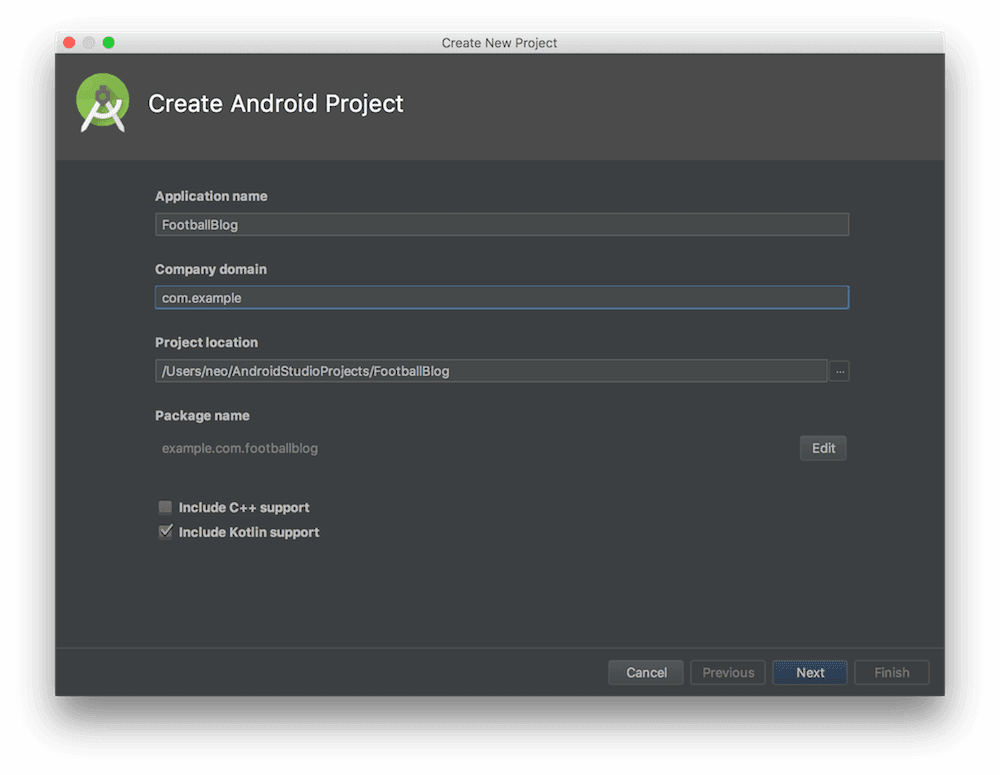
Select Phone and Tablet using API 19: Android 4.4 (Kitkat). Select the EmptyActivity template and create the project. After this process is complete, you should have an activity named MainActivity and its layout activity_main.xml.
Setting up Pusher Channels
Log in to your Pusher dashboard. If you don’t have an account, create one. Your dashboard should look like this:

Create a new Channels app. You can easily do this by clicking the big Create new Channels app card at the bottom right. When you create a new app, you are provided with keys. Keep them safe as you will soon need them.
Getting your FCM key
Before you can start using Beams, you need an FCM key and a google-services file because Beams relies on Firebase. Go to your Firebase console and create a new project.
When you get to the console, click the Add project card to initialize the app creation wizard. Add the name of the project, for example, soccer-blog. Read and accept the terms of conditions. After this, you will be directed to the project overview screen. Choose the Add Firebase to your Android app option. The next screen will require the package name of your app.
An easy way to get the package name of your app is from your AndroidManifest.xml file. Check the <manifest> tag and copy the value of the package attribute. Another place you can find this is your app-module build.gradle file. Look out for the applicationId value. When you enter the package name and click Register app. Next download your google-services.json file. After you have downloaded the file, you can skip the rest of the process. Add the downloaded file to the app folder of your app - name-of-project/app.
Next, go to your Firebase project settings, under the Cloud messaging tab, copy your server key.
Setting up Pusher Beams
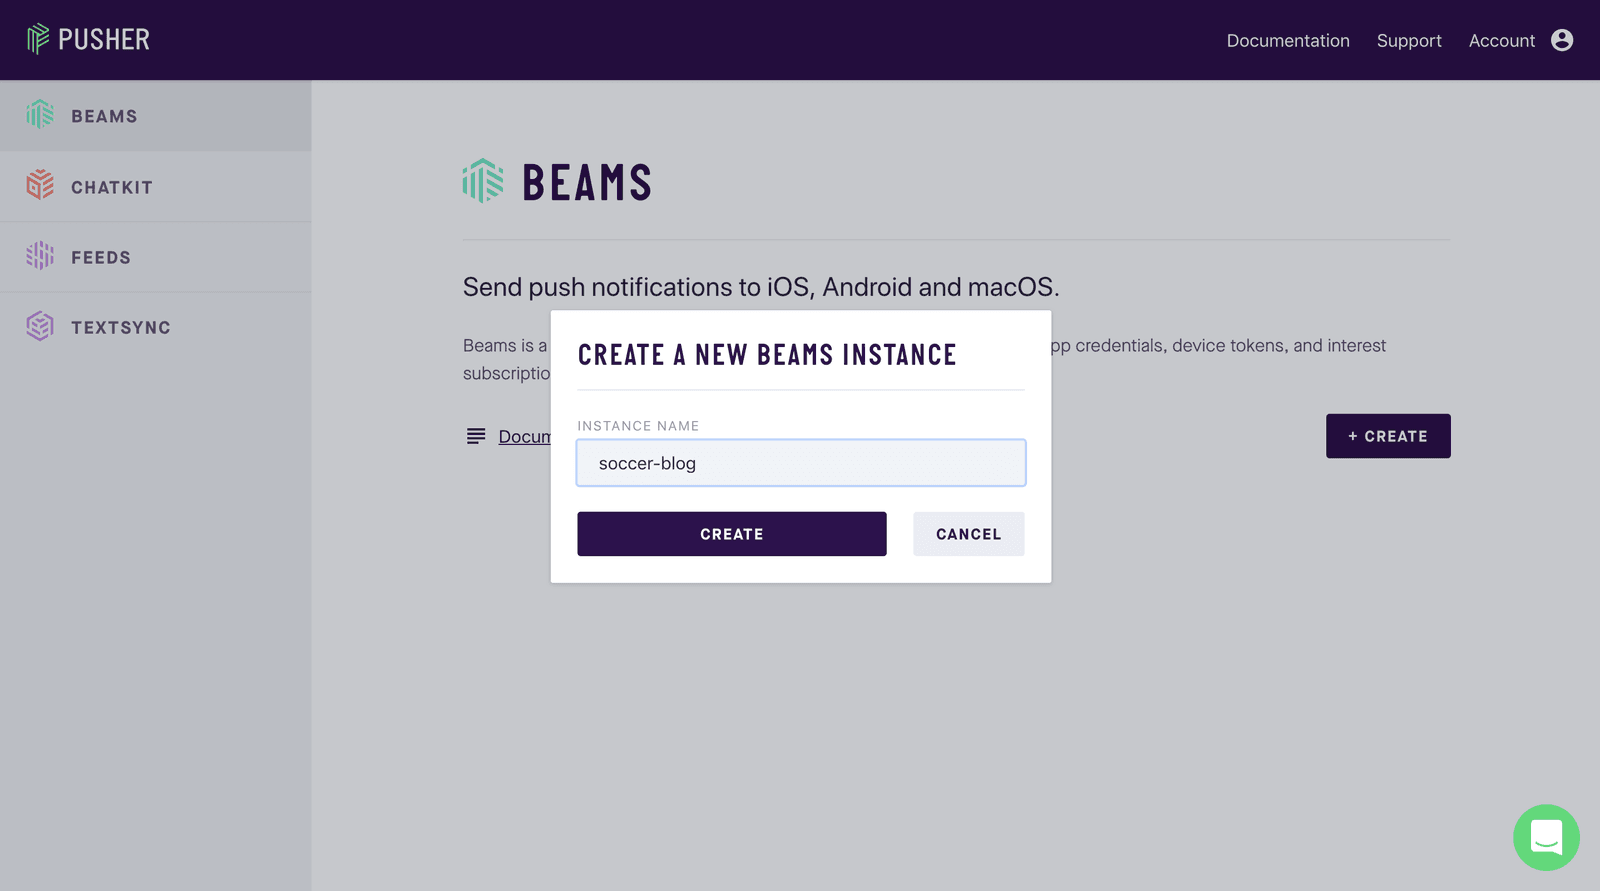
Next, log in to the new Pusher dashboard, in here we will create a Pusher Beams instance. You should sign up if you don’t have an account yet. Click on the Beams button on the sidebar then click Create, this will launch a pop up to Create a new Beams instance. Name it soccer-blog.
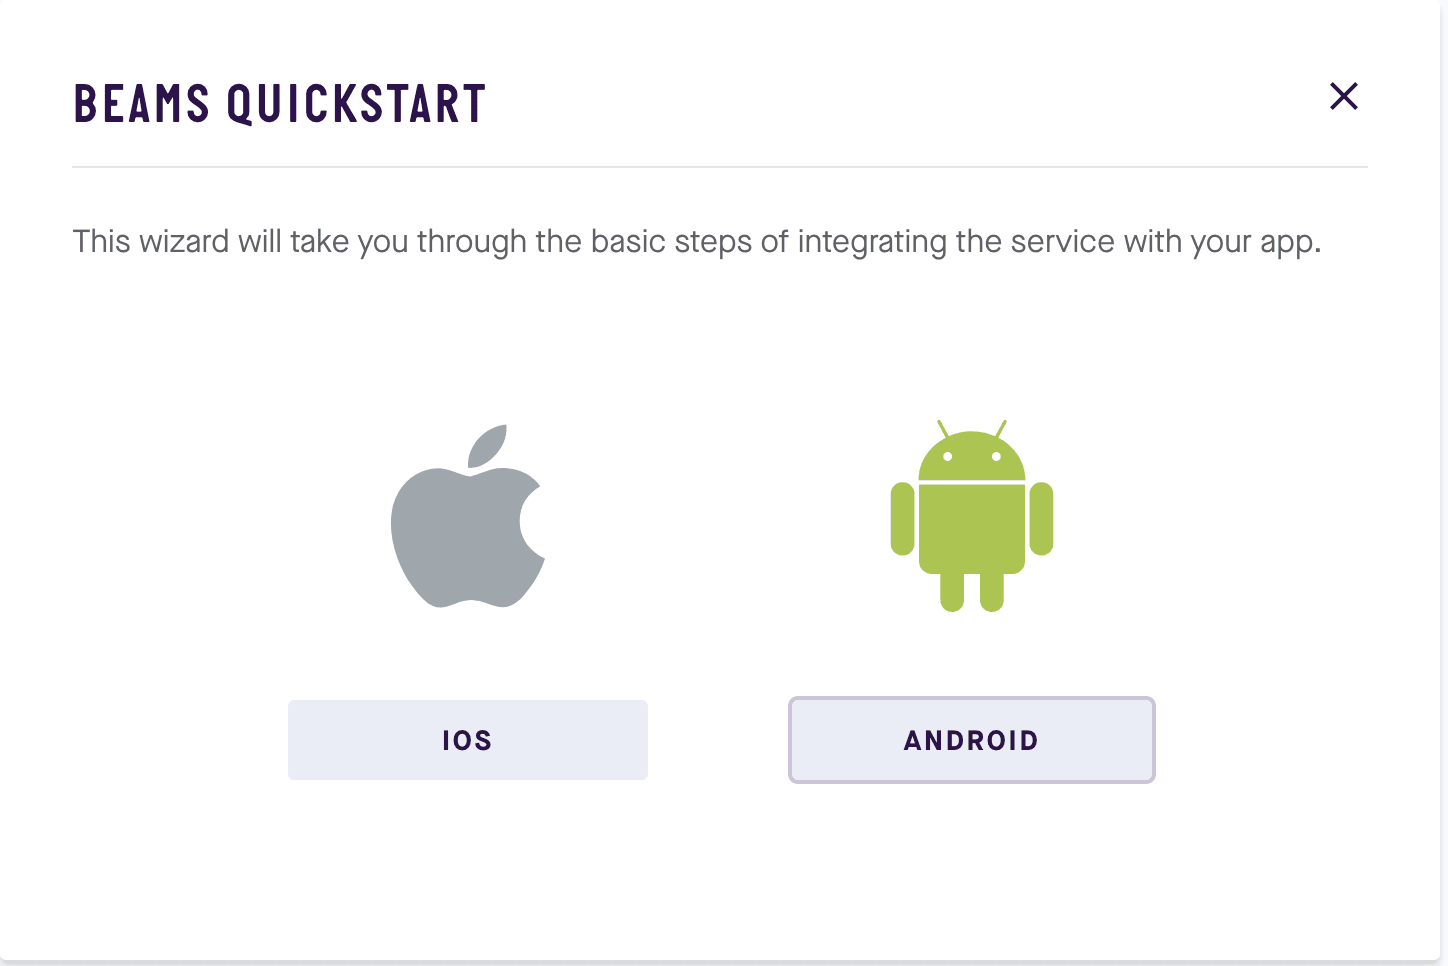
As soon as you create the instance, you will be presented with a quickstart guide. Select the ANDROID quickstart
The next screen requires the FCM key you copied earlier. After you add the FCM key, you can exit the quickstart guide.
Adding dependencies
You will make use of Beams for notifications and the Channels libraries for live events. Add the following to the project’s build-gradle file:
1// File: ./blog-app/build.gradle 2 buildscript { 3 // [...] 4 5 dependencies { 6 classpath 'com.google.gms:google-services:4.0.0' 7 } 8 }
And these other dependencies to the app-module build.gradle file:
1// File: ./blog-app/app/build.gradle 2 dependencies { 3 implementation 'com.android.support:recyclerview-v7:27.1.1' 4 implementation 'com.android.support:cardview-v7:27.1.1' 5 implementation 'com.pusher:pusher-java-client:1.5.0' 6 implementation 'com.google.firebase:firebase-messaging:17.0.0' 7 implementation 'com.pusher:push-notifications-android:0.10.0' 8 } 9 10 // Add this line to the end of the file 11 apply plugin: 'com.google.gms.google-services'
Writing your app
Your app is expected to display a list of posts in realtime and this means you will need a list. Each list row will contain the time of action and current action happening. Since you can’t use the default Android layouts meant for lists as it doesn’t have what you require in the customized fashion you want it, we have to create a custom list row layout. This layout will determine how each item in the list will look like.
Create a new layout file, name it list_row.xml and paste this:
1<!-- File: /blog-app/app/src/main/res/layout/list_row.xml --> 2 <?xml version="1.0" encoding="utf-8"?> 3 <android.support.v7.widget.CardView xmlns:android="http://schemas.android.com/apk/res/android" 4 xmlns:app="http://schemas.android.com/apk/res-auto" 5 app:cardCornerRadius="10dp" 6 xmlns:tools="http://schemas.android.com/tools" 7 android:layout_width="match_parent" 8 android:layout_height="wrap_content" 9 android:layout_margin="15dp"> 10 11 <LinearLayout 12 android:layout_width="match_parent" 13 android:orientation="horizontal" 14 android:padding="10dp" 15 android:layout_height="match_parent"> 16 17 <TextView 18 android:textColor="@android:color/black" 19 android:layout_gravity="center" 20 android:id="@+id/time" 21 android:layout_width="wrap_content" 22 android:layout_height="wrap_content" 23 android:textSize="18sp"/> 24 25 <TextView 26 android:id="@+id/currentActivity" 27 android:layout_width="wrap_content" 28 android:layout_height="wrap_content" 29 android:layout_marginStart="10dp" 30 android:textSize="18sp" /> 31 32 </LinearLayout> 33 </android.support.v7.widget.CardView>
A CardView is here used for easy customization of the borders. The CardView contains a horizontal linear layout, which in turn contains two TextViews. The first TextView will show the minute during the match when an event is happening and the second one will show the event happening.
Next, you need a class to mock the kind of data you want to send to each row. Create a data class named BlogPostModel and paste this:
1// File: /blog-app/app/src/main/java/com/example/soccerliveblog/BlogPostModel.kt 2 data class BlogPostModel(var time:String, var currentActivity:String)
Next, you will need a recycler view adapter to manage items in the recycler view. Create a class BlogListAdapter and set it up like this:
1// File: /blog-app/app/src/main/java/com/example/soccerliveblog/BlogListAdapter.kt 2 import android.support.v7.widget.RecyclerView 3 import android.view.LayoutInflater 4 import android.view.View 5 import android.view.ViewGroup 6 import android.widget.TextView 7 8 class BlogListAdapter : RecyclerView.Adapter<BlogListAdapter.ViewHolder>() { 9 10 private var blogList = ArrayList<BlogPostModel>() 11 12 override fun onCreateViewHolder(parent: ViewGroup, viewType: Int): ViewHolder { 13 return ViewHolder(LayoutInflater.from(parent.context) 14 .inflate(R.layout.list_row, parent, false)) 15 } 16 17 override fun onBindViewHolder(holder: ViewHolder, position: Int) = holder.bind(blogList[position]) 18 19 override fun getItemCount(): Int = blogList.size 20 21 fun addItem(blogItem:BlogPostModel){ 22 blogList.add(0,blogItem) 23 notifyDataSetChanged() 24 } 25 26 inner class ViewHolder(itemView: View) : RecyclerView.ViewHolder(itemView) { 27 28 private val time: TextView = itemView.findViewById(R.id.time) 29 private val currentActivity: TextView = itemView.findViewById(R.id.currentActivity) 30 31 fun bind(currentValue: BlogPostModel) = with(itemView) { 32 time.text = currentValue.time 33 currentActivity.text = currentValue.currentActivity 34 } 35 } 36 }
This class contains the usual RecyclerView.Adapter methods. There are two custom functions created here, addItem to add a new blog post item to the top of the list and bind inside the ViewHolder class to make binding easier.
Next thing you would consider is how you will receive and display notifications in the app. You will create a service for that. Services are one of the key components in Android development. A service is a component that runs in the background to perform long-running operations without needing to interact with the user and it works even if application is destroyed. Create a new class named NotificationsMessagingService and paste this:
1// File: /blog-app/app/src/main/java/com/example/soccerliveblog/NotificationsMessagingService.kt 2 import android.app.NotificationChannel 3 import android.app.NotificationManager 4 import android.app.PendingIntent 5 import android.content.Intent 6 import android.os.Build 7 import android.support.v4.app.NotificationCompat 8 import com.google.firebase.messaging.RemoteMessage 9 import com.pusher.pushnotifications.fcm.MessagingService 10 11 class NotificationsMessagingService : MessagingService() { 12 13 override fun onMessageReceived(remoteMessage: RemoteMessage) { 14 val notificationId = 10 15 val channelId = "soccer-channel" 16 val notificationManager = applicationContext.getSystemService(NotificationManager::class.java) 17 18 lateinit var channel:NotificationChannel 19 20 if (Build.VERSION.SDK_INT >= Build.VERSION_CODES.O) { 21 val name = getString(R.string.channel_name) 22 val description = getString(R.string.channel_description) 23 val importance = NotificationManager.IMPORTANCE_DEFAULT 24 channel = NotificationChannel("world-cup", name, importance) 25 channel.description = description 26 notificationManager!!.createNotificationChannel(channel) 27 } 28 29 val intent = Intent(this, MainActivity::class.java) 30 intent.flags = Intent.FLAG_ACTIVITY_NEW_TASK or Intent.FLAG_ACTIVITY_CLEAR_TASK 31 val pendingIntent = PendingIntent.getActivity(this, 0, intent, 0) 32 33 val mBuilder = NotificationCompat.Builder(this, channelId) 34 .setSmallIcon(R.mipmap.ic_launcher) 35 .setContentTitle(remoteMessage.notification!!.title!!) 36 .setContentText(remoteMessage.notification!!.body!!) 37 .setContentIntent(pendingIntent) 38 .setPriority(NotificationCompat.PRIORITY_DEFAULT) 39 .setAutoCancel(true) 40 41 notificationManager.notify(notificationId, mBuilder.build()) 42 43 } 44 }
This class implements the MessagingService abstract class. This mandates the implementation of the method onMessageReceived, which is called when a message is pushed remotely. From the snippet, when a message is received, a notification is prepared and sent to the user.
Note that if the user is on the app already, this notification will not come up. API versions 26 and above require creating notification channels and that is exactly what is done above. The title and body of the notification are inline with what is received remotely. An intent is added so that the MainActivity will be opened when the notification is selected.
Add these strings to your strings.xml file as they were referenced in the previous snippet:
1<string name="channel_name">soccer</string> 2 <string name="channel_description">Listen to soccer notifications</string>
Next, you add the service in your AndroidManifest.xml file under the <application> tag like this:
1<!-- /blog-app/app/src/main/AndroidManifest.xml --> 2 <application 3 4 [...] 5 6 <service android:name=".NotificationsMessagingService"> 7 <intent-filter android:priority="1"> 8 <action android:name="com.google.firebase.MESSAGING_EVENT" /> 9 </intent-filter> 10 </service> 11 12 [...] 13 14 </application>
With this, you are ready to receive notifications remotely to your app. Next replace the contents of the activity_main.xml file with the following:
1<!-- File: /blog-app/app/src/main/res/layout/activity_main.xml --> 2 <?xml version="1.0" encoding="utf-8"?> 3 <android.support.constraint.ConstraintLayout xmlns:android="http://schemas.android.com/apk/res/android" 4 xmlns:app="http://schemas.android.com/apk/res-auto" 5 xmlns:tools="http://schemas.android.com/tools" 6 android:layout_width="match_parent" 7 android:layout_height="match_parent" 8 tools:context=".MainActivity"> 9 10 <android.support.v7.widget.RecyclerView 11 android:id="@+id/recyclerViewBlogPosts" 12 android:layout_width="match_parent" 13 android:layout_height="match_parent" 14 app:layout_constraintBottom_toBottomOf="parent" 15 app:layout_constraintLeft_toLeftOf="parent" 16 app:layout_constraintRight_toRightOf="parent" 17 app:layout_constraintTop_toTopOf="parent" /> 18 19 </android.support.constraint.ConstraintLayout>
Now, go the MainActivity class and make sure you have these imports in the class:
1// File: /blog-app/app/src/main/java/com/example/soccerliveblog/MainActivity.kt 2 import android.os.Bundle 3 import android.support.v7.app.AppCompatActivity 4 import android.support.v7.widget.LinearLayoutManager 5 import com.pusher.client.Pusher 6 import com.pusher.client.PusherOptions 7 import com.pusher.pushnotifications.PushNotifications 8 import kotlinx.android.synthetic.main.activity_main.* 9 import org.json.JSONObject
The rest of the class should then look like this:
1class MainActivity : AppCompatActivity() { 2 3 private lateinit var pusher: Pusher 4 private val blogListAdapter = BlogListAdapter() 5 6 override fun onCreate(savedInstanceState: Bundle?) { 7 super.onCreate(savedInstanceState) 8 setContentView(R.layout.activity_main) 9 PushNotifications.start(applicationContext, 10 PUSHER_BEAMS_INSTANCEID) 11 PushNotifications.subscribe("world-cup") 12 with(recyclerViewBlogPosts){ 13 layoutManager = LinearLayoutManager(this@MainActivity) 14 adapter = blogListAdapter 15 } 16 setupPusher() 17 } 18 }
You are expected to replace the
PUSHER_BEAMS_INSTANCEIDwith your instance ID found on your Pusher Beams dashboard.
In the above snippet, the pusher and blogListAdapter instance are first declared. In the onCreate method, push notifications is initialized and you are particularly listening to the world-cup stream for updates.
Next, you have initialized the recycler view with a linear layout manager and an adapter. Finally, a setupPusher function is called. Add the function below to the class:
1private fun setupPusher() { 2 val options = PusherOptions() 3 options.setCluster(PUSHER_CLUSTER) 4 pusher = Pusher(PUSHER_API_KEY, options) 5 6 val channel = pusher.subscribe("soccer") 7 8 channel.bind("world-cup") { channelName, eventName, data -> 9 val jsonObject = JSONObject(data) 10 val time = jsonObject.getString("currentTime") 11 val currentActivity = jsonObject.getString("currentPost") 12 val model = BlogPostModel(time,currentActivity) 13 runOnUiThread { 14 blogListAdapter.addItem(model) 15 } 16 } 17 18 pusher.connect() 19 }
Replace the
PUSHER_CLUSTERandPUSHER_API_KEYwith their equivalent values from your dashboard
In the above snippet, there is a listener to the soccer channel and the world-cup event. When a post is received, it is bound to a new model instance before it being added to the adapter.
Finally, give the activity a singleInstance launch mode so that when you open the MainActivity from the notification, it won’t restart the activity. To do this, open the AndroidManifest.xml file and add the android:launchMode attribute to the activity tag and set it to singleInstance:
1<activity android:name=".MainActivity" 2 android:launchMode="singleInstance" 3 ... 4 </activity>
Building the backend
Let’s build a simple Node.js server to power our app. Create a new folder say beams-backend. Open the folder. Create a new config.js file like this:
1module.exports = { 2 appId: 'PUSHER_APP_ID', 3 key: 'PUSHER_APP_KEY', 4 secret: 'PUSHER_APP_SECRET', 5 cluster: 'PUSHER_APP_CLUSTER', 6 secretKey: 'PUSHER_BEAMS_SECRET', 7 instanceId: 'PUSHER_BEAMS_INSTANCEID' 8 };
Replace the first four items with the keys on you Pusher Channel dashboard while the last two keys will be replaced with the keys on your Pusher Beams dashboard
This file holds the keys you will access. It is good practice to keep them all in one file. Next up, create a another file named index.js and paste this:
1// Load the required libraries 2 let Pusher = require('pusher'); 3 let express = require('express'); 4 let bodyParser = require('body-parser'); 5 const PushNotifications = require('@pusher/push-notifications-server'); 6 7 // initialize express and pusher and pusher beams 8 let app = express(); 9 let pusher = new Pusher(require('./config.js')); 10 let pushNotifications = new PushNotifications(require('./config.js')) 11 12 // Middlewares 13 app.use(bodyParser.json()); 14 app.use(bodyParser.urlencoded({ extended: false })); 15 16 app.get('/posts', (req, res) => { 17 18 var arrayEvents = [ 19 "Russia (4-2-3-1): Igor Akinfeev; Mario Fernandes, Ilya Kutepov, Sergey Ignashevich, Yury Zhirkov; Yuri Gazinskiy, Roman Zobnin; Aleksandr Samedov, Alan Dzagoev, Aleksandr Golovin; Fedor Smolov.", 20 "Finally, the festival of football is here. We've got 64 games, 32 teams...but there can be only one winner. And the action starts today!!", 21 "Hello and welcome to live text commentary of the Group A match between Russia and Saudi Arabia at the 2018 World Cup in Russia. The scene is set for the tournament opener!" 22 ]; 23 24 var arrayTime = ["15'", "10'", "5'"]; 25 26 let sendPushNotification = () => { 27 var currentPost = arrayEvents.pop() 28 var currentTime = arrayTime.pop() 29 30 pushNotifications.publish( 31 ['world-cup'],{ 32 fcm: { 33 notification: { 34 title: 'New post', 35 body: currentPost 36 } 37 } 38 }).then((publishResponse) => { 39 console.log('Just published:', publishResponse.publishId); 40 }); 41 42 pusher.trigger('soccer', 'world-cup', {currentTime, currentPost}); 43 } 44 45 sendPushNotification() 46 47 let sendToPusher = setInterval(() => { 48 sendPushNotification() 49 50 if (arrayEvents.length == 0) { 51 clearInterval(sendToPusher) 52 } 53 }, 5000); 54 55 res.json({success: 200}) 56 }); 57 58 // index 59 app.get('/', (req, res) => res.json("It works!")); 60 61 // serve app 62 app.listen(4000, _ => console.log('App listening on port 4000!'));
These commentaries were gotten manually from Goal.com’s commentary blog for the opening match at the FIFA World Cup 2018 (Russia vs Saudi Arabia)
In this snippet, there is one endpoint, the /posts endpoint, which sends data to the Pusher channel and a notification channel every twenty seconds. The data is gotten from an array initialized locally. The app is then served on port 4000. In the beams-backend directory, run the following commands:
1npm install pusher 2 npm install body-parser 3 npm install @pusher/push-notifications-server express --save
This installs the three dependencies you need for your app. Now, your server is ready, run this command in the beams-backend directory:
node index.js
Next, run the application from Android Studio, then open the URL http://localhost:4000/posts in your browser and you should start receiving live updates in your app.
Conclusion
In this post, you have learned how to build a blog app using Kotlin, Pusher Beams, and Pusher Channels. Feel free to fall back to the GitHub repository if you get stuck at any point. I can’t wait to see what you will build with your knowledge of a realtime service like Pusher.


© 2025 Pusher Ltd. All rights reserved.
Pusher Limited is a company registered in England and Wales (No. 07489873) whose registered office is at MessageBird UK Limited, 3 More London Riverside, 4th Floor, London, United Kingdom, SE1 2AQ.