- Products

- Developers
- User stories
- Blog
- Pricing

Lazy loading in Angular 7
Introduction
Learn about how lazy loading is handled by Angular and the reasoning behind it with practical illustrations.

Prerequisites
To be able to follow through in this article's demonstration you should have:
- Node version 11.0 installed on your machine.
- Node Package Manager version 6.7 (usually ships with Node installation).
- Visual Studio Code (as it will be used in the demo)
- Angular CLI version 7.0
- The latest version of Angular (version 7.0)
1// run the command in a terminal 2 ng version
Confirm that you are using version 8, and update to 8 if you are not.
- Download the Augury Chrome extension here.
- Download this tutorial's starter project here to follow through the demonstrations.
- Unzip the project and initialize the node modules in your terminal with this command:
npm install
Other things that will be nice-to-haves are:
- A working knowledge of the Angular framework at a beginner level.
- Familiarity with the Angular constructor will be a plus but not a requirement.
Why is lazy loading important
Firstly, bundling involves aligning our code components in progression and putting them in one JavaScript chunk that it passes to the browser, this is called eagerly loading components and it is the default behavior of Angular and every other framework. However, as your application grows, we notice that bundle gets very cumbersome in size and this can quickly make using your application very hard and especially slow.
With code splitting, the bundle can be split to smaller chunks where the most important chunk can be loaded first and then every other secondary one lazily loaded.
Also, while building applications we know that as a best practice consideration should be made for users using mobile internet data and others with really slow internet connections. We the developers should always be able to control the user experience even during a suspense period when resources are being loaded to the DOM.
How Angular handles lazy loading
The way Angular handles lazy loading is through modules. Every application has a central module called ngModule, which is located in the app module file and contains all the imports and component declarations. This module is what is then bundled at compilation and pushed to the browser, so when the Angular team wanted to facilitate lazy loading they did so through modules. Splitting the central module into smaller bundles and then loading the most important first in the DOM.
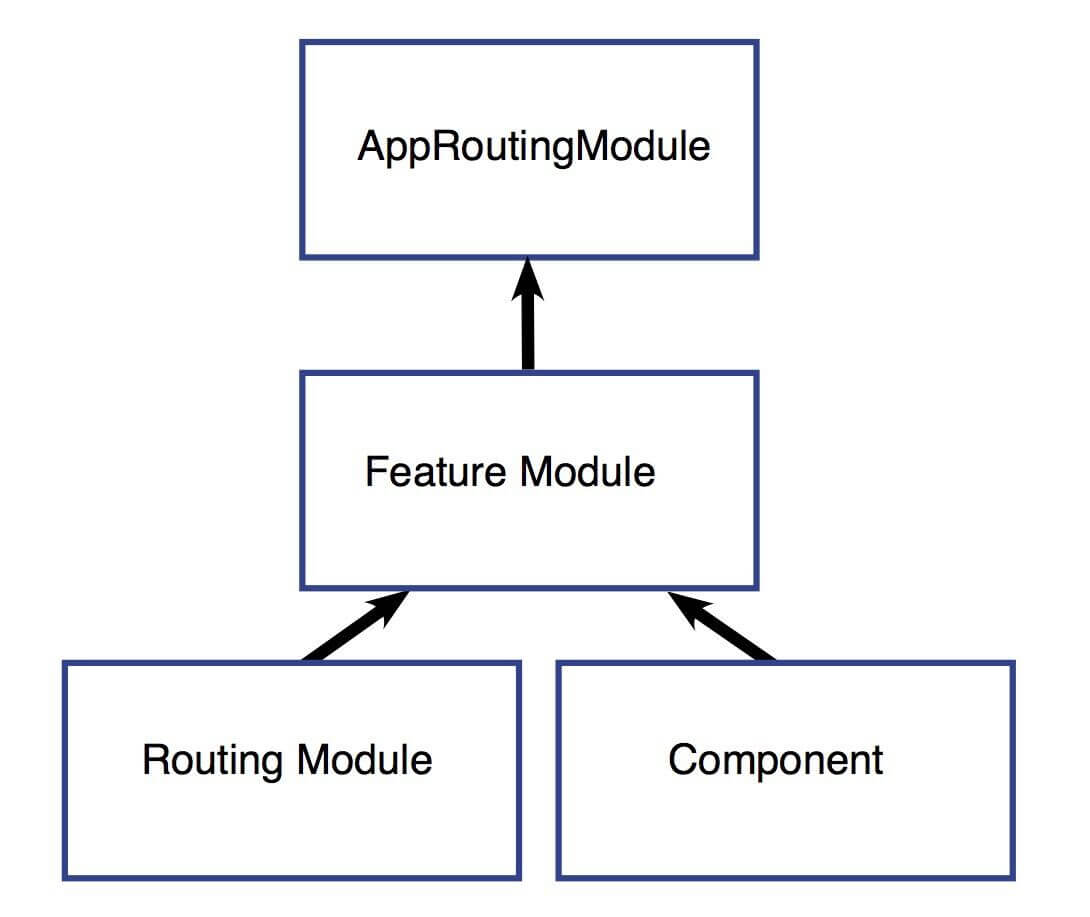
This is how lazy loading is configured through routing with component modules. There are four main steps to setting up a lazy loaded feature module:
- Create the feature module.
- Remove eager loading capabilities.
- Create the feature module's routing module.
- Configure the routes.
What you will build
This is a simple user-blog application that uses Angular services to make get requests to a remote server for building demo or test applications. It has four components: details, posts, sidebar and the users component.
This is the demo that will be used to illustrate lazy loading in this tutorial, if you followed this post from the start you must have downloaded and unzipped this project and you must have downloaded Augury too. Let us start going through the three steps listed above:
Creating feature modules
For every feature or in our application’s case component, we have to create a module. This is because as you have learnt, lazy loading can only be carried out at the module level of abstraction of the Angular application instance. Open up the unzipped project with VS Code and open a new terminal. To create a new module, use the Angular CLI command below:
ng generate module components/details
This creates a details module inside the details component, in the same way create modules for posts and users components respectively.
1ng generate module components/posts 2 ng generate module components/users
Copy the code below into your newly generated details module file:
1// src/app/components/details/details.module.ts 2 import { NgModule } from '@angular/core'; 3 import { CommonModule } from '@angular/common'; 4 import { DetailsComponent } from './details.component'; 5 import { RouterModule } from '@angular/router'; 6 import { DetailsRoutes } from './details.routes'; 7 @NgModule({ 8 declarations: [DetailsComponent], 9 exports: [DetailsComponent], 10 imports: [ 11 RouterModule.forChild(DetailsRoutes), 12 CommonModule 13 ] 14 }) 15 export class DetailsModule { }
This declares the detail component and lists it to be exported to the app module on request. Another very important thing here is that the router module is pointed to the details route we are yet to create.
If you are a little confused at this point, look back at the flowchart image you saw at the start of this post. You will do exactly the same thing in the remaining two module files, so copy the code block below into the users module.
1// src/app/components/users/users.module.ts 2 import { NgModule } from '@angular/core'; 3 import { CommonModule } from '@angular/common'; 4 import { UsersComponent } from './users.component'; 5 import { RouterModule } from '@angular/router'; 6 import { UsersRoutes } from './users.routes'; 7 @NgModule({ 8 declarations: [UsersComponent], 9 exports: [UsersComponent], 10 imports: [ 11 RouterModule.forChild(UsersRoutes), 12 CommonModule 13 ] 14 }) 15 export class UsersModule { }
Then go ahead and also copy the code block below into the posts module file:
1// src/app/components/posts/posts.module.ts 2 import { NgModule } from '@angular/core'; 3 import { CommonModule } from '@angular/common'; 4 import { PostsComponent } from './posts.component'; 5 import { RouterModule } from '@angular/router'; 6 import { PostsRoutes } from './posts.routes'; 7 @NgModule({ 8 declarations: [PostsComponent], 9 exports: [PostsComponent], 10 imports: [ 11 RouterModule.forChild(PostsRoutes), 12 CommonModule 13 ] 14 }) 15 export class PostsModule { }
Remove eager loading capabilities
Now that the modules have been generated to lazily load these component, the next thing is to remove the eager loading capability from these components. To do that, open your app.module.ts file and remove import statements of these components. Your app.module.ts file will now look like this:
1// src/app/app.module.ts 2 import { BrowserModule } from '@angular/platform-browser'; 3 import { NgModule } from '@angular/core'; 4 import { AppRoutingModule } from './app-routing.module'; 5 import { AppComponent } from './app.component'; 6 import { HttpClientModule } from '@angular/common/http'; 7 import { BrowserAnimationsModule } from '@angular/platform-browser/animations' 8 import { SidebarComponent } from './components/sidebar/sidebar.component'; 9 @NgModule({ 10 declarations: [ 11 AppComponent, 12 SidebarComponent 13 ], 14 imports: [ 15 BrowserModule, 16 AppRoutingModule, 17 HttpClientModule, 18 BrowserAnimationsModule 19 ], 20 providers: [], 21 bootstrap: [AppComponent] 22 }) 23 export class AppModule { }
You can see that all the imports have been removed from the app module, this ensures that Angular does not default to eagerly loading them on initialization.
Create the feature module's routing module
Each of the components to be loaded lazily has to have a separate routing module created for them. You can either generate a module with the CLI or manually create the file yourself. We have tried generating modules, so this time you will create the files manually. In the details component folder, create a file call it details.routes.ts , then do the same in the posts component folder and the users component folder.
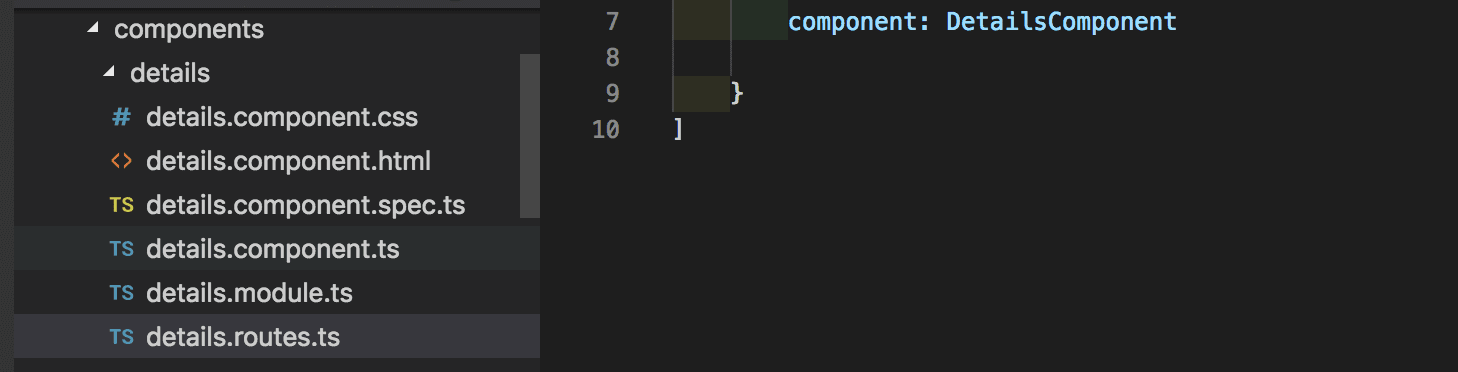
Inside the details.routes.ts file, copy in the code below:
1// src/app/components/details/details.routes.ts 2 import { Route } from '@angular/router'; 3 import { DetailsComponent } from './details.component' 4 export const DetailsRoutes: Route[]=[ 5 { 6 path: '', 7 component: DetailsComponent 8 } 9 ]
Here, the lazily loaded component's route is set, in this same way, you will do it for the posts and the users components respectively.
1// src/app/components/posts/posts.routes.ts 2 import { Route } from '@angular/router'; 3 import { PostsComponent } from './posts.component' 4 export const PostsRoutes: Route[]=[ 5 { 6 path: '', 7 component: PostsComponent 8 } 9 ]
Also, copy the code block below into the users.route.ts file:
1// src/app/components/users/users.routes.ts 2 import { Route } from '@angular/router'; 3 import { UsersComponent } from './users.component' 4 export const UsersRoutes: Route[]=[ 5 { 6 path: '', 7 component: UsersComponent 8 } 9 ]
Configure the routes
This is the final stage, at this point you have finished setting up the modules for all the components you want to lazily load and their separate routes. You have to tell your main app routing module that these routes should be lazily loaded. copy the code block below into your app-routing.module.ts file:
1// src/app/app-routing.module.ts 2 import { NgModule } from '@angular/core'; 3 import { Routes, RouterModule } from '@angular/router'; 4 const routes: Routes = [ 5 { 6 path: '', 7 loadChildren: './components/users/users.module#UsersModule' 8 }, 9 { 10 path: 'details/:id', 11 loadChildren: './components/details/details.module#DetailsModule' 12 }, 13 { 14 path: 'posts', 15 loadChildren: './components/posts/posts.module#PostsModule' 16 } 17 ]; 18 @NgModule({ 19 imports: [RouterModule.forRoot(routes)], 20 exports: [RouterModule] 21 }) 22 export class AppRoutingModule { }
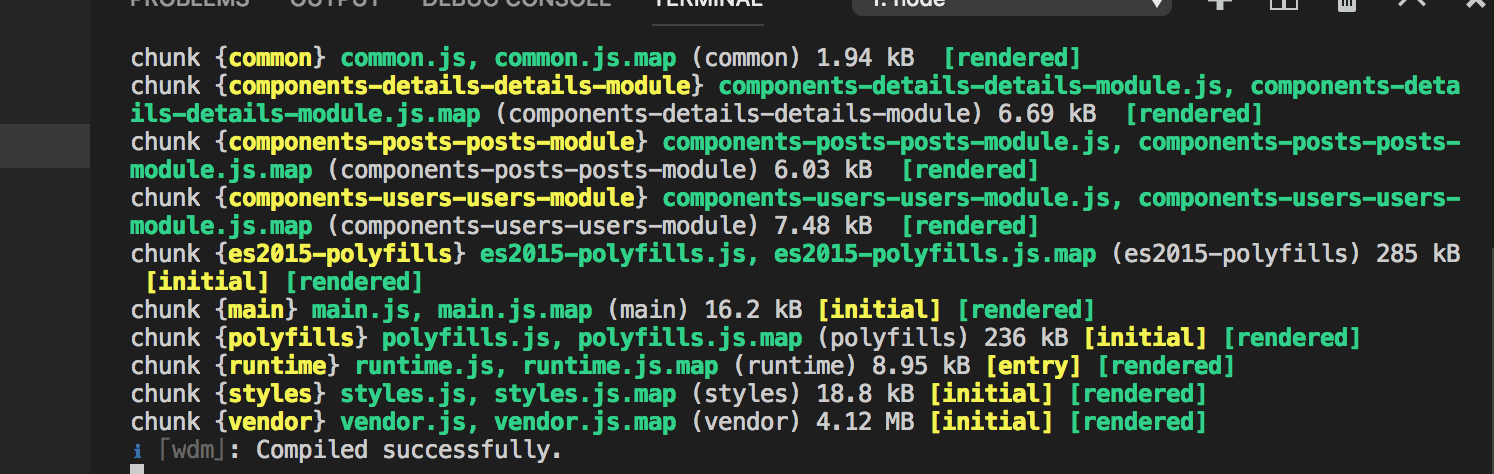
Here you tell Angular it should be loaded lazily by specifying loadChildren in the place of components in an eager loading situation. Everything in the four stages are completely setup, it is time to run your application:
ng serve
You will see that while bundling up the application, it is now split into those modules we created.
Inspecting with Augury
Augury is one of the most used Angular application debuggers and profilers. One of the great features which is really of importance to us is the router tree analysis. If you have not, you can download the Augury Chrome extension here. Open your browser on http://localhost:4200/ go to the settings and open developer tools and select the Augury tab.
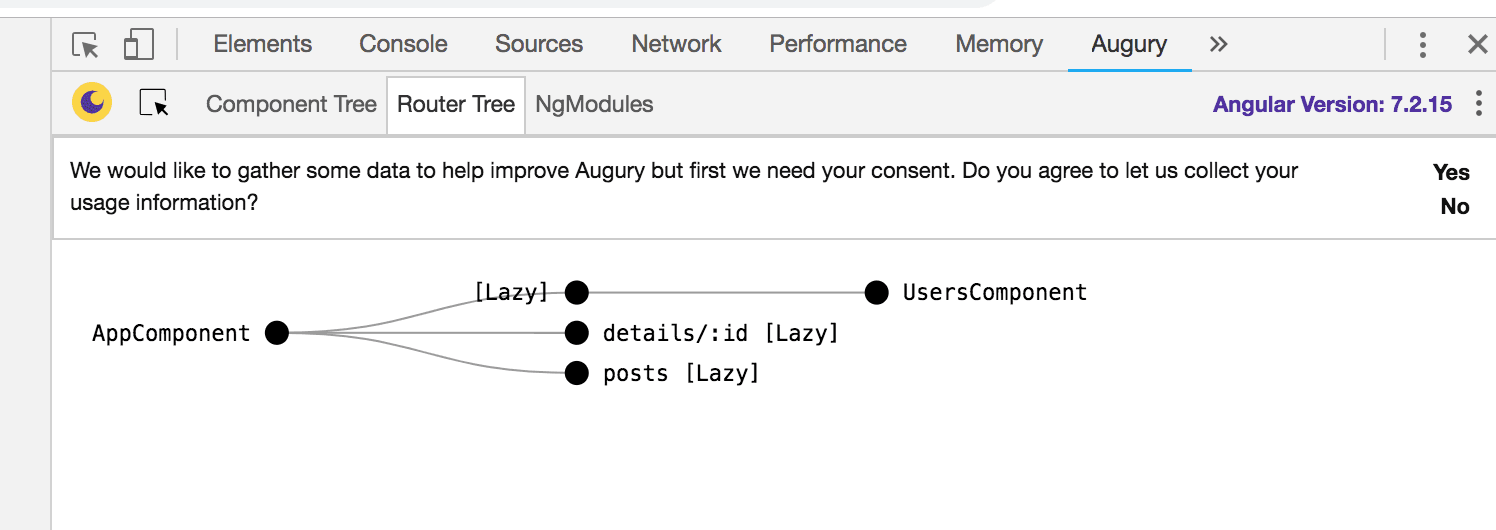
Here you see that all components present are lazy loaded and currently, the only component loaded to the DOM is the users. You will also notice that the other components will be lazily loaded to the DOM (on request)as you interact with the app.
Here is the link to the complete illustration code on GitHub.
Conclusion
This is an introduction to how Angular handles lazy loading at the module level of abstraction with the help of routers. The use cases of applying lazy loading might not be obvious for small Angular projects, but it is very clear that big projects with different nests of components will load faster and be more resource efficient with it. Happy hacking!


© 2026 Pusher Ltd. All rights reserved.
Pusher Limited is a company registered in England and Wales (No. 07489873) whose registered office is at MessageBird UK Limited, 3 More London Riverside, 4th Floor, London, United Kingdom, SE1 2AQ.