- Products

- Developers
- User stories
- Blog
- Pricing

Creating a Laravel Logger - Part 6: Creating our web application
Introduction
In this sixth and final part of our the series, we will build a simple web application to receive realtime updates when logs are pushed from the main Laravel app created in the first part.
In the previous part of this series, we created the iOS application that would be responsible for log monitoring on Apple devices. It also had the ability to receive push notifications from the application when the log level was an error.
We will build a web application using Vue.js and Laravel. Here is a demo of what you will build:
Requirements
To follow along with this series you need the following things:
- Completed previous parts of the series.
- Laravel installed on your local machine. Installation guide.
- Knowledge of PHP and the Laravel framework.
- Composer installed on your local machine. Installation guide.
- The latest version of Android Studio installed on your machine (If you are building for Android).
- Knowledge of Kotlin and the Android Studio IDE.
- The latest version of Xcode installed on your machine (If you are building for iOS).
- Knowledge of the Swift programming language and the Xcode IDE.
- Pusher account to Channels and Beams apps. Create a free sandbox Pusher account or sign in and go to the dashboard to create the apps.
Creating the project
We will start by creating a new Laravel app. Run this command in any directory of your choice:
$ laravel new web_logging_client
The command above will create a new Laravel project.
Building our user interface
After creating and installing our Laravel application and its required dependencies, open the resources/views and replace the codes in the welcome.blade.php file with this:
1<!-- File: ./resources/views/index.blade.php --> 2 <!doctype html> 3 <html> 4 <head> 5 <meta charset="utf-8"> 6 <meta name="viewport" content="width=device-width, initial-scale=1"> 7 <title>Push Logger</title> 8 <!-- Fonts --> 9 <link href="https://fonts.googleapis.com/css?family=Nunito:200,600" rel="style sheet" type="text/css"> 10 <!-- Styles --> 11 <link rel="stylesheet" href="{{ asset('css/app.css')}}"> 12 <style> 13 html, 14 body { 15 overflow-x: hidden; /* Prevent scroll on narrow devices */ 16 } 17 .position-ref { 18 position: relative; 19 } 20 .top-right { 21 position: absolute; 22 right: 10px; 23 top: 18px; 24 } 25 .content { 26 text-align: center; 27 } 28 .title { 29 font-size: 84px; 30 } 31 .m-b-md { 32 margin-bottom: 30px; 33 } 34 </style> 35 </head> 36 <body> 37 <div class="content"> 38 <div class="title m-b-md"> 39 Push Logger 40 </div> 41 <div id="logs" class="row justify-content-md-center"> 42 <div class="col-lg-8"> 43 <div class="alert alert-success" role="alert"> 44 This is a primary alert—check it out! 45 </div> 46 <div class="alert alert-warning" role="alert"> 47 This is a secondary alert—check it out! 48 </div> 49 <div class="alert alert-info" role="alert"> 50 This is a success alert—check it out! 51 </div> 52 </div> 53 </div> 54 </div> 55 <script src="js/app.js"></script> 56 </body> 57 </html>
If you run your app using:
$ php artisan serve
You should see something like this:
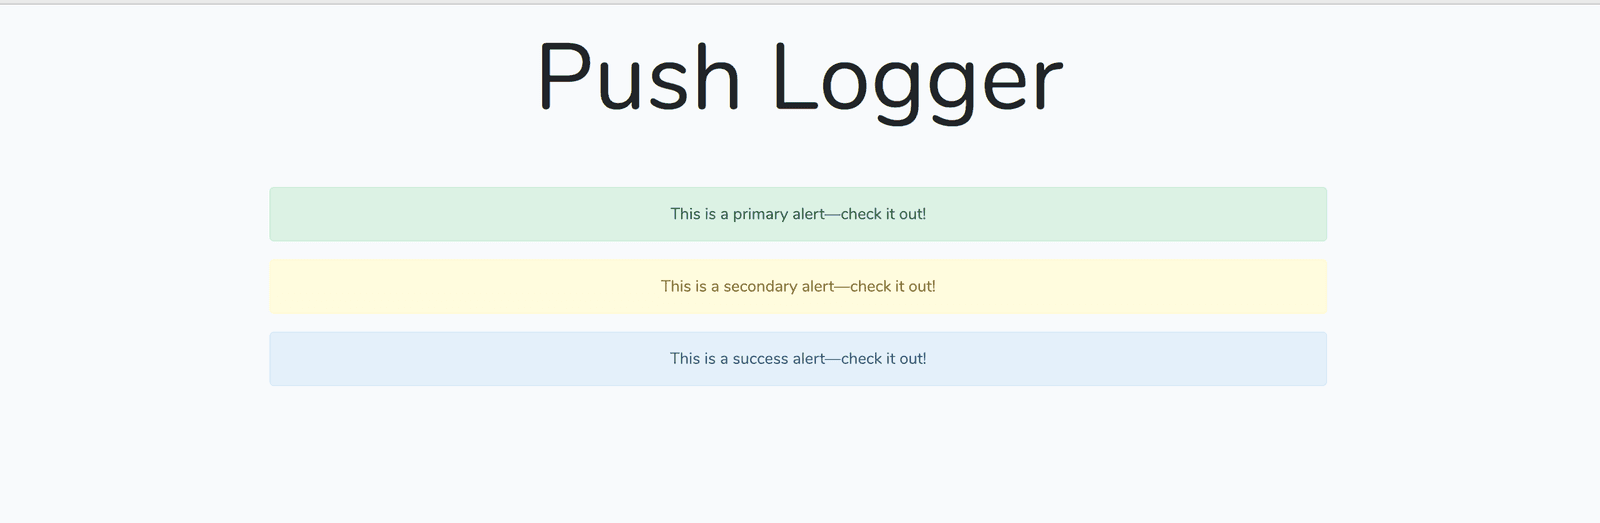
This shows logs with dummy data inserted already. This gives us an idea of what our app will look like when logs are displayed on the page.
We will now use to add Vue.Js to the project. To do that, we need to create a Vue component. Add this script just before the closing body tag in the welcome.blade.php file:
1<script> 2 var logs = []; 3 4 Vue.component('pusher-logger', { 5 data() { 6 return { logs } 7 }, 8 methods: { 9 // Methods go here 10 }, 11 template: `` 12 }); 13 14 new Vue({ 15 el: "#logs" 16 }) 17 </script>
We put the script tags at the end of the body so that they are executed in order after the DOM is loaded. In this snippet, we have the logs array declared to hold our log messages.
Now, we have a pusher-logger Vue component created. This component can be used as an HTML tag like so:
<pusher-logger> </pusher-logger>
The pusher-logger component has the data attribute that hosts the data we want Vue to render. In our own case, we return just the logs.
The methods object is another attribute of the Vue component. We use it to define the behaviors of a component. The template property holds the HTML markup for our component, we will update this part soon enough.
Finally, we initialized a Vue root component on #logs. Notice that in the welcome.blade.php file, you will notice that there is a div with a class name - logs. This is the part that will show our logs to the user.
Next, update the template object of the Vue component like so:
1template: ` 2 <div class="col-lg-8"> 3 <div v-for="log in logs" class="alert" v-bind:class= "checkLevel(log.loglevel)" 4 role="alert"> 5 @{{ log.message }} 6 </div> 7 <div v-show="logs.length == 0"> 8 No Logs Dispatched 9 </div> 10 </div> 11 `
The template property now returns a rendered list of the logs and if the logs array is empty at logs.length == 0 we show No Logs Dispatched.
The {{ }} braces are used both by Vue and Laravel Blade to render data. So whenever using Vue inside a blade file append an @ character to braces {{ }}.
Next, add this method to the methods object of the Vue component :
1// [...] 2 3 methods: { 4 checkLevel(loglevel) { 5 switch(loglevel) { 6 case 'info': 7 return 'alert-info' 8 case 'warning': 9 return 'alert-warning' 10 case 'error': 11 return 'alert-danger' 12 default: 13 return 'alert-default' 14 } 15 } 16 } 17 18 // [...]
In this function, we check the log level to return different alert types. This will change the behavior of the component based on the log level.
Now, still inside the welcome.blade.php view file, update the div section with the ID logs with this snippet below:
1<div id="logs" class="row justify-content-md-center"> 2 <pusher-logger> </pusher-logger> 3 </div>
Here, we replaced the former logs snippet with the pusher-logger HTML tag which is a representation of the pusher-logger Vue component we created earlier.
Adding realtime functionality
Now let’s enable realtime log updates using Pusher Channels. Before the closing body tag, just after the inclusion of the app.js script, add this script:
1<script src="https://js.pusher.com/4.3/pusher.min.js"></script> 2 <script> 3 let pusher = new Pusher('PUSHER_APP_KEY', { 4 cluster: 'PUSHER_APP_CLUSTER', 5 forceTLS: true 6 }); 7 8 // subscribe to the channel the log is broadcasted on 9 let channel = pusher.subscribe('log-channel'); 10 11 // Subscribe to pushlogger event 12 channel.bind('log-event', function (log) { 13 logs.push(log); 14 }); 15 </script>
Replace
PUSHER_APP_KEYandPUSHER_APP_CLUSTERwith their actual values.
In the code above, we are using the Pusher’s library to listen for log updates on the log-channel pusher channel and the log-event event. Whenever any of the events are triggered, we get an update of the log message and level in realtime.
You can run your app by running this command:
$ php artisan serve
We also need to start a development server on the previous application so we can dispatch logs. Be sure to run it on another port:
$ php artisan serve --port=9000
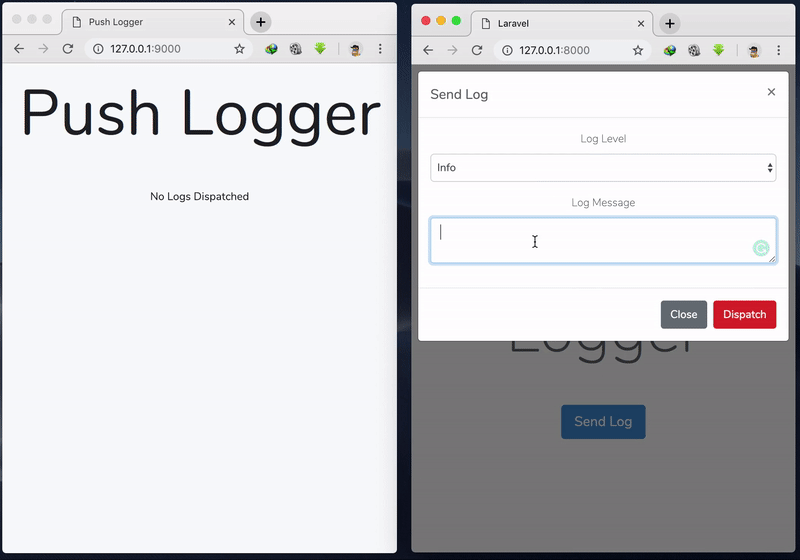
Here is how our app should look like:
Conclusion
We have successfully built our final client app and come to the end of our six-part tutorial series. We have explored various technologies such as Laravel, Vue.js, Swift and Kotlin while using them to showcase Pusher’s realtime functions.
The source code to the code is available on GitHub.


© 2026 Pusher Ltd. All rights reserved.
Pusher Limited is a company registered in England and Wales (No. 07489873) whose registered office is at MessageBird UK Limited, 3 More London Riverside, 4th Floor, London, United Kingdom, SE1 2AQ.