- Products

- Developers
- User stories
- Blog
- Pricing

Creating a Laravel Logger - Part 4: Creating our Android application
Introduction
In this part, we will build an Android application for our logger. The Android app will display logs in a list and receive notifications for errors. We will combine the functionalities of Pusher Channels and Pusher Beams to achieve this.
In the previous parts of this series, we have been able to create the Laravel application that will push all the logs to Pusher. We also added the option to push the logs to Beams which will be triggered only when the log level is critical (error).
Here is how your app will look:

Let’s dig in!
Requirements
To follow along with this series you need the following things:
- Completed previous parts of the series. Part 1, Part 2, Part 3
- Laravel installed on your local machine. Installation guide.
- Knowledge of PHP and the Laravel framework.
- Composer installed on your local machine. Installation guide.
- Android Studio >= 3.x installed on your machine (If you are building for Android).
- Knowledge of Kotlin and the Android Studio IDE.
- Xcode >= 10.x installed on your machine (If you are building for iOS).
- Knowledge of the Swift programming language and the Xcode IDE.
- Pusher account and Beams app. Create a free sandbox Pusher account or sign in. Then go to the dashboard and create a Beams instance.
Creating the project
Open Android Studio and create a new application. Enter the name of your application, for example, AndroidLoggerClient and enter a corresponding package name. You can use com.example.androidloggerclient for your package name.
Make sure the Enable Kotlin Support check box is selected as this article is written in Kotlin. Next, select a suitable minimum SDK for your app, API 19 should be fine. Next, choose the Empty Activity template provided, stick with the MainActivity naming and click Finish. You may have to wait a while Gradle will prepare your project.
Completing Pusher Beams setup
Since Pusher Beams for Android relies on Firebase, we need an FCM key and a google-services.json file for our project. Go to your Firebase console and click the Add project card to initialize the app creation wizard.
Add the name of the project, read and accept the terms and conditions. After this, you will be directed to the project overview screen. Choose the Add Firebase to your Android app option. Enter the app’s package name - com.example.androidloggerclient (in our case), thereafter you download the google-services.json file. After downloading the file, skip the rest of the quick-start guide.
Add the downloaded file to the app folder of your project - AndroidLoggerClient/app/.
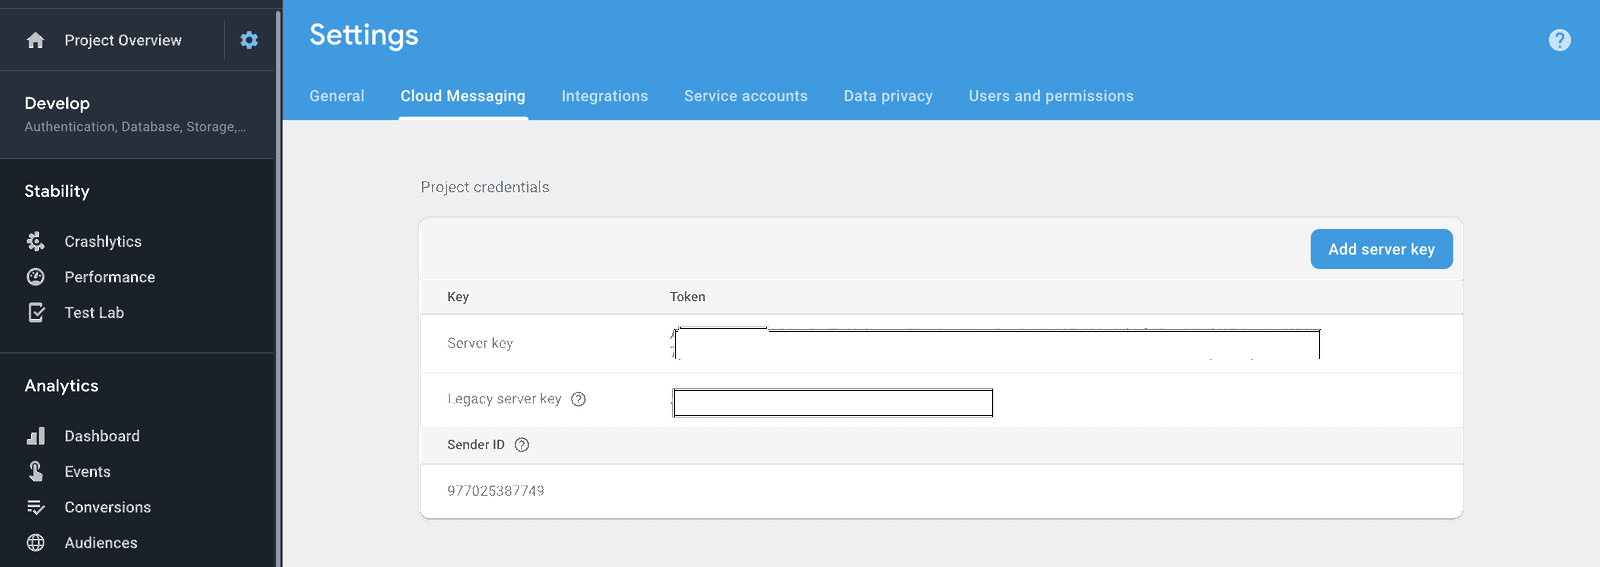
To get the FCM key, go to your project settings on Firebase, under the Cloud Messaging tab, copy out the server key.
Open the Pusher Beams instance created earlier in the series, start the Android quick start and enter your FCM key. After adding it, select Continue and exit the guide.
Adding app dependencies
Here, we will add dependencies to be used for the application. First, open your project build.gradle file and add the google services classpath like so:
1// File: ./build.gradle 2 // [...] 3 4 dependencies { 5 // other claspaths 6 classpath 'com.google.gms:google-services:4.2.0' 7 } 8 9 // [...]
Next, you open the main app build.gradle file and add the following:
1// File: ./app/build.gradle 2 // [...] 3 4 dependencies { 5 // other dependencies 6 implementation 'com.pusher:pusher-java-client:1.8.0' 7 implementation 'com.android.support:recyclerview-v7:28.0.0' 8 implementation 'com.android.support:cardview-v7:28.0.0' 9 implementation 'com.google.firebase:firebase-messaging:17.3.4' 10 implementation 'com.pusher:push-notifications-android:0.10.0' 11 12 } 13 apply plugin: 'com.google.gms.google-services' 14 15 // [...]
This snippet adds Pusher’s dependencies for the app. We equally have some dependencies from the Android support library to help us in building our UIs. Next, sync your Gradle files.
Implementing realtime logs
We will now implement realtime logs for the app. These logs will be displayed on a list, so let’s start by setting up our list. Open the activity_main.xml file and replace it with this:
1<!-- File: ./app/src/main/res/layout/activity_main.xml --> 2 <?xml version="1.0" encoding="utf-8"?> 3 <android.support.constraint.ConstraintLayout 4 xmlns:android="http://schemas.android.com/apk/res/android" 5 xmlns:app="http://schemas.android.com/apk/res-auto" 6 xmlns:tools="http://schemas.android.com/tools" 7 android:layout_width="match_parent" 8 android:layout_height="match_parent" 9 tools:context="com.example.androidloggerclient.MainActivity"> 10 11 <android.support.v7.widget.RecyclerView 12 android:id="@+id/recyclerView" 13 android:layout_width="0dp" 14 android:layout_height="match_parent" 15 android:layout_marginTop="10dp" 16 android:layout_marginLeft="10dp" 17 android:layout_marginRight="10dp" 18 app:layout_constraintLeft_toLeftOf="parent" 19 app:layout_constraintRight_toRightOf="parent" 20 app:layout_constraintTop_toTopOf="parent" /> 21 </android.support.constraint.ConstraintLayout>
This file represents the main screen of the app. Here we added a recyclerview, which represents the UI element for lists. We will configure it as we proceed. The next thing we will do is design how each item will look like. Create a new layout file log_list_row.xml and paste this:
1<!-- File: ./app/src/main/res/layout/log_list_row.xml --> 2 <?xml version="1.0" encoding="utf-8"?> 3 <android.support.v7.widget.CardView 4 xmlns:android="http://schemas.android.com/apk/res/android" 5 android:layout_width="match_parent" 6 xmlns:app="http://schemas.android.com/apk/res-auto" 7 xmlns:tools="http://schemas.android.com/tools" 8 app:cardCornerRadius="5dp" 9 android:layout_margin="10dp" 10 android:layout_height="wrap_content"> 11 12 <android.support.constraint.ConstraintLayout xmlns:android="http://schemas.android.com/apk/res/android" 13 android:layout_width="match_parent" 14 android:layout_margin="10dp" 15 android:layout_height="match_parent"> 16 17 <TextView 18 android:id="@+id/logMessage" 19 android:layout_width="wrap_content" 20 android:layout_height="wrap_content" 21 tools:text="Hello Logger!" 22 /> 23 24 <TextView 25 android:id="@+id/logLevel" 26 android:layout_width="wrap_content" 27 android:layout_height="wrap_content" 28 app:layout_constraintTop_toBottomOf="@id/logMessage" 29 tools:text="Warning" 30 android:textSize="12sp" 31 /> 32 33 </android.support.constraint.ConstraintLayout> 34 35 </android.support.v7.widget.CardView>
This layout contains a cardview that wraps two texts. One text is for the log message and the other for the log level. We will now create a corresponding data model class which will hold two strings.
Create a new class named LogModel and paste this:
1// File: ./app/src/main/java/com/example/androidloggerclient/LogModel.kt 2 data class LogModel(val logMessage:String , val logLevel:String)
Next, we need a class to manage items in the list, also called an adapter. Create a new class named LoggerAdapter and paste this:
1// File: ./app/src/main/java/com/example/androidloggerclient/LoggerAdapter.kt 2 import android.support.v7.widget.RecyclerView 3 import android.view.LayoutInflater 4 import android.view.View 5 import android.view.ViewGroup 6 import android.widget.TextView 7 8 class LoggerAdapter : RecyclerView.Adapter<LoggerAdapter.ViewHolder>() { 9 10 private var logList = ArrayList<LogModel>() 11 12 override fun onCreateViewHolder(parent: ViewGroup, viewType: Int): ViewHolder { 13 return ViewHolder(LayoutInflater.from(parent.context) 14 .inflate(R.layout.log_list_row, parent, false)) 15 } 16 17 override fun onBindViewHolder(holder: ViewHolder, position: Int) = 18 holder.bind(logList[position]) 19 20 override fun getItemCount(): Int = logList.size 21 22 fun addItem(model: LogModel) { 23 this.logList.add(model) 24 notifyDataSetChanged() 25 } 26 27 inner class ViewHolder(itemView: View) : RecyclerView.ViewHolder(itemView) { 28 29 private val logMessage = itemView.findViewById<TextView>(R.id.logMessage)!! 30 private val logLevel = itemView.findViewById<TextView>(R.id.logLevel)!! 31 32 fun bind(item: LogModel) = with(itemView) { 33 34 logMessage.text = item.logMessage 35 logLevel.text = item.logLevel 36 37 when { 38 item.logLevel.toLowerCase() == "warning" -> { 39 logLevel.setTextColor(ContextCompat.getColor(context, R.color.yellow)) 40 } 41 item.logLevel.toLowerCase() == "error" -> { 42 logLevel.setTextColor(ContextCompat.getColor(context, android.R.color.holo_red_dark)) 43 } 44 item.logLevel.toLowerCase() == "info" -> { 45 logLevel.setTextColor(ContextCompat.getColor(context, android.R.color.holo_blue_light)) 46 47 } 48 } 49 50 } 51 52 } 53 54 }
The adapter manages the list through its implemented methods marked with override . The onCreateViewHolder method uses our log_list_row layout to inflate each row of the list using a custom ViewHolder class created at the bottom of the snippet. The onBindViewHolder binds data to each item on the list, the getItemCount method returns the size of the list. The addItem method adds data to the list and refreshes it.
Also, in the above snippet, we add color to log level text based on the type of log. We imported the yellow into our colors.xml file, so add the color in your colors.xml file like so:
1<!-- File: ./app/src/main/res/values/colors.xml --> 2 <color name="yellow">#FFFF00</color>
To finish the first part of our implementation, open your MainActivity.Kt file and do the following:
Add the following imports:
1// File: ./app/src/main/java/com/example/androidloggerclient/MainActivity.kt 2 import android.support.v7.app.AppCompatActivity 3 import android.os.Bundle 4 import android.support.v7.widget.LinearLayoutManager 5 import com.pusher.client.Pusher 6 import com.pusher.client.PusherOptions 7 import kotlinx.android.synthetic.main.activity_main.* 8 import org.json.JSONObject
This imports external classes we will make use of. Then you initialize the adapter in the class like so:
1// File: ./app/src/main/java/com/example/androidloggerclient/MainActivity.kt 2 // [...] 3 4 class MainActivity : AppCompatActivity() { 5 6 private val mAdapter = LoggerAdapter() 7 8 // [...] 9 10 }
Next, you replace the onCreate method with this:
1override fun onCreate(savedInstanceState: Bundle?) { 2 super.onCreate(savedInstanceState) 3 setContentView(R.layout.activity_main) 4 setupRecyclerView() 5 setupPusher() 6 }
This method is one of the lifecycle methods in Android. Here, we called two other methods to help set up the recyclerview and Pusher. Add the methods like so:
1private fun setupRecyclerView() { 2 with(recyclerView){ 3 layoutManager = LinearLayoutManager(this@MainActivity) 4 adapter = mAdapter 5 } 6 }
This assigns a layout manager and our initialized adapter instance to the recyclerview.
1private fun setupPusher() { 2 val options = PusherOptions() 3 options.setCluster("PUSHER_CLUSTER") 4 val pusher = Pusher("PUSHER_API_KEY", options) 5 6 val channel = pusher.subscribe("log-channel") 7 8 channel.bind("log-event") { channelName, eventName, data -> 9 println(data) 10 val jsonObject = JSONObject(data) 11 val model = LogModel(jsonObject.getString("message"), jsonObject.getString("loglevel")) 12 runOnUiThread { 13 mAdapter.addItem(model) 14 } 15 } 16 17 pusher.connect() 18 }
This sets up Pusher to receive logs from a Pusher channel.
NOTE: Replace the Pusher placeholders with your own keys from your dashboard.
Finally, add the internet permission to the AndroidManifest.xml file like so:
1<!-- File: ./app/src/main/AndroidManifest.xml --> 2 <uses-permission android:name="android.permission.INTERNET"/>
With this, whenever we receive a log, it is added to the list through the adapter. With this, the app can display logs as soon as events come in. Now let us go a step further to show notifications when the log is an error log.
Implementing realtime notifications
First, we will create an Android service to listen if we receive any notification and display it accordingly.
Create a new file named NotificationsMessagingService and paste this:
1// File: ./app/src/main/java/com/example/androidloggerclient/NotificationsMessagingService.kt 2 import android.app.NotificationChannel 3 import android.app.NotificationManager 4 import android.app.PendingIntent 5 import android.content.Intent 6 import android.os.Build 7 import android.support.v4.app.NotificationCompat 8 import android.support.v4.app.NotificationManagerCompat 9 import com.google.firebase.messaging.RemoteMessage 10 import com.pusher.pushnotifications.fcm.MessagingService 11 12 class NotificationsMessagingService : MessagingService() { 13 14 override fun onMessageReceived(remoteMessage: RemoteMessage) { 15 val notificationId = 10 16 val channelId = "logs" 17 lateinit var channel:NotificationChannel 18 val intent = Intent(this, MainActivity::class.java) 19 intent.flags = Intent.FLAG_ACTIVITY_NEW_TASK or Intent.FLAG_ACTIVITY_CLEAR_TASK 20 val pendingIntent = PendingIntent.getActivity(this, 0, intent, 0) 21 val mBuilder = NotificationCompat.Builder(this, channelId) 22 .setSmallIcon(R.mipmap.ic_launcher) 23 .setContentTitle(remoteMessage.notification!!.title!!) 24 .setContentText(remoteMessage.notification!!.body!!) 25 .setContentIntent(pendingIntent) 26 .setPriority(NotificationCompat.PRIORITY_DEFAULT) 27 .setAutoCancel(true) 28 29 if (Build.VERSION.SDK_INT >= Build.VERSION_CODES.O) { 30 val notificationManager = applicationContext.getSystemService(NotificationManager::class.java) 31 val name = getString(R.string.channel_name) 32 val description = getString(R.string.channel_description) 33 val importance = NotificationManager.IMPORTANCE_DEFAULT 34 channel = NotificationChannel("log-channel", name, importance) 35 channel.description = description 36 notificationManager!!.createNotificationChannel(channel) 37 notificationManager.notify(notificationId, mBuilder.build()) 38 39 } else { 40 val notificationManager = NotificationManagerCompat.from(this) 41 notificationManager.notify(notificationId, mBuilder.build()) 42 } 43 44 } 45 46 }
The onMessageReceived method in this service is alerted when a notification comes in. When the notification comes in, we display it to the user. Next, we need to register the notification service in the AndroidManifest.xml file. You can do it by adding this to your file:
1<!-- File: ./app/src/main/AndroidManifest.xml --> 2 <application 3 > 4 <!-- [...] --> 5 <service android:name=".NotificationsMessagingService"> 6 <intent-filter android:priority="1"> 7 <action android:name="com.google.firebase.MESSAGING_EVENT" /> 8 </intent-filter> 9 </service> 10 11 </application>
Next, let us setup Pusher beams in the MainActivity file. Create a method like so:
1private fun setupPusherBeams(){ 2 PushNotifications.start(applicationContext, "PUSHER_BEAMS_INSTANCE_ID") 3 PushNotifications.subscribe("log-intrest") 4 }
NOTE: Replace the placeholder above with the actual credentials from your dashboard.
This initializes Pusher beams and subscribes to the error-logs interest. Next, add the method call to your onCreate method in the MainActivity class:
1override fun onCreate(savedInstanceState: Bundle?) { 2 // [...] 3 4 setupPusherBeams() 5 }
If you now run your app, you should have something like this:
Conclusion
In this part, we have created the Android client for our logging monitoring. In the app, we display all logs being sent through the channels and the error logs are also sent as push notifications. In the next part of the series, we will create the iOS application for the log monitor.
The source code is available on GitHub.


© 2026 Pusher Ltd. All rights reserved.
Pusher Limited is a company registered in England and Wales (No. 07489873) whose registered office is at MessageBird UK Limited, 3 More London Riverside, 4th Floor, London, United Kingdom, SE1 2AQ.