- Products

- Developers
- User stories
- Blog
- Pricing

AWS Lambda running Java and Pusher Beams for Android push notifications
Introduction
Introduction
Pusher Beams allows you to customize push notifications you send to your devices via a server. However it can be expensive to run a server 24 hours a day 7 days a week and we may only need to send notifications every so often. This is where AWS Lambda can help. Lambda functions are serverless and work on a pay as you go model (with a generous free tier). This means that you only pay for when you use the function. We’re going to explore how we can setup Pusher Beams on an Android client using an AWS Lambda function running Java to trigger the notifications.
Prerequisites
- A free AWS account. You can create one here.
- A free Pusher account. You can create one here.
- A free Google Firebase account. You can create one here.
- Eclipse IDE for Java Developers installed on your machine. Install instructions here.
- AWS Toolkit for Eclipse installed and setup. Follow the instructions here.
- Android Studio 3.3.2+
- An understanding of Android development and Android Studio environment.
Create your Android application
We will need to have a user that has registered for notifications and signed up for an interest we will call “hello”, so we can test out our implementation. We’re going to create a very basic Android app that doesn’t actually show anything to the user except for the notification on the lock screen.
Create a new Empty Activity project using Android Studio and name it something like LambdaPush. Provide a Package name and remember this as you will need it for completing the Firebase set up. We will be using Kotlin as the language choice for this tutorial and supporting Android 16+ (Jelly Bean).
Firebase set up
Log in to your Firebase account here and go to your console. If you do not already have a project created you will need to create one and name it anything you like, if you have a project select it. Within the Project Overview page select Add App and follow the instruction for creating a new Android application.
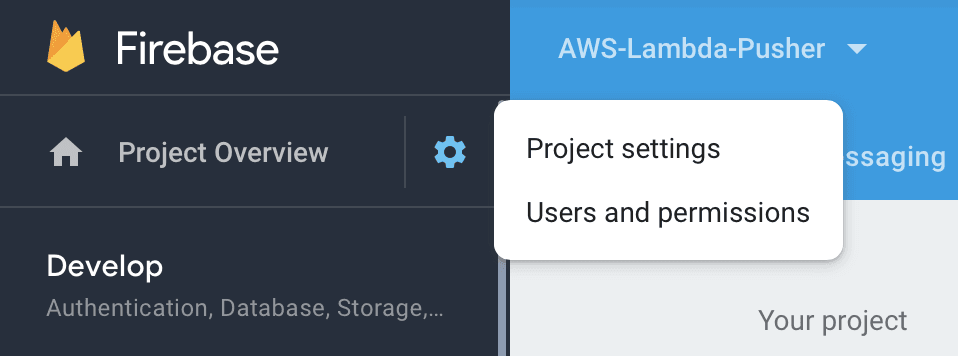
Once you have completed the setup for your Android app you will be returned to the dashboard. You will need to go to the project settings (found within the “settings cog” in the top left). Once in the project settings select the Cloud Messaging tab. Copy the Server Key you will need it for setting up your Pusher Beams instance.
Creating a Pusher Beams instance
Login or create an account to access your dashboard here. Create a new beams instance using the dashboard.
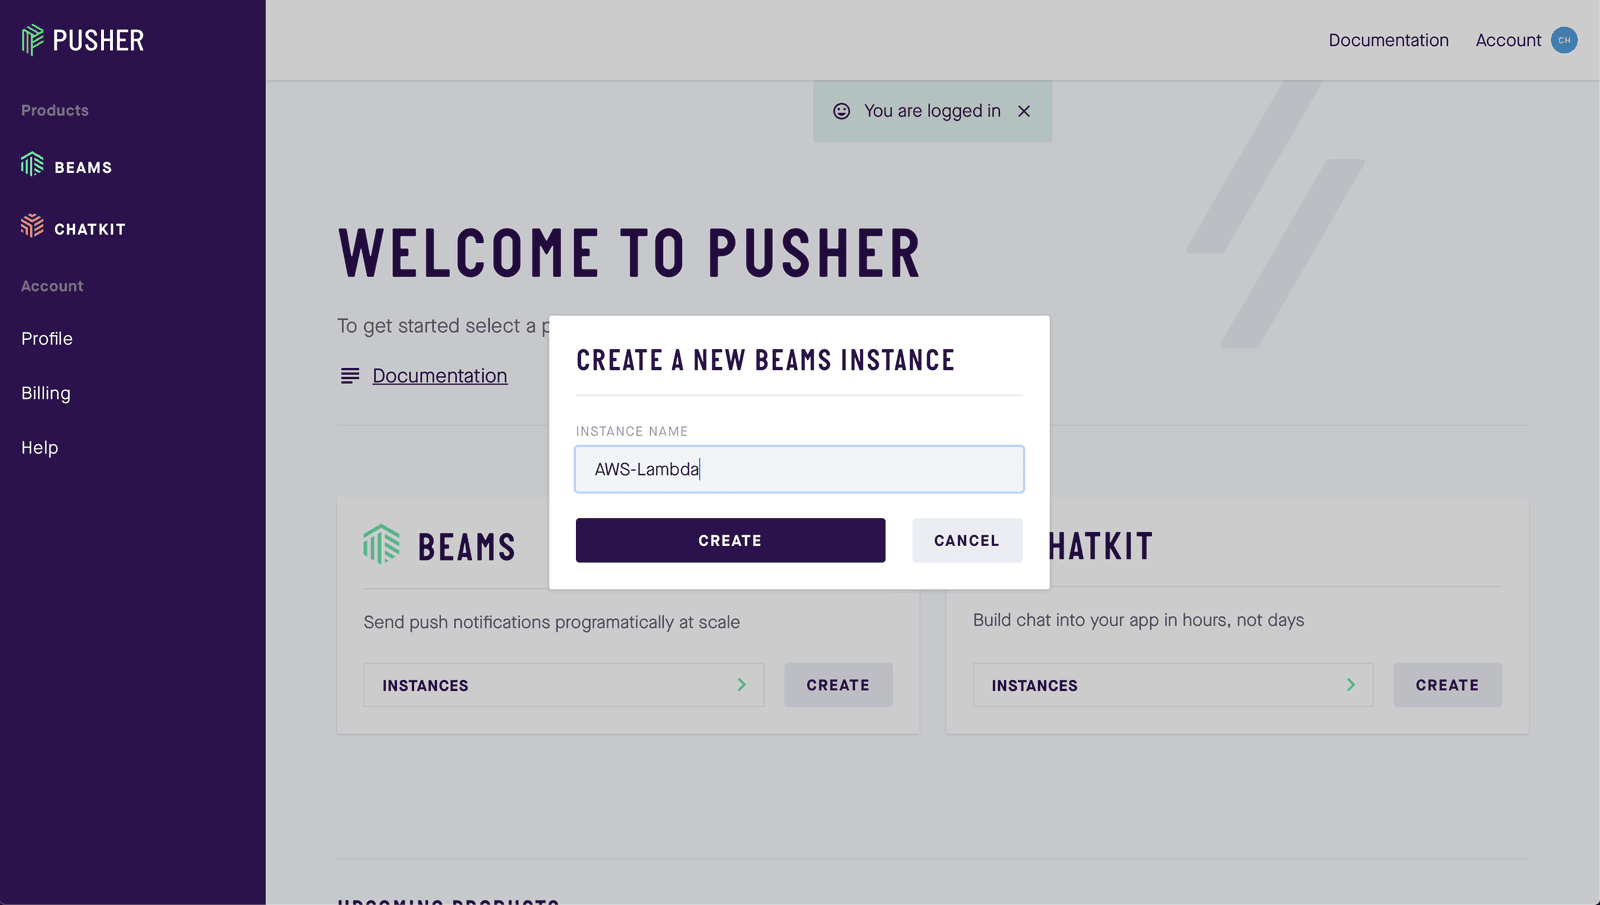
Complete step one of the Android setup guide, by providing your FCM server key you copied earlier and Continue. We will pick up the remainder later on in this tutorial. Press the X to exit the setup guide and you will be returned to your dashboard for that instance. Scroll to the bottom of the page and you will find your Beams instance ID and secret key, make note of these you will need them later.
Adding the SDKs
Open your app level build.gradle file and add the following into your dependencies:
1// app/build.gradle 2 ... 3 dependencies { 4 ... 5 implementation 'com.google.firebase:firebase-messaging:17.1.0' 6 implementation 'com.pusher:push-notifications-android:1.4.0' 7 ... 8 } 9 ...
Here we are adding the Firebase messaging SDK and the Pusher Beams SDK. You should already have the Google Service SDK and google-services.json added to your project when setting up the Firebase app.
Synchronize Gradle by pressing the Sync Now button.
Initialize Pusher Beams
Open your main activity and add the following import:
import com.pusher.pushnotifications.PushNotifications
Add the following to your onCreate function:
1PushNotifications.start(applicationContext, "YOUR_INSTANCE_ID") 2 PushNotifications.addDeviceInterest("hello")
Remember to replace YOUR_INSTANCE_ID with the instance id from your Pusher Beams console and run the application.
Create your Lambda function
Writing our function
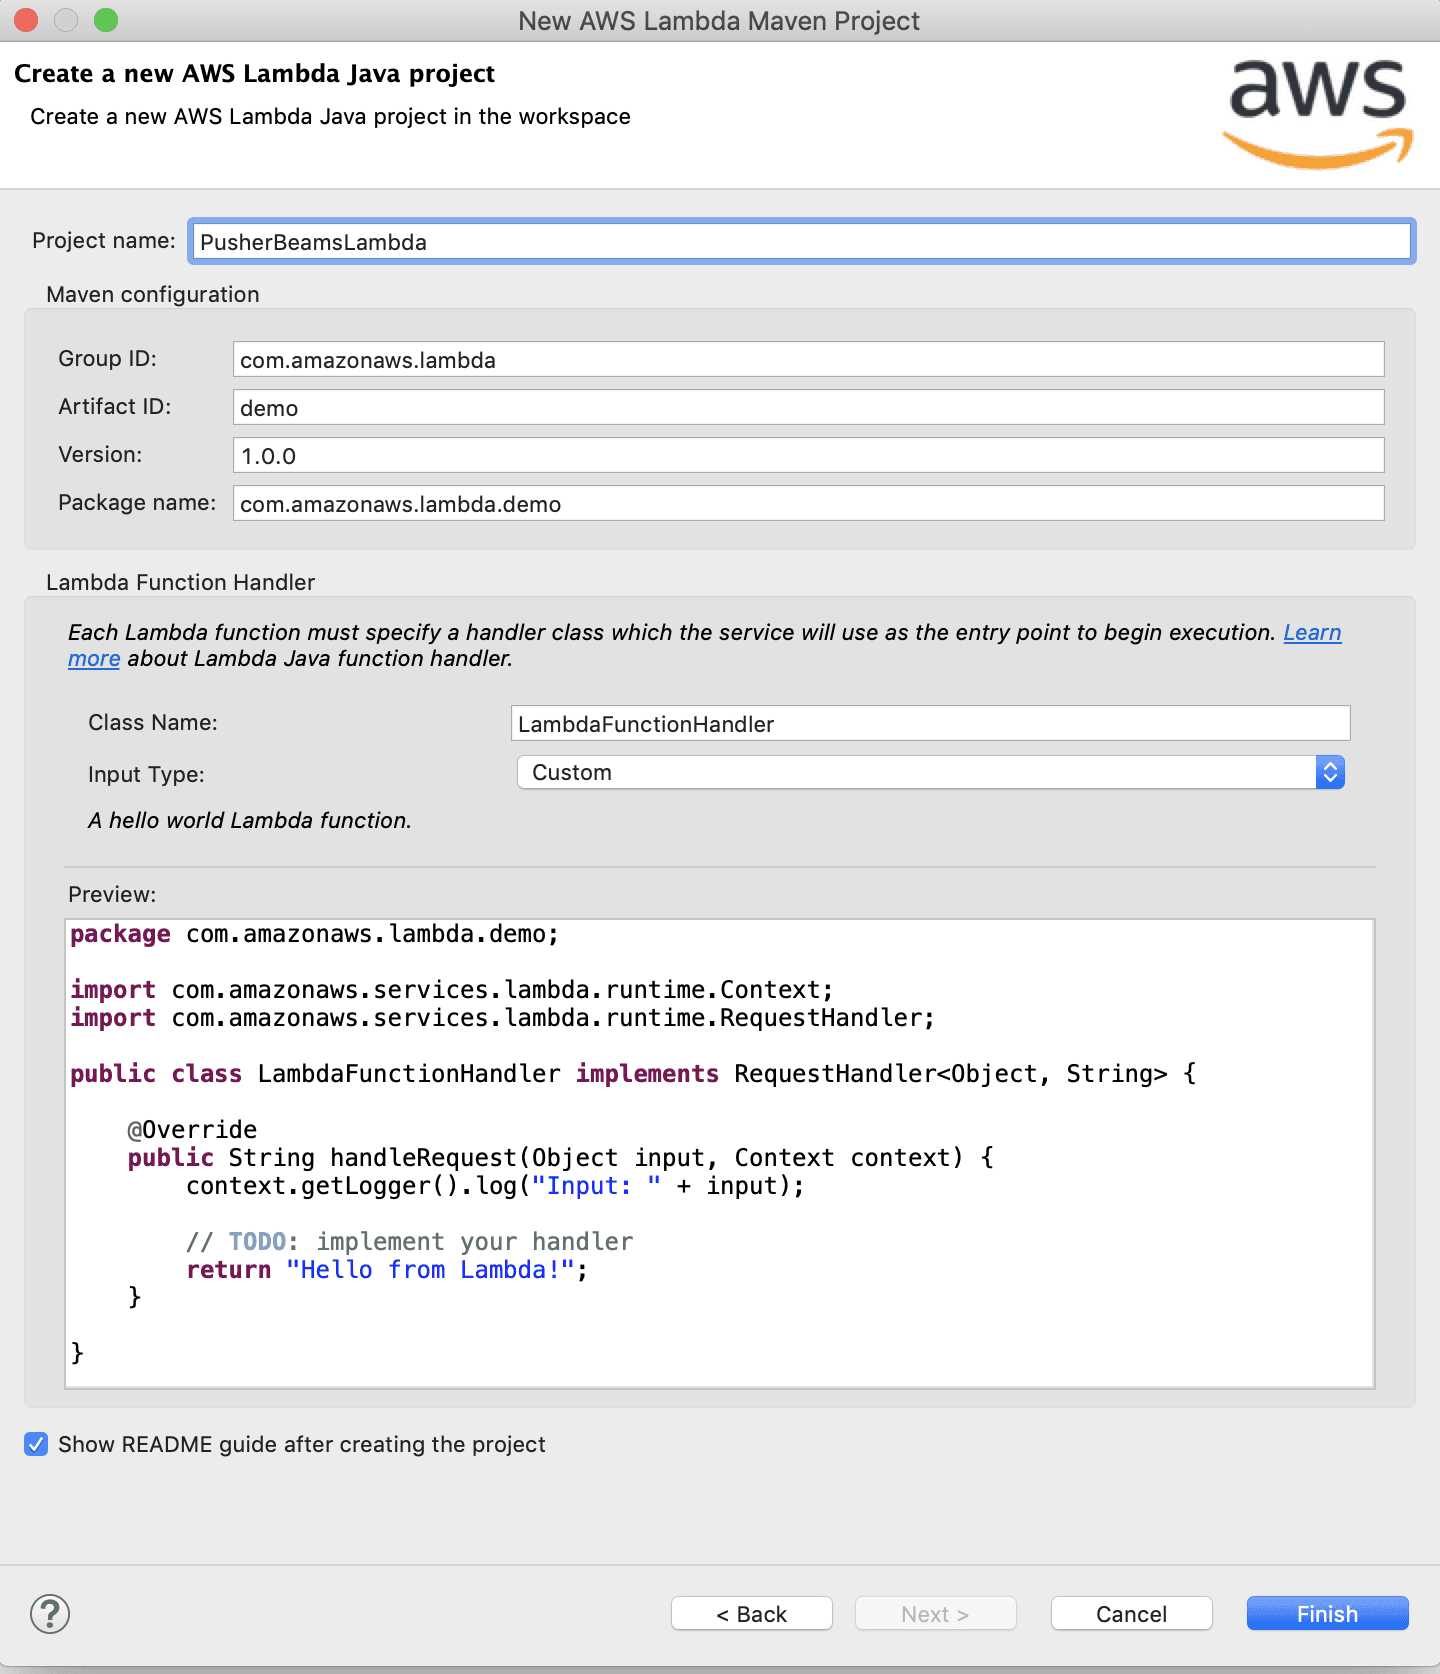
Open your Eclipse IDE and press CMD + N this will open the new project wizard. Expand the AWS folder (make sure you have the AWS Toolkit installed if you don’t see this) and select AWS Lambda Java Project and click Next.
In the next window provide a Project name, Group ID, Artifact ID and Class Name. You may leave these as the default if you wish. For the Input Type, choose Custom, to complete the set up select Finish.
Once the project has finished setting up open the pom.xml. Add the following within your dependencies:
1// pom.xml 2 <dependencies> 3 ... 4 <dependency> 5 <groupId>com.pusher</groupId> 6 <artifactId>push-notifications-server-java</artifactId> 7 <version>1.1.0</version> 8 </dependency> 9 ... 10 </dependencies>
Create a new file in the lambda package called RequestClass.java. Within this file add the following:
1// src/main/java/RequestClass.java 2 package com.amazonaws.lambda.demo; 3 4 public class RequestClass { 5 String title; 6 String message; 7 8 public String getTitle() { 9 return title; 10 } 11 12 public void setTitle(String title) { 13 this.title = title; 14 } 15 16 public String getMessage() { 17 return message; 18 } 19 20 public void setMessage(String message) { 21 this.message = message; 22 } 23 24 public RequestClass(String title, String message) { 25 this.title = title; 26 this.message = message; 27 } 28 29 public RequestClass() { 30 } 31 }
This code will be used by our Lambda function in order to parse the data we will pass in to the function to create our push message. Next open your LambdaFunctionHandler.java and replace the contents with:
1// src/main/java/RequestClass.java 2 package com.amazonaws.lambda.demo; 3 4 import java.util.List; 5 import java.io.IOException; 6 import java.net.URISyntaxException; 7 import java.util.ArrayList; 8 import java.util.Arrays; 9 import java.util.HashMap; 10 import java.util.Map; 11 import com.amazonaws.services.lambda.runtime.Context; 12 import com.amazonaws.services.lambda.runtime.RequestHandler; 13 import com.pusher.pushnotifications.PushNotifications; 14 15 public class LambdaFunctionHandler implements RequestHandler<RequestClass, String> { 16 17 @Override 18 public String handleRequest(RequestClass request, Context context) { 19 String instanceId = "YOUR_INSTANCE_ID"; 20 String secretKey = "YOUR_SECRET_KEY"; 21 22 PushNotifications beamsClient = new PushNotifications(instanceId, secretKey); 23 List<String> interests = Arrays.asList("hello"); 24 25 Map<String, Map> publishRequest = new HashMap(); 26 Map<String, String> fcmNotification = new HashMap(); 27 fcmNotification.put("title", request.title); 28 fcmNotification.put("body", request.message); 29 Map<String, Map> fcm = new HashMap(); 30 fcm.put("notification", fcmNotification); 31 publishRequest.put("fcm", fcm); 32 33 try { 34 beamsClient.publishToInterests(interests, publishRequest); 35 return "Push sent!"; 36 } catch (IOException e) { 37 e.printStackTrace(); 38 return "Push failed!"; 39 } catch (InterruptedException e) { 40 e.printStackTrace(); 41 return "Push failed!"; 42 } catch (URISyntaxException e) { 43 e.printStackTrace(); 44 return "Push failed!"; 45 } 46 47 } 48 }
This code will be used by our Lambda function later on to publish notifications to devices that are registered for the hello interest. We use the request.title and request.message to form part of the FCM notification. We’ll look at this in more detail when we come to test our integration. Remember to replace YOUR_INSTANCE_ID and YOUR_SECRET_KEY with the credentials from your Pusher Beams console.
Deploy your code
Right click in the eclipse editor select AWS Lambda → Upload function to AWS Lambda.
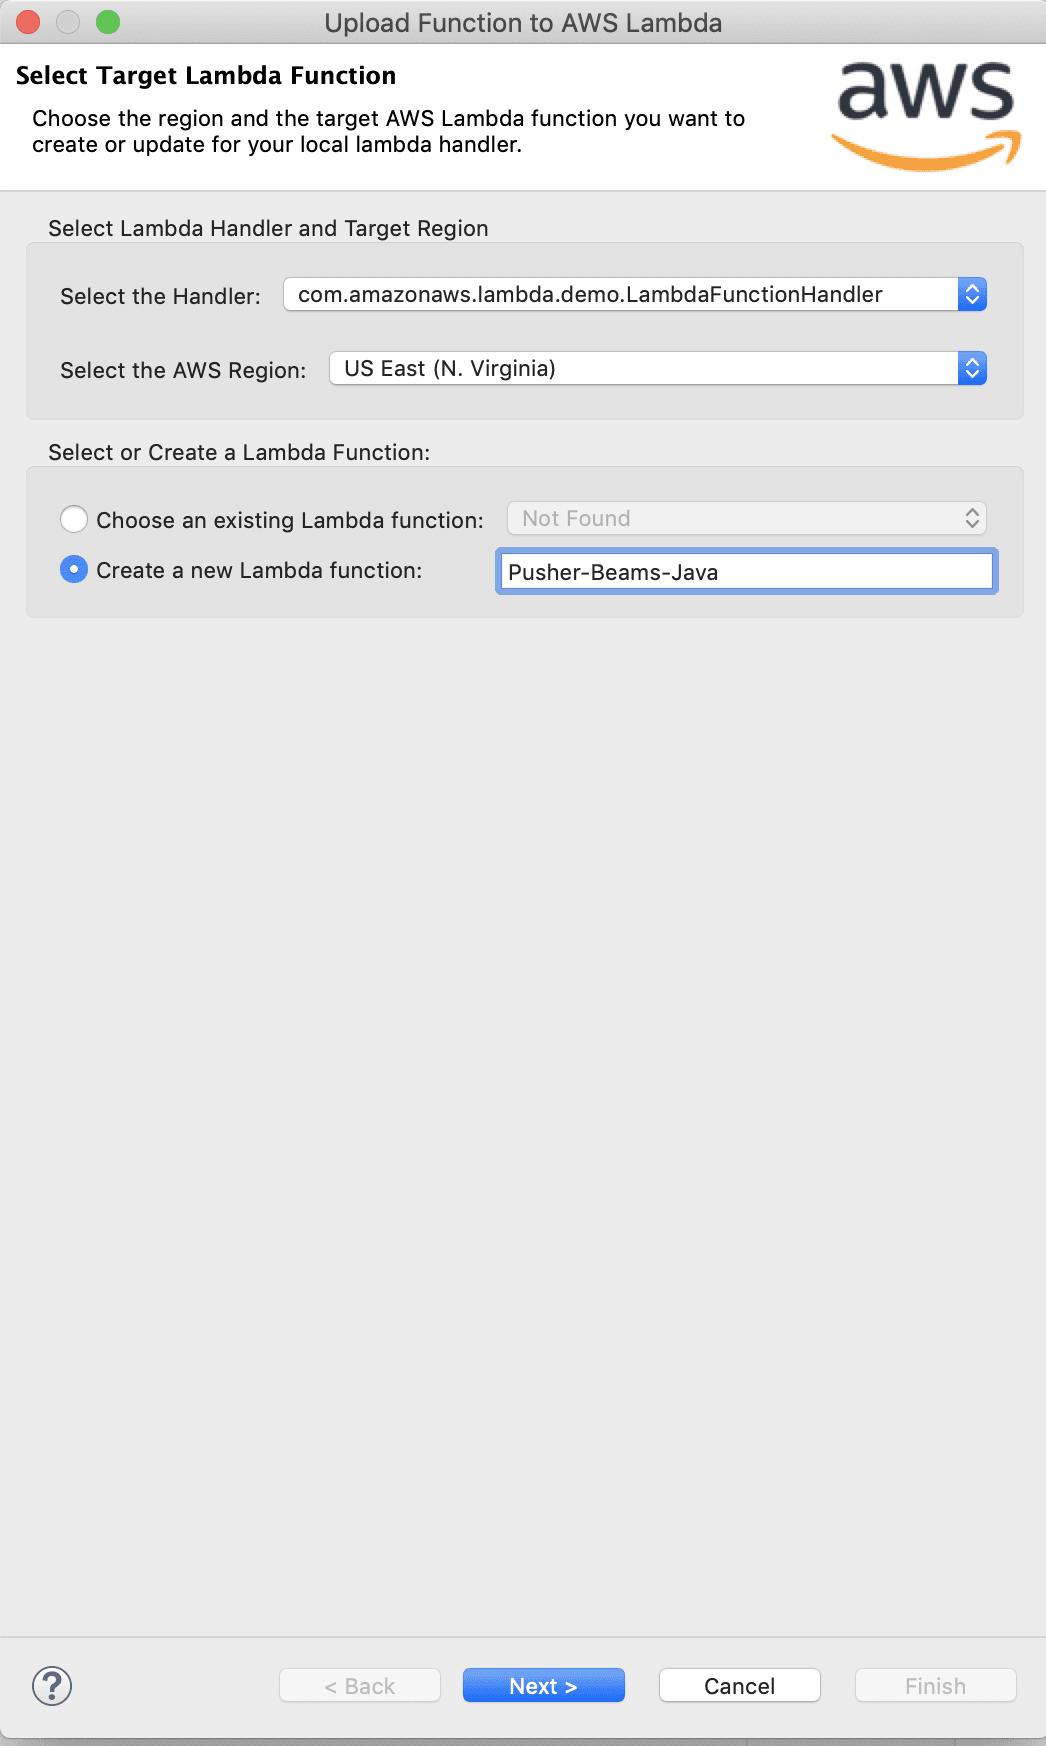
On the next screen select a IAM role if you have one. If you don’t use the Create button to make a new one and call it “lambda_basic_execution”. Next we would need to create a bucket on the AWS console here if we don’t already have one. Make sure that there are permissions to the root user. And lastly but most importantly make sure that the user created initially has all of the permissions required - AmazonS3FullAcces. Leave everything else the same and click Finish to upload your code to AWS Lambda.
Note: Always make sure the bucket region matches the Lambda target region.
Testing our implementation
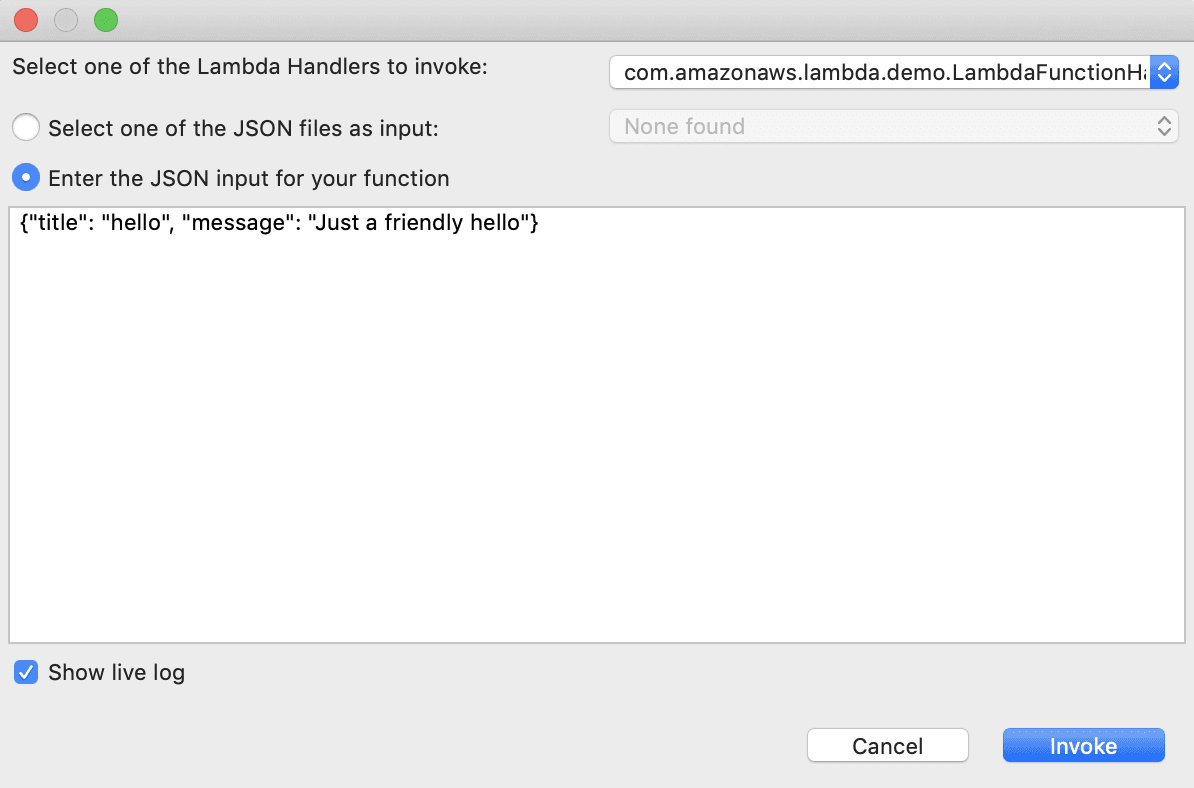
Return to your Lambda function code in the Eclipse IDE. Right-click and select AWS Lambda → Run function on AWS Lambda. A dialog box will appear, make sure your lambda function is selected from the dropdown list and that the Enter the JSON input for your function radio button is selected. In text field provided add the following:
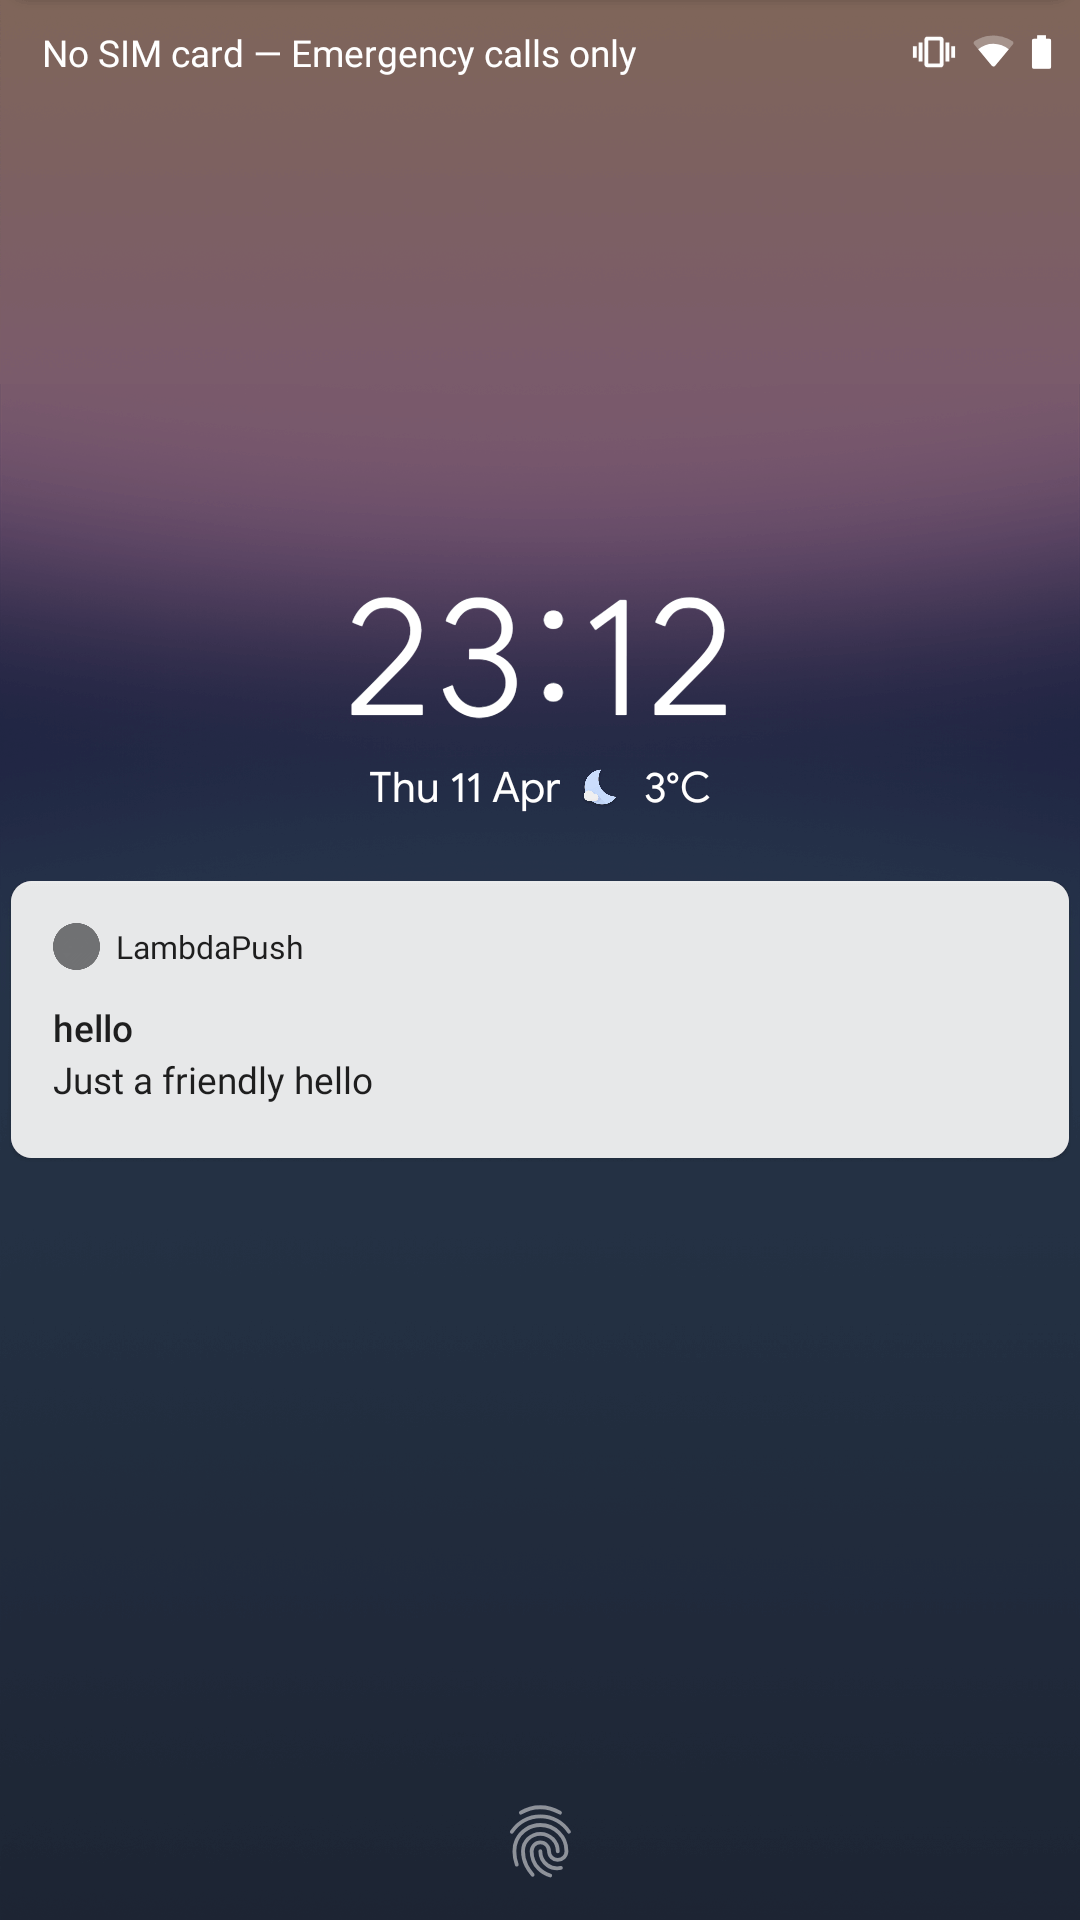
{"title": "hello", "message": "Just a friendly hello"}
Notice how our keys in the JSON object are title and message. These are the event keys we were using in our code to provide the title and body for the push notification.
If everything has worked as expected you should receive a push to your device.
Conclusion
We’ve learnt how to create an AWS Lambda function using Java that can publish a push notification using Pusher Beams to an Android device. The source code for this tutorial can be found here.


© 2026 Pusher Ltd. All rights reserved.
Pusher Limited is a company registered in England and Wales (No. 07489873) whose registered office is at MessageBird UK Limited, 3 More London Riverside, 4th Floor, London, United Kingdom, SE1 2AQ.