- Products

- Developers
- User stories
- Blog
- Pricing

Build a Kotlin ride sharing app with push notifications
- Introduction
- Introduction
- Prerequisites
- Setting up your Pusher account
- Overall architecture
- Backend application
- Broadcasting events
- Building the Riders application
- Displaying the current location
- Requesting a ride
- Receiving push notifications
- Building the drivers application
- Displaying the current location
- Receive notifications of new jobs
- Accepting a job
- Removing old jobs from the map
- Picking up and dropping off
- Sending location updates
- Conclusion
Introduction
Introduction
Many user facing applications can be greatly improved by introducing realtime notifications for the user. This is especially important when the user is actively waiting for a service to arrive.
In this article we are going to build a ride sharing app. There are two parts to this app, both of which will take advantage of the Pusher Beams functionality.
On the Driver side, we will have an Android application that receives a notification when a new job comes up, when the job is no longer available and when the job has finished with the rating from the rider.
On the Rider side, we will also have an Android application that allows the user to request a car from their current location to a target location, gives regular notifications when the car is en-route to pick up and gives the ability to rate the driver when the ride is finished.
Prerequisites
In order to follow along, you will need some experience with the Kotlin programming language, which we are going to use for both the backend and frontend of our application.
You will also need appropriate IDEs. We suggest IntelliJ IDEA and Android Studio. Finally, you will need a free Pusher Account. Sign up now if you haven’t already done so.
It is also assumed that you know how to use the IDEs that you are working with, including interacting with either an emulated or physical mobile device for running the applications.
Setting up your Pusher account
In order to use the Beams API and SDKs from Pusher, you need to create a new Beams instance in the Pusher Beta Dashboard.
Next, on your Overview for your Beams instance, click Open Quickstart to add your Firebase Cloud Messaging (FCM) Server Key to the Beams Instance.
After saving your FCM key, you can finish the Quickstart wizard by yourself to send your first push notification, or just continue as we’ll cover this below.
It’s important to make sure that you download and keep the google-services.json file from the Firebase Console as we are going to need this later on.
Once you have created your Beams instance, you will also need to note down your Instance Id and Secret Key from the Pusher Dashboard, found under the CREDENTIALS section of your Instance settings.
Overall architecture
Our overall application will have two Android applications, and a backend application that orchestrates between them. The Rider application will send a message to the backend in order to request a ride. This will contain the start location. The backend will then broadcast out to all of the drivers that a new job is available. Once one of the drivers accepts the job, the rider is then notified of this fact and is kept informed of the car’s location until it turns up. At the same time, the other drivers are all notified that the job is no longer available.
At the other end of the journey, the driver will indicate that the job is finished. At this point, they will be able to collect a new job if they wish.
Backend application
We are going to build our backend application using Spring Boot and the Kotlin programming language, since this gives us a very simple way to get going whilst still working in the same language as the Android applications will be built.
Head over to https://start.spring.io/ to create our project structure. We need to specify that we are building a Gradle project with Kotlin and Spring Boot 2.0.1 (or newer if available at the time of reading), and we need to include the “Web” component:
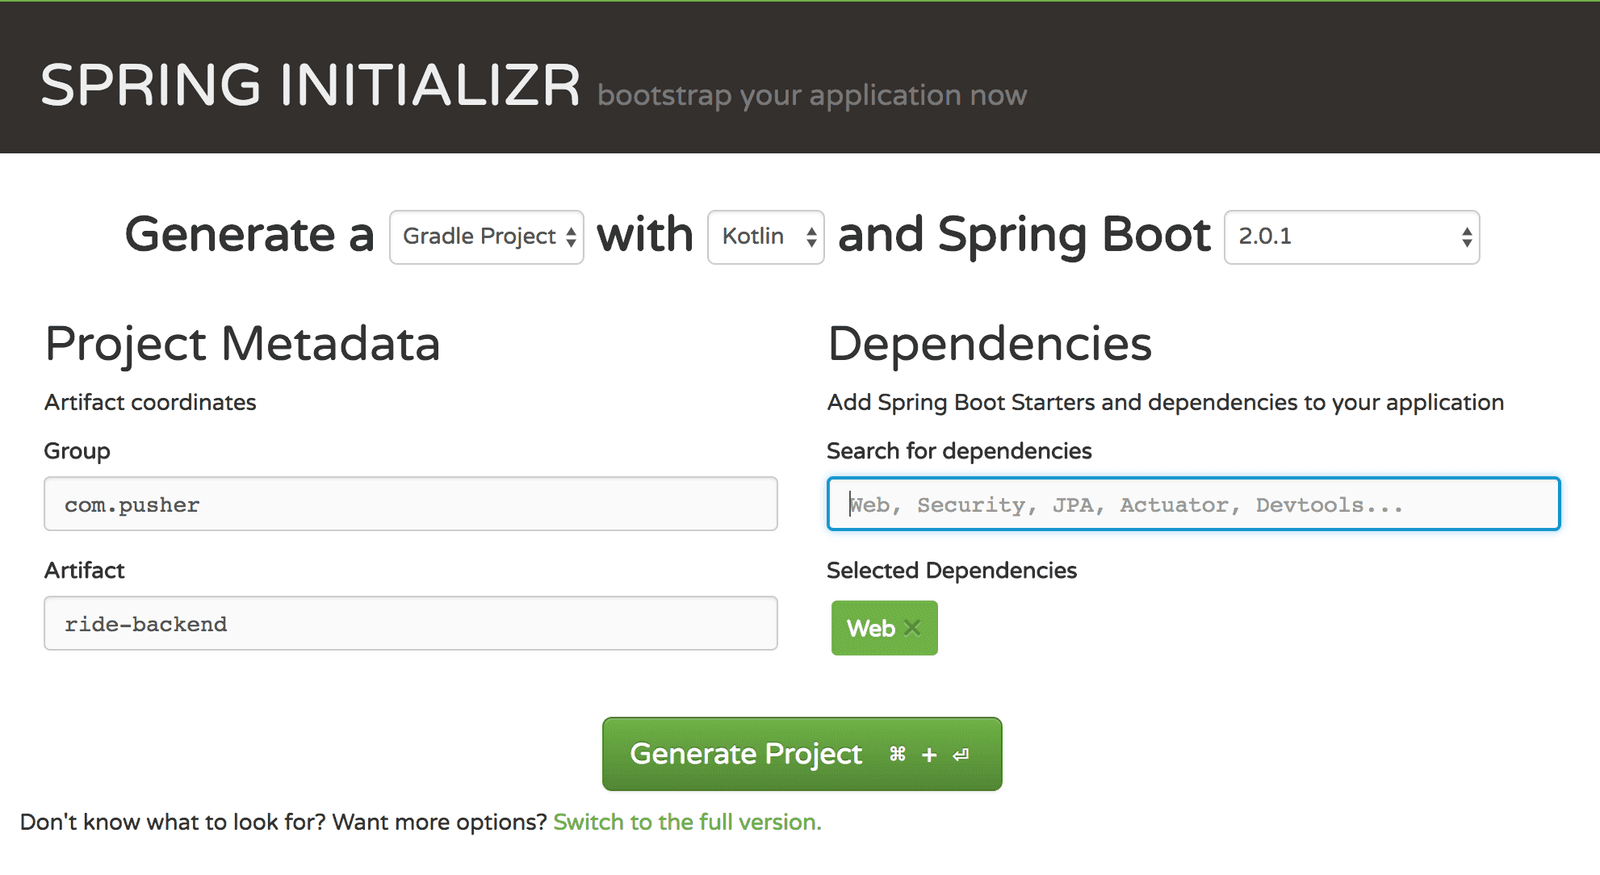
The Generate Project button will give you a zip file containing our application structure. Unpack this somewhere. At any time, you can execute ./gradlew bootRun to build and start your backend server running.
Firstly though, we need to add some dependencies. Open up the build.gradle file and add the following to the dependencies section:
1compile 'com.pusher:push-notifications-server-java:0.9.0' 2 runtime 'com.fasterxml.jackson.module:jackson-module-kotlin:2.9.2'
The first of these is the Pusher library needed for triggering push notifications. The second is the Jackson module needed for serializing and deserializing Kotlin classes into JSON.
Now, build the project. This will ensure that all of the dependencies are downloaded and made available and that everything compiles and builds correctly:
1$ ./gradlew build 2 Starting a Gradle Daemon (subsequent builds will be faster) 3 4 > Task :test 5 2018-04-27 07:34:27.548 INFO 43169 --- [ Thread-5] o.s.w.c.s.GenericWebApplicationContext : 6 Closing org.springframework.web.context.support.GenericWebApplicationContext@c1cf60f: startup date [Fri 7 Apr 27 07:34:25 BST 2018]; root of context hierarchy 8 9 10 BUILD SUCCESSFUL in 17s 11 5 actionable tasks: 5 executed
Broadcasting events
The sole point of the backend application is to broadcast push notifications via the Pusher Beams service in response to incoming HTTP calls.
We have a few different endpoints that we want to handle, each of which will broadcast their own particular events:
- POST /request-ride
- POST /accept-job/{job}
- POST /update-location/{job}
- POST /pickup/{job}
- POST /dropoff/{job}
Out of these, the first one is used by the riders application whilst the others are all used by the drivers application. There is also a strict workflow between these. The very first one will generate a new job, with a unique ID that will be passed between all of the other requests and which will be used as the intent of the push notification to ensure that only the correct rider gets the messages.
The workflow is going to be:
- Rider makes a call to
/request-ridesupplying their current location, and gets a Job ID back. - All currently active drivers are sent a push notification informing them of the job.
- Driver makes a call to
/accept-job/{job}, supplying their current location. This causes the rider to be notified that a driver has accepted the job, and where the driver is, and also causes all the other drivers to remove the job from their list. - Driver makes frequent calls to
/update-location/{job}with their current location. This causes the rider to be notified of where the driver is now. - Driver makes a call to
/pickup/{job}with their current location. This informs the rider that their ride is waiting for them. - Driver makes frequent calls to
/update-location/{job}with their current location. This causes the rider to be notified of where the driver is now. - Driver makes a call to
/dropoff/{job}with their current location. This informs the rider that their ride is over.
The first thing we need is some way to represent a location in the world. All of our endpoints will use this as their payload. Create a new class called Location:
1data class Location( 2 val latitude: Double, 3 val longitude: Double 4 )
We also need an enumeration of the actions that can be performed. Create a new class called Actions:
1enum class Actions { 2 NEW_JOB, 3 ACCEPT_JOB, 4 ACCEPTED_JOB, 5 UPDATE_LOCATION, 6 PICKUP, 7 DROPOFF 8 }
Now we can create our mechanism to send out Pusher Beams notifications to the relevant clients. There are two different kinda of notification to send - one with a location and one with a rating. Create a new class called JobNotifier:
1@Component 2 class JobNotifier( 3 @Value("\${pusher.instanceId}") private val instanceId: String, 4 @Value("\${pusher.secretKey}") private val secretKey: String 5 ) { 6 private val pusher = PushNotifications(instanceId, secretKey) 7 8 fun notify(job: String, action: Actions, location: Location) { 9 val interests = when (action) { 10 Actions.NEW_JOB -> listOf("driver_broadcast") 11 Actions.ACCEPTED_JOB -> listOf("driver_broadcast") 12 else -> listOf("rider_$job") 13 } 14 15 pusher.publish( 16 interests, 17 mapOf( 18 "fcm" to mapOf( 19 "data" to mapOf( 20 "action" to action.name, 21 "job" to job, 22 "latitude" to location.latitude.toString(), 23 "longitude" to location.longitude.toString() 24 ) 25 ) 26 ) 27 ) 28 } 29 }
Note: If the data sent in a notification contains anything that is not a string then the Android client will silently fail to receive the notification.
This will send notifications with one of two interest sets. driver_broadcast will be received by all drivers that are not currently on a job, and driver_$job will be received by the driver currently on that job.
You will also need to add to the application.properties file the credentials needed to access the Pusher Beams API:
1pusher.instanceId=<PUSHER_INSTANCE_ID> 2 pusher.secretKey=<PUSHER_SECRET_KEY>
Finally we need a controller to actually handle the incoming HTTP Requests and trigger the notifications. Create a new class called RideController:
1@RestController 2 class RideController( 3 private val jobNotifier: JobNotifier 4 ) { 5 @RequestMapping(value = ["/request-ride"], method = [RequestMethod.POST]) 6 @ResponseStatus(HttpStatus.CREATED) 7 fun requestRide(@RequestBody location: Location): String { 8 val job = UUID.randomUUID().toString() 9 jobNotifier.notify(job, Actions.NEW_JOB, location) 10 return job 11 } 12 13 @RequestMapping(value = ["/accept-job/{job}"], method = [RequestMethod.POST]) 14 @ResponseStatus(HttpStatus.NO_CONTENT) 15 fun acceptJob(@PathVariable("job") job: String, @RequestBody location: Location) { 16 jobNotifier.notify(job, Actions.ACCEPT_JOB, location) 17 jobNotifier.notify(job, Actions.ACCEPTED_JOB, location) 18 } 19 20 @RequestMapping(value = ["/update-location/{job}"], method = [RequestMethod.POST]) 21 @ResponseStatus(HttpStatus.NO_CONTENT) 22 fun updateLocation(@PathVariable("job") job: String, @RequestBody location: Location) { 23 jobNotifier.notify(job, Actions.UPDATE_LOCATION, location) 24 } 25 26 @RequestMapping(value = ["/pickup/{job}"], method = [RequestMethod.POST]) 27 @ResponseStatus(HttpStatus.NO_CONTENT) 28 fun pickup(@PathVariable("job") job: String, @RequestBody location: Location) { 29 jobNotifier.notify(job, Actions.PICKUP, location) 30 } 31 32 @RequestMapping(value = ["/dropoff/{job}"], method = [RequestMethod.POST]) 33 @ResponseStatus(HttpStatus.NO_CONTENT) 34 fun dropoff(@PathVariable("job") job: String, @RequestBody location: Location) { 35 jobNotifier.notify(job, Actions.DROPOFF, location) 36 } 37 }
Every method simply triggers one notification and returns. The handler for /request-ride will generate a new UUID as the job ID and will return it to the rider - the drivers will get the job ID in the appropriate push notification if they receive it.
Building the Riders application
The Rider Android application will also be built in Kotlin, using Android Studio. To start, open up Android Studio and create a new project, entering some appropriate details and ensuring that you select the Include Kotlin support option. Note that the Package name must match that specified when you set up the FCM Server Key earlier.

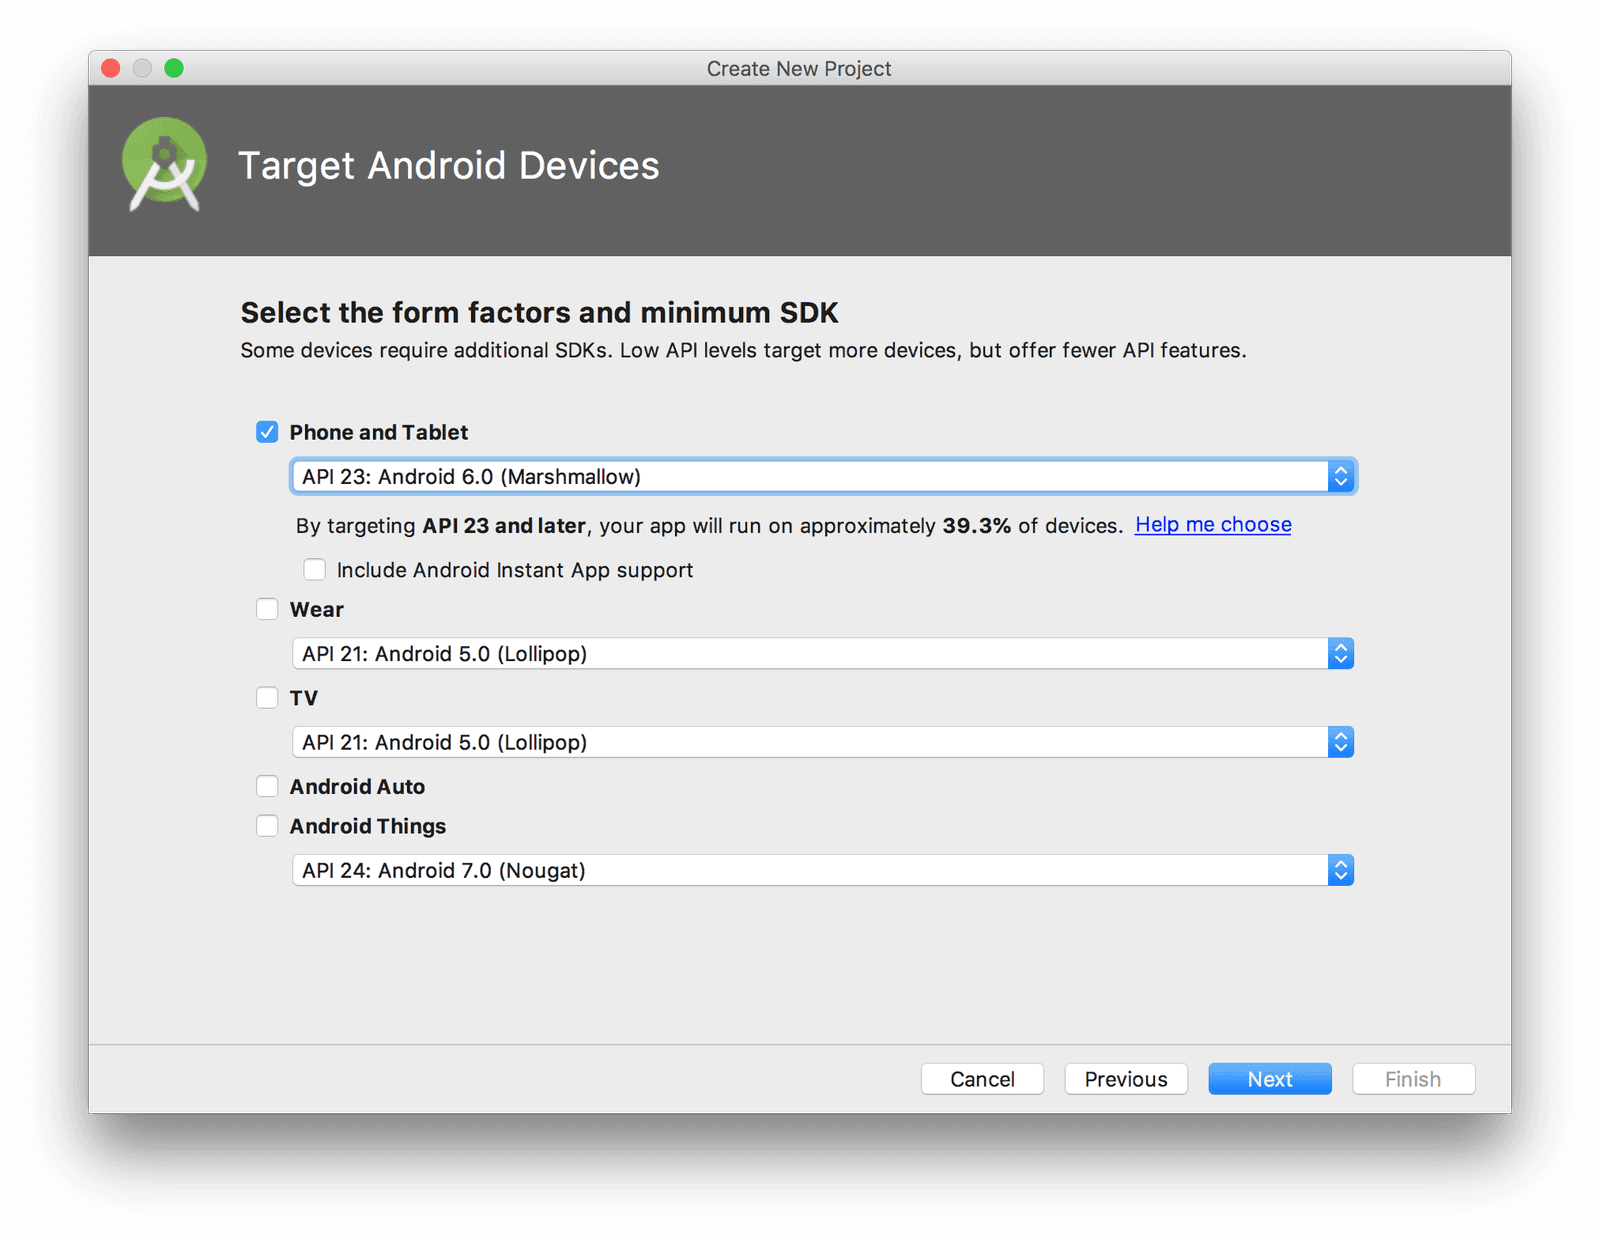
Then on the next screen, ensure that you select support for Phone and Tablet using at least API 23:

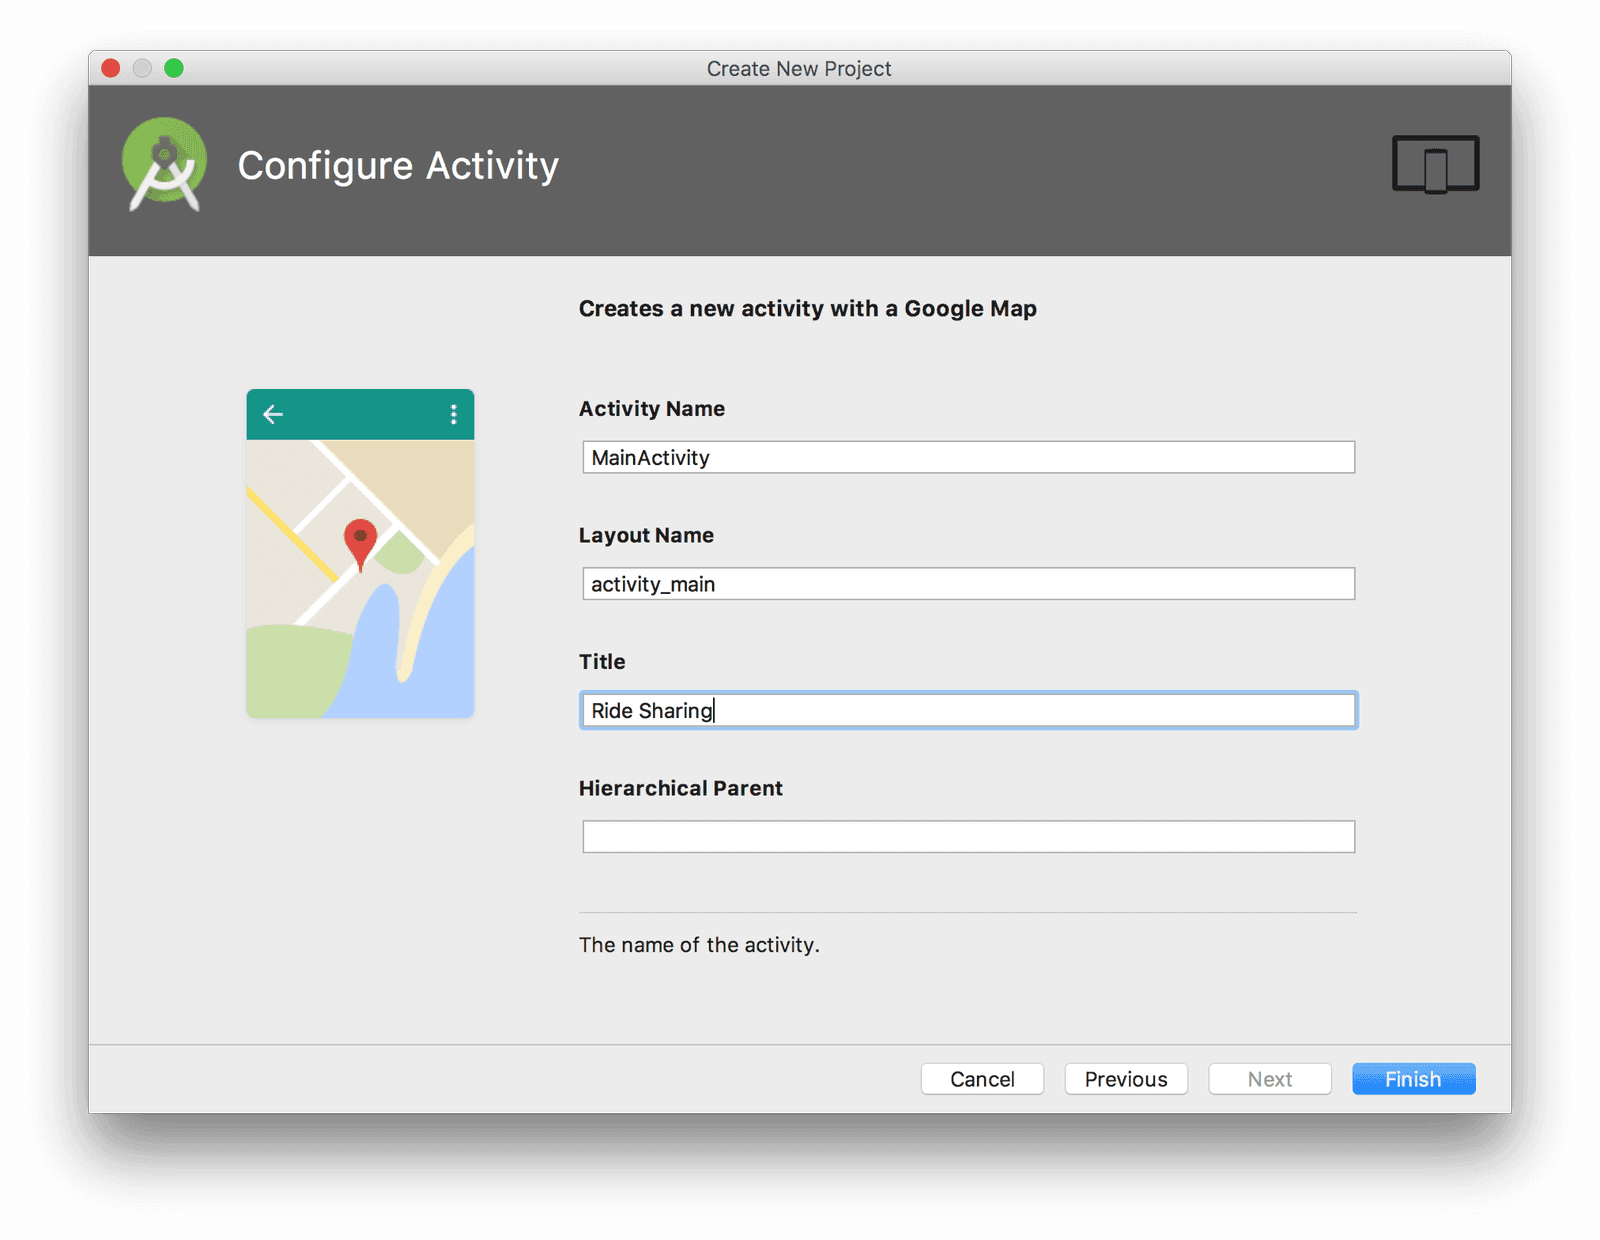
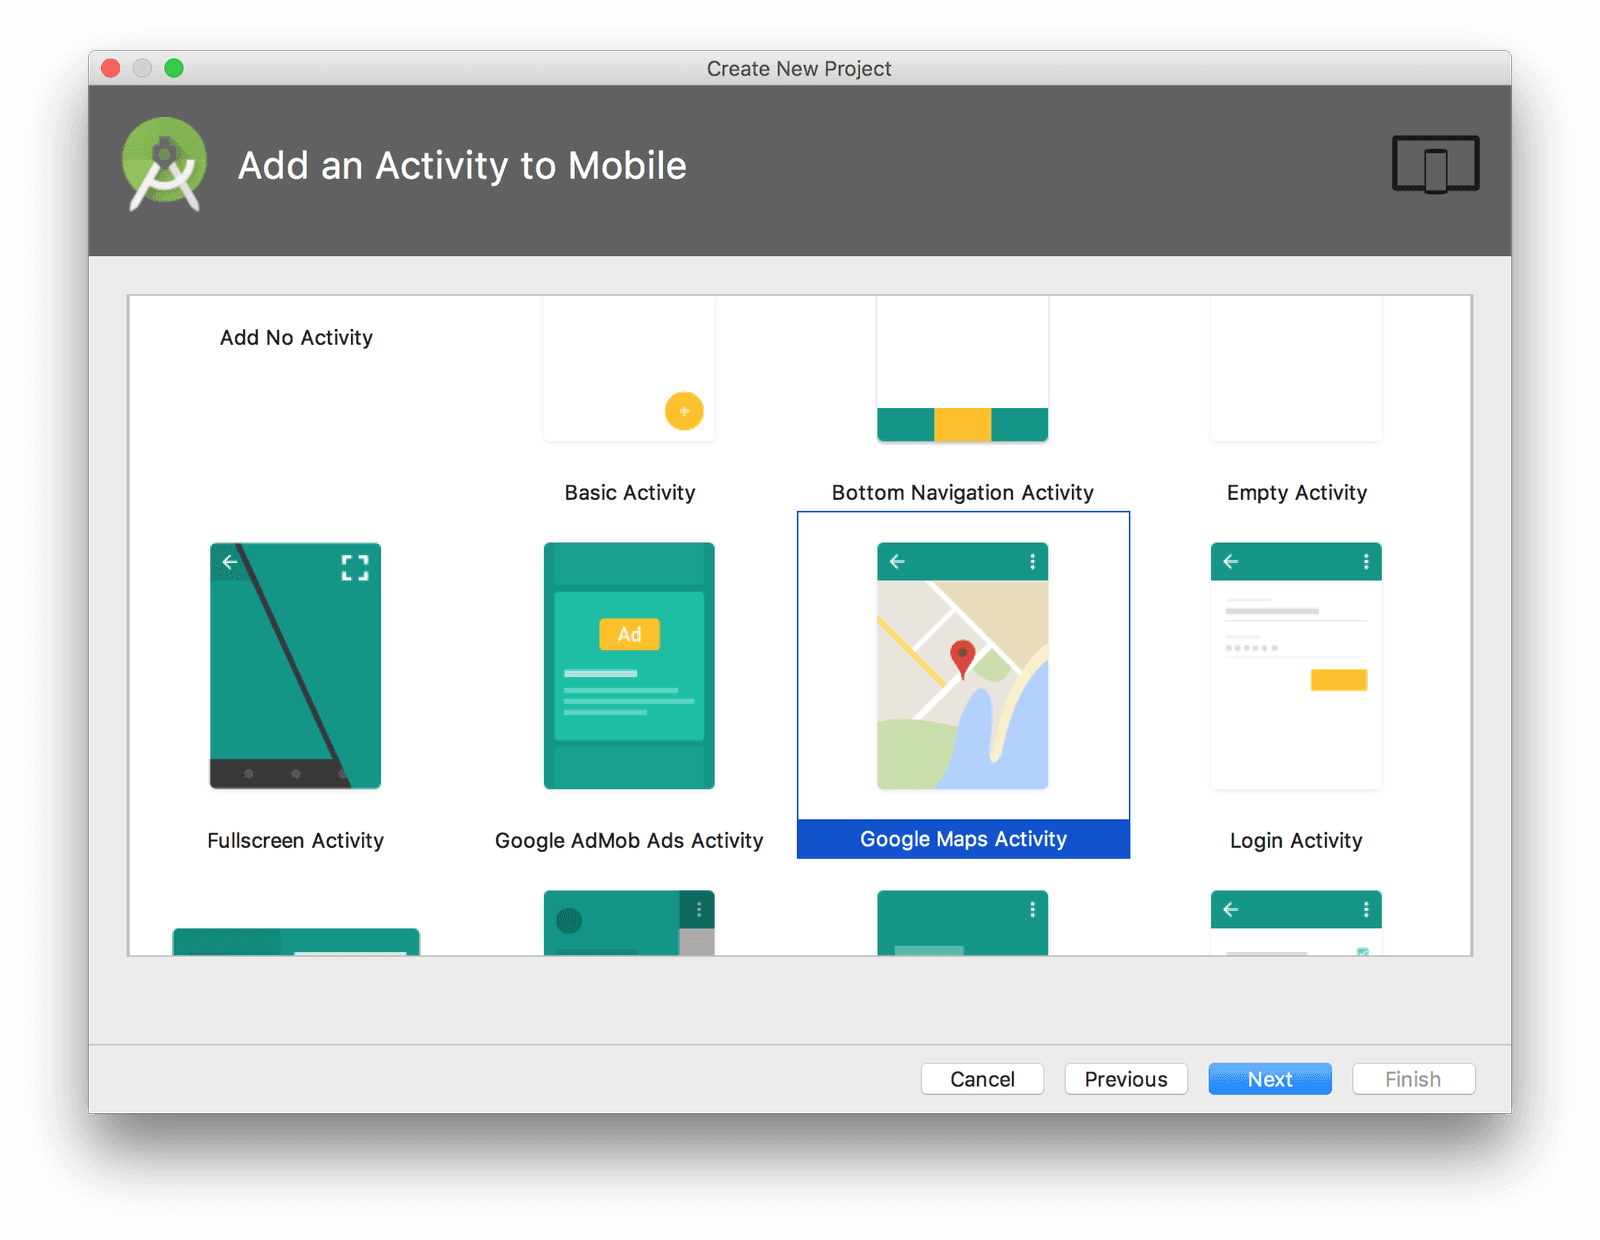
Ensure that an Google Maps Activity is selected:

And set the Activity Name to “MainActivity” and Layout Name to “activity_main”:
Once the project opens, you will be presented with the file google_maps_api.xml with instructions on how to get a Google Maps API key. Follow these instructions to get a key to use in the application.
Next we need to add some dependencies to our project to support Pusher. Add the following to the project level build.gradle, in the existing dependencies section:
classpath 'com.google.gms:google-services:3.2.1'
Then add the following to the dependencies section of the app level build.gradle:
1implementation 'com.google.firebase:firebase-messaging:15.0.0' 2 implementation 'com.pusher:push-notifications-android:0.10.0' 3 4 compile 'com.loopj.android:android-async-http:1.4.9' 5 compile 'com.google.code.gson:gson:2.2.4'
And this to bottom of the app level build.gradle:
apply plugin: 'com.google.gms.google-services'
Next, copy the google-services.json file we downloaded earlier into the app directory under your project. We are now ready to actually develop our specific application using these dependencies.
Finally, we need to add some permissions to our application. Open up the AndroidManifest.xml file and add the following immediately before the <application> tag:
<uses-permission android:name="android.permission.INTERNET"/>
At this point we can run the application and it will display a map.
Note: If you are running this on an emulator then you need to ensure that the emulator is correctly capable of working with the Google Maps API. The “Nexus 5X” with “API 28” works correctly.
Note: if you get a grey screen instead of a map it likely means that the Google Maps API key is not valid or not present. Follow the instructions in
google_maps_api.xmlto set this up.
Displaying the current location
The first thing we want to be able to do is display our current location on the map. This involves requesting permission from the user to determine their location - which we need to know where our ride should pick us up - and then updating the map to display this. All of this is added to the existing MainActivity.
Firstly, update the onMapReady function as follows:
1override fun onMapReady(googleMap: GoogleMap) { 2 mMap = googleMap 3 mMap.isMyLocationEnabled = true 4 mMap.isTrafficEnabled = true 5 }
This simply updates the map to show the My Location and Traffic layers.
Next, add a new method called setupMap as follows:
1private fun setupMap() { 2 val mapFragment = supportFragmentManager 3 .findFragmentById(R.id.map) as SupportMapFragment 4 mapFragment.getMapAsync(this) 5 }
This is the code that is currently in onCreate, but which we will be removing soon.
Next, add a new top-level field to the class called REQUEST_LOCATION_PERMISSIONS:
private val REQUEST_LOCATION_PERMISSIONS = 1001
This is used so that we know in the callback from requesting permissions which call it was - so that an appropriate response can happen.
Next, another new method called onRequestPermissionsResult:
1override fun onRequestPermissionsResult(requestCode: Int, 2 permissions: Array<out String>, 3 grantResults: IntArray) { 4 if (requestCode == REQUEST_LOCATION_PERMISSIONS) { 5 if (grantResults[0] == PackageManager.PERMISSION_GRANTED) { 6 setupMap() 7 } else { 8 Toast.makeText(this, "Location Permission Denied", Toast.LENGTH_SHORT) 9 .show(); 10 } 11 } else { 12 super.onRequestPermissionsResult(requestCode, permissions, grantResults) 13 } 14 }
This is a standard method defined in the FragmentActivity base class that we are extending for our specific case. If the user grants us permission then we move on to our setupMap method we’ve just defined, and if they deny us then we show a message and stop there.
Next, a new method called checkLocationPermissions to actually check if we’ve got permission for accessing the users location already, and if not to request them:
1private fun checkLocationPermissions() { 2 if (checkSelfPermission(android.Manifest.permission.ACCESS_FINE_LOCATION) != PackageManager.PERMISSION_GRANTED) { 3 requestPermissions(arrayOf(android.Manifest.permission.ACCESS_FINE_LOCATION), REQUEST_LOCATION_PERMISSIONS) 4 return 5 } 6 setupMap() 7 }
Finally we update the onCreate method as follows:
1override fun onCreate(savedInstanceState: Bundle?) { 2 super.onCreate(savedInstanceState) 3 setContentView(R.layout.activity_main) 4 5 checkLocationPermissions() 6 }
This starts the whole chain off. When the main activity is first created, we check if we have permission to access the users location. If not we request permission. Then, once permission is granted, we use this fact to allow the user to see where they are on the map.
Requesting a ride
Once we know where the user is, we can allow them to request a ride. This will be done by adding a button to the map that they can click on in order to request their ride, which will then send their current location to our backend.
Firstly, lets add our button to the map. Find and update activity_main.xml as follows:
1<fragment xmlns:android="http://schemas.android.com/apk/res/android" 2 xmlns:map="http://schemas.android.com/apk/res-auto" 3 xmlns:tools="http://schemas.android.com/tools" 4 android:id="@+id/map" 5 android:name="com.google.android.gms.maps.SupportMapFragment" 6 android:layout_width="match_parent" 7 android:layout_height="match_parent" 8 tools:context="com.pusher.pushnotify.ride.MainActivity"> 9 10 <Button 11 android:layout_width="wrap_content" 12 android:layout_height="wrap_content" 13 android:layout_gravity="right|bottom" 14 android:id="@+id/request_ride" 15 android:text="Request Ride" 16 android:padding="10dp" 17 android:layout_marginTop="20dp" 18 android:paddingRight="10dp" 19 android:enabled="false" 20 android:onClick="requestRide" /> 21 22 </fragment>
Note: the value for “tools:context” should match the class name of your main activity class.
Most of this was already present. We are adding the Button element inside the fragment that was already there.
Next we want to only have this button enabled when we have the location of the user. For this we are going to rely on the Map component telling us when it has got the users location. Update the onMapReady method of MainActivity and add this in to the bottom:
1mMap.setOnMyLocationChangeListener { 2 findViewById<Button>(R.id.request_ride).isEnabled = true 3 }
We’re also going to create a new helper method to display a Toast message to the user:
1private fun displayMessage(message: String) { 2 Toast.makeText( 3 this, 4 message, 5 Toast.LENGTH_SHORT).show(); 6 7 }
Finally, we will add the requestRide method that is triggered when the button is clicked. For now this is as follows:
1fun requestRide(view: View) { 2 val location = mMap.myLocation 3 4 val request = JSONObject(mapOf( 5 "latitude" to location.latitude, 6 "longitude" to location.longitude 7 )) 8 mMap.animateCamera(CameraUpdateFactory.newLatLngZoom(LatLng(location.latitude, location.longitude), 15.0f)) 9 10 val client = AsyncHttpClient() 11 client.post(applicationContext, "http://10.0.2.2:8080/request-ride", StringEntity(request.toString()), 12 "application/json", object : TextHttpResponseHandler() { 13 14 override fun onSuccess(statusCode: Int, headers: Array<out Header>, responseString: String) { 15 runOnUiThread { 16 displayMessage("Your ride has been requested") 17 findViewById<Button>(R.id.request_ride).visibility = View.INVISIBLE 18 } 19 } 20 21 override fun onFailure(statusCode: Int, headers: Array<out Header>, responseString: String, throwable: Throwable) { 22 runOnUiThread { 23 displayMessage("An error occurred requesting your ride") 24 } 25 } 26 }); 27 }
Note: The import for
Headermay be ambiguous. Ensure that you selectcz.msebera.android.httpclient.Header
Note: The IP Address “10.0.2.2” is what the Android emulator sees the host machine as. You will want to change this to the real address of the server if you are running this for real.
This builds our JSON message and sends it to the /request-ride endpoint that we built earlier. That in turn will broadcast out to all potential drivers that there is a new job. We then display a message to the rider that their ride has been requested, or else an error if we failed to request the ride. We also hide the Request Ride button when we have successfully requested a ride, so that we can’t request more than one at a time.
Receiving push notifications
The other major feature we need in the riders app is to be able to receive updates from the driver. This includes when a driver has accepted the job, where he is, and when he is ready to pick up or drop off the rider.
All of these notifications work in very similar manner, containing the location of the driver and the action to perform. We want to always update our map to show the position of the driver, and in many cases to display a message to the rider informing them as to what is going on.
Firstly, we need to register with the Pusher Beams service to be able to receive push notifications. Add the following to the onCreate method of MainActivity:
PushNotifications.start(getApplicationContext(), "YOUR_INSTANCE_ID");
Where “YOUR_INSTANCE_ID” is replaced with the value received from the Pusher Beams registration process, and must match the value used in the backend application.
Next we want to actually register to receive notifications from the backend. This is done by updating the o``nSuccess method inside the requestRide method of MainActivity as follows:
1override fun onSuccess(statusCode: Int, headers: Array<out Header>, responseString: String) { 2 PushNotifications.subscribe("rider_$responseString") 3 runOnUiThread { 4 displayMessage("Your ride has been requested") 5 findViewById<Button>(R.id.request_ride).visibility = INVISIBLE 6 } 7 }
This builds an interest string that contains the job ID that we were provided, meaning that we will now receive all rider-focused notifications for this job.
The only thing remaining is to actually handle the notifications. This involves displaying where on the map the driver currently is, and potentially displaying an update message to the rider.
Firstly, add a new field to the MainAction class to store the marker for the drivers location:
private var driverMarker: Marker? = null
This defaults to null until we actually first get a location.
Next, add a new method called updateDriverLocation in the MainActivity class to set the location of the driver, creating the marker if needed:
1private fun updateDriverLocation(latitude: Double, longitude: Double) { 2 val location = LatLng(latitude, longitude) 3 4 if (driverMarker == null) { 5 driverMarker = mMap.addMarker(MarkerOptions() 6 .title("Driver Location") 7 .position(location) 8 ) 9 } else { 10 driverMarker?.position = location 11 } 12 13 mMap.animateCamera(CameraUpdateFactory.newLatLngZoom(location, 17.0f)) 14 }
Finally, add the necessary handler to receive the push notifications and react accordingly. For this, create a new method called onResume in the MainActivity class as follows:
1override fun onResume() { 2 super.onResume() 3 4 PushNotifications.setOnMessageReceivedListenerForVisibleActivity(this, object : PushNotificationReceivedListener { 5 override fun onMessageReceived(remoteMessage: RemoteMessage) { 6 val action = remoteMessage.data["action"] 7 8 runOnUiThread { 9 updateDriverLocation(remoteMessage.data["latitude"]!!.toDouble(), remoteMessage.data["longitude"]!!.toDouble()) 10 11 if (action == "ACCEPT_JOB") { 12 displayMessage("Your ride request has been accepted. Your driver is on their way.") 13 } else if (action == "PICKUP") { 14 displayMessage("Your driver has arrived and is waiting for you.") 15 } else if (action == "DROPOFF") { 16 displayMessage("You are at your destination") 17 findViewById<Button>(R.id.request_ride).visibility = View.VISIBLE 18 } 19 } 20 } 21 }) 22 }
This will call our new method to update the location of the driver on the map, and for selected actions will display a message informing the rider of what is happening. We also re-display the Request Ride button when the drop-off action occurs, so that the rider can use the app again if needed.
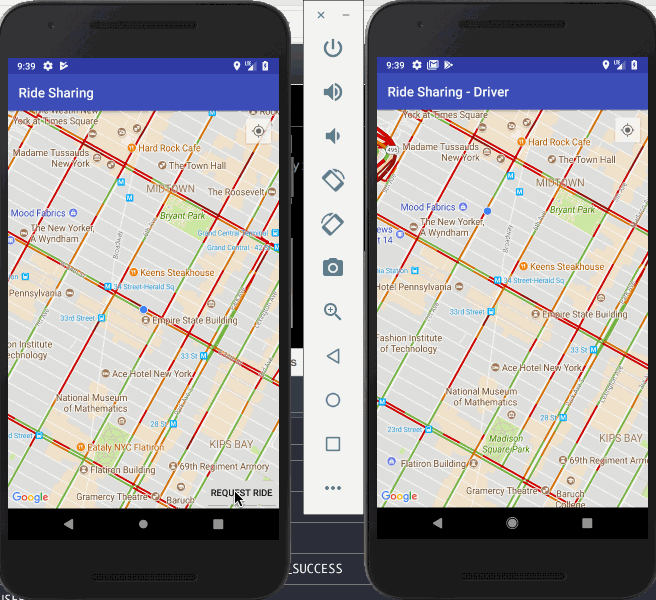
This completes the riders side of the application, allowing them to do everything they need to for the ride:

Building the drivers application
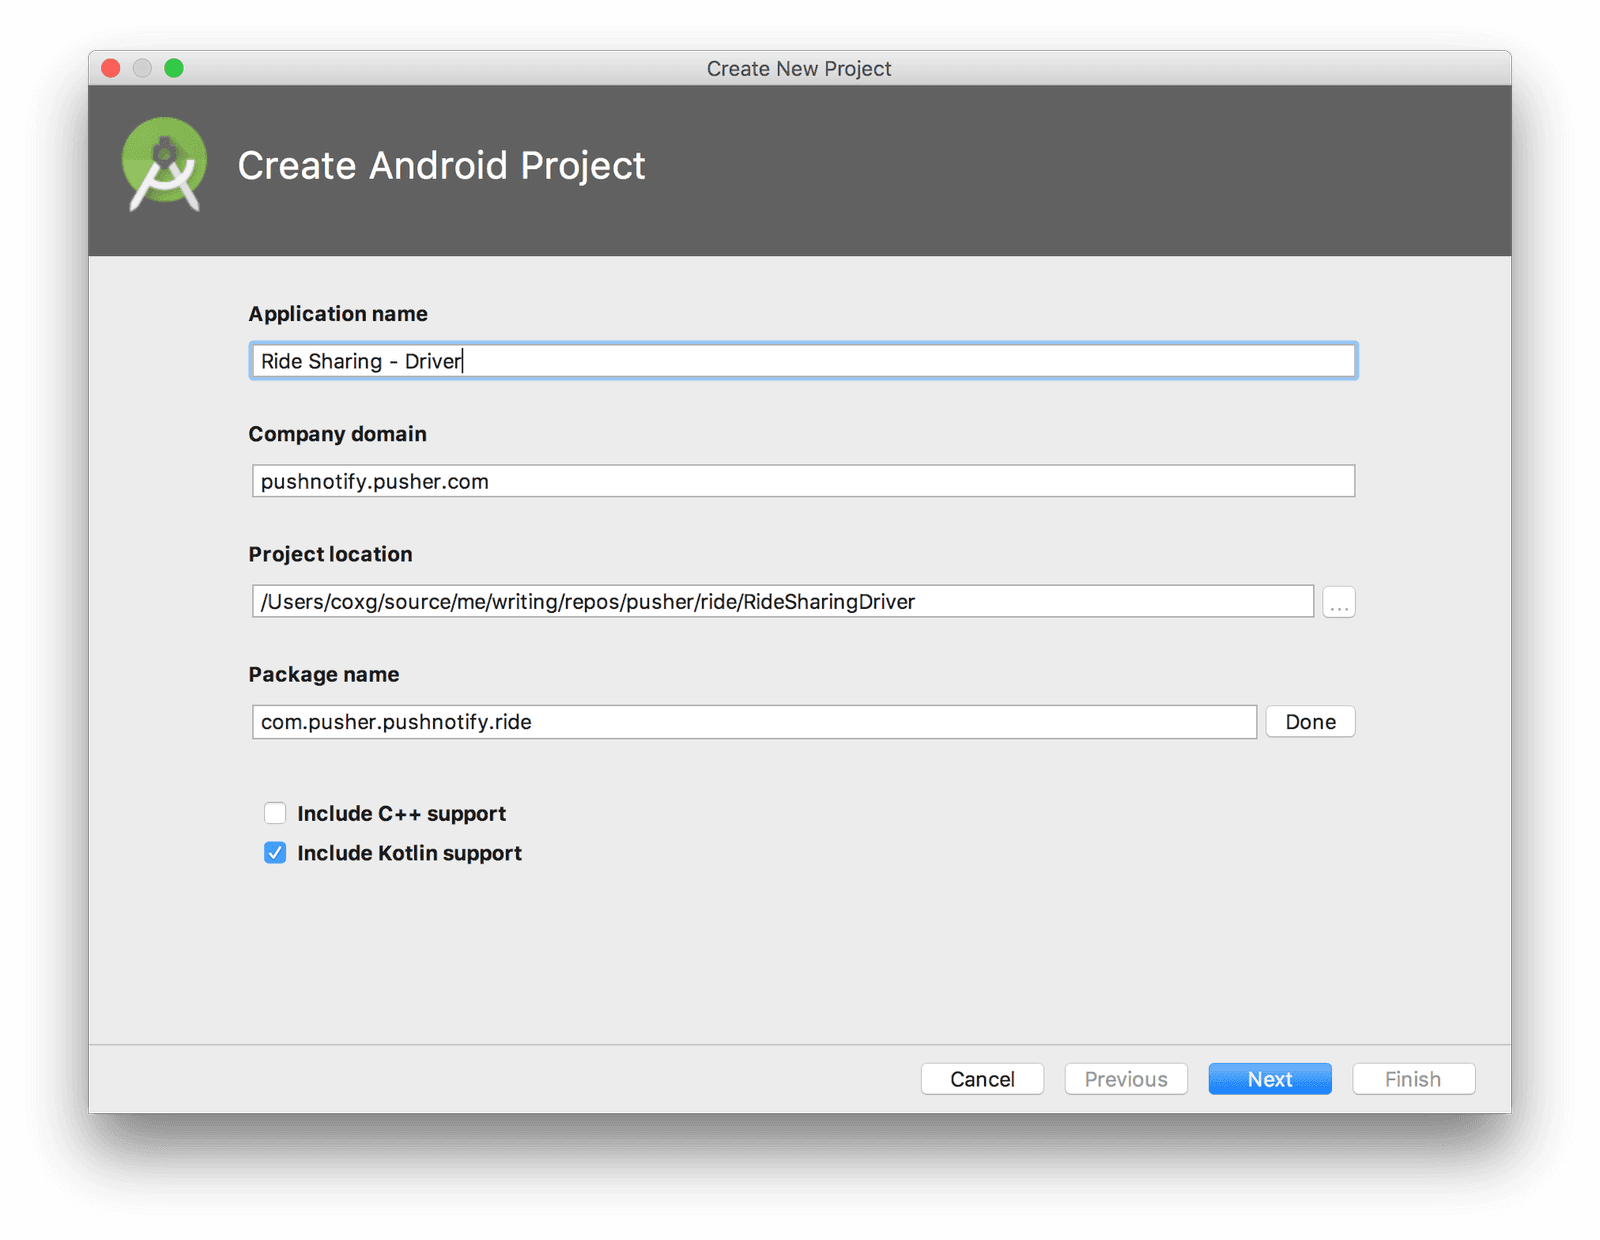
The driver Android application will also be built in Kotlin, using Android Studio. To start, open up Android Studio and create a new project, entering some appropriate details and ensuring that you select the Include Kotlin support option. Note that the Package name must match that specified when you set up the FCM Server Key earlier.
Note: these instructions are almost exactly the same as for the riders app, but are repeated here for ease of following along.
Then on the next screen, ensure that you select support for Phone and Tablet using at least API 23:
Ensure that an Google Maps Activity is selected:
And set the Activity Name to “MainActivity” and Layout Name to “activity_main”:

Once the project opens, you will be presented with the file google_maps_api.xml with instructions on how to get a Google Maps API key. Follow these instructions to get a key to use in the application. This can not be the same key as for the rider application since they are tied to the actual Android application that is using it. It should belong to the same Google project however.
Next we need to add some dependencies to our project to support Pusher. Add the following to the project level build.gradle, in the existing dependencies section:
classpath 'com.google.gms:google-services:3.2.1'
Then add the following to the dependencies section of the app level build.gradle:
1implementation 'com.google.firebase:firebase-messaging:15.0.0' 2 implementation 'com.pusher:push-notifications-android:0.10.0' 3 4 compile 'com.loopj.android:android-async-http:1.4.9' 5 compile 'com.google.code.gson:gson:2.2.4'
And this to bottom of the app level build.gradle:
apply plugin: 'com.google.gms.google-services'
Next, copy the google-services.json file we downloaded earlier into the app directory under your project. We are now ready to actually develop our specific application using these dependencies.
Finally, we need to add some permissions to our application. Open up the AndroidManifest.xml file and add the following immediately before the <application> tag:
<uses-permission android:name="android.permission.INTERNET"/>
At this point we can run the application and it will display a map.
Note: If you are running this on an emulator then you need to ensure that the emulator is correctly capable of working with the Google Maps API. The “Nexus 5X” with “API 28” works correctly.
Note: if you get a grey screen instead of a map it likely means that the Google Maps API key is not valid or not present. Follow the instructions in
google_maps_api.xmlto set this up.
Displaying the current location
The first thing we want to be able to do is display our current location on the map. This involves requesting permission from the user to determine their location - which we need to know where our ride should pick us up - and then updating the map to display this. All of this is added to the existing MainActivity.
Note: this is all exactly the same as for the riders application, but is repeated here for ease of following along.
Firstly, update the onMapReady function as follows:
1override fun onMapReady(googleMap: GoogleMap) { 2 mMap = googleMap 3 mMap.isMyLocationEnabled = true 4 mMap.isTrafficEnabled = true 5 }
This simply updates the map to show the My Location and Traffic layers.
Next, add a new method called setupMap as follows:
1private fun setupMap() { 2 val mapFragment = supportFragmentManager 3 .findFragmentById(R.id.map) as SupportMapFragment 4 mapFragment.getMapAsync(this) 5 }
This is the code that is currently in onCreate, but which we will be removing soon.
Next, add a new top-level field to the class called REQUEST_LOCATION_PERMISSIONS:
private val REQUEST_LOCATION_PERMISSIONS = 1001
This is used so that we know in the callback from requesting permissions which call it was - so that an appropriate response can happen.
Next, another new method called onRequestPermissionsResult:
1override fun onRequestPermissionsResult(requestCode: Int, 2 permissions: Array<out String>, 3 grantResults: IntArray) { 4 if (requestCode == REQUEST_LOCATION_PERMISSIONS) { 5 if (grantResults[0] == PackageManager.PERMISSION_GRANTED) { 6 setupMap() 7 } else { 8 Toast.makeText(this, "Location Permission Denied", Toast.LENGTH_SHORT) 9 .show(); 10 } 11 } else { 12 super.onRequestPermissionsResult(requestCode, permissions, grantResults) 13 } 14 }
This is a standard method defined in the FragmentActivity base class that we are extending for our specific case. If the user grants us permission then we move on to our setupMap method we’ve just defined, and if they deny us then we show a message and stop there.
Next, a new method called checkLocationPermissions to actually check if we’ve got permission for accessing the users location already, and if not to request them:
1private fun checkLocationPermissions() { 2 if (checkSelfPermission(android.Manifest.permission.ACCESS_FINE_LOCATION) != PackageManager.PERMISSION_GRANTED) { 3 requestPermissions(arrayOf(android.Manifest.permission.ACCESS_FINE_LOCATION), REQUEST_LOCATION_PERMISSIONS) 4 return 5 } 6 setupMap() 7 }
Finally we update the onCreate method as follows:
1override fun onCreate(savedInstanceState: Bundle?) { 2 super.onCreate(savedInstanceState) 3 setContentView(R.layout.activity_main) 4 5 checkLocationPermissions() 6 }
This starts the whole chain off. When the main activity is first created, we check if we have permission to access the users location. If not we request permission. Then, once permission is granted, we use this fact to allow the user to see where they are on the map.
Receive notifications of new jobs
Now that we can show the driver where they are on the map, we want to show them where the potential riders are and allow them to accept a job.
Firstly, we need to register with the Pusher Beams service to be able to receive push notifications, and then subscribe to the driver_broadcast interest to be told about the jobs. Add the following to the onCreate method of MainActivity:
1PushNotifications.start(getApplicationContext(), "YOUR_INSTANCE_ID"); 2 PushNotifications.subscribe("driver_broadcast")
Where “YOUR_INSTANCE_ID” is replaced with the value received from the Pusher Beams registration process, and must match the value used in the backend application.
Next, add a method to display a message to the user when we need to inform them of something. Create the method displayMessage in the MainActivity class as follows:
1private fun displayMessage(message: String) { 2 Toast.makeText( 3 this, 4 message, 5 Toast.LENGTH_SHORT).show(); 6 }
Next, add a new top level field into the MainActivity class to store the markers that we are placing:
private val markers = mutableMapOf<String, Marker>()
Next, we add a listener so that when we are notified about a job we can place a pin on the map showing where the rider is. For this, add a new onResume method to the MainActivity class as follows:
1override fun onResume() { 2 super.onResume() 3 4 PushNotifications.setOnMessageReceivedListenerForVisibleActivity(this, object : PushNotificationReceivedListener { 5 override fun onMessageReceived(remoteMessage: RemoteMessage) { 6 val action = remoteMessage.data["action"] 7 8 runOnUiThread { 9 if (action == "NEW_JOB") { 10 val jobId = remoteMessage.data["job"]!! 11 val location = LatLng(remoteMessage.data["latitude"]!!.toDouble(), remoteMessage.data["longitude"]!!.toDouble()) 12 13 val marker = mMap.addMarker(MarkerOptions() 14 .position(location) 15 .title("New job")) 16 marker.tag = jobId 17 markers[jobId] = marker 18 19 displayMessage("A new job is available") 20 } 21 } 22 } 23 }) 24 }
We are setting the tag on the marker to the ID of the job that has turned up. This will be used next to allow the driver to accept the job. We are also storing the marker in a map so that we can look it up later by ID.
Accepting a job
Accepting a job is going to be done by clicking on a marker. Once done, the app will send a message to the backend to accept the job, and will start sending regular messages with the drivers location. It will also allow for a Pickup and Dropoff button to be displayed for the driver to click as appropriate.
Firstly, add a new top-level field to the MainActivity class to store the ID of the current job:
private var currentJob: String? = null
Next, update the onMapReady method to add a handler for clicking on a marker. This will send the HTTP request to our backend to accept the job, and record the fact in the application that this is now the current job.
1mMap.setOnMarkerClickListener { marker -> 2 if (currentJob != null) { 3 runOnUiThread { 4 displayMessage("You are already on a job!") 5 } 6 } else { 7 8 val jobId = marker.tag 9 10 val location = mMap.myLocation 11 12 val request = JSONObject(mapOf( 13 "latitude" to location.latitude, 14 "longitude" to location.longitude 15 )) 16 17 val client = AsyncHttpClient() 18 client.post(applicationContext, "http://10.0.2.2:8080/accept-job/$jobId", StringEntity(request.toString()), 19 "application/json", object : TextHttpResponseHandler() { 20 21 override fun onSuccess(statusCode: Int, headers: Array<out Header>, responseString: String) { 22 runOnUiThread { 23 displayMessage("You have accepted this job") 24 currentJob = jobId as String 25 } 26 } 27 28 override fun onFailure(statusCode: Int, headers: Array<out Header>, responseString: String, throwable: Throwable) { 29 runOnUiThread { 30 displayMessage("An error occurred accepting this job") 31 } 32 } 33 }); 34 } 35 36 true 37 }
Note: The import for
Headermay be ambiguous. Ensure that you selectcz.msebera.android.httpclient.Header
Removing old jobs from the map
We also want to tidy up the map when a job is accepted, removing markers from every drivers map - including the driver that accepted the job - but adding a new one in a different colour back to the local drivers map.
Firstly, add another new field to the MainActivity class for the marker of the job we are currently on:
private var currentJobMarker: Marker? = null
Next, update the onMessageReceived callback inside the onResume method of MainActivity as follows:
1override fun onMessageReceived(remoteMessage: RemoteMessage) { 2 val action = remoteMessage.data["action"] 3 4 runOnUiThread { 5 if (action == "NEW_JOB") { 6 val jobId = remoteMessage.data["job"]!! 7 val location = LatLng(remoteMessage.data["latitude"]!!.toDouble(), remoteMessage.data["longitude"]!!.toDouble()) 8 9 val marker = mMap.addMarker(MarkerOptions() 10 .position(location) 11 .title("New job")) 12 marker.tag = jobId 13 markers[jobId] = marker 14 15 displayMessage("A new job is available") 16 } else if (action == "ACCEPTED_JOB") { 17 val jobId = remoteMessage.data["job"]!! 18 val location = LatLng(remoteMessage.data["latitude"]!!.toDouble(), remoteMessage.data["longitude"]!!.toDouble()) 19 20 markers[jobId]?.remove() 21 markers.remove(jobId) 22 } 23 } 24 }
Here we are adding the block to handle the ACCEPTED_JOB event alongside the NEW_JOB event. This is broadcast out to every driver when any driver accepts a job, and is used to remove the markers indicating a job is waiting for pickup.
Finally, add the following in to the onSuccess handler in the onMapReady method of MainActivity:
1val selectedJobMarker = markers[jobId]!! 2 val marker = mMap.addMarker(MarkerOptions() 3 .position(selectedJobMarker.position) 4 .icon(BitmapDescriptorFactory.defaultMarker(BitmapDescriptorFactory.HUE_AZURE)) 5 .title("Current job")) 6 marker.tag = jobId 7 8 currentJobMarker = marker
This adds a new marker to the map, coloured blue instead of the default red, to indicate the job that we are actively on.
Picking up and dropping off
In order to pick up and drop off the rider, we need to add UI controls to support this. We are going to add buttons that appear on the map at appropriate times to allow the driver to indicate that he’s ready for pickup and for dropoff.
Firstly, update activity_main.xml as follows to add the buttons:
1<fragment xmlns:android="http://schemas.android.com/apk/res/android" 2 xmlns:map="http://schemas.android.com/apk/res-auto" 3 xmlns:tools="http://schemas.android.com/tools" 4 android:id="@+id/map" 5 android:name="com.google.android.gms.maps.SupportMapFragment" 6 android:layout_width="match_parent" 7 android:layout_height="match_parent" 8 tools:context="com.pusher.pushnotify.ride.MainActivity"> 9 10 <Button 11 android:layout_width="wrap_content" 12 android:layout_height="wrap_content" 13 android:layout_gravity="right|bottom" 14 android:id="@+id/pickup_ride" 15 android:text="Pickup" 16 android:padding="10dp" 17 android:layout_marginTop="20dp" 18 android:paddingRight="10dp" 19 android:visibility="invisible" 20 android:onClick="pickupRide" /> 21 22 <Button 23 android:layout_width="wrap_content" 24 android:layout_height="wrap_content" 25 android:layout_gravity="right|bottom" 26 android:id="@+id/dropoff_ride" 27 android:text="Dropoff" 28 android:padding="10dp" 29 android:layout_marginTop="20dp" 30 android:paddingRight="10dp" 31 android:visibility="invisible" 32 android:onClick="dropoffRide" /> 33 34 </fragment>
These buttons are initially invisible, but we will display them as necessary in the application.
Next, update the onSuccess method inside of onMapReady to ensure the correct buttons are displayed. This should now look like:
1override fun onSuccess(statusCode: Int, headers: Array<out Header>, responseString: String) { 2 runOnUiThread { 3 displayMessage("You have accepted this job") 4 currentJob = jobId as String 5 findViewById<Button>(R.id.dropoff_ride).visibility = View.INVISIBLE 6 findViewById<Button>(R.id.pickup_ride).visibility = View.VISIBLE 7 } 8 }
Finally, we add the handlers for these buttons. First the one to pick up the rider. Add a new method called pickupRide as follows:
1fun pickupRide(view: View) { 2 val location = mMap.myLocation 3 4 val request = JSONObject(mapOf( 5 "latitude" to location.latitude, 6 "longitude" to location.longitude 7 )) 8 9 val client = AsyncHttpClient() 10 client.post(applicationContext, "http://10.0.2.2:8080/pickup/$currentJob", StringEntity(request.toString()), 11 "application/json", object : TextHttpResponseHandler() { 12 13 override fun onSuccess(statusCode: Int, headers: Array<out Header>, responseString: String?) { 14 runOnUiThread { 15 findViewById<Button>(R.id.dropoff_ride).visibility = View.VISIBLE 16 findViewById<Button>(R.id.pickup_ride).visibility = View.INVISIBLE 17 currentJobMarker?.remove() 18 currentJobMarker = null 19 } 20 } 21 22 override fun onFailure(statusCode: Int, headers: Array<out Header>, responseString: String, throwable: Throwable) { 23 runOnUiThread { 24 displayMessage("An error occurred picking up your ride") 25 } 26 } 27 }); 28 }
This will make the call to the backend, and on success will cause the Pickup button to be hidden and the Dropoff button to be displayed. It also removes the blue marker for the current job, since we have just picked them up.
Next the handler for dropping off the rider. Add another new method called dropoffRide as follows:
1fun dropoffRide(view: View) { 2 val location = mMap.myLocation 3 4 val request = JSONObject(mapOf( 5 "latitude" to location.latitude, 6 "longitude" to location.longitude 7 )) 8 9 val client = AsyncHttpClient() 10 client.post(applicationContext, "http://10.0.2.2:8080/dropoff/$currentJob", StringEntity(request.toString()), 11 "application/json", object : TextHttpResponseHandler() { 12 13 override fun onSuccess(statusCode: Int, headers: Array<out Header>, responseString: String?) { 14 runOnUiThread { 15 findViewById<Button>(R.id.dropoff_ride).visibility = View.INVISIBLE 16 findViewById<Button>(R.id.pickup_ride).visibility = View.INVISIBLE 17 currentJob = null 18 } 19 } 20 21 override fun onFailure(statusCode: Int, headers: Array<out Header>, responseString: String, throwable: Throwable) { 22 runOnUiThread { 23 displayMessage("An error occurred dropping off your ride") 24 } 25 } 26 }); 27 }
Sending location updates
The final thing that we need to do is have the driver application send updates about its location so that the rider can be updated.
This involves using the phones GPS to get updates every time the phone moves, and sending these updates to the backend - but only if we are currently on a job.
In order to do this, add the following to the bottom of the setupMap method in MainActivity. This is used because it’s called already once we know we have permission to get the devices location.
1val locationManager = applicationContext.getSystemService(LocationManager::class.java) 2 locationManager.requestLocationUpdates(LocationManager.GPS_PROVIDER, 100, 0.0f, object : LocationListener { 3 override fun onLocationChanged(location: Location) { 4 if (currentJob != null) { 5 val request = JSONObject(mapOf( 6 "latitude" to location.latitude, 7 "longitude" to location.longitude 8 )) 9 10 val client = AsyncHttpClient() 11 client.post(applicationContext, "http://10.0.2.2:8080/update-location/$currentJob", StringEntity(request.toString()), 12 "application/json", object : TextHttpResponseHandler() { 13 14 override fun onSuccess(statusCode: Int, headers: Array<out Header>, responseString: String?) { 15 } 16 17 override fun onFailure(statusCode: Int, headers: Array<out Header>, responseString: String, throwable: Throwable) { 18 } 19 }); 20 21 } 22 } 23 24 override fun onStatusChanged(provider: String?, status: Int, extras: Bundle?) { 25 26 } 27 28 override fun onProviderEnabled(provider: String?) { 29 30 } 31 32 override fun onProviderDisabled(provider: String?) { 33 34 } 35 }, null)
Note: it’s likely that Android Studio will complain about having not performed the correct permissions checks. This error is actually wrong, except that Android Studio can’t tell that because of the way the methods are structured.
Note: we have a number of empty methods here. They are required to be defined by the calling class, but we don’t actually have any need for them.
At this point, we have a fully working application suite that allows riders to request rides, and drivers to pick them up and drop them off. Remember to run your backend application before you launch the Android apps, and then we can test them out working together.
Conclusion
This article shows how to use Pusher Beams along with the location and maps functionality of your phone to give a truly interactive experience of requesting a ride. We have painlessly implemented the sending of appropriate details from one device to another, keeping both parties updated to the current job.
The full source code for this application is available on GitHub. Why not try extending it yourself. There are many additional things that can be added very easily using Pusher technology to improve the application even further.


© 2026 Pusher Ltd. All rights reserved.
Pusher Limited is a company registered in England and Wales (No. 07489873) whose registered office is at MessageBird UK Limited, 3 More London Riverside, 4th Floor, London, United Kingdom, SE1 2AQ.