- Products

- Developers
- User stories
- Blog
- Pricing

Getting started with Flutter - Part 2: Creating your first app
- Introduction
- Prerequisites
- App Overview
- Setting up Flutter
- General Setup
- Mac OS setup
- General setup
- Android-specific setup
- iOS-specific setup
- Installing on Windows
- Android-specific setup
- Installing on Ubuntu
- Android-specific setup
- Building the hello world app
- Directory structure
- Running the app
- Hello world app
- Building the dog lister app
- Directory structure
- Entry point file
- Initializing the main app file
- Dog model
- CardList widget
- Bringing everything together
- Conclusion
Introduction
This is the second part of a two-part series on getting started with Flutter. You can find part one here. In this part, we’ll be setting up our machine for Flutter development and create a simple app.
Prerequisites
This tutorial assumes no previous knowledge of Flutter. Though you need to have previous programming experience in order to follow along. Specifically, you need to know basic object-oriented programming concepts such as variables, conditionals, loops, classes, and objects.
Knowledge of the Dart language is optional. If you’ve done any sort of programming work previously, the syntax should be easy to pick up.
JavaScript knowledge will be helpful as well, especially ES6 features.
We’ll be setting up the development environment in this tutorial so your machine doesn’t need to have Flutter installed already. This tutorial assumes that you know your way around the operating system you’re using. This means you should know how to add environment variables, and install different pieces of software.
App Overview
We’re going to build a dog lister app. Here’s what the final output will look like:
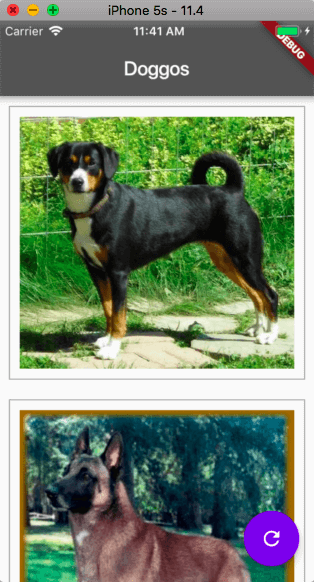
As you might already imagine, this app allows the user to view a list of dog photos. They can click on the floating action button to load a new photo which will get appended to the end of the list.
You can find the full source code of the app on this GitHub repo.
Setting up Flutter
In this section, we’ll be setting up Flutter. There are sub-sections for the general setup, Android-specific, and iOS-specific setup. Note that you cannot develop for iOS if you’re on Windows or Linux. If you’re on Mac, you can develop both Android and iOS apps. This tutorial was tested on Windows 7, Ubuntu 16.04, and Mac OS High Sierra. But it should work as well if you’re using any other flavors or versions of those operating systems.
General Setup
These are the steps you need to follow regardless of the operating system you’re using.
- Install Git and set up a user account.
- Install Android Studio. Setting it up should be fairly straightforward. It will also prompt you to install the essential packages so I’m no longer going to go into details. Once installed, make sure the following platforms and SDK tools are installed:
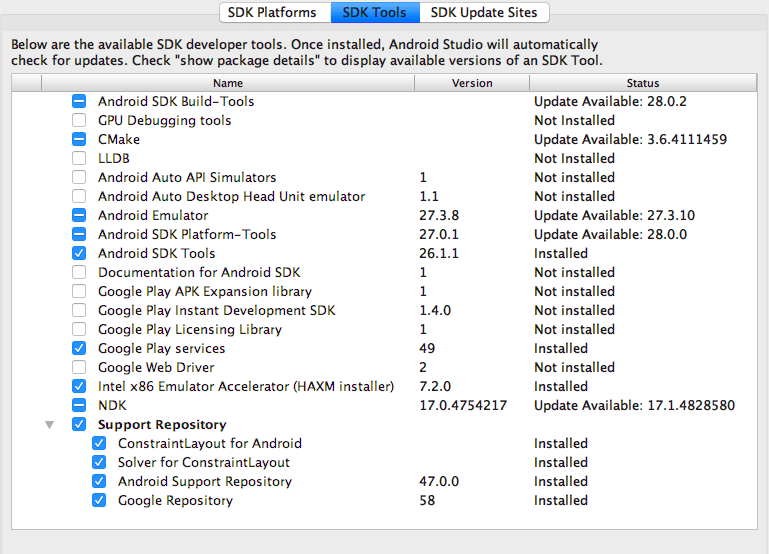 These are the build tools in text form:
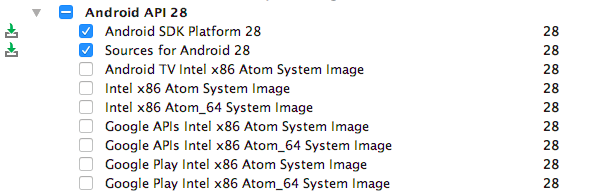
- CMake
- Android Emulator
- Android SDK Platform - Tools
- Android SDK Tools
- Google Play services
- Intel x86 Emulator Accelerator
- NDK
- Support Repository
As for the Android platform, the only requirement is the Android SDK Platform 28.
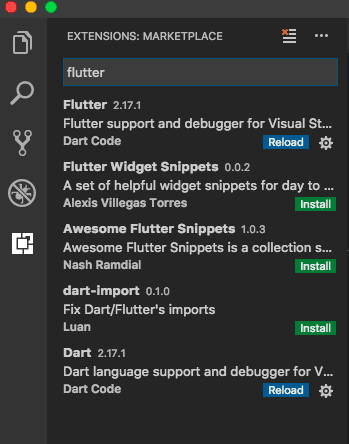
- Install Visual Studio Code. After that, install the Flutter extension. Installing the Flutter extension will install Dart extension as well:
- Download and install Genymotion emulator. You can also use the Android emulator in Android Studio if you want, but we’ll be using Genymotion in this tutorial. As for the virtual device, I had good luck with devices using API 19 and above.
- Flutter will also require the Flutter and Dart plugin for Android Studio, you can install those if you want but we’re not really going to use Android Studio in this tutorial so you can skip it. If you want to use Android Studio then go to Preferences → Plugins then click on Browse Repositories, search for “Flutter” and install it. This will ask you to install Dart as well so just agree.
Mac OS setup
This section shows the steps to follow to setup Flutter on Mac. Mac OS High Sierra version 10.13.6 was used for testing. But it should also work if you have a lower or higher version of High Sierra installed.
General setup
These are the general steps in setting up Flutter on Mac OS.
- Make sure that you have curl, and unzip installed. You can install these via Homebrew if you don’t already have them.
- Download the Flutter SDK from here. At the time of writing this tutorial, the most recent version is 0.6.0. Always stick with the latest available version.
- Extract the zip file using the
unzipcommand or the archive manager that you have on your machine:
unzip ~/Downloads/flutter_macos_v0.6.0-beta.zip
-
Copy the
flutterfolder to where you store your development tools. Mine is in the root of my user directory. -
Open your bash profile and add Flutter to your path:
1nano ~/.bash_profile # open bash profile 2 export PATH=/Users/$USER/flutter/bin:$PATH # add this with the rest of your exports
- Source your bash profile for the changes to take effect:
source ~/.bash_profile
Android-specific setup
If you want to develop Android apps with Flutter, here are the steps:
-
Run
flutter doctorto check what else your system lacks before you can start developing apps in Flutter. Mine looks like this: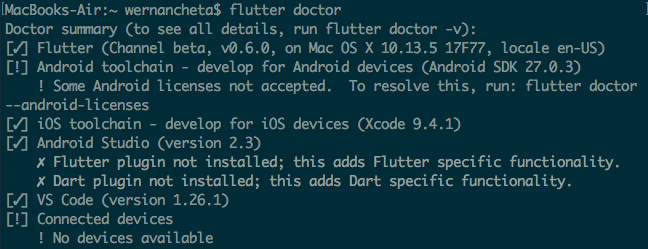
-
After that, all you need to do is run
flutter doctor --android-licensesand accepting the licenses by responding withyto each of the questions asked.
iOS-specific setup
Follow these steps if you want to develop iOS apps with Flutter.
- If you want to develop iOS apps with Flutter, install the latest stable version of Xcode via the App Store.
- Configure the Xcode command-line tools:
sudo xcode-select --switch /Applications/Xcode.app/Contents/Developer
- Accept the license agreement:
sudo xcodebuild -license
Installing on Windows
Follow these steps if you’re using Windows. This was specifically tested on Windows 7 so there’s a high chance that it will work on higher versions of the OS as well.
Android-specific setup
- Download the latest copy of the Flutter SDK from the SDK Archive page for Windows. At the time of writing this tutorial, the latest is version 0.6.0.
- Once downloaded, extract the zip file and copy the resulting
flutterfolder to yourC:drive. After copying, the resulting path should beC:\flutterand there should be aflutter_console.batfile at the root of that directory. - Double-click on the
flutter_console.batfile insideC:\flutter. This should open a new command line window. Runflutter doctorto check which system requirement you’re still lacking to develop Flutter apps. In my case, it required me to accept the licenses for Android by runningflutter doctor --android-licensesand responding withy(yes) to all the licenses. flutter doctorshould also complain about not having a connected device. To solve this, boot up the Genymotion or Android emulator and runflutter doctoragain.- The requirement for the Flutter and Dart plugin for Android Studio is optional because we’re not really going to use Android Studio to write code in this tutorial.
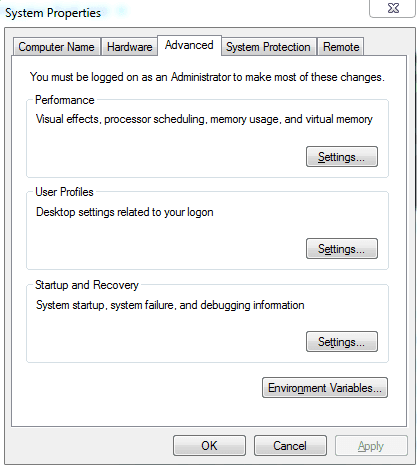
- Go to your advanced system settings. You can find this one either in the Control Panel or right-clicking on Computer and select System properties. Once you see a window similar to the one below, click on Environment Variables:
- Under User Variables, edit the
Pathvariable:
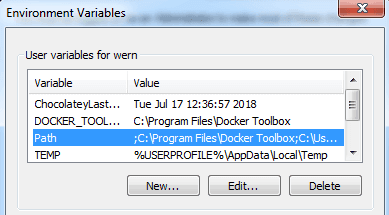
- Append
;C:\flutter\binafter the last value. Mine looks like this after adding the path to Flutter:
;C:\Program Files\Docker Toolbox;C:\Users\wern\AppData\Roaming\npm;C:\Users\wern\AppData\Local\Programs\Microsoft VS Code\bin;C:\flutter\bin
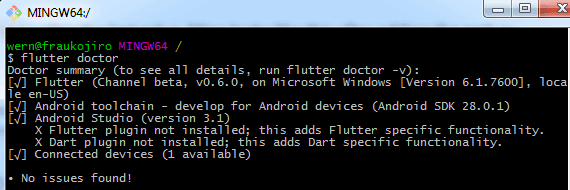
- Save the changes. This will allow you to execute any Flutter command from either the default command line, PowerShell, or Git Bash. I personally prefer Git Bash because its character set doesn’t mess up the check mark and it’s a whole lot more readable than the other two:
Installing on Ubuntu
Follow these steps if you’re on Ubuntu or any Linux distribution. Just execute the equivalent command for your particular flavor of Linux if it’s different. Ubuntu 16.04 LTS is used for testing.
Android-specific setup
- Before anything else, make sure to update the packages installed on your operating system first. You can do so by opening the software updater and installing all the relevant updates. Alternatively, you can also run
sudo apt-get updatefrom the terminal. - Download the latest version of the Flutter SDK from the SDK archives page. At the time of writing this tutorial, the most recent version is 0.6.0.
- Extract the
.tar.xzfile in the root of your home directory. For me, it’s in/home/wern/flutter, where theflutterdirectory is the extracted folder containing aflutter_console.batfile in its root. - Update the
.bash_profilefile to include the path to theflutter/binfolder. Make sure you have the Android paths in there as well:
1export ANDROID_HOME=$HOME/Android/Sdk 2 export PATH=$PATH:$ANDROID_HOME/tools 3 export PATH=$PATH:$ANDROID_HOME/tools/bin 4 export PATH=$PATH:$ANDROID_HOME/platform-tools 5 6 export PATH=$HOME/flutter/bin:$PATH
- Run
flutter doctorto check your system for software requirements. If you followed the general setup, the only thing left for you to do is executeflutter doctor --android-licensesto accept the Android licenses. Just respond withyto all of those to accept it.
Building the hello world app
Start by generating a new Flutter app:
flutter create doglister
Directory structure
Once the project is created, drag it into VS code. We’re using VS code because it has the most complete Flutter support (Dart syntax, code completion, debugging tools).
By default, you should see the following directory structure:
android- where Android-related files are stored. If you’ve done any sort of cross-platform mobile app development before, this, along with theiosfolder should be pretty familiar.ios- where iOS-related files are stored.lib- this is where you’ll be working on most of the time. By default, it contains amain.dartfile, this is the entry point file of the Flutter app.test- this is where you put the unit testing code for the app. We won’t really be working on it in this tutorial.pubspec.yaml- this file defines the version and build number of your app. It’s also where you define your dependencies. If you’re coming from a web development background, this file has the same job description as thepackage.jsonfile so you can define the external packages (from the Dart packages website) you want to use in here.
Note that I’ve skipped on other folders and files because most of the time you won’t really need to touch them.
Running the app
Next, open an iOS simulator or Android emulator and run the app once it has completely booted:
flutter run
The command above detects any running instance of an Android or iOS simulator so it should automatically pick up the one you launched beforehand.
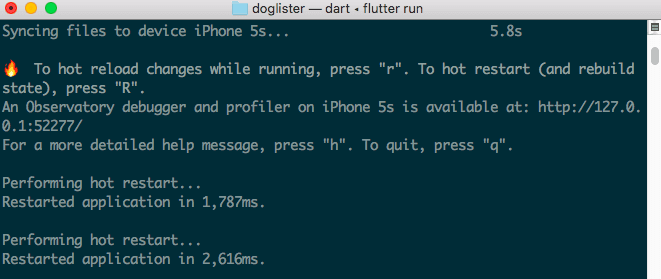
Anytime you make a change to the code and you want to preview the change, simply hit the r key while in the terminal window. This hot reloads the app but the state will still be retained. But if you notice that the change doesn’t appear, you might need to hit the Shift + R key to hot restart the app. Note that this wouldn’t retain the app state like hot reload does.
If you find it cumbersome to be hitting the r key each time you make a change, consider going into debug mode in Visual Studio code. You can do that by going to Debug → Start Debugging, or simply hit Ctrl + Shift + F5 or ⌘ + Shift + F5 on your keyboard. While on debug mode, everytime you hit save, the app is hot reloaded so you don’t have to go back and forth between your text editor, simulator, and the terminal while you’re working.
Hello world app
The code that comes with the Flutter starter app is a bit complicated, so we’ll stick with the same hello world app from this CodeLab first. Open the lib/main.dart file in the project directory and put the following code:
1import 'package:flutter/material.dart'; // import the material package 2 3 void main() => runApp(MyApp()); // render the MyApp widget 4 5 // define a stateless widget 6 class MyApp extends StatelessWidget { 7 @override // override the build method from the StatelessWidget 8 Widget build(BuildContext context) { // define the method for rendering the app 9 return MaterialApp( 10 title: 'Welcome to Flutter', // the title of the app 11 home: Scaffold( // specify the screen structure 12 // the app's header 13 appBar: AppBar( // the widget for rendering an app header 14 title: Text('Welcome to Flutter'), // the header text 15 ), 16 // the contents of the body 17 body: Center( // center the contents 18 child: Text('Hello World'), // render some text 19 ), 20 ), 21 ); 22 } 23 }
To have a better understanding of what’s going on, let’s break down the code above.
First, we import the Material library from Flutter:
import 'package:flutter/material.dart';
This allows us to use widgets that implement Material Design. Among those are the MaterialApp, Scaffold, and AppBar widgets that we’re using above. The methods that we’re using are either part of a library you’ve imported, or part of the Flutter framework itself.
Note that almost everything in Flutter is a widget, and each one can have its own set of properties and child widgets. So Center and Text are also widgets.
For most packages, you’ll have to search for it on the Dart packages website and add it to your pubspec.yaml file:
But in this case, the library that we’re working with is a part of Flutter. When we create a new app with flutter create, the Flutter library is already installed, and with that, the material library among others is also installed.
Next, we define the main method. If you’ve worked with languages such as Java, this method should look familiar. This is the entry point of the whole program so it must always be defined if you want to render something on the screen:
void main() => runApp(MyApp())
But what about the fat-arrow (=>)? If you’re familiar with ES6 features in JavaScript, this is pretty much the same. It’s just a more concise way of defining functions, so we’re actually running the runApp() function inside the main() function. This function makes the MyApp widget the root of the widget tree. This effectively renders the widget, along with its children into the screen.
In Flutter, there are two types of widget that you’ll commonly work with: stateless and stateful. The difference between the two is that stateless widgets don’t manage it’s own internal state, while a stateful widget does. For example, a button widget doesn’t need to keep track of anything internally while a counter widget needs to keep track of its current count because it needs it for display. In our case, we’re creating a stateless widget because all we need to do is render something on the screen. To create a stateless widget, you need to extend the StatelessWidget class:
1class MyApp extends StatelessWidget { 2 // ... 3 }
That class requires you to override its build method which should return the actual contents of the widget. In this case, we’re using the MaterialApp widget as a wrapper. This allows us to easily implement Material Design for the widgets that we’re going to render as its child:
1@override 2 Widget build(BuildContext context) { 3 return MaterialApp( 4 title: 'Welcome to Flutter', 5 home: Scaffold( 6 ... 7 ), 8 ); 9 }
Note that the MaterialApp widget doesn’t only allow us to use the Material Design theme, it also handles navigation and navigation animations. So the home property actually allows us to define the widget to render on the home route. For that, we’re using the Scaffold widget which provides the structure for the layout that we’re trying to build.
The Scaffold widget accepts the appBar (app header) and the body (main content of the app):
1appBar: AppBar( 2 title: Text('Welcome to Flutter'), 3 ), 4 body: Center( 5 child: Text('Hello World'), 6 ),
Those are the basics of building the UI in Flutter. Basically, everything in Flutter is a widget. There are widgets used for specifying the UI structure (for example, Scaffold). There are also widgets that allow you to render something on the screen (for example, Text). Each widget can have their own child, and those child widgets can also have their own children and so on. The only caveat is that some widgets won’t accept just any child. For example, widgets like the Scaffold only accept a handful of widget types.
If you’re like me and you’re coming from a framework like React Native, then you must be thinking that it’s a whole lot of work! And I agree with you. Building the UI of the app will definitely take longer especially if you’re just starting out. But once you get used to it, you’ll be productive in no time. This is where the documentation really shines because everything you need is literally just one search away.
Building the dog lister app
Now it’s time for us to build the app that we’ve set out to build, the dog lister app. For this, we’ll be using the same Flutter project that we created earlier.
Directory structure
First, let’s talk about the directory structure. We’ll be following the default directory structure set by Flutter, but we’re going to add a few folders inside the lib directory as well:
1- `src` 2 - `models` 3 - `dog_model.dart` 4 - `widgets` 5 - `card_list.dart` 6 - `app.dart` 7- `main.dart`
Go ahead and create those folders and files. Feel free to consult the GitHub repo as a basis.
Entry point file
Open the lib/main.dart file and replace the existing contents with the following:
1import 'package:flutter/material.dart'; // import the material library 2 import 'src/app.dart'; // import the app.dart local file 3 void main() { 4 runApp(App()); 5 }
All of these lines should look familiar except for the second line if you haven’t previously worked with relative linking. In the first line, we’re trying to link a Flutter package, thus the package: prefix. But for Dart files that are inside the project directory, all you have to do is specify the path in which they’re stored.
The third to fifth lines is just the long way of doing this:
void main() => runApp(App())
Initializing the main app file
Next, open the lib/src/app.dart file. This is where we will add the main content of the app. Start by importing the Material library:
import 'package:flutter/material.dart';
Unlike the hello world app from earlier, we will be using a stateful widget for this app. A stateful widget requires a createState() method to be implemented. Inside the method body is where you return the stateful widget:
1// lib/src/app.dart 2 class App extends StatefulWidget { 3 createState() { 4 return AppState(); 5 } 6 }
Next, declare the actual stateful widget. From the name of the method above (createState) which returns this widget, and also the class that the widget below extends (State), it can look like we’re just declaring the state of the stateful widget. But in reality, we’re creating the actual widget, not just its state. It still requires us to declare a build method which returns the contents of the widget, the only difference is that we’re going to add an internal state to this widget later on. For now, we’ll simply return the UI components:
1// lib/src/app.dart 2 class AppState extends State<App> { 3 4 Widget build(context) { 5 return MaterialApp( 6 home: Scaffold( 7 body: Container(), 8 floatingActionButton: FloatingActionButton( 9 child: Icon(Icons.refresh), 10 onPressed: () => { 11 // nothing for now.. 12 }, 13 backgroundColor: Colors.deepPurpleAccent[700], 14 ), 15 appBar: AppBar( 16 title: Text('Doggos'), 17 backgroundColor: Colors.black54, 18 ), 19 ), 20 ); 21 } 22 }
In case you’re wondering what this weird-looking syntax means, this means that we want to create a copy of the State class that will work specifically for the App class we created right above this class. And since the App class is extending the StatefulWidget class, this means that we’re inheriting the methods from the StatefulWidget class as well. One of these methods is the setState method which allows us to update the state. You’ll see this in action later on:
1class AppState extends State<App> { 2 // ... 3 }
The code above should look familiar except for the Container and floatingActionButton widget that we’re using:
Container- used as a wrapper for other widgets for them to occupy the available space in the screen. In this case, we’re not really wrapping anything so it simply acts as a placeholder. If you don’t pass in another widget to aContainer, it won’t actually occupy the screen.FloatingActionButton- this widget is used for creating, you guessed it, a floating action button! In case you’re not familiar, these are the buttons that seemingly hover over the rest of the UI. They’re usually circular in shape and are often used with theIconwidget. TheFloatingActionButtonwidget is special because theScaffoldwidget accepts it as a parameter. As mentioned earlier, not all widgets can accept all other types of widget.
Aside from that, we’re also adding custom colors to the appBar and floatingActionButton widgets. In Flutter, colors are not represented using hex color codes, instead they’re represented in ARGB format. There are also color constants, which can be controlled to be lighter or darker based on the number you specify. Note that the Material theme comes with default colors which are automatically applied to some of the UI elements (for example, appBar and floatingActionButton), so by specifying a color, we’re basically overriding the default color assigned by the theme.
In case you’re wondering why we had to create two separate classes just to implement a stateful widget, this is because of the way widgets work in Flutter. We already know that stateless widgets have this method called build. This method automatically gets called whenever the data that you pass to it gets updated from a parent widget. In effect, this wipes out the current state of that widget. And that’s why it’s called a stateless widget.
On the other hand, we have stateful widgets. As you have seen, they require two separate classes in order to work. This is because the primary widget (in this case, the App class) will also get its current state wiped out if a data that it’s depending on gets updated from its parent widget. So the reason why we’re returning a second class which serves as the widget’s state is so we could keep the current data from being over-written. If you’re familiar with JavaScript closures, stateful widgets work similarly. In the example below, the counter() function is the primary widget class while the function inside is the widget’s state:
1function counter(num){ 2 var x = num; 3 return function(y){ 4 return x = x + y; 5 } 6 } 7 8 var num = counter(3); 9 num(4); // outputs: 7 10 num(3); // outputs: 10
That’s it for now. We’ll come back to this file later once we’ve created the widget for rendering a list of cards.
Dog model
Models in Dart allows us to define a new data type to be used inside our app. This provides structure and uniformity to the different kinds of data that we’re using inside the app. It also serves as a nice tool for documenting what type of data we’re expecting for the properties of an object. This is very useful when working on a collection of objects.
To define a model in Dart, you use the same syntax as for defining a class, only this time you’re not going to need to extend another class. Inside the class, you define the properties. In this case, we only have one property called url. Below that, we declare the constructor which accepts a parsed JSON as its argument. We’re using Map<String, dynamic> to annotate its type. The parsed JSON is basically a JavaScript object so we used the equivalent data type in Dart which is Map. Lastly, <String, dynamic> is the type of the key and value pairs for each object:
1// lib/src/models/dog_model.dart 2 class DogModel { 3 String url; 4 DogModel(Map<String, dynamic> parsedJson) { 5 url = parsedJson['message']; 6 } 7 }
But what about the message property we’re accessing from the parsedJson? Its response looks something like this:
1{ 2 "status": "success", 3 "message": "https://images.dog.ceo/breeds/shihtzu/n02086240_10785.jpg" 4 }
The DogModel is extracting that message property to get the image URL. Later on, you’ll see how we’re actually passing the parsedJson to the DogModel.
CardList widget
The CardList widget is used for rendering the cards which shows a dog picture. This is a stateless widget which depends on the data that comes from the lib/src/app.dart file.
Start by importing the Material library and Dog model:
1import 'package:flutter/material.dart'; 2 import '../models/dog_model.dart';
Next, create the widget. Below, we’re using the List class as the data type for the collection of dog images. In Dart, a List is pretty similar to an array, it allows us to add a collection of objects to it. Note that not just any object can be added because we’ve added the DogModel as a constraint, this means that only objects of type DogModel can be added to the list. After that, we set images as the context for the widget. Later on in the lib/src/app.dart file you will see how to pass these images to the widget:
1class CardList extends StatelessWidget { 2 final List<DogModel> images; 3 4 CardList(this.images); // set the widget's context 5 6 // next: add build method 7 8 }
Next, add the build() function. Here we’re checking if there are any images in the list. If there is, then we use the ListView widget to render a list. This requires an itemCount and itemBuilder properties to be passed in. These are the total number of images in the list and the function for rendering each list item.
The context and the item’s index is passed as an argument to the itemBuilder. This allows us to extract a specific index from the list. The context is a handle to the location of a widget in the widget tree. We don’t really have any use for it so I’m not going to expound further.
If no images are available, we simply render a Text widget with some text in it:
1Widget build(context) { 2 3 if(this.images.length > 0){ 4 return ListView.builder( 5 itemCount: images.length, // the total number of images 6 itemBuilder: (context, int index) { // the function for rendering each list item 7 return buildCard(images[index]); 8 } 9 ); 10 } 11 return Center(child: Text('No doggos for you yet...')); 12 } 13 14 // next: add buildCard widget
Note that unlike JavaScript, we have to explicitly define the condition which returns a boolean value. So we can’t simply do something like this:
1if(this.images.length){ 2 // ... 3 }
Next is the widget for rendering each list item. Each item represents a single instance of the DogModel class. We’re using a Container widget as the main wrapper. This allows us to add a decoration, padding, margin and child widgets:
1Widget buildCard(DogModel image) { 2 return Container( 3 decoration: BoxDecoration( 4 border: Border.all(color: Colors.grey), 5 ), 6 padding: EdgeInsets.all(10.0), 7 margin: EdgeInsets.all(10.0), 8 child: Image.network(image.url), 9 ); 10 }
Most of the properties that the Container widget expects are part of Flutter’s painting library:
decoration- used for painting things like borders, box shadows, and fills on the screen. In this case, we’re using it to surround the container with a grey border on all sides.padding- used for adding an empty space inside the surrounding area of the container.margin- used for adding an empty space outside the surrounding area of the container.
If you’ve worked with CSS before, these concepts should look familiar. The only difference is the syntax that we’re using.
As for the child, we’re rendering an Image widget. The network() method allows us to display an image from the internet, all it requires is the URL that points out to the image resource.
Bringing everything together
Going back to the lib/src/app.dart file, we’re now ready to make use of the CardList widget.
At the top of the file, import the libraries, models, and widgets that we’re going to need:
1// lib/src/app.dart 2 import 'package:flutter/material.dart'; 3 4 // add these: 5 import 'package:http/http.dart' show get; // for making http requests 6 import 'models/dog_model.dart'; // dog model 7 import 'dart:convert'; // for parsing JSON strings 8 import 'widgets/card_list.dart'; // CardList widget
Note that these libraries come pre-installed when you create a new Flutter project. Some of these are libraries are really big like Dart’s HTTP library. That’s why we’re only extracting the get method from it.
Next, update the AppState class to include the initialization of the two states that we’ll be using:
1class AppState extends State<App> { 2 bool _loaderIsActive = false; // whether the loader is currently showing or not 3 List<DogModel> images = []; // the list of images 4 5 // next: add fetchDog method 6 }
The fetchDog() function is responsible for updating the state whenever the user taps on the button for loading a new image. When this happens, we want to show a loading animation in the screen. This animation will only be hidden once the HTTP request is done:
1void fetchDog() async { 2 // show the loader 3 setState(() { 4 _loaderIsActive = true; 5 }); 6 7 // make an HTTP request to get the dog photo 8 var response = await get('https://dog.ceo/api/breeds/image/random'); 9 var dogModel = DogModel(json.decode(response.body)); 10 11 // hide the lower and add the newly loaded image into the state 12 setState(() { 13 _loaderIsActive = false; 14 images.add(dogModel); 15 }); 16 } 17 18 // next: add build method
In Flutter, the setState() method is used for updating the state of a Stateful widget. Before we request for a new image, we update the state so the loader will show up, then we call it again once the image has been loaded, this time to add the new image to the list and hide the loader.
The fetchDog() function uses the same async/await pattern that we use in JavaScript. The get() function in Dart’s HTTP library returns a Future which is just a fancy term for Promises in JavaScript. This Future represents a potential value which will be available in the future. So by default, the response variable doesn’t actually contain the value that we’re expecting right after we call the get() function. By using the async/await pattern, we make the program wait for this future value to become available before we execute the rest of the code inside the function. Meanwhile, all the codes outside the function will continue to execute.
Next, update the widget’s build method to show the loader when _loaderIsActive is true and show the CardList if it’s false. Then execute the fetchDog() function when the floatingActionButton is pressed:
1Widget build(context) { 2 return MaterialApp( 3 home: Scaffold( 4 body: Center(child: _loaderIsActive == true ? CircularProgressIndicator() : CardList(images)), // update this: 5 floatingActionButton: FloatingActionButton( 6 child: Icon(Icons.refresh), 7 onPressed: fetchDog, // update this: use fetchDog instead of the empty function 8 backgroundColor: Colors.deepPurpleAccent[700], 9 ), 10 ) 11 ); 12 }
Once that’s done, the app should already be functional. Pressing the button should show the loader, and once the image has been loaded it should be added to the list. If you don’t already have the app running, launch an Android emulator or iOS simulator instance and execute the following command from the root of the project directory:
flutter run
Conclusion
That’s it! In this tutorial, you learned how to create your very first Flutter app. Along the way, you also learned some of the important Flutter concepts like stateful and stateless widgets, how to use Dart packages, how to make HTTP requests and parse JSON strings, and lastly, rendering things on the screen.
That also concludes this series. I hope you gained the necessary knowledge in order to continue exploring Flutter. Flutter is a very young technology, so early adopters are really important for its growth. The more people who use Flutter, the better the technology gets.
You can find the code used in this tutorial on its GitHub repo.


© 2026 Pusher Ltd. All rights reserved.
Pusher Limited is a company registered in England and Wales (No. 07489873) whose registered office is at MessageBird UK Limited, 3 More London Riverside, 4th Floor, London, United Kingdom, SE1 2AQ.