- Products

- Developers
- User stories
- Blog
- Pricing

Build a group chat app in JavaScript
Introduction
In this tutorial, we’re going to build a group chat app in JavaScript and Pusher. Though the app will be basic, it will have some of the features a typical group chat app would have, such as the number of users in the group, notifications when a new user joins the group and finally, display chat messages to all users in the group in real-time. We’ll be using Node.js (Express) as the application server, Vue.js on the front-end and Pusher for realtime communication between our server and frontend.
This tutorial assumes you already have Node.js and NPM installed on your computer.
Let’s take a quick look at what we’ll be building:
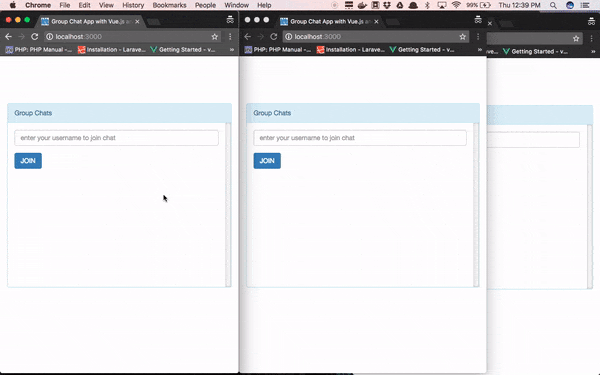
Let’s get started!
Create a Pusher app
If you don’t have one already, create a free Pusher account here then log in to your dashboard and create an app. Take note of your app credentials as we’ll be using them shortly. You can find your app credentials under the Keys section on the Overview tab.
Create Node.js server
Having created our Pusher app and gotten our app credentials, we can move on to creating the Node.js server. As stated above, we’ll be using Express as our Node.js framework. Initialize a new Node.js project by using the following command:
1mkdir pusher-group-chat 2 cd pusher-group-chat 3 npm init -y
Next, we’ll install Express, Pusher’s Node.js package and some other dependencies that our app will need:
npm install express body-parser express-session dotenv pusher --save
You will noticed we installed the dotenv package which will allow us to pull details from an environment variable from a .env file.
The rest of this tutorial assumes you’re already cd to the pusher-group-chat directory as subsequent commands will be run from within that directory.
Now let’s start fleshing the server, run command to create a new file name server.js:
touch server.js
Open the newly created file and paste the code below into it:
1// server.js 2 require('dotenv').config(); 3 const express = require('express'); 4 const path = require('path'); 5 const bodyParser = require('body-parser'); 6 const session = require('express-session'); 7 const Pusher = require('pusher'); 8 9 const app = express(); 10 11 // Session middleware 12 app.use(session({ 13 secret: 'somesuperdupersecret', 14 resave: true, 15 saveUninitialized: true 16 })) 17 18 // Body parser middleware 19 app.use(bodyParser.json()); 20 app.use(bodyParser.urlencoded({ extended: false })); 21 22 // Serving static files 23 app.use(express.static(path.join(__dirname, 'public'))); 24 25 // Create an instance of Pusher 26 const pusher = new Pusher({ 27 appId: process.env.PUSHER_APP_ID, 28 key: process.env.PUSHER_APP_KEY, 29 secret: process.env.PUSHER_APP_SECRET, 30 cluster: process.env.PUSHER_APP_CLUSTER, 31 encrypted: true 32 }); 33 34 app.listen(3000, () => { 35 console.log('Server is up on 3000') 36 });
First, we create a basic Express server and enable some middleware that the server will use. The session middleware will allow us to save a user’s details in session for later use. The body-parser middleware will allow us get form data. Then we serve static files from public directory.
Next, we create an instance of Pusher. As you can see, we’re loading our Pusher app credentials from environment variables from a .env (which we’re yet to create) file. Lastly, we start the server on port 3000.
Before we move to the other part of the server, let’s create the .env file we talked above:
touch .env
And paste the lines below into it:
1// .env 2 PUSHER_APP_ID=xxxxxx 3 PUSHER_APP_KEY=xxxxxxxxxxxxxxxxxxxx 4 PUSHER_APP_SECRET=xxxxxxxxxxxxxxxxxxxx 5 PUSHER_APP_CLUSTER=xxxx
Remember to replace the xs with your Pusher app credentials.
Adding Routes
Now let’s add the necessary routes our server will need. Open server.js and add the following code to it just after where we created an instance of Pusher:
1// server.js 2 3 ... 4 5 app.get('/', (req, res) => { 6 res.sendFile('index.html'); 7 }); 8 9 app.post('/join-chat', (req, res) => { 10 // store username in session 11 req.session.username = req.body.username; 12 res.json('Joined'); 13 }); 14 15 app.post('/pusher/auth', (req, res) => { 16 const socketId = req.body.socket_id; 17 const channel = req.body.channel_name; 18 // Retrieve username from session and use as presence channel user_id 19 const presenceData = { 20 user_id: req.session.username 21 }; 22 const auth = pusher.authenticate(socketId, channel, presenceData); 23 res.send(auth); 24 }); 25 26 app.post('/send-message', (req, res) => { 27 pusher.trigger('presence-groupChat', 'message_sent', { 28 username: req.body.username, 29 message: req.body.message 30 }); 31 res.send('Message sent'); 32 }); 33 34 ...
In the snippet above, the first route will render the index.html which is the main entry point of our app when we hit the / endpoint. Next, we define the /join-chat endpoint which will be called when a user fills the input field to join the chat. We get the username entered by the user and save it in the session. Because we’ll be using a presence channel for our group chat app, we need to implement an auth API which will authenticate the user request on the server side. So the /pusher/auth endpoint will be called automatically when a user subscribes to our chat. We pass along the user’s username retrieved from the session to Pusher’s authenticate method so it will be available on the client side when a user has subscribed to the channel. Lastly, we create the /send-message route that uses Pusher to broadcast a message_sent event to the channel presence-groupChat. Typically, within the /send-message route is where you will persist the message into a database, but for the purpose of this tutorial and to keep things simple, we won’t be persisting messages to database.
That’s all on the server side.
Setup chat app frontend
Let’s move on to building our app front-end. We talked about index.html which will be the main entry point of our app and recall that we set up our server to render static files from within the public directory. Now we’ll create the directory and the file.
1mkdir public 2 cd public 3 touch index.html
And paste the following code into it:
1<!-- public/index.html --> 2 3 <!DOCTYPE html> 4 <html lang="en"> 5 <head> 6 <meta charset="utf-8"> 7 <title>Group Chat App with Vue.js and Pusher</title> 8 <link rel="stylesheet" href="//netdna.bootstrapcdn.com/bootstrap/3.3.4/css/bootstrap.min.css"> 9 <style> 10 body { 11 padding-top: 100px; 12 } 13 .chat { 14 list-style: none; 15 margin: 0; 16 padding: 0; 17 } 18 .chat li { 19 margin-bottom: 10px; 20 padding-bottom: 5px; 21 border-bottom: 1px dotted #B3A9A9; 22 } 23 .chat li .chat-body p { 24 margin: 0; 25 color: #777777; 26 } 27 .panel-body { 28 overflow-y: scroll; 29 height: 350px; 30 } 31 ::-webkit-scrollbar-track { 32 -webkit-box-shadow: inset 0 0 6px rgba(0,0,0,0.3); 33 background-color: #F5F5F5; 34 } 35 ::-webkit-scrollbar { 36 width: 12px; 37 background-color: #F5F5F5; 38 } 39 ::-webkit-scrollbar-thumb { 40 -webkit-box-shadow: inset 0 0 6px rgba(0,0,0,.3); 41 background-color: #555; 42 } 43 </style> 44 </head> 45 <body> 46 <div class="container" id="app"> 47 <div class="row"> 48 <div class="col-md-6 col-md-offset-3"> 49 <div class="panel panel-info"> 50 </div> 51 </div> 52 </div> 53 </div> 54 <script src="https://unpkg.com/axios/dist/axios.min.js"></script> 55 <script src="https://unpkg.com/vue"></script> 56 <script src="//js.pusher.com/4.0/pusher.min.js"></script> 57 <script src="./app.js"></script> 58 </body> 59 </html>
Basic Bootstrap webpage with some few stylings. As started in the introductory section of this tutorial, we’ll be using Vue.js. So we pull in Vue, Axios (will be used to make AJAX request to our server) and of course the Pusher JavaScript library. We also reference our own JavaScript file which will contain all our Vue.js specific code.
Now let’s add the main section of the chat app. Open index.html and add the following code immediately after the div with class panel panel-info:
1<!-- public/index.html --> 2 3 <div class="panel-heading"> 4 Group Chats <span class="badge">{{ members.count }}</span> 5 </div> 6 <div class="panel-body"> 7 <div v-if="joined"> 8 <em><span v-text="status"></span></em> 9 <ul class="chat"> 10 <li class="left clearfix" v-for="message in messages"> 11 <div class="chat-body clearfix"> 12 <div class="header"> 13 <strong class="primary-font"> 14 {{ message.username }} 15 </strong> 16 </div> 17 <p> 18 {{ message.message }} 19 </p> 20 </div> 21 </li> 22 </ul> 23 <div class="panel-footer"> 24 <div class="input-group"> 25 <input id="btn-input" type="text" name="message" class="form-control input-sm" placeholder="Type your message here..." v-model="newMessage" @keyup.enter="sendMessage"> 26 <span class="input-group-btn"> 27 <button class="btn btn-primary btn-sm" id="btn-chat" @click="sendMessage">Send</button> 28 </span> 29 </div> 30 </div> 31 </div> 32 <div v-else> 33 <div class="form-group"> 34 <input type="text" class="form-control" placeholder="enter your username to join chat" v-model="username" @keyup.enter="joinChat"> 35 </div> 36 <button class="btn btn-primary" @click="joinChat">JOIN</button> 37 </div> 38 </div>
We have added Vue.js to the webpage, so we can start using it. We are displaying the number of users that have joined the group chat next to the Group Chat heading. Using Vue.js conditional rendering, we will only show the chat form when the user has joined (that is, entered his/her username) the group chat, else the user will be shown a form to enter a username to join chat. When the user clicks the JOIN button or presses ENTER while within the username input field, the joinChat method will be triggered. We also bind the username input field with the username data so we can easily pass whatever the user entered to Vue.js.
Once a user has joined the chat, we loop through (using v-for) the messages (if there are any) and display them, then show the user an input field to type their chat message. When the user clicks the Send button or presses ENTER while within the message input field, the sendMessage method will be triggered. We also bind the message input field with the newMessage data so we can easily pass whatever the user entered to Vue.js.
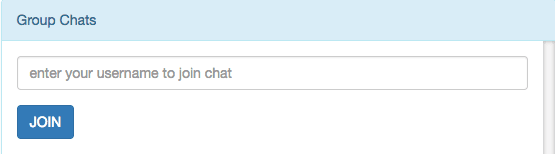
When a user has not joined the chat:
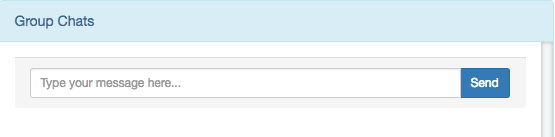
When the user has joined the chat:
Create App.js
Now let’s create the file that will contain all our Vue.js specific code. Use the command below to do just that:
1cd public 2 touch app.js
And paste the following code into it:
1// public/app.js 2 3 const pusher = new Pusher('xxxxxxxxxxxxxxxxxxxx', { 4 cluster: 'APP_CLUSTER', 5 encrypted: true, 6 authEndpoint: 'pusher/auth' 7 }); 8 const app = new Vue({ 9 el: '#app', 10 data: { 11 joined: false, 12 username: '', 13 members: '', 14 newMessage: '', 15 messages: [], 16 status: '' 17 }, 18 methods: { 19 joinChat() { 20 axios.post('join-chat', {username: this.username}) 21 .then(response => { 22 // User has joined the chat 23 this.joined = true; 24 const channel = pusher.subscribe('presence-groupChat'); 25 channel.bind('pusher:subscription_succeeded', (members) => { 26 this.members = channel.members; 27 }); 28 // User joins chat 29 channel.bind('pusher:member_added', (member) => { 30 this.status = `${member.id} joined the chat`; 31 }); 32 // Listen for chat messages 33 this.listen(); 34 }); 35 }, 36 sendMessage() { 37 let message = { 38 username: this.username, 39 message: this.newMessage 40 } 41 // Clear input field 42 this.newMessage = ''; 43 axios.post('/send-message', message); 44 }, 45 listen() { 46 const channel = pusher.subscribe('presence-groupChat'); 47 channel.bind('message_sent', (data) => { 48 this.messages.push({ 49 username: data.username, 50 message: data.message 51 }); 52 }); 53 } 54 } 55 });
Remember to replace the xs with your Pusher app key and also specify your app cluster.
First, we create an instance of Pusher, passing to it our app key and other options. We pass in the auth endpoint /pusher/auth we set up in our Express server. Next we create an instance of Vue.js. Then we specify the element (#app) we want to mount Vue.js on. We define some data that will be used by our app. The joined data which is false by default indicates whether a user has joined the chat or not. The username will be the username a user enters from the join chat form. The members will hold the number of users in the group chat. The newMessage will be the message a user enters from the chat form. The messages will hold an array of chat messages. The status will simply display notification of newly joined users.
When a user enters a username to join chat, the joinChat method is called which in turn make an HTTP POST request to the /join-chat endpoint on our server passing along the username. Once the request is successful, we set joined to true and subscribe the user to the presence-groupChat channel. Because we’re using a presence channel, Pusher provides us with additional functionality like getting the members in the channel. With that, we can listen for when the subscription is successful and get all the users subscribed to the channel and assign it to our members data. We also listen for when a new user joins the chat using the pusher:member_added event and notify other users that a new user has joined the chat. Lastly, we call a listen method (which we’ll create shortly) which listens for new chat messages and broadcast to users.
The sendMessage method is pretty simple, it makes an HTTP POST request to the /send-message endpoint on our server passing along the chat message. We also clear the input field of the previous message so the user can start typing new messages without having to manually clear the input field first.
Lastly, the listen method which we called from within the joinChat method will listen for message_sent event that was triggered from our server and add the new message to the messages array and finally broadcast it to users.
Note: By default, Pusher will try to use /pusher/auth as authEndpoint. If you setup yours different from that, you’ll have to specify while instantiating the Pusher JavaScript library.
Note: Pusher presence channels are to be prefixed with presence-.
Testing The App
So we’re done with building our group chat app. It’s time test out what we’ve built. To test the app, we need to start up our Express server by executing the command below:
node server.js
The app should be running now and can be access through localhost:3000. Go on and try the app out. You should get something similar as the demo below:
Conclusion
So that’s it for this tutorial. In this tutorial we saw how to build a group chat app with JavaScript and Pusher. Using Pusher’s presence channel, we saw how easy it is to get all the members subscribed to a channel.


© 2026 Pusher Ltd. All rights reserved.
Pusher Limited is a company registered in England and Wales (No. 07489873) whose registered office is at MessageBird UK Limited, 3 More London Riverside, 4th Floor, London, United Kingdom, SE1 2AQ.