- Products

- Developers
- User stories
- Blog
- Pricing

Build a group chat app with Angular and Dialogflow
Introduction
Introduction
Over the past few years, advances in machine learning, especially natural language processing (NLP), have made it easy for computers to analyse and derive meaning from human language in a smart way. With this, developers can now create smaller, simpler and more intuitive natural language processing software.
In this tutorial, we’ll demonstrate how to build a group chat using Pusher with an Angular application. We will also build a basic chatbot using the Dialogflow conversation platform formerly know as api.ai by Google. This bot will engage in a simple conversation with any user within the group chat.

Prerequisites
We are going to make use of the following dependencies:
-
Angular 6+: a platform that makes it easy to build applications with the web. Angular combines declarative templates, dependency injection, end to end tooling, and integrated best practices to solve development challenges.
-
Pusher: a hosted service that makes it super-easy to add realtime data and functionality to web and mobile applications. It has different products based on the need of your application.
-
Bootstrap 4: an open source toolkit for developing with HTML and CSS. It includes HTML and CSS based design templates for typography, forms, buttons, tables, navigation, modals, image carousels and many other, as well as optional JavaScript plugins.
-
Dialogflow: an engine for building conversational experiences. It leverages Google’s machine learning and natural language processing technology, thereby giving developers the ability to utilize a user-friendly interface to build chatbots and deploy them to any platform.
Please ensure you have Node and npm installed before starting the tutorial. No knowledge of Angular is required, but a basic understanding of Javascript (not necessarily Typescript) may be helpful.
Let’s build our group chat
Bootstrapping with Angular-cli:
1npm install -g @angular/cli 2 ng new botAndPusher 3 cd botAndPusher
We installed a command line interface to scaffold and build Angular apps globally. It exposes ng in our terminal for us to make use of the commands available. To confirm everything went well, run the below command on your terminal within the newly created app folder /botAndPusher.
ng serve
You should see this:
Installing dependencies:
npm install bootstrap pusher-js
Open angular.json within our application root folder and update the projects.botAndPusher.architect.build.styles field to look like so:
1"styles": [ 2 "../node_modules/bootstrap/dist/css/bootstrap.css", 3 "styles.css" 4 ]
Open src/styles.css and add the below CSS to it:
1/* You can add global styles to this file, and also import other style files */ 2 .box-shadow { box-shadow: 0 .25rem .75rem rgba(0, 0, 0, .05); }
We added a utility style for adding shadows to our div.
Next, we need to create two services to manage our Pusher instance (we don’t have to always create a new instance of Pusher anytime we want to use it, we can use just one instance of it throughout the entire app) and our chat (interaction with the remote server and vice versa for chat messages):
1ng g s services/pusher --spec false 2 ng g s services/chat --spec false 3 ng g i interfaces/ichat
We used another command of Angular CLI, which in full is ng generate service path/name. This creates a folder if it doesn’t already exist called services/ and place our service files there. We also used --spec false to let the Angular CLI know we don’t need to generate a test file for the service file. The last comand generates an employee interface to help give an idea of what an employee object should have.
Open src/app/services/pusher.service.ts and update it to look like the one below:
1import { Injectable } from '@angular/core'; 2 import * as Pusher from 'pusher-js'; 3 4 // this is here to discourage the instantiating of pusher any where its 5 // needed, better to reference it from one place 6 @Injectable() 7 export class PusherService { 8 private _pusher: any; 9 10 constructor() { 11 this._pusher = new Pusher('API_KEY', { 12 cluster: 'CLUSTER', 13 encrypted: true 14 }); 15 } 16 // any time it is needed we simply call this method 17 getPusher() { 18 return this._pusher; 19 } 20 21 }
We insert the free API_KEY and CLUSTER we get after signing up and creating a channel app with Pusher.
After creating an app from Pusher’s dashboard, navigate to App Keys tab to see your app credentials
To ensure that connection traffic is encrypted, we set encrypted to the Boolean true in our app. Read more about client configuration here.
Open src/app/interfaces/ichat.ts and update it to look like so:
1export interface IChat { 2 id: string; 3 displayName: string; 4 email: string; 5 type: 'human' | 'joined'; 6 message: string; 7 createdAt: string; 8 isMe: boolean; 9 }
From the above interface, every chat message must contain an ID, display name (used to display who sent the message), and a type (whether not the speaker is human).
Let’s create our chat service to help send messages to others, connect to Pusher’s channel and to join the group.
1// src/app/services/chat.service.ts 2 import { Injectable } from '@angular/core'; 3 import { PusherService } from './pusher.service'; 4 import { HttpClient } from '@angular/common/http'; 5 import { Observable } from 'rxjs'; 6 import {tap} from 'rxjs/operators'; 7 8 @Injectable({ 9 providedIn: 'root' 10 }) 11 export class ChatService { 12 user: {displayName: string, email: string}; 13 private _endPoint = 'http://localhost:2000'; // normally you use environment.ts 14 private _channel: any; 15 16 constructor(private _pusherService: PusherService, private _http: HttpClient) { 17 this._channel = this._pusherService.getPusher().subscribe('chat-group'); 18 } 19 20 join(param): Observable<any> { 21 return this._http.post(`${this._endPoint}/join`, param) 22 .pipe(tap(data => { 23 this.user = param; 24 })); 25 } 26 27 sendMessage(message: string): Observable<any> { 28 const param = { 29 message, 30 type: 'human', 31 ...this.user 32 }; 33 return this._http.post(`${this._endPoint}/message`, param); 34 } 35 36 getChannel() { 37 return this._channel; 38 } 39 }
We’ve created three different methods to help us interact with others within our service file.
join: this is like registration of new users to get their display name and email address which we are going to be using to send messages to others within the group. If you observe, anytime we join, we automatically use RxJs tap (formerly called do) to pipe the response and do something with the response before sending it to the caller (save our user information for later usage).sendMessage: this attaches the user object we saved after joining to the message before sending it to our server.getChannel: is returning our Pusher’s channel so we can easily subscribe to any message coming fromchat-groupchannel
Let’s make our services available in the app. Add them to app.module.ts, along with the [HTTPClientModule](https://angular.io/guide/http) since it was used within chat.service.ts for http requests. ReactiveFormsModule and FormsModule are going to be used later to build our forms :
1// src/app/app.module.ts 2 import { ChatService } from './services/chat.service'; 3 import { PusherService } from './services/pusher.service'; 4 import { HttpClientModule } from '@angular/common/http'; 5 import { FormsModule, ReactiveFormsModule } from '@angular/forms'; 6 7 ... 8 imports: [ 9 ..., 10 HttpClientModule, 11 FormsModule, 12 ReactiveFormsModule 13 ], 14 providers:[ChatService, PusherService]
Angular components to join and chat with others
We’ll now create two more components to join and chat with others in the group chat:
1ng g c myDetails -is --spec false 2 ng g c chat --spec false
Using the Angular CLI, we generated a component with no test attached as explained earlier. It will create a folder for each containing a .ts and a .html. The -is command means don’t create a .css file. We will use inline styling within our .ts.
Let’s begin with my details component, it should look like our gif above. Open my-details/my-details.component.html and update it to look like so:
1<!-- src/app/my-details/my-details.component.html --> 2 3 <h6 class="pb-2 mb-0">My Details</h6> 4 5 <form [formGroup]="detailsForm" (ngSubmit)="onSubmit()" novalidate> 6 <div class="form-group"> 7 <label for="name">Display Name</label> 8 <input formControlName="displayName" type="text" class="form-control" id="name" placeholder="Alien"> 9 <small *ngIf="detailsForm.get('displayName').hasError('required')" class="form-text text-danger">Display name is required.</small> 10 </div> 11 <div class="form-group"> 12 <label for="email">Email</label> 13 <input formControlName="email" type="email" class="form-control" id="email" placeholder="test@example.com"> 14 <small *ngIf="detailsForm.get('email').hasError('required')" class="form-text text-danger">Email is required.</small> 15 <small *ngIf="detailsForm.get('email').hasError('email')" class="form-text text-danger">Email is invalid.</small> 16 </div> 17 <button type="submit" [disabled]="loader || detailsForm.invalid" class="btn btn-primary">{{loader?'Joining':'Join Group'}}</button> 18 </form>
We have created our template using Bootrap’s forms with Angular’s reactive form directives such as formControlName and [formGroup] which allows us to easily validate the form.
Let’s wire the template above to be functional, open my-details/my-details.component.ts
1// src/app/my-details/my-details.component.ts 2 3 import { Component, OnInit } from '@angular/core'; 4 import { FormGroup, FormBuilder, Validators } from '@angular/forms'; 5 import { ChatService } from '../services/chat.service'; 6 7 @Component({ 8 selector: 'app-my-details', 9 templateUrl: './my-details.component.html', 10 styles: [] 11 }) 12 export class MyDetailsComponent implements OnInit { 13 detailsForm: FormGroup; 14 loader; 15 16 constructor(private _fb: FormBuilder, private _chatService: ChatService) { } 17 18 ngOnInit() { 19 this._createForm(); 20 } 21 22 /** 23 * create our reactive form here 24 */ 25 private _createForm() { 26 this.detailsForm = this._fb.group({ 27 displayName: ['', Validators.required], 28 email: ['', [Validators.required, Validators.email]] 29 }); 30 } 31 32 /** 33 * Join the fun 34 */ 35 onSubmit() { 36 const param = this.detailsForm.value; 37 this._chatService.join(param) 38 .subscribe((resp) => { 39 this.loader = false; 40 }, 41 (error) => { 42 console.error(error); 43 this.loader = false; 44 }); 45 } 46 }
We used the _createForm method to instantiate our reactive form and set the validations needed. On submit of our form we call the onSubmit method, which was used ((ngSubmit)="onSubmit()" ) within our my-details.component.html.
Let’s make use of our just created component within our app.component.html .
1<!-- src/app/app.component.html --> 2 3 <nav class="navbar navbar-expand-lg navbar-dark bg-primary"> 4 <a class="navbar-brand" href="#"> 5 <img src="assets/angular.svg" width="30" height="30" class="d-inline-block align-top" alt=""> 6 Angular Group Chat with Pusher And Dialogflow Chat Bot 7 </a> 8 </nav> 9 10 <div class="container"> 11 12 <p align="center"> 13 <img src="assets/pusher.svg" width="30" height="100" width="60" alt="Pusher"> 14 </p> 15 16 <div class="row justify-content-center"> 17 <div class="col-md-4"> 18 <div class="my-3 p-3 bg-white rounded box-shadow"> 19 <app-my-details></app-my-details> 20 </div> 21 </div> 22 </div> 23 24 </div>
Run ng serve on your terminal to see our component in action, we should get something like so:
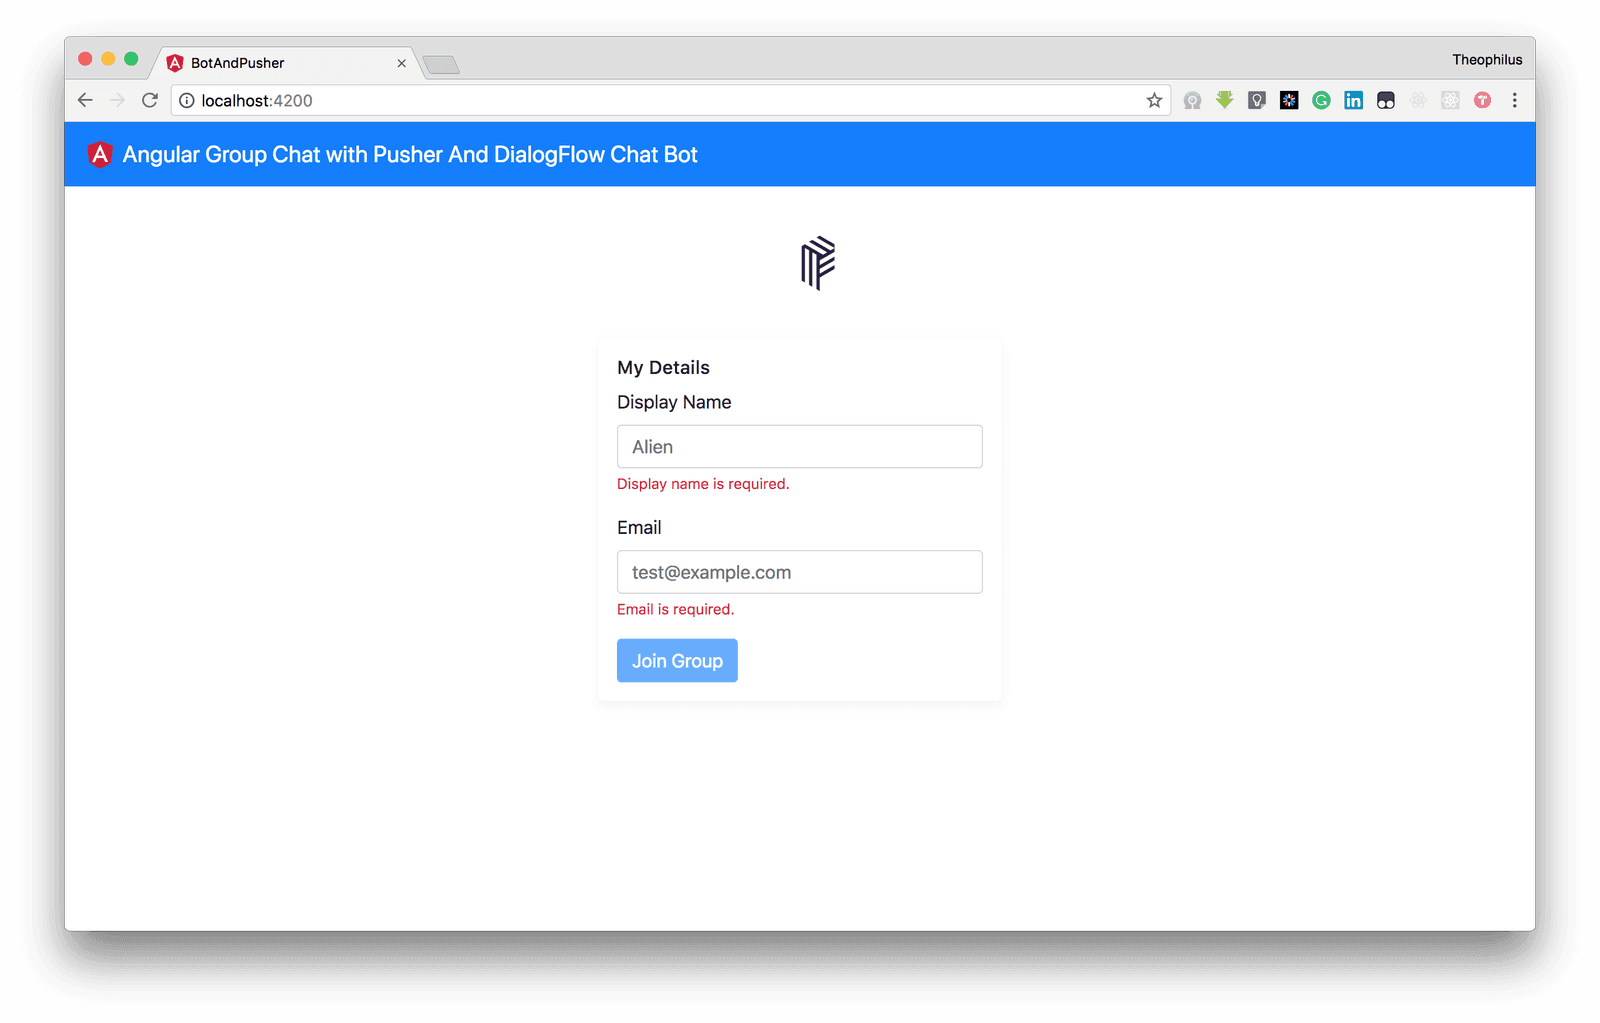
You can join the group, but we need a screen to see who joined and also to chat with others within the group.
Open chat.component.html and update it to look like so:
1<!-- src/app/chat/chat.component.html --> 2 3 <h6 class="pb-2 mb-0">Group Chat <button class="btn btn-sm btn-primary">invite others</button></h6> 4 5 <div class="chats"> 6 <div class="chatbox"> 7 <div *ngFor="let chat of chats"> 8 <div class="message sent" *ngIf="chat.type!=='joined' && chat.isMe"> 9 {{chat.message}} 10 <span class="metadata"> 11 <span class="time">{{chat.createdAt | date: 'HH:mm aaa'}}</span> 12 </span> 13 </div> 14 <div class="message received" *ngIf="chat.type!=='joined' && !chat.isMe"> 15 <strong>{{chat.displayName}}</strong> <br> 16 {{chat.message}} 17 <span class="metadata"> 18 <span class="time">{{chat.createdAt | date: 'HH:mm aaa'}}</span> 19 </span> 20 </div> 21 <p align="center" class="joined" *ngIf="chat.type==='joined'"> 22 <span class="rounded bg-primary text-white">{{chat.displayName}} Joined</span> 23 </p> 24 </div> 25 </div> 26 27 <div class="d-flex flex-row"> 28 <input [(ngModel)]="message" type="text" class="form-control" placeholder="Enter message" style="margin-right: 10px"> 29 <button [disabled]="!message || sending" (click)="sendMessage(message)" class="btn btn-primary"> {{sending ? 'Sending' : 'Send'}}</button> 30 </div> 31 </div>
From the above template, we are making use of the *ngFor directive to loop through our chats and display them based on the type of chat message. We have three types of chat messages:
- Joined: once you join a chat from my details component, we receive a chat message of type
joined. Doing this gives us the privilege to style it or handle how to display who just joined the chat to others. - From me: if the chat message is from me which means my email address from my details matches with the email address within the chat message. Here, you observe we didn’t show the name of the person sending the message since it’s me, and the styling we used
message sentclass. - Not me: if the chat message is not from me and it’s not joined, which means another user from the group sent a message. Here, we added the user display name, so we can easily identify who sent the message.
Now, let’s add styling to our chat component, to differentiate the three types of chat messages. Open chat.component.css and update it to look like so:
1/* src/app/chat/chat.component.css */ 2 3 .chats { 4 height: calc(100% - 12px); 5 position: relative; 6 z-index: 0; 7 } 8 9 .chats .chatbox { 10 height: calc(100% - 68px); 11 overflow-x: hidden; 12 padding: 0 16px; 13 margin-bottom: 5px; 14 } 15 16 .joined { 17 clear: both; 18 line-height: 18px; 19 font-size: 15px; 20 margin: 8px 0; 21 padding: 8px; 22 } 23 .joined span { 24 padding: 5px 25 } 26 27 /* Messages*/ 28 29 .message { 30 color: #000; 31 clear: both; 32 line-height: 18px; 33 font-size: 15px; 34 padding: 8px; 35 position: relative; 36 margin: 8px 0; 37 max-width: 85%; 38 word-wrap: break-word; 39 z-index: -1; 40 } 41 42 .message:after { 43 position: absolute; 44 content: ""; 45 width: 0; 46 height: 0; 47 border-style: solid; 48 } 49 50 .metadata { 51 display: inline-block; 52 float: right; 53 padding: 0 0 0 7px; 54 position: relative; 55 bottom: -4px; 56 } 57 58 .metadata .time { 59 color: rgba(0, 0, 0, .45); 60 font-size: 11px; 61 display: inline-block; 62 } 63 64 65 .message:first-child { 66 margin: 16px 0 8px; 67 } 68 69 .message.received { 70 background: #ccc; 71 border-radius: 0px 5px 5px 5px; 72 float: left; 73 } 74 75 76 .message.received:after { 77 border-width: 0px 10px 10px 0; 78 border-color: transparent #ccc transparent transparent; 79 top: 0; 80 left: -10px; 81 } 82 83 .message.sent { 84 background: #e1ffc7; 85 border-radius: 5px 0px 5px 5px; 86 float: right; 87 } 88 89 .message.sent:after { 90 border-width: 0px 0 10px 10px; 91 border-color: transparent transparent transparent #e1ffc7; 92 top: 0; 93 right: -10px; 94 } 95 96 97 .metadata { 98 display: inline-block; 99 float: right; 100 padding: 0 0 0 7px; 101 position: relative; 102 bottom: -4px; 103 } 104 105 .metadata .time { 106 color: rgba(0, 0, 0, .45); 107 font-size: 11px; 108 display: inline-block; 109 }
Before we try out our chat component, let’s incorporate Pusher and connect to our server to send messages to others.
Integrating Pusher and message sending to server
Pusher is going to listen to the channel we created above for chat and give us realtime updates of any triggered event related to our chat group.
Open chat.component.ts and update it to look like so:
1// src/app/chat/chat.component.ts 2 3 import { Component, OnInit } from '@angular/core'; 4 import { IChat } from '../interfaces/ichat'; 5 import { ChatService } from '../services/chat.service'; 6 7 @Component({ 8 selector: 'app-chat', 9 templateUrl: './chat.component.html', 10 styleUrls: ['./chat.component.css'] 11 }) 12 export class ChatComponent implements OnInit { 13 chats: IChat[] = []; 14 message: string; 15 sending: boolean; 16 17 constructor(private _chatService: ChatService) { } 18 19 ngOnInit() { 20 // subscribe to pusher's event 21 this._chatService.getChannel().bind('chat', data => { 22 if (data.email === this._chatService.user.email) { 23 data.isMe = true; 24 } 25 this.chats.push(data); 26 }); 27 } 28 29 sendMessage(message: string) { 30 this.sending = true; 31 this._chatService.sendMessage(message) 32 .subscribe(resp => { 33 this.message = undefined; 34 this.sending = false; 35 }, err => { 36 this.sending = false; 37 } ); 38 } 39 40 }
From the above code, we subscribed to our Pusher channel for chat-group when the component is being called by Angular (ngOnInit). We also check if the message that is coming from Pusher contains the same email as the one we used in joining the chat group. If so we add an extra key called isMe:boolean, which is going to be true when it matches.
We used sendMessage method to send messages to our server and toggling a variable called sending to notify our template to show what is going on to the users. Then we reset the message to undefined to clear the message input field on our chat.component.html.
Finalizing our Angular application
We need to toggle the chat component only when the user joined our group. So, initially, any new user sees my details component, which is going to get the display name and email address before entering the chat component to chat with others.
Open app.component.ts and update it to look like so:
1import { Component } from '@angular/core'; 2 import { ChatService } from './services/chat.service'; 3 4 @Component({ 5 selector: 'app-root', 6 templateUrl: './app.component.html', 7 styleUrls: ['./app.component.css'] 8 }) 9 export class AppComponent { 10 11 constructor(public chatService: ChatService) { 12 } 13 }
What we simply did above, is just to make use of our chat service, which contains the user object. This user object is gotten anytime a user joins our chat group. If it is undefined it means the current user trying to use our group chat is not registered or hasn’t joined. Let’s make use of it to toggle which view/component a user is going to see.
Open app.component.html and update it to look like so:
1<!-- src/app/app.component.html --> 2 3 <nav class="navbar navbar-expand-lg navbar-dark bg-primary"> 4 <a class="navbar-brand" href="#"> 5 <img src="assets/angular.svg" width="30" height="30" class="d-inline-block align-top" alt=""> 6 Angular Group Chat with Pusher And Dialogflow Chat Bot 7 </a> 8 </nav> 9 10 <div class="container"> 11 12 <p align="center"> 13 <img src="assets/pusher.svg" width="30" height="100" width="60" alt="Pusher"> 14 </p> 15 16 <div class="row justify-content-center"> 17 <div class="col-md-8" [hidden]="!chatService.user"> 18 <div class="my-3 p-3 bg-white rounded box-shadow"> 19 <app-chat></app-chat> 20 </div> 21 </div> 22 <div class="col-md-4" [hidden]="chatService.user"> 23 <div class="my-3 p-3 bg-white rounded box-shadow"> 24 <app-my-details></app-my-details> 25 </div> 26 </div> 27 </div> 28 29 </div>
We’ve used the user within our chatService to handle what the user sees using angular’s hidden directive. If the user is defined we hide our my-details component. Else, we show it to get details of the new user. If there is no user, we hide our chat component and wait for registration through the my-details component.
Run ng serve. You should get something like this:
Observe our above result, we were unable to join our chat group because the server specified in our chatService._endPoint does not exist. Let’s go over to setting up our server.
Setting up our Node server with Pusher
Our Node server is going to handle when a new message is sent from our frontend Angular application and also when a new user is joining the chat group. Open your terminal and run the below commands:
1npm install express body-parser cors pusher dotenv shortid 2 touch server.js 3 touch .env
What we have done above is to install our node dependencies, creating our server file which is going to hold our APIs using Express and .env to help manage our environment variables using the dotenv module.
Open server.js and update it to look like so:
1// server.js 2 3 const express = require('express') 4 const bodyParser = require('body-parser') 5 const Pusher = require('pusher') 6 const cors = require('cors') 7 require('dotenv').config() 8 const shortId = require('shortid') 9 10 const app = express() 11 app.use(cors()) 12 app.use(bodyParser.urlencoded({ extended: false })) 13 app.use(bodyParser.json()) 14 15 const pusher = new Pusher({ 16 appId: process.env.PUSHER_APP_ID, 17 key: process.env.PUSHER_APP_KEY, 18 secret: process.env.PUSHER_APP_SECRET, 19 cluster: 'eu', 20 encrypted: true 21 }) 22 23 app.post('/message', async (req, res) => { 24 // simulate actual db save with id and createdAt added 25 const chat = { 26 ...req.body, 27 id: shortId.generate(), 28 createdAt: new Date().toISOString() 29 } 30 // trigger this update to our pushers listeners 31 pusher.trigger('chat-group', 'chat', chat) 32 res.send(chat) 33 }) 34 35 app.post('/join', (req, res) => { 36 const chat = { 37 ...req.body, 38 id: shortId.generate(), 39 type: 'joined', 40 createdAt: new Date().toISOString() 41 } 42 // trigger this update to our pushers listeners 43 pusher.trigger('chat-group', 'chat', chat) 44 res.send(chat) 45 }) 46 47 app.listen(process.env.PORT || 2000, () => console.log('Listening at 2000'))
We have created two APIs:
POST /messsage: send a message to others in the group by triggering an event with Pusher so our chat component (which subscribed to it earlier on) can receive the message.POST /join: anytime a new user wants to join our chat we send a trigger to the others that a user just joined the chat with atype:'joined``'and thereq.bodywhich containsemailanddisplayName.
Before running our server to test our group chat, we need to set our .env variables used in our server.js. Open .env and make it look like so:
1PUSHER_APP_ID="APP_ID" 2 PUSHER_APP_KEY="APP_KEY" 3 PUSHER_APP_SECRET="APP_SECRET"
You can get your own .env config within your Pusher’s channel application dashboard. Navigate to the Getting Started tab, under Add this to your server column, select .env to copy, then paste in your .env file.
Let’s run our server. Start the frontend if it is not already running. Open your terminal and run this:
node server.js
Now, let’s go over to our application to test it out:
Our application is working as it should 😊, but we are not done yet. The next section is going to show how to add a chatbot user to our group.
Integrating Dialogflow with our server
We are going to add a chatbot to our group chat to help with getting live scores of football matches. We can easily trigger our bot or call out our bot with the below command:
/bot message-here
For example: /bot who are you ?
Let’s head over to Dialogflow to setup our chatbot. Open your Dialogflow dashboard after creating a free account:
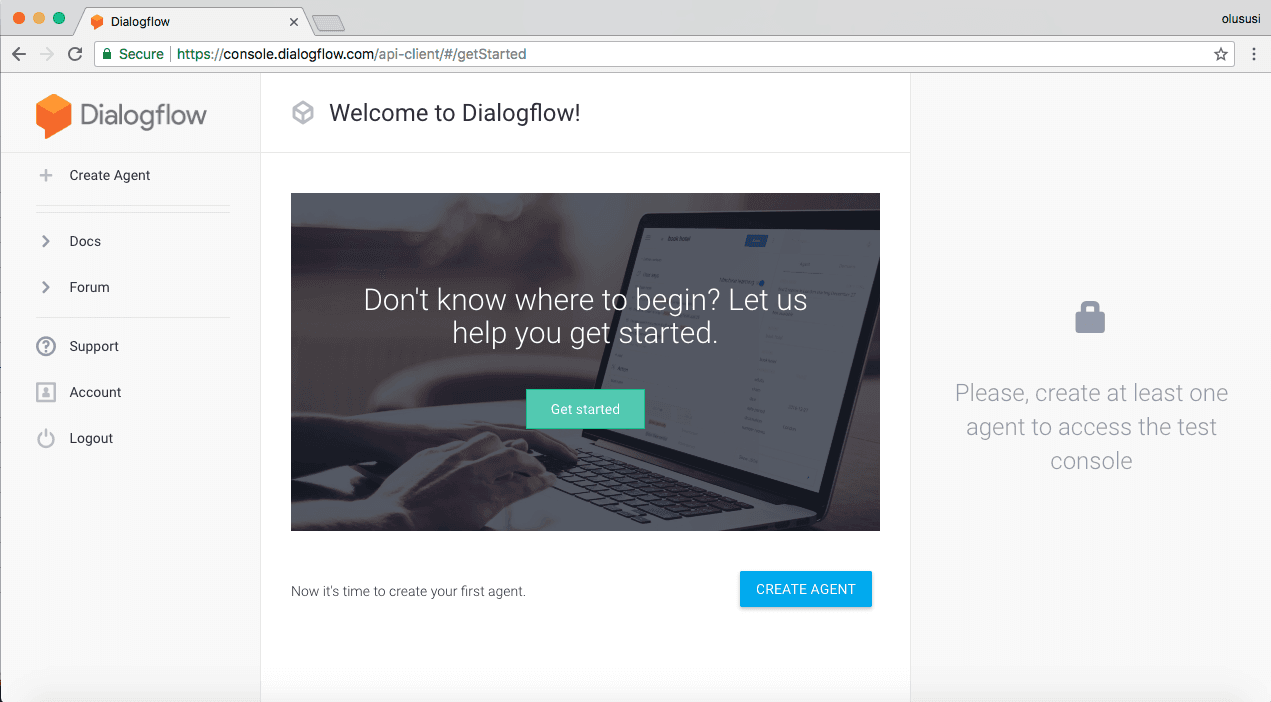
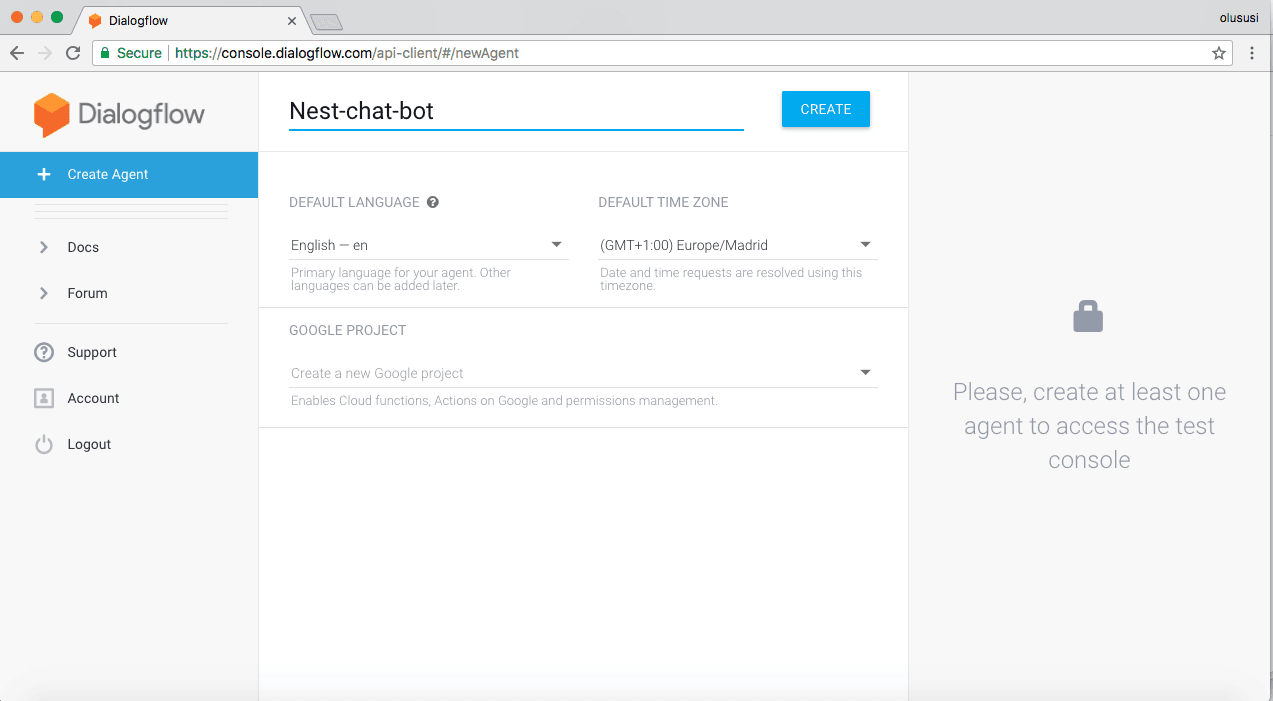
Click on Create Agent button to create our chatbot. We are going to name our agent Pusher-chatbot
Creating small talk
For a quick start, we can easily program our chatbot for common chat style questions in the small talk panel. This will give our bot a basic level of interactivity with the users. By default, there are responses with predefined phrases within the small talk panel. Go ahead and customize the response as you deem fit. For now, we are going to keep it simple and respond to few questions:
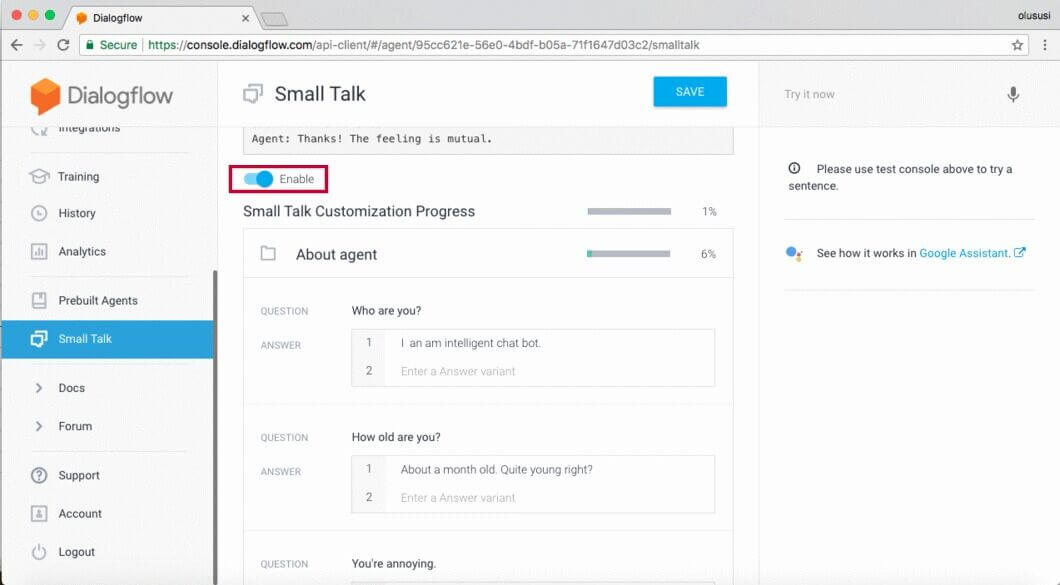
Enable and save it. You can use the Try it now by your right to test our chatbot responses. Let’s get our access token for connecting to our chatbot from our Node server:
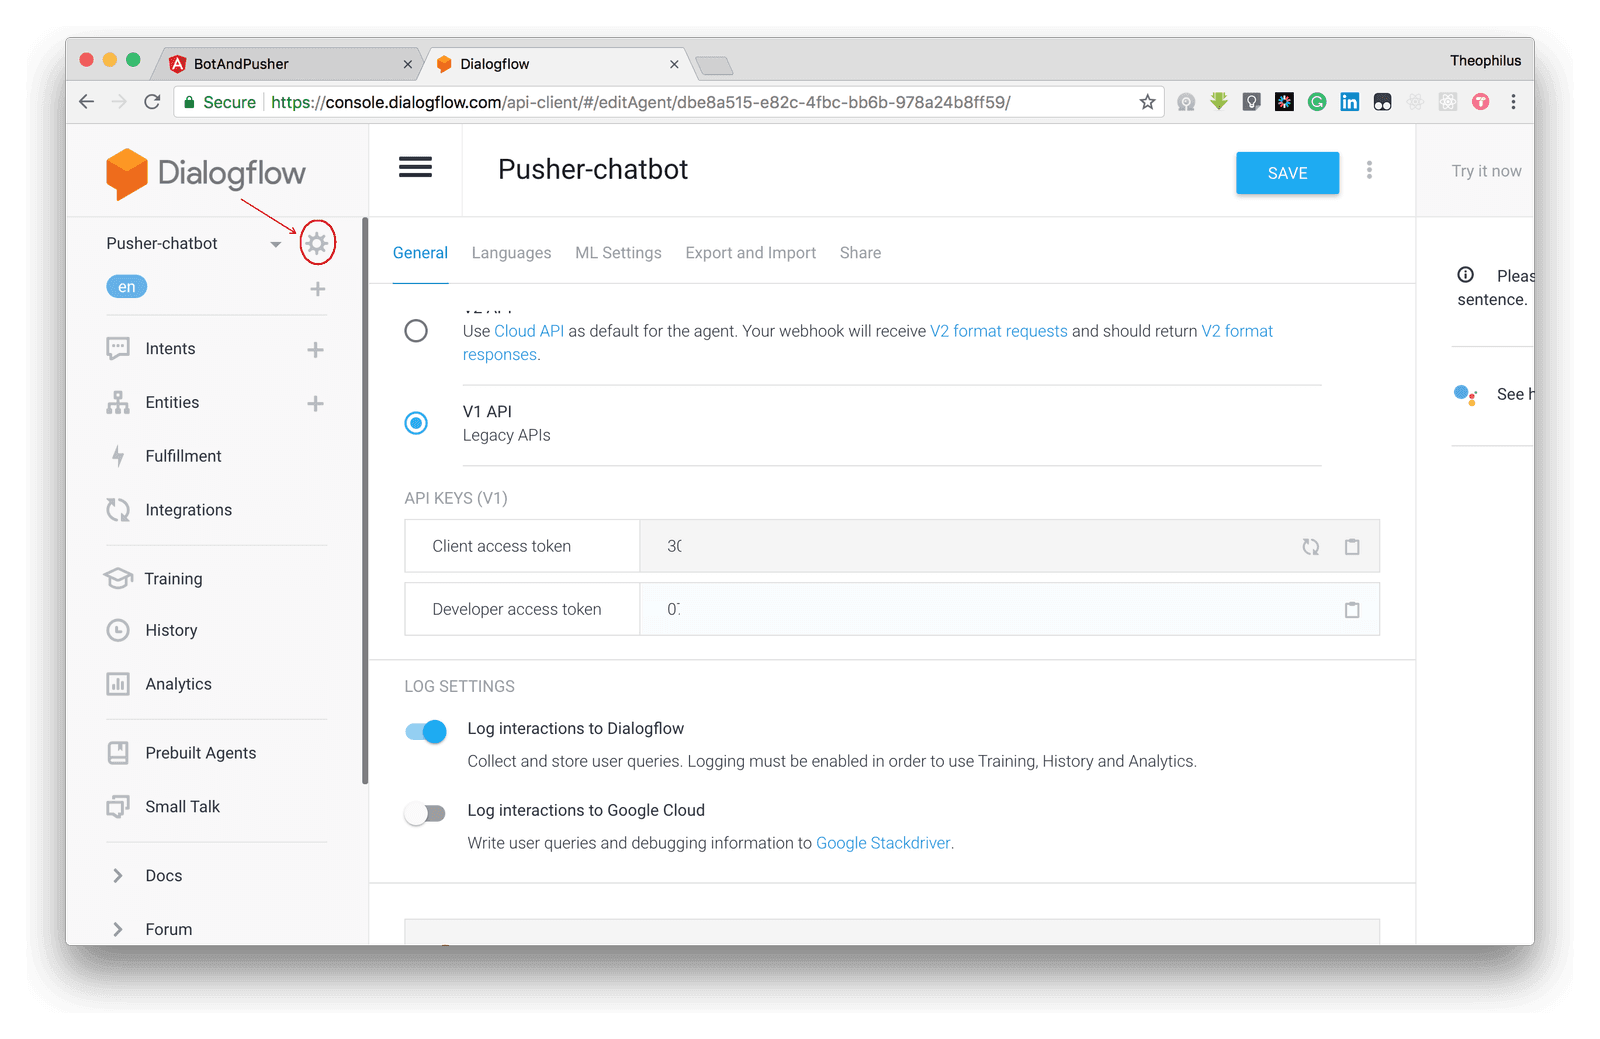
Click on the icon within the red circle to view our agent settings where we can locate our API keys. Open our .env and add our client access token not the developer token, as our use case we are going to be doing more of querying of our chatbot via APIs. Read more.
1PUSHER_APP_ID="APP_ID" 2 PUSHER_APP_KEY="APP_KEY" 3 PUSHER_APP_SECRET="APP_SECRET" 4 DIALOG_ACCESS_TOKEN="CLIENT_ACCESS_TOKEN"
Let’s install Axios for sending HTTP request from our Node server to Dialogflow endpoints:
1npm install axios 2 touch dialogFlow.js
Open dialogFlow.js and update it to look like so:
1// dialogFlow.js 2 3 const axios = require('axios') 4 5 const accessToken = process.env.DIALOG_ACCESS_TOKEN 6 const baseURL = 'https://api.dialogflow.com/v1/query?v=20150910' 7 8 module.exports = { 9 send (message) { 10 const data = { 11 query: message, 12 lang: 'en', 13 sessionId: '123456789!@#$%' 14 } 15 16 return axios.post(baseURL, data, { 17 headers: { Authorization: `Bearer ${accessToken}` } 18 }) 19 } 20 }
We used Axios to send a post request to Dialogflow, passing our message to the bot as query. Let’s make use of our utility function above to communicate with out chatbot. Open server.js
and update it to look like so:
1const express = require('express') 2 const bodyParser = require('body-parser') 3 const Pusher = require('pusher') 4 const cors = require('cors') 5 require('dotenv').config() 6 const shortId = require('shortid') 7 const dialogFlow = require('./dialogFlow') 8 9 const app = express() 10 app.use(cors()) 11 app.use(bodyParser.urlencoded({ extended: false })) 12 app.use(bodyParser.json()) 13 14 const pusher = new Pusher({ 15 appId: process.env.PUSHER_APP_ID, 16 key: process.env.PUSHER_APP_KEY, 17 secret: process.env.PUSHER_APP_SECRET, 18 cluster: 'eu', 19 encrypted: true 20 }) 21 22 app.post('/message', async (req, res) => { 23 // simulate actual db save with id and createdAt added 24 const chat = { 25 ...req.body, 26 id: shortId.generate(), 27 createdAt: new Date().toISOString() 28 } 29 // trigger this update to our pushers listeners 30 pusher.trigger('chat-group', 'chat', chat) 31 32 // check if this message was invoking our bot, /bot 33 if (chat.message.startsWith('/bot')) { 34 const message = chat.message.split('/bot')[1] 35 const response = await dialogFlow.send(message) 36 pusher.trigger('chat-group', 'chat', { 37 message: `@${chat.displayName} ${ 38 response.data.result.fulfillment.speech 39 }`, 40 displayName: 'Bot User', 41 email: 'bot@we.com', 42 createdAt: new Date().toISOString(), 43 id: shortId.generate() 44 }) 45 } 46 47 res.send(chat) 48 }) 49 50 app.post('/join', (req, res) => { 51 const chat = { 52 ...req.body, 53 id: shortId.generate(), 54 type: 'joined', 55 createdAt: new Date().toISOString() 56 } 57 // trigger this update to our pushers listeners 58 pusher.trigger('chat-group', 'chat', chat) 59 res.send(chat) 60 }) 61 62 app.listen(process.env.PORT || 2000, () => console.log('Listening at 2000'))
What we have done is to update the POST /message endpoint to handle any message sent from our angular application. The goal is to check where /bot is used to begin a message, then intercept those type of messages after sending a Pusher event to others that a user just called a bot. The code within our POST /message checks if the message starts with /bot. If so we take the second part of the message as what the user is trying to ask the bot to do. After getting the main message we send it to Dialogflow through our utility function. Dialogflow returns a response containing what our bot processed from the message. Then we triggered Pusher’s event to send a message to our group as a bot user using the response from Dialogflow.
Let’s re-run our server like so:
node server.js
Open our angular app and try sending this message:
/bot who are you?
Conclusion
Here, we have been able to build a group chat with a chatbot user. The intention was to give you a general building block that can be built on, explored, and improved to build an amazing chatbot that can do much more with group chats.
I hope this tutorial was helpful and gave you enough information required to start building bots tailored for other use cases, as you deem fit in your organization.
The source code for this tutorial can be found on GitHub. Feel free to explore and add more features.


© 2025 Pusher Ltd. All rights reserved.
Pusher Limited is a company registered in England and Wales (No. 07489873) whose registered office is at MessageBird UK Limited, 3 More London Riverside, 4th Floor, London, United Kingdom, SE1 2AQ.