- Products

- Developers
- User stories
- Blog
- Pricing

Integrate Google reCAPTCHA in Flask
Introduction
In this tutorial, we will look at how to add Google reCAPTCHA v2 to a registration form in Flask.
We will build a Flask app which simply allows users to register, ticking within the reCAPTCHA box to ensure it's not a robot requesting to register.
Google reCAPTCHA is a service that protects websites from spam and abuse.
Prerequisites
- Python 3.7
- pip (Python package installer)
- virtualenv
This tutorial assumes you have basic knowledge in Flask, Python and you know how to navigate your operating system's command line and configure your development environment.
Register for Google reCAPTCHA
In order to integrate Google reCAPTCHA in a Flask-based app, we need to register a site and get an API key pair .
Google provides four types of reCAPTCHA.
- reCAPTCHA v3
- reCAPTCHA v2
- Invisible reCAPTCHA
- reCAPTCHA Android
reCAPTCHA v3 validates requests with a score whilst v2 validates request with the "I am not a robot" checkbox.
The Invisible reCAPTCHA does not need the user to click on a check box instead it is called upon when a user clicks on a button on a site.
In this tutorial let's make use of reCAPTCHA v2 to validate request in a Flask app.
Browse to Google and sign up or login with your Google account.
Click on the My reCAPTCHA blue button to register a site to use reCAPTCHA.
-
In the Label section, choose and enter a label to make it easy to identify the site in the future, for example: register
-
Choose the type of reCAPTCHA you want to use. Choose the reCAPTCHA v2 purposely for this tutorial.
-
In the Domains box, enter the name of the site you are registering, for example: 127.0.0.1 or localhost
-
Click on the Register button to save settings for your site. Google will generate two keys (site key and secret key) after registering a site
Create your virtual environment using Virtualenv
We need to install virtualenv via pip before we can go ahead to create a virtualized environment for this project.
Use the following command to install virtualenv:
pip install virtualenv
Next create a directory to hold the virtualized environment with the mkdir command.
mkdir Google
Afterwards change to the Google directory you created few seconds ago using the command below:
cd Google
Create a virtualized environment with the tool virtualenv
virtualenv reCaptcha
Next change to the directory reCaptcha and activate your virtual environment using the following commands:
1cd reCaptcha 2source bin/activate
Still inside your virtual environment, install the following packages with pip:
1pip install Flask 2 pip install Flask-WTF
The second package we have installed with pip is an integration of Flask and WTForms including CSRF, file upload and reCAPTCHA.
Inside our virtualized environment, create two files as app.py and form.py using the touch command as shown below
touch app.py form.py
Inside the form.py file, import the following packages
1from flask_wtf import Form, RecaptchaField 2 from wtforms import TextField, PasswordField, TextAreaField, StringField, validators
On the first line, we imported Form and RecaptchaField from flask_wtf.
Next we imported TextField , PasswordField, TextAreaField, StringField , and validatorsfrom wtforms .
Beneath the import statement in form.py file, insert the following code
1class RegisterForm(Form): 2 name = StringField('name', [validators.DataRequired(), validators.Length(max=255)]) 3 password = PasswordField('new password', [validators.DataRequired(),validators.Length(min=8)]) 4 email = StringField('emailaddress', [validators.DataRequired(), validators.Length(min=6, max=35)]) 5 recaptcha = RecaptchaField()
Under the Class RegisterForm, we have form fields such as StringField, and PasswordField.
Each field represents a specific data type and contain a number of properties such as a label and description.
Inside the app. py file , import Flask, render_template and request from flask .
render_template will make it possible for us to display the registration form to those who navigate to the register section.
In addition, import the RegisterForm class via the form file.
Afterwards create view method for our registration form.
1// ../reCaptcha/app.py 2 3 from flask import Flask, render_template, request, 4 5 from form import RegisterForm 6 7 app = Flask(__name__) 8 9 app.config['SECRET_KEY'] = 'lablam.2017' 10 app.config['RECAPTCHA_USE_SSL']= False 11 app.config['RECAPTCHA_PUBLIC_KEY']='enter_your_public_key' 12 app.config['RECAPTCHA_PRIVATE_KEY']='enter_your_private_key' 13 app.config['RECAPTCHA_OPTIONS']= {'theme':'black'} 14 15 @app.route('/register', methods=['GET', 'POST']) 16 def register(): 17 form = RegisterForm() 18 19 if form.validate_on_submit(): 20 return "the form has been submitted. Success!" 21 22 return render_template("register.html", form=form) 23 24 if __name__ == '__main__': 25 app.run(port=5000, debug=True)
In the app.py file, add your Google reCAPTCHA keys.
You need to place reCAPTCHA configuration settings below app = Flask(__name__).
1app.config['RECAPTCHA_USE_SSL']= False 2 app.config['RECAPTCHA_PUBLIC_KEY']= 'enter_your_public_key' 3 app.config['RECAPTCHA_PRIVATE_KEY']='enter_your_private_key' 4 app.config['RECAPTCHA_OPTIONS'] = {'theme':'white'}
In the project directory, create a sub-directory using the mkdir command and name it templates.
We will place the registration HTML file inside the templates directory.
You can create HTML files in the templates by using the touch command.
touch register.html
The register.html file will be used to displayed registration form integrated with Google reCAPTCHA by the render_template method .
We will make use of Jinja templates to do so.
Inside the register.html file, place the following code:
1// ../reCaptcha/templates/register.html 2 3 <html> 4 <head> 5 <title>Register</title> 6 </head> 7 <body> 8 <h1>Register form</h1> 9 <form method="POST" action="{{ url_for('register') }}"> 10 {{ form.csrf_token }} 11 {{ form.name.label }} 12 {{ form.name }} 13 <ul> 14 {% for error in form.name.error %} 15 <li style="coloured:red;">{{ error }}</li> 16 {% endfor %} 17 </ul> 18 {{ form.password.label }} 19 {{ form.password }} 20 {% for error in form.password.error %} 21 <ul> 22 <li style="coloured:red;">{{ error }}</li> 23 {% endfor %} 24 </ul> 25 {{ form.email.label }} 26 {{ form.email }} 27 <ul> 28 {% for error in form.email.error %} 29 <li style="coloured:red;">{{ error }}</li> 30 {% endfor %} 31 </ul> 32 {{ form.recaptcha }} 33 <input type="submit" value="submit"> 34 </form> 35 </body> 36 </html>
Afterwards, type the following command on your console:
python app.py
Open your web browser and type the following:
localhost:5000/register
or
127.0.0.1:5000/register
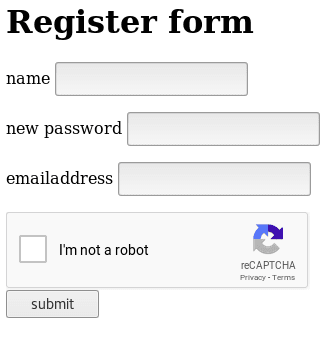
This page below will be displayed to users who navigate to the register section.
Conclusion
In this tutorial, we leverage on flask_wtf to integrate Google reCAPTCHA in Flask.
Because the primary purpose of the tutorial is to show users how to integrate Google reCAPTCHA in Flask, we did not place much emphasis on the user interface.
Google reCAPTCHA can be used to prevent spam abuse
The code is available in GitHub. You can clone it to see how it works.


© 2026 Pusher Ltd. All rights reserved.
Pusher Limited is a company registered in England and Wales (No. 07489873) whose registered office is at MessageBird UK Limited, 3 More London Riverside, 4th Floor, London, United Kingdom, SE1 2AQ.