- Products

- Developers
- User stories
- Blog
- Pricing

Build a geofencing web app using Next.js
- Introduction
- Prerequisites
- Pusher application
- GoogleMaps application
- Installing dependencies
- Setting environment variables
- Getting started
- Setting up the server
- Modify npm scripts
- Building the server routes
- Building the index page
- Choosing a persona
- Building the map components
- The map component
- The map container
- The user marker
- The person marker
- Displaying nearby friends
- Keeping track of nearby friends
- Completing the index page
- Updating the map container
- Conclusion
Introduction
According to Wikipedia, a geo-fence is a virtual perimeter for a real-world geographic area. A geo-fence could be dynamically generated—as in a radius around a point location, or a geo-fence can be a predefined set of boundaries (such as school zones or neighborhood boundaries).
It is quite obvious that geofencing can be very useful for several of real life location-specific applications. With the advent of GPS technology, it becomes very easy to get the position of objects in realtime. These days, almost every smartphone have built-in GPS sensors that can be used to estimate the position of the device using WiFi or Cellular data.
As web technologies advance, a couple of tools are made available to us that can enable us build location-aware applications. One of such tools is the GeolocationAPI which is supported by most of the modern browsers.
With the GeolocationAPI, getting the current position of the device is as simple as running the following code snippet in a browser:
1if ('geolocation' in navigator) { 2 navigator.geolocation.getCurrentPosition(function(position) { 3 console.log({ lat: position.coords.latitude, lng: position.coords.longitude }); 4 }); 5 }
If you are interested in realtime position updates of the device, you can run the following code snippet on the browser:
1if ('geolocation' in navigator) { 2 navigator.geolocation.watchPosition(function(position) { 3 console.log({ lat: position.coords.latitude, lng: position.coords.longitude }); 4 }); 5 }
In this tutorial, we’ll build a very simple application with realtime geofencing updates, to list nearby people within a circular region of 1km radius.
In order to make testing our app as simple as possible, we will not be using any geolocation API in this tutorial. To avoid having to send our friends and coworkers out into the city to test our app, we will have a list of 15 fake people and randomly set their positions. We will also update the positions of the people who are online using an interval that runs every 10 seconds.
In a real application, you would use the GeolocationAPI available on the user’s browser to get the approximate position of the user. You can also use a geolocation service such as Google’s Geolocation API without relying on the GPS of the device.
Here is a screenshot of what we will end up building in this tutorial.
Prerequisites
Before you begin, ensure that you have Node and npm or Yarn installed on your machine. Here is a run-down of the core technologies we will be using.
-
Next.js - A framework for building server-side rendered(SSR) React applications with ease. It handles most of the challenges that come with building SSR React apps.
-
Pusher - Pusher is a technology for building apps with varying realtime needs like push notifications and pub/sub messaging. It is the engine behind the realtime geofencing updates.
-
GoogleMaps API - GoogleMaps JavaScript API provides utilities that make it possible to add interactive and customizable maps to web apps. We will use the react-google-maps package to enable us to add GoogleMaps to our React application.
-
React - A very popular JavaScript DOM rendering framework for building scalable web applications using a component-based architecture.
A few other libraries will be used as we will see in a moment. Also ensure that you have Node installed on your machine.
Pusher application
Create a new application on your Pusher Dashboard to get your application credentials. The following credentials are required:
APP_IDAPP_KEYAPP_SECRETAPP_CLUSTER
GoogleMaps application
To use the Maps JavaScript API, you must register your app project on the Google API Console and get a Google API key which you can add to your app. Follow this quick guide to register your Maps app and get your API credentials.
Installing dependencies
Create a new directory for the application and run the following command to install the required dependencies for the app.
1# Create a new directory 2 mkdir realtime-geofencing-app 3 4 # cd into the new directory 5 cd realtime-geofencing-app 6 7 # Initiate a new package and install app dependencies 8 npm init -y 9 10 npm install react react-dom next pusher pusher-js react-google-maps 11 npm install express body-parser morgan cors dotenv axios uuid 12 npm install --save-dev cross-env npm-run-all
Setting environment variables
Create a .env file in the root directory of your application and add your application credentials as follows.
1PUSHER_APP_ID=YOUR_APP_ID 2 PUSHER_APP_KEY=YOUR_APP_KEY 3 PUSHER_APP_SECRET=YOUR_APP_SECRET 4 PUSHER_APP_CLUSTER=YOUR_APP_CLUSTER 5 6 # GOOGLE MAPS API CREDENTIALS 7 GMAPS_API_KEY=YOUR_GOOGLE_MAPS_API_KEY
Ensure that you use the same variable names as specified in the above snippet. We will refer to them at several points in our code.
Next create a Next.js configuration file named next.config.js in the root directory of your application with the following content:
1/* next.config.js */ 2 3 const webpack = require('webpack'); 4 require('dotenv').config(); 5 6 module.exports = { 7 webpack: config => { 8 const env = Object.keys(process.env).reduce((acc, curr) => { 9 acc[`process.env.${curr}`] = JSON.stringify(process.env[curr]); 10 return acc; 11 }, {}); 12 13 config.plugins.push(new webpack.DefinePlugin(env)); 14 15 return config; 16 } 17 };
Since Next.js uses Webpack in the background for module loading and bundling, we are simply configuring Webpack to be able to provide the environment variables we have defined and make them available to our React components by accessing the process.env object.
Getting started
Setting up the server
We will go ahead to setup a simple server using Next.js to wrap an Express application server. We will also load the necessary middlewares for the Express server and then we will configure Pusher using the credentials we added to our environment variables.
Create a server.js file in the root directory of your application and add the following code snippet to setup the server:
1/* server.js */ 2 3 const cors = require('cors'); 4 const uuid = require('uuid').v4; 5 const next = require('next'); 6 const Pusher = require('pusher'); 7 const logger = require('morgan'); 8 const express = require('express'); 9 const bodyParser = require('body-parser'); 10 const dotenv = require('dotenv').config(); 11 12 const dev = process.env.NODE_ENV !== 'production'; 13 const port = process.env.PORT || 3000; 14 15 const app = next({ dev }); 16 const handler = app.getRequestHandler(); 17 18 // Ensure that your pusher credentials are properly set in the .env file 19 // Using the specified variables 20 const pusher = new Pusher({ 21 appId: process.env.PUSHER_APP_ID, 22 key: process.env.PUSHER_APP_KEY, 23 secret: process.env.PUSHER_APP_SECRET, 24 cluster: process.env.PUSHER_APP_CLUSTER, 25 encrypted: true 26 }); 27 28 app.prepare() 29 .then(() => { 30 31 const server = express(); 32 33 server.use(cors()); 34 server.use(logger('dev')); 35 server.use(bodyParser.json()); 36 server.use(bodyParser.urlencoded({ extended: true })); 37 38 server.get('*', (req, res) => { 39 return handler(req, res); 40 }); 41 42 server.listen(port, err => { 43 if (err) throw err; 44 console.log(`> Ready on http://localhost:${port}`); 45 }); 46 47 }) 48 .catch(ex => { 49 console.error(ex.stack); 50 process.exit(1); 51 });
Modify npm scripts
Finally, we will modify the "scripts" section of the package.json file to look like the following snippet:
1/* package.json */ 2 3 "scripts": { 4 "dev": "node server.js", 5 "build": "next build", 6 "prod:server": "cross-env NODE_ENV=production node server.js", 7 "start": "npm-run-all -s build prod:server" 8 }
We have gotten all we need to start building our app components. If you run the command npm run dev on your terminal now, it will start up the application server on port 3000 if it is available. However, nothing happens on the browser yet, because we have not built any index page component.
Building the server routes
As stated earlier for our app, we have a list of 15 people. We will randomly create a person object for each person containing the following:
id- UUID identifier for the personname- the name of the personposition- a random{ lat, lng }position coordinate for the persononline- the online status of the person
Make the following modifications to the server.js file.
1/* server.js */ 2 3 app.prepare() 4 .then(() => { 5 6 // server.use() middlewares here ... 7 8 const initializePeople = ({ lat, lng }) => { 9 10 const randomInRange = num => (width = 0.01) => ((Math.random() * width * 2) + num - width); 11 12 const randomLat = randomInRange(lat); 13 const randomLng = randomInRange(lng); 14 15 const people = [ 'Stephanie', 'John', 'Steve', 'Anna', 'Margaret', 'Felix', 'Chris', 'Jamie', 'Rose', 'Bob', 'Vanessa', '9lad', 'Bridget', 'Sebastian', 'Richard' ]; 16 17 return people.map(name => ({ 18 name, 19 id: uuid(), 20 position: { lat: randomLat(0.0075), lng: randomLng(0.02) }, 21 online: false 22 })); 23 24 }; 25 26 const referencePosition = { lat: 6.4311415, lng: 3.4625833 }; 27 28 let people = initializePeople(referencePosition); 29 30 server.get('/people', (req, res, next) => { 31 res.json({ status: 'success', people }); 32 }); 33 34 server.post('/transit/:id', (req, res, next) => { 35 const id = req.params.id; 36 const { lat, lng } = req.body; 37 38 people.forEach((person, index) => { 39 if (person.id === id) { 40 people[index] = { ...person, position: { lat, lng } }; 41 42 pusher.trigger('map-geofencing', 'transit', { 43 person: people[index], people 44 }); 45 } 46 }); 47 }); 48 49 server.post('/:presence/:id', (req, res, next) => { 50 const id = req.params.id; 51 const presence = req.params.presence; 52 53 if (['online', 'offline'].includes(presence)) { 54 people.forEach((person, index) => { 55 if (person.id === id) { 56 return people[index] = { ...person, online: presence === 'online' }; 57 } 58 }); 59 } 60 }); 61 62 // server.get('*') is here ... 63 64 }) 65 .catch(ex => { 66 console.error(ex.stack); 67 process.exit(1); 68 });
First, we create the initializePeople() function, which loops through the list of 15 people and creates a person object for each of them with random position coordinates based on a reference position. It then returns the collection of person objects.
Next, we create the people collection on the server by calling initializePeople() with a reference position. We then go ahead to define the server routes.
We first define the GET /people route. Whenever a client makes a GET request to the /people endpoint, it gets the current people collection from the server in the returned response.
On the POST /transit/:id route, we are fetching the ID of the person from the id route parameter. We then fetch the person’s current position from req.body through the help of the body-parser middleware we added earlier.
Next, we update the person’s position on the people collection. Then, we trigger a transit event on the map-geofencing Pusher channel, passing the updated person and people collection. This is important for the realtime behavior of the app.
Finally, we define the POST /:presence/:id route which accepts two route parameters: presence and id. The presence parameter can be either online or offline. We simply set the online status of the person with the given id parameter to either true or false based on the value of presence.
Building the index page
Next.js requires that you create the page components of your app in a pages directory. We will go ahead and create a pages directory in our app root directory and create a new index.js file inside it for the index page of our application.
It is considered a good practice to have a layout that can be reused across multiple pages. It gives you a form of boilerplate and saves you from unnecessary repetitions.
Before we add content to the index page, we will build a Layout component that can be used in our app pages as a boilerplate. Go ahead and create a components directory in your app root. Create a new Layout.js file inside the just created components directory with the following content:
1/* components/Layout.js */ 2 3 import React, { Fragment } from 'react'; 4 import Head from 'next/head'; 5 6 const Layout = props => ( 7 <Fragment> 8 <Head> 9 <meta charSet="utf-8" /> 10 <meta name="viewport" content="width=device-width, initial-scale=1, shrink-to-fit=no" /> 11 <link rel="stylesheet" href="https://maxcdn.bootstrapcdn.com/bootstrap/4.0.0/css/bootstrap.min.css" integrity="sha384-Gn5384xqQ1aoWXA+058RXPxPg6fy4IWvTNh0E263XmFcJlSAwiGgFAW/dAiS6JXm" crossOrigin="anonymous" /> 12 <title>{props.pageTitle || 'Realtime Geofencing'}</title> 13 </Head> 14 {props.children} 15 </Fragment> 16 ); 17 18 export default Layout;
Here, we try not to do so much. We are simply using the next/head component to add meta information to the <head> of our pages. We have also added a link to the Bootstrap CDN file to add some default styling to our app. We are also setting the page title dynamically from props and rendering the page contents using {props.children}.
Now let's go ahead and add content to the pages/index.js file we created earlier:
1/* pages/index.js */ 2 3 import React, { Component, Fragment } from 'react'; 4 import axios from 'axios'; 5 import Pusher from 'pusher-js'; 6 import Layout from '../components/Layout'; 7 8 class IndexPage extends Component { 9 10 state = { id: null, people: [] } 11 12 endConnection = () => { 13 this.pusher.disconnect(); 14 axios.post(`/offline/${this.state.id}`); 15 } 16 17 componentWillMount() { 18 this.pusher = new Pusher(process.env.PUSHER_APP_KEY, { 19 cluster: process.env.PUSHER_APP_CLUSTER, 20 encrypted: true 21 }); 22 23 this.channel = this.pusher.subscribe('map-geofencing'); 24 } 25 26 componentDidMount() { 27 axios.get('/people').then(({ data }) => { 28 const { people = [] } = data; 29 this.setState({ people }); 30 }); 31 32 window.onbeforeunload = this.endConnection; 33 } 34 35 componentWillUnmount() { 36 this.endConnection(); 37 } 38 39 }; 40 41 export default () => <IndexPage />
First, we initialize the state with two props namely:
-
id- UUID used to identify the current user. This is initialized withnulland is updated when a persona is selected. -
people- An array of people with their respective position coordinates. This is initialized with an empty array ([]). It will be populated after we fetch people from the server.
Next, we create the endConnection() method which terminates the current Pusher connection and also sends an /offline request to the server for the current user. The endConnection() method is called before the component is unmounted or before the page is unloaded.
On the componentWillMount() lifecycle method, we set up a Pusher connection and a channel subscription to the map-geofencing channel.
When the component is mounted as seen in the componentDidMount() lifecycle method, we fetch the people collection from the server by making a GET HTTP request using axios to the /people endpoint. We then update the state with the people collection gotten from the response.
We will go ahead and add the render() method to the IndexPage component. Make the following additions to the IndexPage component.
1/* pages/index.js */ 2 3 import ChoosePersona from '../components/ChoosePersona'; 4 5 class IndexPage extends Component { 6 7 // previous methods here ... 8 9 personaSelected = id => { 10 this.setState({ id }); 11 axios.post(`/online/${id}`); 12 } 13 14 render() { 15 16 const { id, people } = this.state; 17 const person = people.find(person => person.id === id) || {}; 18 const peopleOffline = people.filter(person => !person.online); 19 20 return ( 21 <Layout pageTitle="Realtime Geofencing"> 22 <main className="container-fluid position-absolute h-100 bg-light"> 23 { 24 id ? <div className="row position-absolute w-100 h-100"></div> 25 : <ChoosePersona count={5} people={peopleOffline} onSelected={this.personaSelected} /> 26 } 27 </main> 28 </Layout> 29 ); 30 31 } 32 33 };
First, we import the ChoosePersona component, which we will create in a moment. This component enables us to activate a selected user.
In the render() method, we conditionally render the ChoosePersona component when there is no active user. The ChoosePersona component will randomly display a maximum of 5 people who are offline, using the count and people props. Notice how we filter the people collection to fetch those who are offline.
We also added a personaSelected() method which is passed to the ChoosePersona component via the onSelected prop, and is triggered when a user persona has been chosen. The method sends an /online request to the server to activate the selected user.
Choosing a persona
Now we will go ahead and create the ChoosePersona component we saw in the last section. Create a new ChoosePersona.js file inside the components directory and add the following content:
1/* components/ChoosePersona.js */ 2 3 import React from 'react'; 4 5 const ChoosePersona = props => { 6 7 const { people = [], count = 3, onSelected = f => f } = props; 8 9 const nameBadgeStyles = { 10 fontSize: '0.8rem', 11 height: 40, 12 borderRadius: 20, 13 cursor: 'pointer' 14 }; 15 16 const choosePersona = id => evt => onSelected(id); 17 18 const randomPeople = count => people => { 19 20 const selected = []; 21 let i = 0; 22 23 count = Math.max(0, Math.min(count, people.length)); 24 25 while (i < count) { 26 const index = Math.floor(Math.random() * people.length); 27 if (selected.includes(index)) continue; 28 ++i && selected.push(index); 29 } 30 31 return selected.map(index => { 32 const { id, name } = people[index]; 33 const className = 'd-flex align-items-center text-center text-white bg-secondary font-weight-bold py-2 px-4 mx-1 my-2'; 34 35 return <span key={index} className={className} style={nameBadgeStyles} title={name} onClick={ choosePersona(id) }>{name}</span> 36 }); 37 38 }; 39 40 return ( 41 <div className="w-100 h-100 px-3 pb-5 d-flex flex-wrap align-items-center align-content-center justify-content-center"> 42 <span className="h3 text-dark text-center py-3 w-100 font-weight-bold">Choose your Persona</span> 43 { randomPeople(count)(people) } 44 </div> 45 ); 46 }; 47 48 export default ChoosePersona;
The randomPeople() function takes a count as its only argument - which is the number of random personas to pick from the people collection prop. It then uses .map() to create an array of <span> elements for each randomly picked persona and returns the array.
Notice the onClick event handler for each <span>. The choosePersona(person) function is used as the handler. It simply invokes the function passed to the onSelected prop with the id of the selected persona as argument.
Finally, we render some random personas based on the count and people props passed to the ChoosePersona component.
If you test the app now in your browser, with npm run dev, you should see the following screen. Ensure that you hit Ctrl+C (Windows) or Cmd+C (Mac) on your command terminal before running npm run dev to restart the server.

Building the map components
We will go ahead and build the map components. As stated earlier in this tutorial, we will be using the react-google-maps package for easy integration of the GoogleMaps API with our application.
The map component
We will start with building the Map component. This a wrapper component for the map. Create a new Map.js file inside the components directory and add the following content:
1/* components/Map.js */ 2 3 import React, { Fragment, Component } from 'react'; 4 import MapContainer from './MapContainer'; 5 6 const API_KEY = process.env.GMAPS_API_KEY; 7 const MAP_URL = `https://maps.googleapis.com/maps/api/js?key=${API_KEY}&v=3.exp&libraries=geometry`; 8 9 class Map extends Component { 10 11 render() { 12 const containerStyles = { 13 height: '100%', 14 width: '100%', 15 position: 'relative' 16 }; 17 18 return <MapContainer 19 googleMapURL={MAP_URL} 20 loadingElement={<div style={containerStyles} />} 21 containerElement={<div style={containerStyles} />} 22 mapElement={<div style={containerStyles} />} 23 {...this.props} 24 /> 25 } 26 27 }; 28 29 export default Map;
Here we form the MAP_URL using the API_KEY of the GoogleMaps app we created earlier for our application. We also render the MapContainer passing in the MAP_URL. The MapContainer component contains the map and other visual elements such as markers and shape regions.
Notice, how we pass the props received from the Map component to the MapContainer. We will go ahead and create the MapContainer component.
The map container
Create a new MapContainer.js file inside the components directory and add the following content:
1/* components/MapContainer.js */ 2 3 import axios from 'axios'; 4 import React, { Fragment, Component } from 'react'; 5 import { withGoogleMap, withScriptjs, GoogleMap } from 'react-google-maps'; 6 7 import UserMarker from './UserMarker'; 8 import PersonMarker from './PersonMarker'; 9 10 class MapContainer extends Component { 11 12 withinRegion = (position, radius) => { 13 const to = new google.maps.LatLng(position.lat, position.lng); 14 const distance = google.maps.geometry.spherical.computeDistanceBetween; 15 return point => { 16 const from = new google.maps.LatLng(point.lat, point.lng); 17 return distance(from, to) <= radius; 18 } 19 } 20 21 render() { 22 const { person: { id, position }, radius, people, channel } = this.props; 23 24 return ( 25 <GoogleMap ref={elem => this.map = elem} zoom={15} center={position}> 26 <Fragment> 27 { people.map((person, index) => { 28 29 const props = { key: index, radius, person, channel }; 30 const withinRegion = point => (position, radius) => this.withinRegion(position, radius)(point); 31 32 return (person.id === id) 33 ? <UserMarker {...props} /> 34 : <PersonMarker user={this.props.person} withinRegion={withinRegion} {...props} /> 35 36 }) } 37 </Fragment> 38 </GoogleMap> 39 ); 40 } 41 42 }; 43 44 export default withScriptjs(withGoogleMap(MapContainer));
First, we create the withinRegion() method that enables us determine if a point is within a defined circular region. It takes the center and radius of the region as its arguments, and returns a function. The returned function takes a point as argument and returns if the point is in the region.
In the render() method, we render the GoogleMap component passing the position of the current user as the center prop. We loop through the people collection received by the MapComponent and render different types of makers based on the person.
Notice that we create a ref to the GoogleMap component and store it in the this.map property. This ref will give us access to the underlying google.maps.Map instance, which we will need later to update the map properties.
We render the UserMarker for the currently active user and the PersonMarker for other people. We also pass the radius, person and channel props to the marker components. The channel prop contains a reference to the current Pusher channel subscription.
For the PersonMarker component, we pass in the currently active user to the user prop. We also pass in an inverted version of the withinRegion() method to the withinRegion prop.
Finally, we export the higher-order component withScriptjs(withGoogleMap(MapContainer)). See the react-google-maps documentation to learn more. We will go ahead and create the UserMarker and PersonMarker components.
The user marker
Create a new UserMarker.js file inside the components directory and add the following content:
1/* components/UserMarker.js */ 2 3 import React, { Fragment, Component } from 'react'; 4 import { Marker, Circle } from 'react-google-maps'; 5 6 class UserMarker extends Component { 7 8 constructor(props) { 9 super(props); 10 const { person: { id = null, position = null }, channel = null } = this.props; 11 12 this.id = id; 13 this.channel = channel; 14 this.state = { position }; 15 } 16 17 componentDidMount() { 18 this.channel && this.channel.bind('transit', ({ person = {} }) => { 19 const { id, position } = person; 20 (id === this.id) && this.setState({ position }); 21 }); 22 } 23 24 render() { 25 26 const { radius } = this.props; 27 const { position } = this.state; 28 const regionOptions = { fillOpacity: 0.1, strokeWidth: 1, strokeOpacity: 0.2 }; 29 30 const MARKER_SIZE = new google.maps.Size(50, 70); 31 const MARKER_ICON = 'https://i.imgur.com/Rhv5xQh.png'; 32 33 return <Fragment> 34 <Marker position={position} title="You" options={{ icon: { url: MARKER_ICON, scaledSize: MARKER_SIZE } }} /> 35 <Circle center={position} radius={radius} options={regionOptions} /> 36 </Fragment> 37 38 } 39 }; 40 41 export default UserMarker;
The UserMarker component stores the position of the current active user in the position property of the component’s state.
When the component mounts, we bind to the transit event on the Pusher channel, and update the state with the new position of the user. We only update the state when the current user’s position changes.
In the render() method, we render a red marker icon for the currently active user by setting the MARKER_ICON constant as the marker icon URL. We also render a Circle region using the user’s current position as center and the radius received as prop.
The person marker
Create a new PersonMarker.js file inside the components directory and add the following content:
1/* components/PersonMarker.js */ 2 3 import React, { Component } from 'react'; 4 import { Marker } from 'react-google-maps'; 5 6 const BLACK_MARKER = 'https://i.imgur.com/8dOrls4.png?2'; 7 const GREEN_MARKER = 'https://i.imgur.com/9v6uW8U.png'; 8 9 class PersonMarker extends Component { 10 11 constructor(props) { 12 super(props); 13 14 const { 15 user: { id: userID, position: userPosition }, 16 person: { id = null, position = null }, 17 channel = null 18 } = this.props; 19 20 this.id = id; 21 this.userID = userID; 22 this.channel = channel; 23 24 this.state = { position, userPosition }; 25 } 26 27 componentDidMount() { 28 this.channel && this.channel.bind('transit', ({ person = {} }) => { 29 const { id, position } = person; 30 (id === this.id) && this.setState({ position }); 31 (id === this.userID) && this.setState({ userPosition: position }); 32 }); 33 } 34 35 render() { 36 const { position, userPosition } = this.state; 37 const { person: { name }, radius, withinRegion = f => f } = this.props; 38 39 const within = !!(withinRegion(position)(userPosition, radius)); 40 41 const MARKER_SIZE = new google.maps.Size(25, 35); 42 const MARKER_ICON = within ? GREEN_MARKER : BLACK_MARKER; 43 44 return <Marker position={position} title={name} options={{ icon: { url: MARKER_ICON, scaledSize: MARKER_SIZE } }} /> 45 } 46 47 }; 48 49 export default PersonMarker;
The PersonMarker component stores the position of the person in the position property of the component’s state and the position of the current active user in the userPosition property of the state.
When the component mounts, we bind to the transit event on the Pusher channel, and update the state with the new position of the person or currently active user. We update the state’s position when the person’s position changes, and the userPosition when the currently active user’s position changes.
In the render() method, we use the withinRegion() method received as prop to check if the person is within the defined circular region of the currently active user. We then conditionally render a green marker icon if the person is within the region, otherwise, we render a black icon.
Displaying nearby friends
Now, we will create a component for displaying a list of nearby people/friends. We will display a green marker icon for people within the current user’s region and a black icon for other people.
Create a new NearbyFriends.js file inside the components directory and add the following content:
1/* components/NearbyFriends.js */ 2 3 import React, { Component, Fragment } from 'react'; 4 5 const BLACK_MARKER = 'https://i.imgur.com/8dOrls4.png?2'; 6 const GREEN_MARKER = 'https://i.imgur.com/9v6uW8U.png'; 7 8 class NearbyFriends extends Component { 9 10 state = { people: [] } 11 12 updatePeople = people => this.setState({ people }) 13 14 render() { 15 const { people } = this.state; 16 const { person: { name, id } } = this.props; 17 18 const nameBadgeStyles = { 19 fontSize: '0.8rem', 20 height: 40, 21 borderRadius: 20, 22 cursor: 'pointer' 23 }; 24 25 const showPeople = (filterFn, marker) => { 26 return <Fragment> 27 { people.filter(filterFn).map((person, index) => { 28 29 if (person.id === id) return null; 30 31 return ( 32 <div key={index} className="d-flex border-bottom border-gray w-100 px-4 py-3 font-weight-bold text-secondary align-items-center"> 33 34 <div className="pl-2" style={{ width: 30, height: 30 }}> 35 <img src={marker} className="img-fluid" alt="marker" /> 36 </div> 37 38 <span className="pl-3">{person.name}</span> 39 40 </div> 41 ); 42 43 }) } 44 </Fragment> 45 }; 46 47 return id && <Fragment> 48 49 <div className="border-bottom border-gray w-100 px-2 d-flex align-items-center bg-white justify-content-between" style={{ height: 90 }}> 50 <span className="h4 text-dark mb-0 mx-4 font-weight-bold">Nearby Friends</span> 51 <span className="d-flex align-items-center text-center text-white bg-primary font-weight-bold py-2 px-4 mx-4" style={nameBadgeStyles} title={name}>{name}</span> 52 </div> 53 54 <div className="w-100 d-flex flex-wrap align-items-start align-content-start position-relative" style={{ height: 'calc(100% - 90px)', overflowY: 'auto' }}> 55 { showPeople(person => person.within, GREEN_MARKER) } 56 { showPeople(person => !person.within, BLACK_MARKER) } 57 </div> 58 59 </Fragment> 60 } 61 }; 62 63 export default NearbyFriends;
We initialize the state with a people property set to an empty array([]). We then expose the updatePeople() method which will make it possible for us to update the people property of the component’s state.
In the render() method, we define the showPeople() method which will filter the people collection based on a filterFn and renders the filtered list of people using the given marker. Notice in the showPeople() function that we skip rendering the currently active user in the list.
Finally, we render the two lists of people. First, we render the list of the people within the user’s region with a green marker. Then, we render the list of the rest people with a black marker.
Keeping track of nearby friends
Now that we have our rendered list of nearby friends, we need to be able to update the list as the position of either the user or some other person changes.
Currently, our map markers are sensitive to position changes but our list is not. However, the list has an updatePeople() method that can enable us to update the people in the list based on position changes.
We will go ahead and create a bridge between the map and the list from the parent IndexPage component.
Completing the index page
Make the following additions to the pages/index.js file:
1/* pages/index.js */ 2 3 import Map from '../components/Map'; 4 import NearbyFriends from '../components/NearbyFriends'; 5 6 class IndexPage extends Component { 7 8 regionFiltered = people => this.nearby.updatePeople(people) 9 10 render() { 11 const { id, people } = this.state; 12 const person = people.find(person => person.id === id) || {}; 13 const peopleOffline = people.filter(person => !person.online); 14 15 return ( 16 <Layout pageTitle="Realtime Geofencing"> 17 <main className="container-fluid position-absolute h-100 bg-light"> 18 { 19 id ? <div className="row position-absolute w-100 h-100"> 20 21 <section className="col-md-9 px-0 border-right border-gray position-relative h-100"> 22 <Map person={person} radius={1000} people={people} channel={this.channel} onRegionFiltered={this.regionFiltered} /> 23 </section> 24 25 <section className="col-md-3 position-relative d-flex flex-wrap h-100 align-items-start align-content-between bg-white px-0"> 26 <NearbyFriends ref={elem => this.nearby = elem} person={person} /> 27 </section> 28 29 </div> 30 : <ChoosePersona count={5} people={peopleOffline} onSelected={this.personaSelected} /> 31 } 32 </main> 33 </Layout> 34 ); 35 } 36 37 }
Here, we update the render() method to render the Map and NearbyFriends components. You can see that we create a ref to the NearbyFriends component, storing it in the this.nearby component property.
We also add the regionFiltered() bridge method. This method receives a people collection as argument. It then calls the updatePeople() method on the ref created for the NearbyFriends component. This makes it possible for us to update the list as we so required.
To complete the bridge, we pass the regionFiltered() method to the Map component via the onRegionFiltered prop. We will go ahead and update the MapContainer component to handle position changes.
Updating the map container
Make the following additions to the components/MapContainer.js file:
1/* components/MapContainer.js */ 2 3 class MapContainer extends Component { 4 5 analyzeRegion = (position, radius) => people => { 6 const { onRegionFiltered = f => f } = this.props; 7 const withinRegion = this.withinRegion(position, radius); 8 9 const mappedPeople = people.map(person => { 10 const { position } = person || {}; 11 const within = withinRegion(position); 12 return { ...person, within }; 13 }); 14 15 onRegionFiltered(mappedPeople); 16 } 17 18 componentDidMount() { 19 20 const { person: { id, position }, radius, people = [], channel = null } = this.props; 21 const mapContext = this.map.context['__SECRET_MAP_DO_NOT_USE_OR_YOU_WILL_BE_FIRED']; 22 const setMapCenter = mapContext.setCenter.bind(mapContext); 23 24 let { lat, lng } = position; 25 26 channel && channel.bind('transit', ({ person = {}, people }) => { 27 const { id: $id, position: $position } = person; 28 const isUser = id === $id; 29 const center = isUser ? $position : position; 30 31 isUser && setMapCenter(center); 32 this.analyzeRegion(center, radius)(people); 33 }); 34 35 this.positionUpdate = setInterval(() => { 36 lat = lat + Math.random() * 0.001; 37 lng = lng + Math.random() * 0.001; 38 39 axios.post(`/transit/${id}`, { lat, lng }); 40 }, 10000); 41 42 this.analyzeRegion(position, radius)(people); 43 44 } 45 46 componentWillUnmount() { 47 clearInterval(this.positionUpdate); 48 } 49 50 };
First, we add an analyzeRegion() method that uses the withinRegion() method defined earlier to modify the people collection based on the current user’s position, setting the within property for each person in the collection. It then calls the onRegionFiltered() method received as prop to the component, which in turns updates the people collection on the list as we stated earlier.
We then add the componentDidMount() lifecycle method. When the component mounts, we get the setMapCenter method from the underlying google.maps.Map instance which we will need to update the center of the map.
We then bind to the transit event on the Pusher channel, and update the center of the map to the new position of the currently active user. We also call the analyzeRegion() method to update the people on the NearbyFriends list.
Next, we create an interval that randomly changes the user’s position every 10 seconds and triggers a realtime position update of the user by making a server request to the /transit/:id endpoint.
Finally, we clear the interval when the component is unmounted.
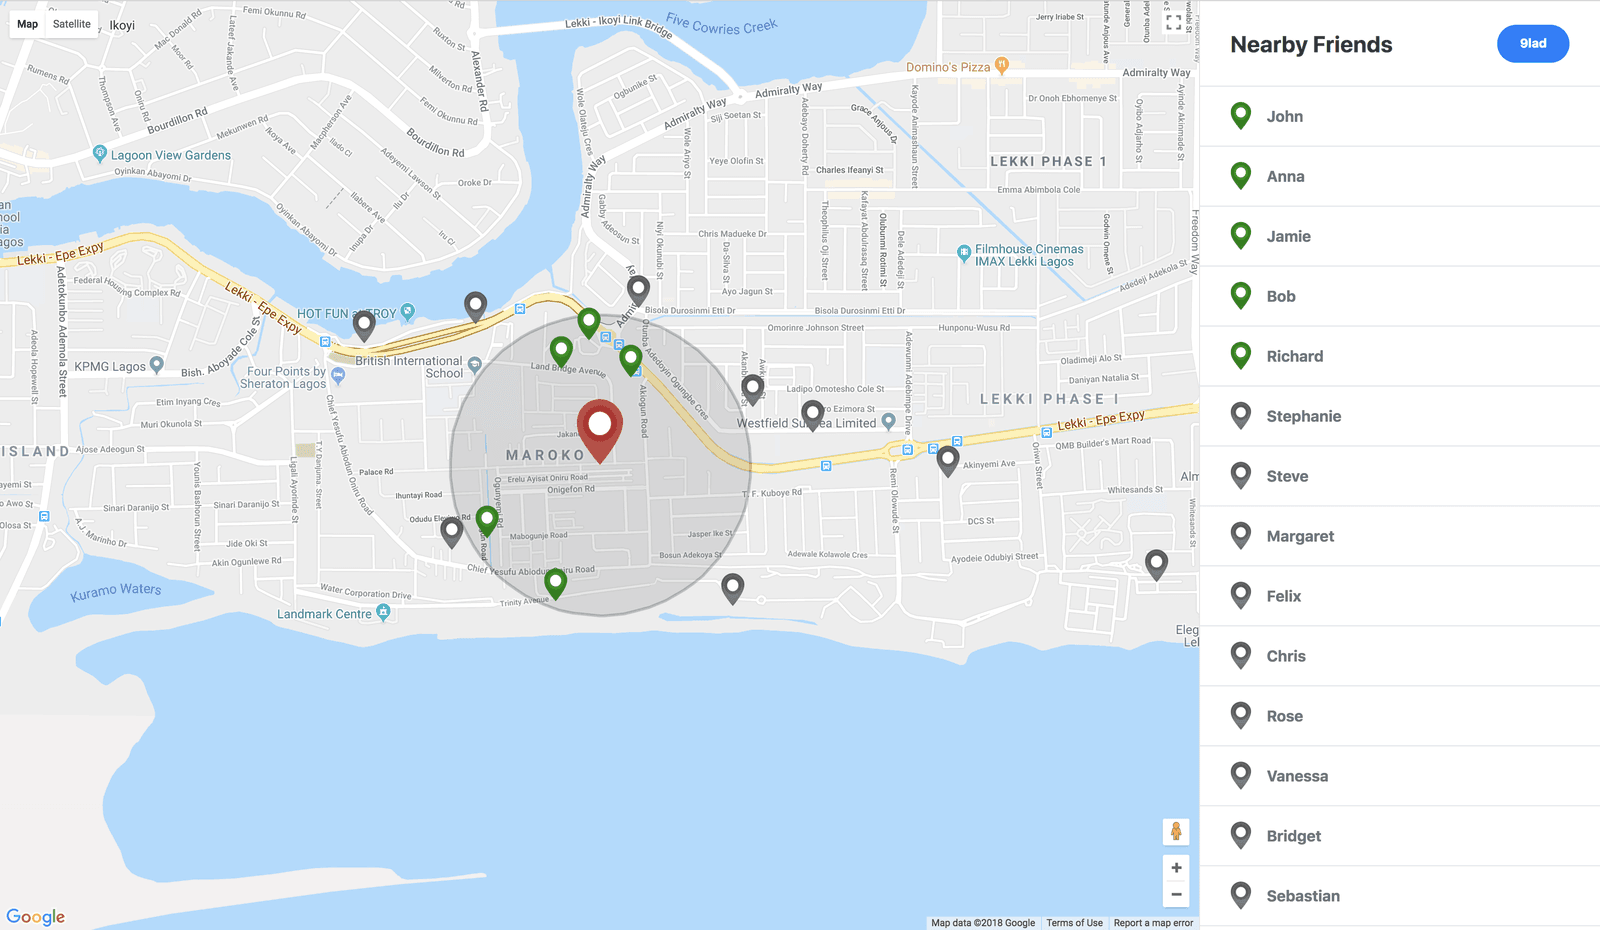
Bravo. If you made it to this point, then you have successfully built a realtime location-aware application app with geofencing updates using Next.js and Pusher.
Test the app now in your browser, with npm run dev. Choose a persona and see how the position of the user along with the circular geofence updates in realtime. Your screen should look like the following screenshot.
Ensure that you hit Ctrl+C (Windows) or Cmd+C (Mac) on your command terminal before running npm run dev to restart the server.
Conclusion
In this tutorial, we have been able to build a very simple realtime application with geofencing updates using Next.js, React, GoogleMaps API and Pusher. You can check the source code of this tutorial on GitHub.
Do check the documentation for each technology we used in this project to learn more about other ways of using them. I duly hope that this tutorial is of help to you.


© 2025 Pusher Ltd. All rights reserved.
Pusher Limited is a company registered in England and Wales (No. 07489873) whose registered office is at MessageBird UK Limited, 3 More London Riverside, 4th Floor, London, United Kingdom, SE1 2AQ.