- Products

- Developers
- User stories
- Blog
- Pricing

Implement geofencing in Ionic
- Introduction
- Introduction
- Prerequisites
- Setup and folder structure
- Installing dependencies
- Building our server
- Realtime location updates
- Geofence updates
- Home page
- Realtime location updates
- Setting up geofences
- Setting up the map component
- Introducing Pusher and updating location in realtime
- Admin page
- Using Ngrok as a proxy
- Running on an emulator
- Conclusion
Introduction
Introduction
A geo-fence is a virtual perimeter for a real-world geographic area. Geofencing is the use of GPS or RFID technology to create a virtual geographic boundary, enabling software to trigger a response when a mobile device enters or leaves a particular area.
Using Ionic, you can create a mobile application using web technologies and use a wide array of existing components. Using Pusher, we can enable realtime functionalities in the application using Pusher’s pub/sub pattern.
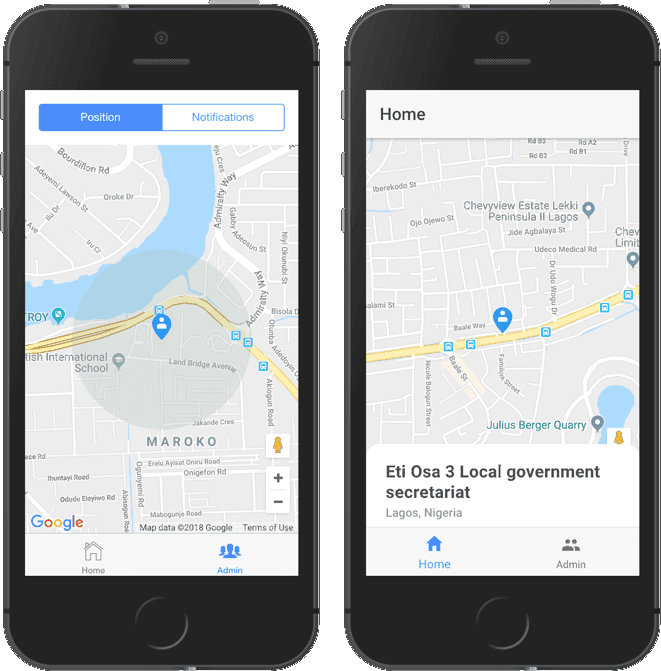
We’ll be building a realtime location tracker application using Pusher, Ionic and the Google Maps library. Using the application, admin users will be notified when a user exits a predefined geofence. When this happens, the admin user receives a notification containing the user’s current location
Here’s a demo of the final product:
Prerequisites
To follow this tutorial a basic understanding of Angular, Ionic and Node.js is required. Please ensure that you have Node and npm installed before you begin.
We’ll be using these tools to build out our application:
We’ll be sending messages to the server and using Pusher’s pub/sub pattern, we’ll listen to and receive messages in realtime. To make use of Pusher you’ll have to create an account here.
After account creation, visit the dashboard. Click Create new Channels app, fill out the details, click Create my app, and make a note of the details on the App Keys tab.
Let’s build!
Setup and folder structure
We’ll initialize our project using the Ionic CLI (command line interface). First, install the CLI by running npm install -g ionic in your terminal. NPM is a package manager used for installing packages. It will be available on your PC if you have Node installed.
To create a new Ionic project called geofence``-app using the CLI, open a terminal and run:
ionic start geofence-app tabs
The command uses the CLI to create a new project using the tabs template. Follow the prompt and integrate your app with Cordova to target IOS and Android.
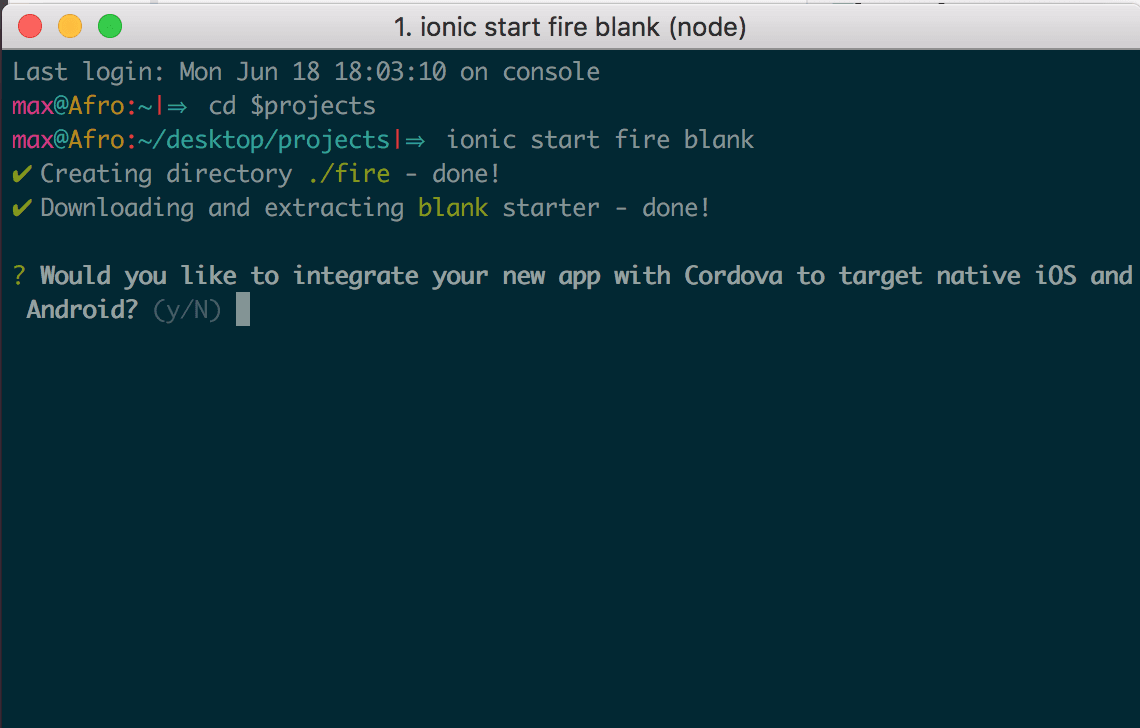
Type Y to integrate Cordova into the application. The next prompt will ask if you want to integrate Ionic pro into the application. If you have an Ionic pro account, type Y and N if you don’t.
The Ionic team provides three ready made starter templates. You can check out the rest of the templates here.
If you don’t have Cordova installed on your PC, install it by running the following command:
npm install -g cordova
Open the newly created folder, your folder structure should look something like this:
1geofence-app/ 2 resources/ 3 node_modules/ 4 src/ 5 app/ 6 app.component.html 7 app.module.ts 8 app.scss 9 ... 10 assets/ 11 ... 12 pages/ 13 home/ 14 about/ 15 ...
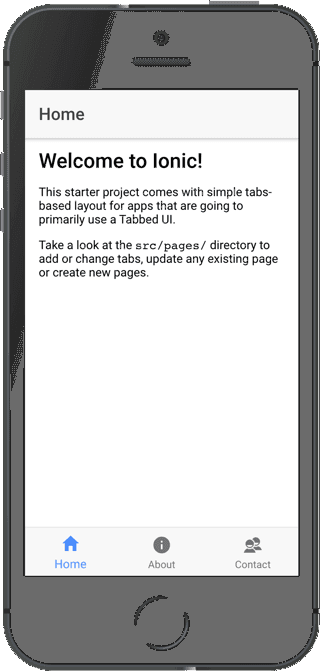
Open a terminal inside the project folder and start the application by running ionic serve. A browser window should pop up and you should see screenshot below.
Installing dependencies
Next, run the following commands in the root folder of the project to install dependencies.
1// install depencies required to build the server 2 npm install express body-parser dotenv pusher sentiment uuid 3 4 // front-end dependencies 5 npm install pusher-js @types/pusher-js @agm/core
Building our server
Now that we have our application running, let’s build out our server.
To do this we’ll make user of Express. Express is a fast, unopinionated, minimalist web framework for Node.js. We’ll use this to receive requests from our Angular application.
Create a file called server.js in the root of the project and update it with the code snippet below:
1// server.js 2 3 require('dotenv').config(); 4 const express = require('express'); 5 const bodyParser = require('body-parser'); 6 7 const app = express(); 8 const port = process.env.PORT || 4000; 9 10 app.use(bodyParser.json()); 11 app.use(bodyParser.urlencoded({ extended: false })); 12 app.use((req, res, next) => { 13 res.header('Access-Control-Allow-Origin', '*'); 14 res.header( 15 'Access-Control-Allow-Headers', 16 'Origin, X-Requested-With, Content-Type, Accept' 17 ); 18 next(); 19 }); 20 21 app.listen(port, () => { 22 console.log(`Server started on port ${port}`); 23 });
We referenced three packages in the snippet above, body-parser, pusher and dotenv. Let’s get into what each one does.
- body-parser is a package used to parse incoming request bodies in a middleware before your handlers, available under the
req.bodyproperty. - dotenv is a zero-dependency module that loads environment variables from a
.envfile into[process.env](https://nodejs.org/docs/latest/api/process.html#process_process_env). This package is used so sensitive information like theappIdandsecretaren’t added to our codebase directly. - The dotenv package will load the variables provided in our
.envfile into our environment.
The dotenv package should always be initialized very early in the application at the top of the file. This is because we need the environment variables available throughout the application.
The calls to our endpoint will be coming in from a different origin, therefore we need to make sure we include the CORS headers (Access-Control-Allow-Origin). If you are unfamiliar with the concept of CORS headers, you can find more information here.
Also, you’ll notice that we installed Pusher library as a dependency. Visit the Pusher website to create a Pusher account if you haven’t done so already.
Create a .env file to load the variables we’ll be needing into the Node environment. The file should be in the root folder of your project. Open the file and update it with the code below.
1// .env 2 3 PUSHER_APP_ID=<APP_ID> 4 PUSHER_KEY=<PUSHER_KEY> 5 PUSHER_SECRET=<PUSHER_SECRET> 6 PUSHER_CLUSTER=<PUSHER_CLUSTER>
P.S: Please ensure you replace the placeholder values above with your Pusher
appId,key,secretandcluster.
This is a standard Node application configuration, nothing specific to our app.
Realtime location updates
To enable users send in their current receive messages, we’ll create a route to handle incoming requests. Update your server.js file with the code below.
1// server.js 2 3 require('dotenv').config(); 4 const express = require('express'); 5 const bodyParser = require('body-parser'); 6 const Pusher = require('pusher'); 7 8 const pusher = new Pusher({ 9 appId: process.env.PUSHER_APP_ID, 10 key: process.env.PUSHER_KEY, 11 secret: process.env.PUSHER_SECRET, 12 cluster: process.env.PUSHER_CLUSTER, 13 encrypted: true, 14 }); 15 16 ... 17 18 app.use((req, res, next) => { 19 res.header('Access-Control-Allow-Origin', '*'); 20 res.header( 21 'Access-Control-Allow-Headers', 22 'Origin, X-Requested-With, Content-Type, Accept' 23 ); 24 next(); 25 }); 26 27 28 app.post('/ping', (req, res) => { 29 const { lat, lng } = req.body; 30 const data = { 31 lat, 32 lng, 33 }; 34 pusher.trigger('location', 'ping', data); 35 res.json(data); 36 }); 37 ...
- We created a
POST /pingroute which, when hit, triggers a Pusher event. - We used object destructuring to get the body of the request, we also got the
latandlngin the request body sent by the user. - The
dataobject will contain thelatandlatsent by the user. - The trigger is achieved using the
triggermethod which takes the trigger identifier(location), an event name (ping) and a payload(data). - The payload can be any value, but in this case, we have a JS object.
- The response will contain the
dataobject.
Geofence updates
We’ll need another route to notify admin users when a user leaves their defined geofence. Let’s create a POST /notify route to handle incoming updates on the user’s geofence status. Update the server.js file to include the new route.
1//server.js 2 3 ... 4 app.post('/ping', (req, res) => { 5 ... 6 }); 7 8 app.post('/notify', (req, res) => { 9 const { lat, lng } = req.body; 10 const data = { 11 lat, 12 lng, 13 }; 14 pusher.trigger('geofence', 'exit', data); 15 res.json(data); 16 }); 17 18 ...
You can now start the server by running node server.js in a terminal in the root folder of the project.
Home page
Let’s build out the home page for our application. We’ll be creating two pages for this project, the home page and the admin page. Typically, the admin page would have been a separate application but in this context, we’ll limit it to just a page on this project.
Since we’re using a starter template, we already have some pages created in the pages directory.
We’ll edit and refactor the home page to suit our needs. The home page will display the user’s current location on the map using a marker and a string of containing the user’s formatted address. Open the home.html file and replace the contents with the snippet below:
1<!-- home.html --> 2 3 <ion-header> 4 <ion-navbar> 5 <ion-title>Home</ion-title> 6 </ion-navbar> 7 </ion-header> 8 <ion-content> 9 <map [center]="center" [zoom]="zoom"> 10 </map> 11 <div class="location-address"> 12 <p>{{address}}</p> 13 <h4>{{state}}</h4> 14 </div> 15 </ion-content>
We’ve referenced a map component that hasn’t been created, we’ll get to creating it but before then let’s add some styles to the home.scss file. Open the file and copy the following content into it:
1// home.scss 2 3 page-home { 4 ion-content { 5 position: relative; 6 agm-map { 7 height: 100%; 8 width: 100%; 9 } 10 .location-address { 11 width: 100%; 12 border-top-left-radius: 15px; 13 border-top-right-radius: 15px; 14 box-shadow: 0 2px 4px 0 rgba(0, 0, 0, 0.2); 15 background: white; 16 position: absolute; 17 bottom: 0; 18 left: 0; 19 padding: 0 23px 10px; 20 p{ 21 font-size: 20px; 22 opacity: .7; 23 font-weight: bold; 24 letter-spacing: .2px; 25 margin-bottom: 4px; 26 } 27 h4{ 28 font-size: 14px; 29 opacity: 0.4; 30 font-weight: 500; 31 margin: 0; 32 } 33 } 34 } 35 }
Update the home.ts file below to be similar to the snippet below:
1import { Component, OnInit } from '@angular/core'; 2 import { NavController, Platform } from 'ionic-angular'; 3 import { MapsAPILoader } from '@agm/core'; 4 import { HttpClient } from '@angular/common/http'; 5 6 declare const google; 7 @Component({ 8 selector: 'page-home', 9 templateUrl: 'home.html', 10 }) 11 export class HomePage implements OnInit { 12 constructor( 13 public navCtrl: NavController, 14 private loader: MapsAPILoader, 15 private http: HttpClient, 16 ) { 17 18 } 19 center = { 20 lat: 6.4393477, 21 lng: 3.5244628999999996, 22 }; 23 zoom = 15; 24 address = ''; 25 state = ''; 26 27 pingLocation(location) { 28 this.http 29 .post('http://localhost:4000/ping', location) 30 .subscribe((res) => {}); 31 } 32 notify(location) { 33 this.http 34 .post('http://localhost:4000/notify', location) 35 .subscribe((res) => {}); 36 } 37 38 ngOnInit() { 39 this.loader.load().then(() => { 40 this.pingLocation(this.center); 41 }); 42 } 43 }
Realtime location updates
We’ll be updating the user’s location in realtime and also sending live location data of the user to the server. For this we’ll be using the native Geolocation API by ionic. The API will watch the user’s current position and update the marker on the map.
First, we'll install the Geolocation plugin. Run the following commands to add the plugin to your project.
1ionic cordova plugin add cordova-plugin-geolocation --variable GEOLOCATION_USAGE_DESCRIPTION="To locate you" 2 npm install --save @ionic-native/geolocation
Update the home.ts file with the snippet below:
1// home.ts 2 ... 3 import { MapsAPILoader } from '@agm/core'; 4 import { Geolocation } from '@ionic-native/geolocation'; 5 ... 6 export class HomePage implements OnInit{ 7 constructor( 8 ... 9 private platform: Platform, 10 private geolocation: Geolocation 11 ){}; 12 ... 13 notify(location) { 14 ... 15 } 16 reverseGeocode(latLng) { 17 const geocoder = new google.maps.Geocoder(); 18 geocoder.geocode({ location: latLng }, (results, status) => { 19 if (status === 'OK') { 20 if (results[0]) { 21 const address = results[0].formatted_address; 22 const addressList = address.split(','); 23 this.address = addressList[0]; 24 this.state = addressList.slice(2).join(', '); 25 } 26 } 27 }); 28 } 29 30 ngOnInit(){ 31 this.loader.load().then(() => { 32 this.reverseGeocode(this.center); 33 this.pingLocation(this.center); 34 }); 35 this.platform.ready().then(() => { 36 if (this.platform.is('cordova')) { 37 const watch = this.geolocation.watchPosition(); 38 watch.subscribe((position) => { 39 const positionEmpty = Object.keys(position).length < 1; 40 if (!positionEmpty) { 41 this.center = { 42 lat: position.coords.latitude, 43 lng: position.coords.longitude, 44 }; 45 this.reverseGeocode(this.center); 46 this.pingLocation(this.center); 47 } 48 }); 49 } 50 }); 51 } 52 }
In the snippet above, we added a new method to the HomePage component. The reverseGeocode method uses the Google Maps Geocoder API to reverse geocode coordinates to addresses. In the function we split the formatted_address property getting the short_name, state and country.
The ngOnInit lifecycle got an update. First we reverse geocoded the current address after the Google Maps script has been loaded. We then check if the platform is Cordova supported. If it is, we initialize the geolocation API to watch the user's location, subscribing to the watch variable initiates the process. When the user's location is returned, we reverse geocode the coordinates to get the address, then we send the coordinates to the server.
After this update, you should get an error that the Geolocation and HttpClient providers haven't been registered. To clear this error, we'll register the these providers in the app.module.ts file. Open the file and add them to the list of providers.
1// app.module.ts 2 3 ... 4 import { SplashScreen } from '@ionic-native/splash-screen'; 5 import { Geolocation } from '@ionic-native/geolocation'; 6 import { HttpClientModule, HttpClient } from '@angular/common/http'; 7 8 @NgModule({ 9 ... 10 imports: [ 11 ... 12 HttpClientModule 13 ], 14 ... 15 providers: [ 16 ... 17 Geolocation, 18 HttpClient, 19 ], 20 }) 21 export class AppModule {}
Setting up geofences
To set up geofences for the user, we'll make use of the native Geofence Ionic API. Install this plugin by running the following commands in a terminal in the root folder of your project.
1ionic cordova plugin add cordova-plugin-geofence 2 3 npm install --save @ionic-native/geofence
The next step is to use the Geofence provider in the HomePage component. Open the home.ts file and update it like so:
1// home.ts 2 ... 3 import { HttpClientModule, HttpClient } from '@angular/common/http'; 4 import { Geofence } from '@ionic-native/geofence'; 5 import { v4 } from 'uuid'; 6 ... 7 export class HomePage implements OnInit { 8 constructor( 9 ... 10 private geofence: Geofence 11 ){ 12 if (this.platform.is('cordova')) { 13 this.platform.ready().then((_) => { 14 geofence.initialize().then((_) => { 15 console.log('Geofence Plugin Ready'); 16 }); 17 }); 18 } 19 } 20 21 ... 22 private createGeofence() { 23 let fence = { 24 id: v4(), //any unique ID 25 latitude: this.center.lat, //center of geofence radius 26 longitude: this.center.lng, 27 radius: 1000, //radius to edge of geofence in meters 28 transitionType: 2, 29 }; 30 this.geofence 31 .addOrUpdate(fence) 32 .then( 33 () => console.log('Geofence added'), 34 (err) => console.log('Geofence failed to add', err) 35 ); 36 this.geofence.onTransitionReceived().subscribe((res) => { 37 this.notify(this.center); 38 }); 39 } 40 ngOnInit(){ 41 this.loader.load().then(() => { 42 ... 43 }); 44 this.platform.ready().then(() => { 45 if (this.platform.is('cordova')) { 46 this.createGeofence(); 47 const watch = this.geolocation.watchPosition(); 48 ... 49 } 50 }); 51 } 52 }
First we check if the platform is supported by Cordova and if the platform is ready. Then we initialize the Geofence provider in the constructor. In the createGeofence method, we define a fence object. The id, latitude, longitude and radius properties are kind of self explanatory. The transitionType is one of three possible types. A geofence has three transition types:
-
Enter
-
Leave
-
Both
Each type is represented by accordingly by the numbers 1, 2 and 3. Next, we call the addOrUpdate method of the geofence provider, the method takes in the fence object we created.
We'll be listening for the transition type of leave, which means we should get notified when the user leaves the set geofence.
Updating the ngOnInit lifecycle to call the createGeofence method ensures that the geofence is created once the component is initialized. Include the Geofence provider in the module file to prevent the app from throwing errors. Add the Geofence to the list of providers in the app.module.ts file.
1// app.module.ts 2 ... 3 import { HttpClientModule, HttpClient } from '@angular/common/http'; 4 import { Geofence } from '@ionic-native/geofence'; 5 @NgModule({ 6 ... 7 providers: [ 8 StatusBar, 9 SplashScreen, 10 { provide: ErrorHandler, useClass: IonicErrorHandler }, 11 Geolocation, 12 HttpClient, 13 Geofence, 14 ], 15 }) 16 export class AppModule {}
Setting up the map component
We referenced an uncreated map component in the home.html file. Create a components folder in the src directory. Within it, create a map folder with three files in it. map.ts, map.html and map.scss.
For the map component, we'll be using components provided by the angular-google-maps library. Let's register the angular-google-maps module and the new map component in the app.module.ts file. Open the app.module.ts file and update the imports and declarations properties.
1// app.module.ts 2 ... 3 import { Geofence } from '@ionic-native/geofence'; 4 import { AgmCoreModule } from '@agm/core'; 5 import { MapComponent } from '../components/map/map'; 6 @NgModule({ 7 declarations: [ 8 ... 9 MapComponent 10 ], 11 imports: [ 12 ... 13 AgmCoreModule.forRoot({ 14 // please add your own API key here: https://developers.google.com/maps/documentation/javascript/get-api-key?hl=en 15 apiKey: 'GOOGLE_API_KEY', 16 libraries: ['geometry'], 17 }), 18 ], 19 ... 20 }) 21 export class AppModule {}
Now, open the map.html file and copy the content below into it:
1<!-- map.html --> 2 <agm-map [latitude]="center.lat" [longitude]="center.lng" [zoom]="zoom"> 3 <agm-marker [latitude]="center.lat" [longitude]="center.lng" [iconUrl]="'assets/imgs/user.svg'"></agm-marker> 4 <agm-circle [latitude]="radiusCenter.lat" [longitude]="radiusCenter.lng" [radius]="500" [fillColor]="'#ADC1B9'"></agm-circle> 5 </agm-map>
P.S: All assets used in the project are available on GitHub
Next, let's update the map.scss file to feature styles for the component:
1// map.scss 2 map { 3 agm-map{ 4 width: 100%; 5 height: 100%; 6 } 7 }
That's it. Pretty straightforward. Let's define the missing variables for the map component in the map.ts file.
1// map.ts 2 import { Component, Input } from '@angular/core'; 3 /** 4 * Generated class for the MapComponent component. 5 * 6 * See https://angular.io/api/core/Component for more info on Angular 7 * Components. 8 */ 9 @Component({ 10 selector: 'map', 11 templateUrl: 'map.html', 12 }) 13 export class MapComponent { 14 text: string; 15 constructor() {} 16 @Input() 17 center = { 18 lat: 6.435838, 19 lng: 3.451384, 20 }; 21 @Input() zoom = 15; 22 radiusCenter = { 23 lat: 6.435838, 24 lng: 3.451384, 25 } 26 }
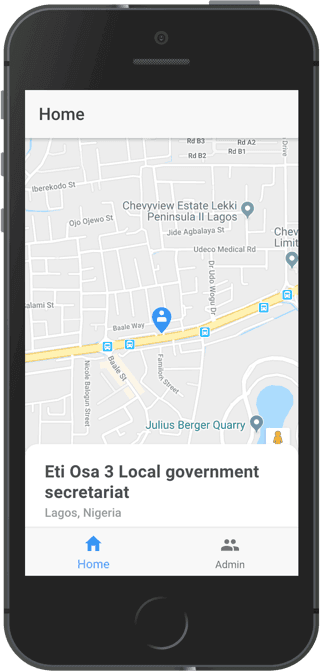
The map component will feature two inputs, center and zoom. The center input will set the center of the map and the zoom will do the same. Pretty self-explanatory. The radiusCenter will be used to define the circle drawn on the map, displaying the geofence set up. Below is a screenshot of the home page after all the changes made.
Introducing Pusher and updating location in realtime
So far we have an application that allows users to send location data but the location isn’t updated in realtime. To solve this problem, we’ll include the Pusher library.
Let’s create a Pusher service to be used application wide. The Angular CLI can aid in the service creation. Open a terminal in your project’s root folder and run the following command.
ionic generate provider pusher
This command simply tells the CLI to generate a provider named pusher . Now open the pusher.ts file in the src/providers/pusher directory and update it with the code snippet below:
1// src/providers/pusher/pusher.ts 2 3 import { Injectable } from '@angular/core'; 4 import Pusher from 'pusher-js'; 5 6 @Injectable() 7 export class PusherProvider { 8 constructor() { 9 this.pusher = new Pusher('PUSHER_KEY', { 10 cluster: 'PUSHER_CLUSTER', 11 encrypted: true, 12 }); 13 } 14 pusher; 15 16 public init(channelName) { 17 const channel = this.pusher.subscribe(channelName); 18 return channel; 19 } 20 }
- First, we initialize Pusher in the constructor.
- The
initmethod returns the Pusher property we created.
Note: Ensure you replace the
PUSHER_KEYandPUSHER_CLUSTERstring with your actual Pusher credentials.
Admin page
The admin page will feature two segments, location and notifications. The location segment will display the user's current location at any particular time. Create the admin page using the CLI by running the following command:
ionic generate page admin
You’ll find the admin page generated in the pages folder. Open the admin.html file and copy the code below into it:
1<!-- admin.html --> 2 3 <ion-header> 4 <div padding> 5 <ion-segment [(ngModel)]="tab"> 6 <ion-segment-button value="location"> 7 Position 8 </ion-segment-button> 9 <ion-segment-button value="notifications"> 10 Notifications 11 </ion-segment-button> 12 </ion-segment> 13 </div> 14 </ion-header> 15 <ion-content> 16 <div [ngSwitch]="tab" style="height: 100%"> 17 <div *ngSwitchCase="'location'" style="height: 100%"> 18 <map [center]="center"></map> 19 </div> 20 <div *ngSwitchCase="'notifications'" class="notifications-holder"> 21 <h4 class="no-notifications" *ngIf="!notifications.length">No notifications to display</h4> 22 <ion-list *ngIf="notifications.length"> 23 <ion-item *ngFor="let notification of notifications"> 24 <ion-thumbnail item-start> 25 <ion-icon name="person"></ion-icon> 26 </ion-thumbnail> 27 <h2>{{notification.header}}</h2> 28 <p>{{notification.body}}</p> 29 </ion-item> 30 </ion-list> 31 </div> 32 </div> 33 </ion-content>
Style up the page by copying the following styles into the admin.scss file.
1agm-map { 2 width: 100%; 3 height: 100%; 4 } 5 ion-thumbnail { 6 display: flex; 7 align-items: center; 8 justify-content: center; 9 background: #adc1b9; 10 border-radius: 50%; 11 ion-icon { 12 font-size: 2.2em; 13 color: whitesmoke; 14 } 15 } 16 .no-notifications { 17 font-size: 14px; 18 color: deepskyblue; 19 text-transform: uppercase; 20 text-align: center; 21 }
Let’s update the admin.ts file to include the variables we used in the HTML file:
1// admin.ts 2 3 import { Component, OnInit } from '@angular/core'; 4 import { NavController } from 'ionic-angular'; 5 import { PusherProvider } from '../../providers/pusher/pusher'; 6 import { Platform } from 'ionic-angular'; 7 import { PhonegapLocalNotification } from '@ionic-native/phonegap-local-notification'; 8 9 declare const google; 10 11 @Component({ 12 selector: 'page-admin', 13 templateUrl: 'admin.html', 14 }) 15 16 export class AdminPage implements OnInit { 17 constructor( 18 public navCtrl: NavController, 19 private pusher: PusherProvider, 20 private platform: Platform, 21 private localNotification: PhonegapLocalNotification 22 ) { 23 if (platform.is('cordova')) { 24 platform.ready().then((_) => { 25 this.localNotification.requestPermission().then((perm) => { 26 if (perm === 'granted') this.permissionGranted = true; 27 }); 28 }); 29 } 30 } 31 tab = 'location'; 32 notifications = []; 33 center = { 34 lat: 6.435838, 35 lng: 3.451384, 36 }; 37 permissionGranted = false; 38 address = ''; 39 reverseGeocode(latLng) { 40 const geocoder = new google.maps.Geocoder(); 41 geocoder.geocode({ location: latLng }, (results, status) => { 42 if (status === 'OK') { 43 if (results[0]) { 44 const address = results[0].formatted_address; 45 const addressList = address.split(','); 46 this.address = addressList[0]; 47 } 48 } 49 }); 50 } 51 ngOnInit() { 52 const locationChannel = this.pusher.init('location'); 53 const geofenceChannel = this.pusher.init('location'); 54 locationChannel.bind('ping', (data) => { 55 this.center = { 56 ...data, 57 }; 58 }); 59 geofenceChannel.bind('exit', (data) => { 60 this.reverseGeocode(data); 61 if (this.permissionGranted) { 62 this.localNotification.create('Geofence exited', { 63 tag: 'message1', 64 body: 'User has exited the defined geofence', 65 icon: 'assets/imgs/user.svg', 66 }); 67 } 68 const notification = { 69 header: 'User has exited the geofence', 70 body: `Current location: ${this.address}`, 71 }; 72 this.notifications = this.notifications.concat(notification); 73 }); 74 } 75 }
The admin component will be displaying notifications in the notifications bar whenever a user leaves the set geofence. We’ll also have a notifications segment that will show a list of notifications over time.
To display notifications in the notifications bar, we’ll be using the PhonegapLocalNotification native API. Install it as a plugin by running the following commands.
1ionic cordova plugin add phonegap-plugin-local-notification 2 3 npm install --save @ionic-native/phonegap-local-notification
In the ngOnInit lifecycle, we list for two events ping and exit from Pusher. In the ping event callback we use the data returned to update the current position of the marker. When the exit event is called we trigger a notification using the PhonegapLocalNotification. A notification object is created containing a reverse geocoded address and appended to the notifications array.
After creating the admin page, the next step is to register it in the app.module.ts file and then add it to the tabs page. Update the app.module.ts file and the tabs page to include the admin page and the PhonegapLocalNotification provider.
1// src/app/app.module.ts 2 3 ... 4 import { AdminPage } from '../pages/admin/admin'; 5 import { PhonegapLocalNotification } from '@ionic-native/phonegap-local-notification'; 6 7 @NgModule({ 8 declarations: [ 9 ... 10 AdminPage 11 ], 12 ... 13 providers: [ 14 ... 15 PhonegapLocalNotification, 16 ], 17 }) 18 export class AppModule {}
Then update the TabsPage to Include the AdminPage. Open the tabs.html file in the src/pages/tabs directory and replace the content with the code below:
1<!-- tab.html --> 2 <ion-tabs> 3 <ion-tab [root]="tab1Root" tabTitle="Home" tabIcon="home"></ion-tab> 4 <ion-tab [root]="tab2Root" tabTitle="Admin" tabIcon="people"></ion-tab> 5 </ion-tabs>
Next update the tabs.ts file and include the AdminPage:
1import { Component } from '@angular/core'; 2 import { AdminPage } from '../admin/admin'; 3 import { HomePage } from '../home/home'; 4 @Component({ 5 templateUrl: 'tabs.html', 6 }) 7 export class TabsPage { 8 tab1Root = HomePage; 9 tab2Root = AdminPage; 10 constructor() {} 11 }
To test the application on your mobile device, download the IonicDevApp on your mobile device. Make sure your computer and your mobile device are connected to the same network. When you open the IonicDevApp, you should see Ionic apps running on your network listed.
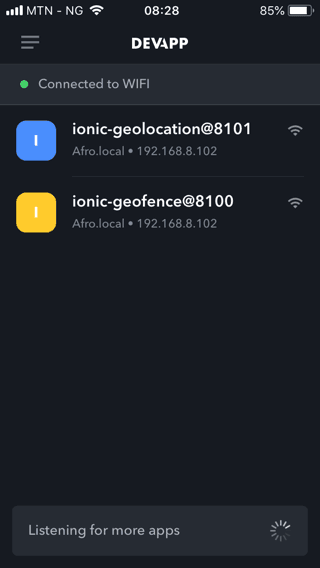
To view the application, click on it and you should see a similar view with what was on the browser. Sending messages to the server might have worked on the browser but localhost doesn’t exist on your phone, so we’ll need to create a proxy to be able to send messages from mobile.
Using Ngrok as a proxy
To create a proxy for our server, we’ll download Ngrok. Visit the download page on the Ngrok website. Download the client for your OS. Unzip it and run the following command in the folder where Ngrok can be found:
./ngrok http 4000

Copy the forwarding url with https and place it in the home.ts file that previously had http://localhost:4000/ping and http://localhost:4000/notify. Please do not copy mine from the screenshot above.
1// src/pages/home/home.ts 2 ... 3 export class HomePage implements OnInit { 4 ... 5 pingLocation() { 6 this.http 7 .post('<NGROK_URL>/ping', data) 8 .subscribe((res: Message) => {}); 9 } 10 11 notify(location) { 12 this.http 13 .post('<NGROK_URL>/notify', location) 14 .subscribe((res) => {}); 15 } 16 ... 17 } 18 ...
Ensure to include the forwarding url you copied where the placeholder string is
Running on an emulator
Since our application is making use of some native APIs, we’ll need to test it on an emulator. To run our app on an emulator, run any of the following commands depending on the platform you’re building for.
1// for IOS 2 ionic cordova emulate ios 3 4 // for android 5 ionic cordova emulate android
To build your application to deploy on either the AppStore or PlayStore, follow the instructions found here.
Conclusion
Using Ionic, Google Maps and Pusher, we’ve been able to create an application that offers realtime location tracking. We’ve also learnt how to create geofences using native APIs. You can view the source code for the demo here.


© 2025 Pusher Ltd. All rights reserved.
Pusher Limited is a company registered in England and Wales (No. 07489873) whose registered office is at MessageBird UK Limited, 3 More London Riverside, 4th Floor, London, United Kingdom, SE1 2AQ.