- Products

- Developers
- User stories
- Blog
- Pricing

Create a food ordering app in React Native - Part 2: Adding the driver app and chat functionality
- Introduction
- Prerequisites
- Feature overview
- Setting up Chatkit
- Bootstrapping the driver app
- Setting up the ordering app
- Setting up the server
- Creating the driver app
- Adding the chat functionality
- Driver app: OrderMap screen
- Driver app: ContactCustomer screen
- Ordering app: OrderSummary screen
- Ordering app: TrackOrder screen
- Ordering app: GlobalContext
- Ordering app: ContactDriver screen
- Chatkit server
- Running the app
- Conclusion
Introduction
This is part two of a three-part series on creating a food delivery app with React Native.
In this part, we’ll be going through the code for the driver app. After that, we’ll be adding the chat functionality so that the customer and the driver can contact each other.
Prerequisites
This part has the same prerequisites as the first part.
You’ll need a ChatKit account for implementing the chat functionality.
IMPORTANT: ChatKit has been retired from the Pusher product stack as of April, 2020. This tutorial will no longer be functional in its current version. Explore our other Pusher tutorials to find out how Channels and Beams can help you build.
Feature overview
We will be creating the driver app in this part of the series. Here’s what the driver will see by default when they open the app. Basically, it’s just showing a map of where the driver currently is. In the header, there’s a button that the driver can click to update the status of the order. By default, there will be no button in there. But once the driver has accepted an order, it will say PICKED ORDER. The driver can click on this button to send an update to the customer that they have picked their order from the restaurant. It will then turn to DELIVERED ORDER and the driver can click on it once they have delivered the order to the customer:

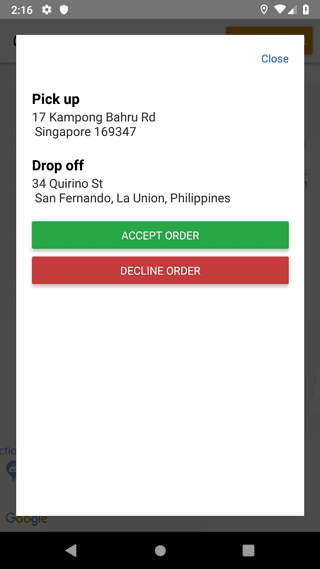
When a driver receives an order, a modal which displays the pick up (restaurant’s location) and drop off (customer’s location) will show up. From here, the driver can either accept or decline:
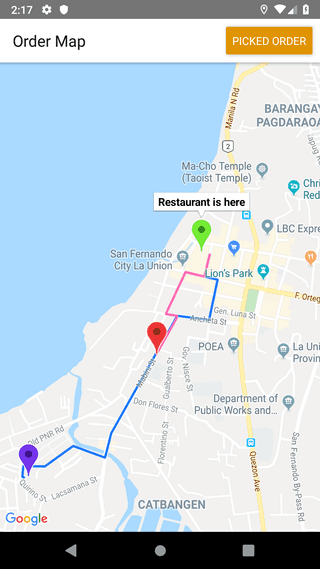
Once the driver agrees, the restaurant’s and customer’s location is plotted on the map along with the route between the two. The map is updated in realtime as the driver drives to their destination:
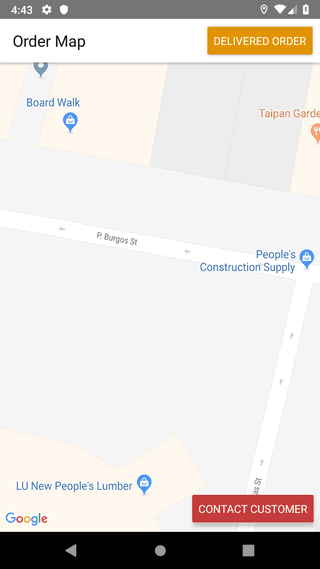
Once the driver has picked the order, a new button will be overlayed on top of the map. This will allow the driver to contact the customer. This will be useful in cases wherein the address is in a subdivision or a building:
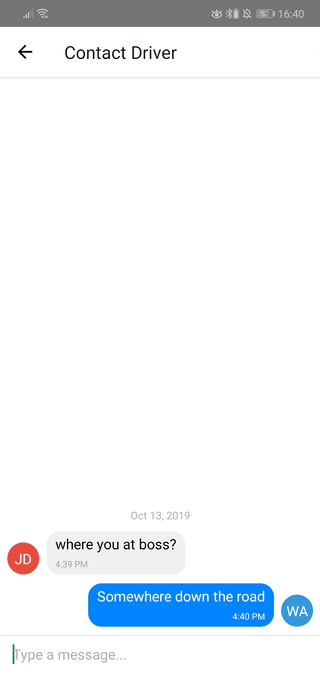
Here’s what the chat interface looks like:
You can find the code on this GitHub repo. The completed code for this part of the series is on the driver-app branch.
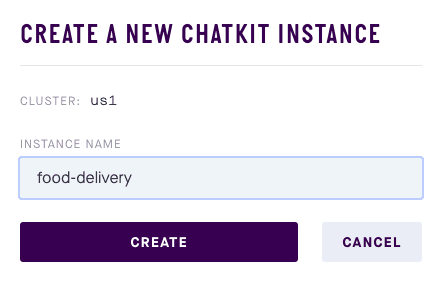
Setting up Chatkit
On your Chatkit dashboard, click on the + CREATE button to create a new Chatkit app instance:
Under the Credentials tab, enable the test token provider. This allows us to use Pusher’s servers for authenticating users of our app. Note that this is only for testing purposes. If you’re going to use this for production, be sure to check out the Authentication docs so you can create your own authentication server.
Bootstrapping the driver app
If you’ve followed part one of this series, there’s really no starter code for the driver app so you’ll have to create everything from scratch. Start by generating a new React Native project:
react-native init RNFoodDeliveryDriver
Once that’s done, open the package.json file and replace the dependencies with the following:
1"dependencies": { 2 "@pusher/chatkit-client": "^1.13.1", 3 "@react-native-community/netinfo": "^4.4.0", 4 "axios": "^0.19.0", 5 "pusher-js": "^5.0.2", 6 "react": "16.9.0", 7 "react-native": "0.61.2", 8 "react-native-config": "^0.11.7", 9 "react-native-geocoding": "^0.4.0", 10 "react-native-geolocation-service": "^3.1.0", 11 "react-native-gesture-handler": "^1.4.1", 12 "react-native-gifted-chat": "^0.11.0", 13 "react-native-maps": "0.25.0", 14 "react-native-maps-directions": "^1.7.3", 15 "react-native-modal": "^11.4.0", 16 "react-native-permissions": "^2.0.2", 17 "react-native-reanimated": "^1.3.0", 18 "react-native-screens": "^1.0.0-alpha.23", 19 "react-navigation": "^4.0.10", 20 "react-navigation-stack": "^1.9.4" 21 },
Install the dependencies:
yarn install
The driver app depends on the same packages as the ordering app so you can go ahead and re-visit the Bootstrapping the app section of part one for the instructions on how to configure the packages.
Next, copy over the src/helpers/location.js file from the ordering app to the root directory of the driver app as we’re going to use the same helper function.
Lastly, create a .env file at the root of the project directory and add your Channels, Chatkit, and Google API credentials. We’ll add the ngrok URL later:
1CHANNELS_APP_KEY="YOUR CHANNELS APP KEY" 2 CHANNELS_APP_CLUSTER="YOUR CHANNELS APP CLUSTER" 3 4 CHATKIT_INSTANCE_LOCATOR_ID="YOUR CHATKIT INSTANCE LOCATOR ID" 5 CHATKIT_SECRET_KEY="YOUR CHATKIT SECRET KEY" 6 CHATKIT_TOKEN_PROVIDER_ENDPOINT="YOUR CHATKIT TOKEN PROVIDER ENDPOINT" 7 8 GOOGLE_API_KEY="YOUR GOOGLE API KEY" 9 10 NGROK_HTTPS_URL="YOUR NGROK HTTPS URL"
Setting up the ordering app
If you’ve followed part one of this series, the only thing you need to do is include the additional packages that we need:
1"dependencies": { 2 // ... 3 "@pusher/chatkit-client": "^1.13.1", 4 "react-native-gifted-chat": "^0.11.0", 5 "string-random": "^0.1.3" 6 }
Here’s a brief overview of each:
- @pusher/chatkit-client - the client-side library of Chatkit. We use this for easily implementing chat functionality.
- react-native-gifted-chat - used for easily building chat UI.
- string-random - used for generating random room IDs for chat rooms.
Install them once added:
yarn install
Setting up the server
To set up the server, all you need is install the Chatkit server SDK for Node.js:
yarn add @pusher/chatkit-server
Creating the driver app
Now we’re ready to build the driver app. Start by updating the App.js file with the following:
1import React, {Fragment} from 'react'; 2 import {SafeAreaView, StatusBar, View, StyleSheet} from 'react-native'; 3 4 import Root from './Root'; 5 6 const App = () => { 7 return ( 8 <Fragment> 9 <StatusBar barStyle="light-content" /> 10 <SafeAreaView style={styles.container}> 11 <Root /> 12 </SafeAreaView> 13 </Fragment> 14 ); 15 }; 16 17 const styles = StyleSheet.create({ 18 container: { 19 flex: 1, 20 }, 21 }); 22 23 export default App;
Then create a Root.js file at the root of the project directory. This is where we use React Navigation to build a stack navigator (navigates by pushing and popping screens from a stack):
1import React, {Component} from 'react'; 2 import {YellowBox} from 'react-native'; 3 4 import {createAppContainer} from 'react-navigation'; 5 import {createStackNavigator} from 'react-navigation-stack'; 6 7 import OrderMap from './src/screens/OrderMap'; 8 9 YellowBox.ignoreWarnings(['Setting a timer']); 10 11 const RootStack = createStackNavigator( 12 { 13 OrderMap, 14 }, 15 { 16 initialRouteName: 'OrderMap', 17 }, 18 ); 19 20 const AppContainer = createAppContainer(RootStack); 21 22 class Router extends Component { 23 render() { 24 return <AppContainer />; 25 } 26 } 27 28 export default Router;
Next, create the src/screens/OrderMap.js file. This will serve as the main screen for the driver. As you’ve seen in the feature overview earlier, this is where the driver can wait for orders and either accept or decline them. Start by importing the packages we need:
1import React, {Component} from 'react'; 2 import { 3 View, 4 Text, 5 Button, 6 TouchableOpacity, 7 Alert, 8 StyleSheet, 9 } from 'react-native'; 10 11 import MapView from 'react-native-maps'; 12 import Pusher from 'pusher-js/react-native'; 13 14 import {check, request, PERMISSIONS, RESULTS} from 'react-native-permissions'; 15 16 import Geolocation from 'react-native-geolocation-service'; 17 import Modal from 'react-native-modal'; 18 import Config from 'react-native-config'; 19 20 import MapViewDirections from 'react-native-maps-directions'; 21 import axios from 'axios'; 22 23 import {regionFrom} from '../helpers/location'; 24 25 const CHANNELS_APP_KEY = Config.CHANNELS_APP_KEY; 26 const CHANNELS_APP_CLUSTER = Config.CHANNELS_APP_CLUSTER; 27 const BASE_URL = Config.NGROK_HTTPS_URL; 28 29 const GOOGLE_API_KEY = Config.GOOGLE_API_KEY;
Next, add the navigation header. This is where we optionally render the main action button for the driver. The action it performs depends on which step of the order process they currently are. So we use a navigation param to store the title and the onPress action:
1class OrderMap extends Component { 2 static navigationOptions = ({navigation}) => { 3 const showHeaderButton = navigation.getParam('showHeaderButton'); 4 return { 5 title: 'Order Map', 6 headerRight: showHeaderButton ? ( 7 <View style={styles.navHeaderRight}> 8 <Button 9 onPress={navigation.getParam('headerButtonAction')} 10 title={navigation.getParam('headerButtonLabel')} 11 color="#e19400" 12 /> 13 </View> 14 ) : null, 15 }; 16 }; 17 18 // next: initialize state 19 }
Next, initialize the state:
1state = { 2 locationPermission: 'undetermined', 3 isOrderDetailsModalVisible: false, 4 customer: null, // customer info 5 currentLocation: null, // driver's current location 6 hasOrder: false, // whether the driver is currently handling an order or not 7 restaurantAddress: '', 8 customerAddress: '', 9 }; 10 // next: add constructor()
Inside the constructor, initialize the communication channels. This uses pretty much the same channels as the ordering app so I’ll no longer elaborate on it:
1constructor(props) { 2 super(props); 3 this.available_drivers_channel = null; // this is where customer will send a request to any available driver 4 5 this.ride_channel = null; // the channel used for communicating the current location 6 // for a specific order. Channel name is the customer's username 7 8 this.pusher = null; // the pusher client 9 }
Inside componentDidMount(), we set the default navigation params for the main action button. By default, the action is to set the order as “picked”. Note that the button wouldn’t be visible until the driver accepts an order:
1async componentDidMount() { 2 this.props.navigation.setParams({ 3 headerButtonLabel: 'Picked Order', 4 headerButtonAction: this._pickedOrder, 5 }); 6 7 // next: subscribe to channels 8 }
Next, subscribe to the same channel as the one we subscribed to earlier in part one with the ordering app. This time, we’re implementing the receiving end of the order request. When the driver receives an order request, we update the state with the order details and show the order details modal:
1this.pusher = new Pusher(CHANNELS_APP_KEY, { 2 authEndpoint: `${BASE_URL}/pusher/auth`, 3 cluster: CHANNELS_APP_CLUSTER, 4 encrypted: true, 5 }); 6 7 this.available_drivers_channel = this.pusher.subscribe( 8 'private-available-drivers', 9 ); // subscribe to "available-drivers" channel 10 11 this.available_drivers_channel.bind('pusher:subscription_succeeded', () => { 12 this.available_drivers_channel.bind( 13 'client-driver-request', 14 order_data => { 15 if (!this.state.hasOrder) { 16 // if the driver has currently no order 17 this.setState({ 18 isOrderDetailsModalVisible: true, 19 customer: order_data.customer, 20 restaurantLocation: { 21 latitude: order_data.restaurant_location[0], 22 longitude: order_data.restaurant_location[1], 23 }, 24 customerLocation: order_data.customer_location, 25 26 restaurantAddress: order_data.restaurant_address, 27 customerAddress: order_data.customer_address, 28 }); 29 } 30 }, 31 ); 32 }); 33 34 // next: add code for getting driver's current location
Next, we request for the location permission and get the current location. We use it for setting the initial location to be displayed on the map. After that, we start watching for location changes and trigger the event for updating the location on the customer’s side when an order is already accepted by the driver:
1let location_permission = await check( 2 PERMISSIONS.ANDROID.ACCESS_FINE_LOCATION, 3 ); 4 5 if (location_permission === 'denied') { 6 location_permission = await request( 7 PERMISSIONS.ANDROID.ACCESS_FINE_LOCATION, 8 ); 9 } 10 11 if (location_permission === 'granted') { 12 Geolocation.getCurrentPosition( 13 position => { 14 const {latitude, longitude, accuracy} = position.coords; 15 const initialRegion = regionFrom(latitude, longitude, accuracy); 16 17 this.setState({ 18 initialRegion, 19 }); 20 }, 21 error => { 22 console.log(error.code, error.message); 23 }, 24 {enableHighAccuracy: true, timeout: 15000, maximumAge: 10000}, 25 ); 26 27 this.watch_location_id = Geolocation.watchPosition( 28 position => { 29 this.setState({ 30 currentLocation: position.coords, 31 }); 32 33 if (this.state.hasOrder) { 34 this.ride_channel.trigger('client-driver-location', { 35 latitude: position.coords.latitude, 36 longitude: position.coords.longitude, 37 accuracy: position.coords.accuracy, 38 }); 39 } 40 }, 41 error => { 42 console.log(error.code, error.message); 43 }, 44 {enableHighAccuracy: true}, 45 ); 46 }
Here’s the render() method. This has pretty much the same code as the TrackOrder screen screen in the ordering app. The only difference is the order details modal. We also have the button for contacting the customer which is overlayed on top of the map:
1render() { 2 const { 3 isOrderDetailsModalVisible, 4 restaurantAddress, 5 customerAddress, 6 7 currentLocation, // driver's current location 8 restaurantLocation, 9 customerLocation, 10 initialRegion, 11 } = this.state; 12 13 return ( 14 <View style={styles.wrapper}> 15 <MapView initialRegion={initialRegion} style={styles.map}> 16 {currentLocation && ( 17 <MapView.Marker 18 coordinate={{ 19 latitude: currentLocation.latitude, 20 longitude: currentLocation.longitude, 21 }} 22 title={"You're here"} 23 /> 24 )} 25 26 {currentLocation && restaurantLocation && ( 27 <MapViewDirections 28 origin={currentLocation} 29 destination={restaurantLocation} 30 apikey={GOOGLE_API_KEY} 31 strokeWidth={3} 32 strokeColor="hotpink" 33 /> 34 )} 35 36 {restaurantLocation && customerLocation && ( 37 <MapViewDirections 38 origin={restaurantLocation} 39 destination={customerLocation} 40 apikey={GOOGLE_API_KEY} 41 strokeWidth={3} 42 strokeColor="#1b77fb" 43 /> 44 )} 45 46 {restaurantLocation && ( 47 <MapView.Marker 48 coordinate={{ 49 latitude: restaurantLocation.latitude, 50 longitude: restaurantLocation.longitude, 51 }} 52 title={'Restaurant is here'} 53 pinColor={'#4CDB00'} 54 /> 55 )} 56 57 {customerLocation && ( 58 <MapView.Marker 59 coordinate={{ 60 latitude: customerLocation.latitude, 61 longitude: customerLocation.longitude, 62 }} 63 title={'Your customer is here'} 64 pinColor={'#6f42c1'} 65 /> 66 )} 67 </MapView> 68 69 <View style={styles.floatingButtonContainer}> 70 <Button 71 onPress={this._contactCustomer} 72 title={'Contact customer'} 73 color="#c53c3c" 74 /> 75 </View> 76 77 <Modal isVisible={isOrderDetailsModalVisible}> 78 {restaurantAddress && ( 79 <View style={styles.modal}> 80 <TouchableOpacity onPress={this._hideOrderDetailsModal}> 81 <Text style={styles.close}>Close</Text> 82 </TouchableOpacity> 83 <View style={styles.modalBody}> 84 <View style={styles.addressContainer}> 85 <Text style={styles.labelText}>Pick up</Text> 86 <Text style={styles.valueText}> 87 {restaurantAddress.replace(',', '\n')} 88 </Text> 89 </View> 90 91 <View style={styles.addressContainer}> 92 <Text style={styles.labelText}>Drop off</Text> 93 <Text style={styles.valueText}> 94 {customerAddress.replace(',', '\n')} 95 </Text> 96 </View> 97 98 <View style={styles.buttonContainer}> 99 <Button 100 onPress={this._acceptOrder} 101 title={'Accept order'} 102 color="#28a745" 103 /> 104 </View> 105 106 <View style={styles.buttonContainer}> 107 <Button 108 onPress={this._declineOrder} 109 title={'Decline order'} 110 color="#c53c3c" 111 /> 112 </View> 113 </View> 114 </View> 115 )} 116 </Modal> 117 </View> 118 ); 119 }
Next, add the code for accepting an order. When this happens, we subscribe to the customer’s channel then trigger an event that tells them they’re available. This is the part where the customer then triggers the client-driver-response on their side to confirm that they still haven’t found another driver. When this happens, the driver triggers the client-found-driver event to the customer to inform them that they accepted their request. We also trigger a client-order-update event to update the order status:
1_acceptOrder = () => { 2 const {customer, currentLocation} = this.state; 3 4 this.setState({ 5 isOrderDetailsModalVisible: false, 6 }); 7 8 this.ride_channel = this.pusher.subscribe( 9 'private-ride-' + customer.username, 10 ); 11 12 this.ride_channel.bind('pusher:subscription_succeeded', () => { 13 this.ride_channel.trigger('client-driver-response', { 14 response: 'yes', // yes, I'm available 15 }); 16 17 // listen for the acknowledgement from the customer 18 this.ride_channel.bind('client-driver-response', customer_response => { 19 20 if (customer_response.response == 'yes') { 21 this.setState({ 22 hasOrder: true, 23 }); 24 25 this.props.navigation.setParams({ 26 showHeaderButton: true, // show the main action button 27 }); 28 29 this.ride_channel.trigger('client-found-driver', { 30 driver: { 31 name: this.user_name, 32 }, 33 location: { 34 latitude: currentLocation.latitude, 35 longitude: currentLocation.longitude, 36 accuracy: currentLocation.accuracy, 37 }, 38 }); 39 40 setTimeout(() => { 41 // update order status 42 this.ride_channel.trigger('client-order-update', { 43 step: 1, 44 }); 45 }, 2000); 46 } else { 47 Alert.alert( 48 'Order no longer available', 49 'Someone else already took the order. Or the customer cancelled.', 50 [ 51 { 52 text: 'Ok', 53 }, 54 ], 55 {cancelable: false}, 56 ); 57 } 58 }); 59 }); 60 };
Here’s the method for handling the onPress event on the close button of the order details modal. This is equivalent to declining the order, but I’ll leave that to you to implement. It will have the same code as the _declineOrder() method:
1_hideOrderDetailsModal = () => { 2 this.setState({ 3 isOrderDetailsModalVisible: false, 4 }); 5 // homework: add code for declining order 6 }; 7 8 _declineOrder = () => { 9 // homework: add code for declining order 10 };
Here’s the first action for the main action button. This will update the customer that the driver has picked their order from the restaurant. This will also change the action of the main action button to that of setting the order as delivered:
1_pickedOrder = async () => { 2 this.props.navigation.setParams({ 3 headerButtonLabel: 'Delivered Order', 4 headerButtonAction: this._deliveredOrder, 5 }); 6 7 this.ride_channel.trigger('client-order-update', { 8 step: 2, 9 }); 10 };
Here’s the _deliveredOrder() method. This updates the customer that their order has been delivered at their doorstep. Having completed the delivery means that the order has been completely processed so we reset the UI as well:
1_deliveredOrder = () => { 2 this.ride_channel.unbind('client-driver-response'); // unbind from passenger event 3 this.pusher.unsubscribe('private-ride-' + this.state.customer.username); // unsubscribe from passenger channel 4 5 this.setState({ 6 hasOrder: false, 7 customer: null, 8 restaurantLocation: null, 9 customerLocation: null, 10 restaurantAddress: null, 11 customerAddress: null, 12 }); 13 14 this.props.navigation.setParams({ 15 headerButtonLabel: 'Picked Order', 16 headerButtonAction: this._pickedOrder, 17 }); 18 19 this.ride_channel.trigger('client-order-update', { 20 step: 3, 21 }); 22 };
Before the component is unmounted, we clean up after ourselves by stopping the app from watching the driver’s location:
1componentWillUnmount() { 2 Geolocation.clearWatch(this.watch_location_id); 3 }
Lastly, add the styles and export the component:
1class OrderMap extends Component { 2 // .. 3 } 4 5 const styles = StyleSheet.create({ 6 navHeaderRight: { 7 marginRight: 10, 8 }, 9 wrapper: { 10 flex: 1, 11 }, 12 map: { 13 ...StyleSheet.absoluteFillObject, 14 }, 15 floatingButtonContainer: { 16 position: 'absolute', 17 bottom: '2%', 18 left: '2%', 19 alignSelf: 'flex-end', 20 }, 21 modal: { 22 flex: 1, 23 backgroundColor: '#FFF', 24 padding: 20, 25 }, 26 close: { 27 alignSelf: 'flex-end', 28 marginBottom: 10, 29 color: '#0366d6', 30 }, 31 modalBody: { 32 marginTop: 20, 33 }, 34 addressContainer: { 35 marginBottom: 20, 36 }, 37 labelText: { 38 fontSize: 18, 39 fontWeight: 'bold', 40 }, 41 valueText: { 42 fontSize: 16, 43 color: '#333', 44 }, 45 buttonContainer: { 46 marginBottom: 10, 47 }, 48 }); 49 50 export default OrderMap;
Adding the chat functionality
Now that we’ve created the driver app, it’s time to implement the chat functionality on both apps. We’ll first implement the chat for the driver app.
Driver app: OrderMap screen
First, open the src/screens/OrderMap.js file and import axios:
1import MapViewDirections from 'react-native-maps-directions'; 2 import axios from 'axios'; // add this
Then in the constructor, add the user_id. This will serve as the unique ID for the user in Chatkit:
1constructor(props) { 2 // .. 3 this.pusher = null; 4 5 // add these: 6 this.user_name = 'John Doe'; 7 this.user_id = 'johndoe'; // add this 8 }
Next, update componentDidMount() to make a request to the server to log in the user in Chatkit. Note that this doesn’t actually log in the user. It’s purpose is to create a corresponding Chatkit user for the driver if it doesn’t already exists. You’ll see this in the server code later on:
1async componentDidMount() { 2 // ... 3 if (location_permission === 'granted') { 4 // ... 5 } 6 7 // add these 8 try { 9 await axios.post(`${BASE_URL}/login`, { 10 user_id: this.user_id, 11 user_name: this.user_name, 12 }); 13 } catch (err) { 14 console.log('error creating user: ', err); 15 } 16 }
Next, update the code for accepting orders so that it extracts the room_id and room_name for the chat room. We will add this on the code for the ordering app later on:
1_acceptOrder = () => { 2 // ... 3 this.props.navigation.setParams({ 4 showHeaderButton: true, 5 }); 6 7 this.ride_channel.bind('pusher:subscription_succeeded', () => { 8 // .. 9 10 this.ride_channel.bind('client-driver-response', customer_response => { 11 if (customer_response.response == 'yes') { 12 // .. 13 14 // add these: 15 const {room_id, room_name} = customer_response; 16 17 this.room_id = room_id; 18 this.room_name = room_name; 19 // end add 20 21 this.ride_channel.trigger('client-found-driver', { 22 // ... 23 }); 24 25 // ... 26 } else { 27 // ... 28 } 29 } 30 } 31 32 // .. 33 34 }
Next update the code for setting the order as “picked” so that it makes a request to let the driver join the chat room. We’ll add the code for this later on once we get to the server part:
1_pickedOrder = () => { 2 // ... 3 4 this.ride_channel.trigger('client-order-update', { 5 step: 2, 6 }); 7 8 // add these: 9 try { 10 await axios.post(`${BASE_URL}/room`, { 11 room_id: this.room_id, 12 room_name: this.room_name, 13 user_id: this.user_id, 14 }); 15 } catch (room_err) { 16 console.log('room error: ', room_err); 17 } 18 }
When the contact customer button is clicked, we navigate to the ContactCustomer screen. We pass along the user_id and room_id as navigation params because we’ll need it to subscribe to the chat room:
1_contactCustomer = () => { 2 this.props.navigation.navigate('ContactCustomer', { 3 user_id: this.user_id, 4 room_id: this.room_id, 5 }); 6 };
Driver app: ContactCustomer screen
Now we proceed to implementing the actual chat functionality. Create a src/screens/ContactCustomer.js file and add the following. We’re using Chatkit and Gifted Chat to easily implement the chat functionality:
1import React, {Component} from 'react'; 2 import {View, StyleSheet} from 'react-native'; 3 4 import {GiftedChat} from 'react-native-gifted-chat'; 5 import {ChatManager, TokenProvider} from '@pusher/chatkit-client'; 6 7 import Config from 'react-native-config'; 8 9 const CHATKIT_INSTANCE_LOCATOR_ID = Config.CHATKIT_INSTANCE_LOCATOR_ID; 10 const CHATKIT_SECRET_KEY = Config.CHATKIT_SECRET_KEY; 11 const CHATKIT_TOKEN_PROVIDER_ENDPOINT = Config.CHATKIT_TOKEN_PROVIDER_ENDPOINT;
Next, create the component class. Initialize the messages state and extract the navigation params that were passed from the OrderMap screen earlier:
1class ContactCustomer extends Component { 2 static navigationOptions = ({navigation}) => { 3 return { 4 title: 'Contact Customer', 5 }; 6 }; 7 8 state = { 9 messages: [], // array of messages that are sent in the room 10 }; 11 12 constructor(props) { 13 super(props); 14 this.user_id = this.props.navigation.getParam('user_id'); 15 this.room_id = this.props.navigation.getParam('room_id'); 16 } 17 18 // next: add componentDidMount() 19 }
Next, connect to Chatkit and subscribe to the room that was specifically created for this order. This allows us to attach to the onMessage hook which gets called everytime a new message is sent in the room (including the one’s sent by the current user):
1async componentDidMount() { 2 try { 3 const chatManager = new ChatManager({ 4 instanceLocator: CHATKIT_INSTANCE_LOCATOR_ID, 5 userId: this.user_id, 6 tokenProvider: new TokenProvider({ 7 url: CHATKIT_TOKEN_PROVIDER_ENDPOINT, 8 }), 9 }); 10 11 let currentUser = await chatManager.connect(); 12 this.currentUser = currentUser; 13 14 await this.currentUser.subscribeToRoomMultipart({ 15 roomId: this.room_id, 16 hooks: { 17 onMessage: this._onMessage, 18 }, 19 messageLimit: 30, 20 }); 21 } catch (err) { 22 console.log('chatkit error: ', err); 23 } 24 }
Here’s the render() method. This uses Gifted Chat to render a chat UI. All it requires us to supply is the array of messages, the function to execute when a message is sent, and the user ID of the current user. This is what Gifted Chat uses to determine which side of the chat UI a specific message will be rendered. If the message contains the same user ID specified here, then it will be rendered on the right side to indicate that it’s the current user:
1render() { 2 const {messages} = this.state; 3 return ( 4 <View style={styles.wrapper}> 5 <GiftedChat 6 messages={messages} 7 onSend={messages => this._onSend(messages)} 8 showUserAvatar={true} 9 user={{ 10 _id: this.user_id, 11 }} 12 /> 13 </View> 14 ); 15 }
Here’s the onSend() method. This gets executed when the user clicks on the send button in the chat UI. This uses Chatkit’s sendSimpleMessage() method to send a simple text message. You can also send multipart messages if you want to attach photos or other media to the message:
1_onSend = async ([message]) => { 2 try { 3 await this.currentUser.sendSimpleMessage({ 4 roomId: this.room_id, 5 text: message.text, 6 }); 7 } catch (send_msg_err) { 8 console.log('error sending message: ', send_msg_err); 9 } 10 };
Here’s the function that gets executed whenever a new message is received. This will create a new array consisting of the current messages with the new message appended at the end:
1_onMessage = data => { 2 const {message} = this._getMessage(data); 3 this.setState(previousState => ({ 4 messages: GiftedChat.append(previousState.messages, message), 5 })); 6 };
Here’s the _getMessage() function. This creates a new object consisting only of the data required by Gifted Chat in order to render a message. Note that even though we’re only sending simple text messages, we still have to extract the inline part to get the actual text as messages still follow the same multi-part structure regardless of whether they’re sent as a simple message or multi-part:
1_getMessage = ({id, sender, parts, createdAt}) => { 2 const text = parts.find(part => part.partType === 'inline').payload.content; 3 4 const msg_data = { 5 _id: id, 6 text: text, 7 createdAt: new Date(createdAt), 8 user: { 9 _id: sender.id.toString(), 10 name: sender.name, 11 avatar: `https://na.ui-avatars.com/api/?name=${sender.name}`, 12 }, 13 }; 14 15 return { 16 message: msg_data, 17 }; 18 };
Lastly, in your Root.js file, add the ContactCustomer screen:
1import OrderMap from './src/screens/OrderMap'; 2 import ContactCustomer from './src/screens/ContactCustomer'; 3 4 const RootStack = createStackNavigator( 5 { 6 OrderMap, 7 ContactCustomer, 8 }, 9 { 10 initialRouteName: 'OrderMap', 11 }, 12 );
Ordering app: OrderSummary screen
Next, we now proceed to the ordering app. Open the src/screens/OrderSummary.js file and import the two additional packages that we need:
1Geocoder.init(GOOGLE_API_KEY); 2 3 // add these 4 const random = require('string-random'); 5 import axios from 'axios';
Next, update the placeOrder() method so it generates a random room ID for the chat room. We’ll be needing this along with the room name later so we store it in the global app state. We’ll update the GlobalContext.js file later to add this method. After that, make a request to log in the user and create the chat room:
1placeOrder = async () => { 2 const {customer_location, customer_address} = this.state; 3 4 // add these 5 const room_id = random(); 6 const room_name = `Order ${room_id}`; 7 this.context.setRoom(room_id, room_name); 8 // end 9 10 const { 11 address: restaurant_address, 12 location: restaurant_location, 13 } = this.context.cart_items[0].restaurant; 14 15 // add these 16 try { 17 // creates the Chatkit user if it doesn't already exists 18 await axios.post(`${BASE_URL}/login`, { 19 user_id: this.context.user_id, 20 user_name: this.context.user_name, 21 }); 22 23 // create the Chatkit room 24 await axios.post(`${BASE_URL}/room`, { 25 room_id, 26 room_name: room_name, 27 user_id: this.context.user_id, 28 }); 29 } catch (err) { 30 console.log('login err: ', err); 31 } 32 }
Ordering app: TrackOrder screen
Open the src/screens/TrackOrder.js file and update the client-driver-response event to include the room_id and room_name. Since we saved it in the global app state earlier, we can now access it via this.context:
1componentDidMount() { 2 // ... 3 this.user_ride_channel = this.pusher.subscribe( 4 'private-ride-' + this.context.user_id, 5 ); 6 7 // update this: 8 this.user_ride_channel.bind('client-driver-response', data => { 9 const {hasDriver} = this.state; 10 this.user_ride_channel.trigger('client-driver-response', { 11 response: hasDriver ? 'no' : 'yes', 12 13 // add these 14 room_id: hasDriver ? '0' : this.context.room_id, 15 room_name: hasDriver ? '' : this.context.room_name, 16 }); 17 }); 18 }
After that, add the code for navigating to the ContactDriver screen:
1contactDriver = () => { 2 this.props.navigation.navigate('ContactDriver'); 3 };
Ordering app: GlobalContext
Open the GlobalContext.js file and add the initial value for the room_id and room_name:
1export class AppContextProvider extends React.Component { 2 state = { 3 cart_items: [], 4 user_id: 'wernancheta', 5 user_name: 'Wern Ancheta', 6 7 // add these: 8 room_id: '', 9 room_name: '', 10 }; 11 }
Then add the method for updating them:
1setRoom = (id, name) => { 2 this.setState({ 3 room_id: id, 4 room_name: name, 5 }); 6 };
Don’t forget to add setRoom() method as a value:
1render() { 2 return ( 3 <AppContext.Provider 4 value={{ 5 ...this.state, 6 addToCart: this.addToCart, 7 setRoom: this.setRoom, 8 }}> 9 {this.props.children} 10 </AppContext.Provider> 11 ); 12 }
Ordering app: ContactDriver screen
Create a src/screens/ContactDriver.js file and add the following. This has pretty much the same code as the src/screens/ContactCustomer.js file from the driver app earlier. The only difference is that we’re using the user_id and room_id from the context and not from the navigation params:
1import React, {Component} from 'react'; 2 import {View, StyleSheet} from 'react-native'; 3 4 import {GiftedChat} from 'react-native-gifted-chat'; 5 import {ChatManager, TokenProvider} from '@pusher/chatkit-client'; 6 7 import Config from 'react-native-config'; 8 9 const CHATKIT_INSTANCE_LOCATOR_ID = Config.CHATKIT_INSTANCE_LOCATOR_ID; 10 const CHATKIT_SECRET_KEY = Config.CHATKIT_SECRET_KEY; 11 const CHATKIT_TOKEN_PROVIDER_ENDPOINT = Config.CHATKIT_TOKEN_PROVIDER_ENDPOINT; 12 13 import {AppContext} from '../../GlobalContext'; 14 15 class ContactDriver extends Component { 16 static navigationOptions = ({navigation}) => { 17 return { 18 title: 'Contact Driver' 19 }; 20 }; 21 22 static contextType = AppContext; 23 24 state = { 25 messages: [], 26 }; 27 28 async componentDidMount() { 29 try { 30 const chatManager = new ChatManager({ 31 instanceLocator: CHATKIT_INSTANCE_LOCATOR_ID, 32 userId: this.context.user_id, 33 tokenProvider: new TokenProvider({ 34 url: CHATKIT_TOKEN_PROVIDER_ENDPOINT, 35 }), 36 }); 37 38 let currentUser = await chatManager.connect(); 39 this.currentUser = currentUser; 40 41 await this.currentUser.subscribeToRoomMultipart({ 42 roomId: this.context.room_id, 43 hooks: { 44 onMessage: this._onMessage, 45 }, 46 messageLimit: 30, 47 }); 48 } catch (err) { 49 console.log('chatkit error: ', err); 50 } 51 } 52 53 _onMessage = data => { 54 const {message} = this._getMessage(data); 55 56 this.setState(previousState => ({ 57 messages: GiftedChat.append(previousState.messages, message), 58 })); 59 }; 60 61 _getMessage = ({id, sender, parts, createdAt}) => { 62 const text = parts.find(part => part.partType === 'inline').payload.content; 63 64 const msg_data = { 65 _id: id, 66 text: text, 67 createdAt: new Date(createdAt), 68 user: { 69 _id: sender.id.toString(), 70 name: sender.name, 71 avatar: `https://na.ui-avatars.com/api/?name=${sender.name}`, 72 }, 73 }; 74 75 return { 76 message: msg_data, 77 }; 78 }; 79 80 render() { 81 const {messages} = this.state; 82 return ( 83 <View style={styles.wrapper}> 84 <GiftedChat 85 messages={messages} 86 onSend={messages => this._onSend(messages)} 87 showUserAvatar={true} 88 user={{ 89 _id: this.context.user_id, 90 }} 91 /> 92 </View> 93 ); 94 } 95 96 _onSend = async ([message]) => { 97 try { 98 await this.currentUser.sendSimpleMessage({ 99 roomId: this.context.room_id, 100 text: message.text, 101 }); 102 } catch (send_msg_err) { 103 console.log('error sending message: ', send_msg_err); 104 } 105 }; 106 } 107 108 const styles = StyleSheet.create({ 109 wrapper: { 110 flex: 1, 111 }, 112 }); 113 114 export default ContactDriver;
Lastly, in your Root.js file, add the ContactDriver screen:
1import TrackOrder from './src/screens/TrackOrder'; 2 import ContactDriver from './src/screens/ContactDriver'; 3 4 const RootStack = createStackNavigator( 5 { 6 FoodList, 7 FoodDetails, 8 OrderSummary, 9 TrackOrder, 10 ContactDriver, 11 }, 12 { 13 initialRouteName: 'FoodList', 14 }, 15 );
Chatkit server
Now we proceed with the server code. Start by importing the Chatkit server SDK:
1const cors = require('cors'); 2 const Chatkit = require('@pusher/chatkit-server'); // add this
Initialize Chatkit:
1const app = express(); 2 3 // add these: 4 const CHATKIT_INSTANCE_LOCATOR_ID = process.env.CHATKIT_INSTANCE_LOCATOR_ID; 5 const CHATKIT_SECRET_KEY = process.env.CHATKIT_SECRET_KEY; 6 7 const chatkit = new Chatkit.default({ 8 instanceLocator: CHATKIT_INSTANCE_LOCATOR_ID, 9 key: CHATKIT_SECRET_KEY, 10 });
Add the /login route. As mentioned earlier, all this does is create a corresponding Chatkit user for the user_id and user_name provided if it doesn’t already exists:
1app.post('/login', async (req, res) => { 2 const {user_id, user_name} = req.body; 3 try { 4 const user = await chatkit.getUser({ 5 id: user_id, 6 }); 7 } catch (err) { 8 if (err.error == 'services/chatkit/not_found/user_not_found') { 9 await chatkit.createUser({ 10 id: user_id, 11 name: user_name, 12 }); 13 } 14 } 15 16 return res.send('ok'); 17 });
The /room route works the same way. It will create a Chatkit room if it doesn’t already exists. But if it already does then it will add the user to the room. As you’ve seen earlier, the first time this gets called is when the customer places their order so the room is created at that point. The second time is when the driver marks the order as “picked”. At that point, the driver is added to the room:
1app.post('/room', async (req, res) => { 2 const {room_id, room_name, user_id} = req.body; 3 4 try { 5 const room = await chatkit.getRoom({ 6 roomId: room_id, 7 includePrivate: true, 8 }); 9 10 if (room) { 11 const user_rooms = await chatkit.getUserRooms({ 12 userId: user_id, 13 }); 14 15 const room_index = user_rooms.findIndex(item => item.id == room_id); 16 if (room_index == -1) { 17 await chatkit.addUsersToRoom({ 18 roomId: room_id, 19 userIds: [user_id], 20 }); 21 } 22 } 23 } catch (err) { 24 if (err.error == 'services/chatkit/not_found/room_not_found') { 25 const created_room = await chatkit.createRoom({ 26 id: room_id, 27 creatorId: user_id, 28 name: room_name, 29 isPrivate: true, 30 }); 31 } 32 } 33 34 return res.send('ok'); 35 });
Running the app
At this point, you can now run the app. Start by running the server and exposing it via ngrok:
1cd RNFoodDelivery 2 node server/index.js 3 ~/Downloads/ngrok http 5000
Replace the NGROK_HTTPS_URL on the .env file then run the app. If you want to test on the same machine, you need to start the metro bundler first on a different port (default is port 8081):
react-native start --port=8080
Then run the ordering app:
react-native run-android
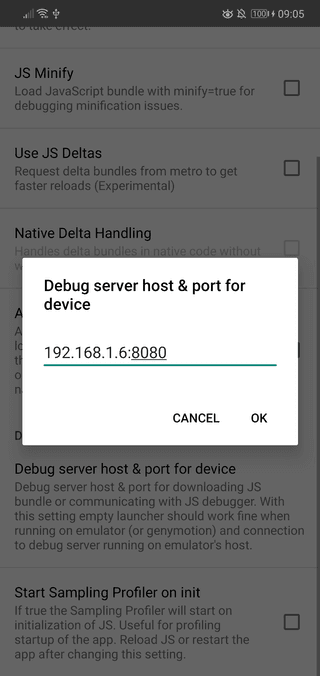
After that, update the server host and port under the debug server host & port settings (you can access the settings by shaking the device):
Once that’s done, disconnect the first device and connect the second device (or launch the emulator) then run the driver app. This will now run using the default port so there’s no need to separately run the metro bundler. Don’t forget to update the .env file with the ngrok HTTPS URL before doing so:
react-native run-android
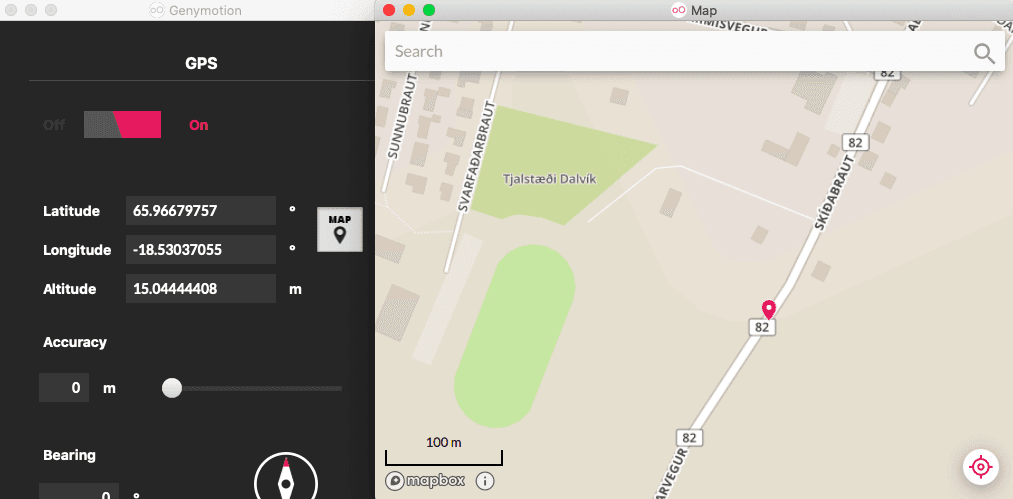
If you want to easily test the changing of locations, you can run the driver app using the Genymotion emulator. It has a feature for changing the location via a Mapbox UI:
Conclusion
That’s it! In this part of the series, you learned how to create the driver side of the app. You also learned how to implement chat functionality using Chatkit.
Stay tuned for the final part wherein we will implement Push Notifications using Pusher Beams.
You can find the app’s code on this GitHub repo.
IMPORTANT: ChatKit has been retired from the Pusher product stack as of April, 2020. This tutorial will no longer be functional in its current version. Explore our other Pusher tutorials to find out how Channels and Beams can help you build.


© 2026 Pusher Ltd. All rights reserved.
Pusher Limited is a company registered in England and Wales (No. 07489873) whose registered office is at MessageBird UK Limited, 3 More London Riverside, 4th Floor, London, United Kingdom, SE1 2AQ.