- Products

- Developers
- User stories
- Blog
- Pricing

Create a food ordering app in React Native - Part 1: Making an order
Introduction
Food ordering apps such as Uber Eats and FoodPanda are popular these days as they allow you to conveniently order foods from your favorite local restaurant right from your phone.
In this tutorial, we’ll take a look at how to create a food ordering app in React Native. We will create the ordering app as well as the driver app.
Here’s a breakdown of what we will be discussing throughout the series:
- Part 1: Making an order
- Part 2: Adding the driver app and chat functionality
- Part 3: Adding push notifications
Prerequisites
Basic knowledge of React Native and Node.js is required to follow this tutorial.
We will use the following package versions:
- Node 11.10.1
- Yarn 1.17.3
- React Native CLI 2.0.1
- React Native 0.61.1
Be sure to use the versions indicated above if you encounter any issues getting the app to run.
We will use Pusher Channes and an ngrok. We will use Channels to establish a connection between the customer and the driver, while ngrok is for exposing the server to the internet. To get started with Pusher Channels, sign up for a free acount or sign in.
App overview
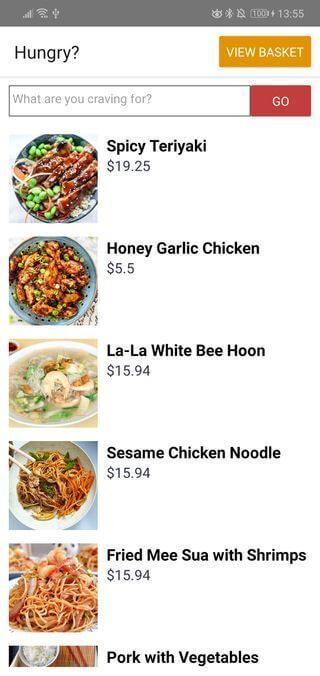
We will create a simplified version of a food ordering app. First, the user will be greeted with a food list. From here, they can click on any of the items to view the details:
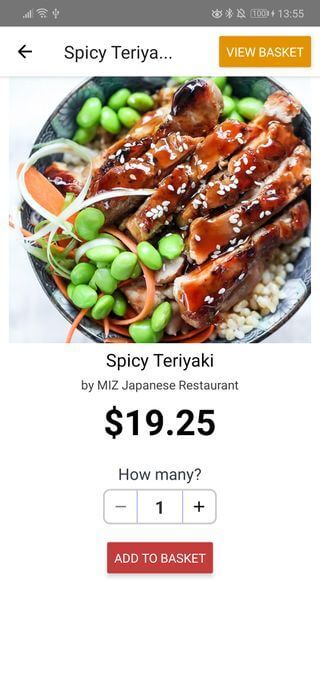
Here’s what the details screen looks like. This is where they can select the quantity and add the item to the cart. Adding an existing item to the cart will result in incrementing the quantity of the item that’s already in the cart. Note that users can only order from one restaurant at a time:
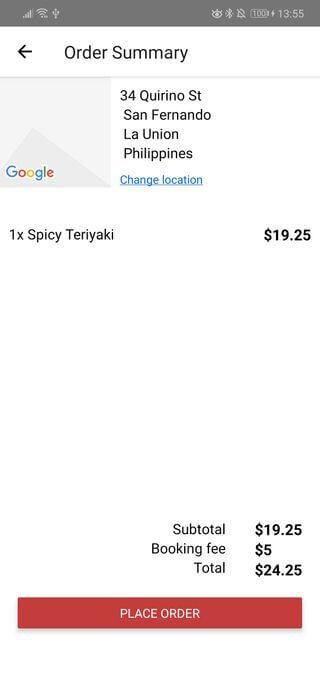
Once the user is done adding items to their cart, they can click on the View Basket button in the header. This will navigate them to the order summary screen. This screen is where all the items they added to their cart is listed along with the amount they need to pay. This is also where they can change their delivery location:
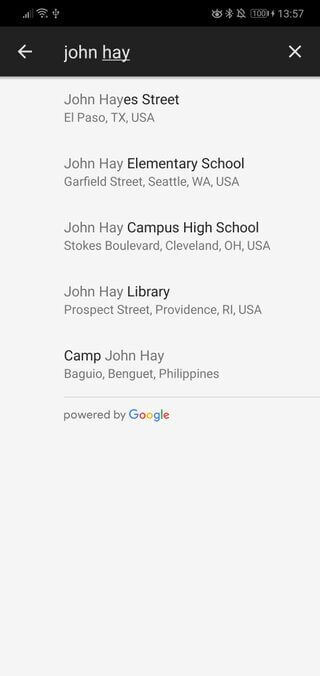
Though Geolocation is used by default to determine the user’s location, if it isn’t accurate then the user can also pick their location:
Once the user is ready, they can click on the Place Order button to trigger the app to send a request to a driver.
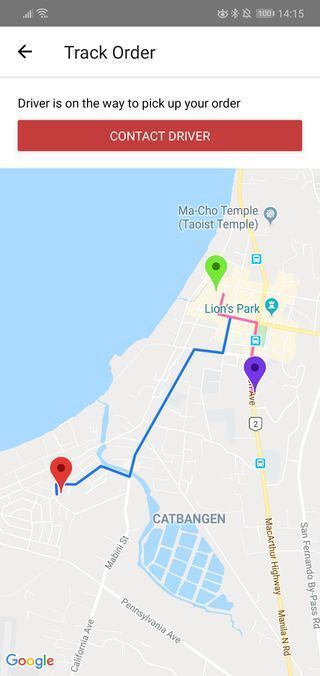
Once a driver has accepted their request, the driver’s location is displayed in realtime on the map. The path from the driver to the restaurant and from the restaurant to the user is also indicated on the map:
You can find the app’s code on this GitHub repo. The completed code for this part of the series is on the food-ordering branch.
Setting up Channels
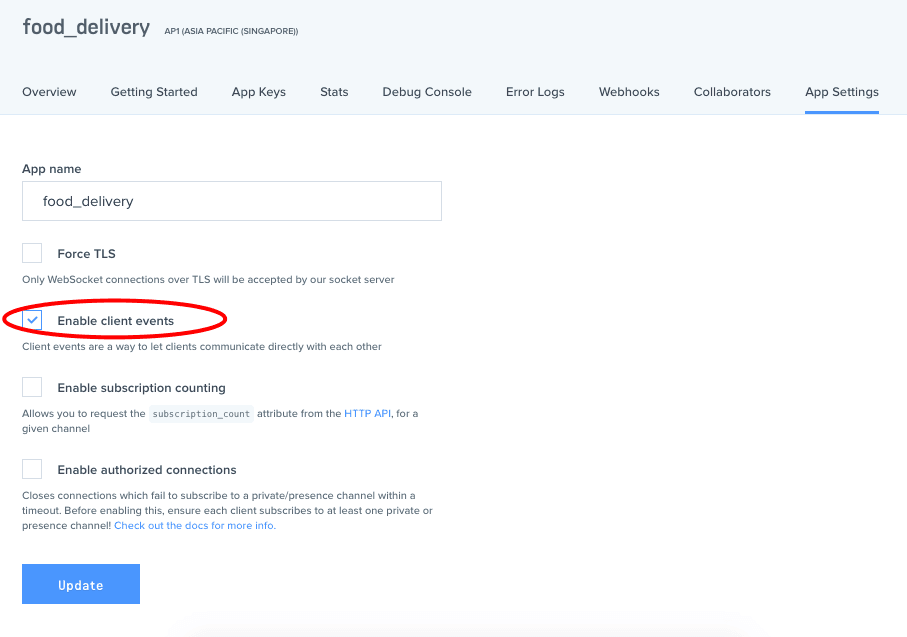
Create a new Channels app instance if you haven’t already. Then under the App Settings tab, enable client events. For anything Channels-related, refer to Channels docs.
This allows us to trigger events right from the app itself:
Setting up Google Maps
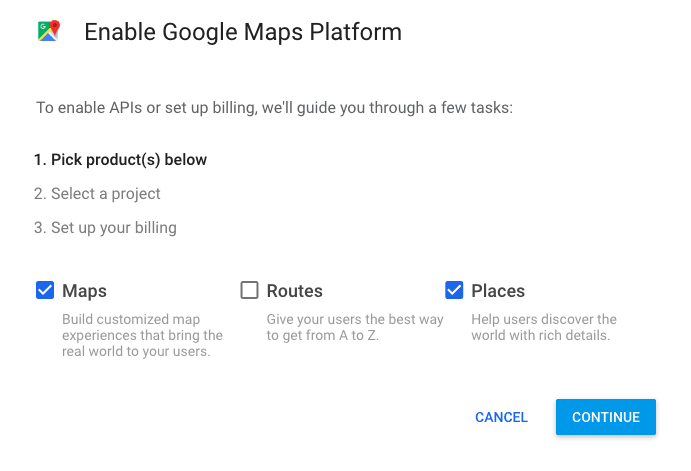
In order to use React Native Maps, you first need to set up the Google Maps Platform. Thankfully, this has been covered extensively in the official docs: Get Started with Google Maps Platform.
If you’re new to it, a highly recommend following the Quickstart. This is the fastest way to get up and running because it will automatically configure everything for you. All you need to do is pick the specific Google Maps products that you’re going to need. In this case, we’ll only need Maps and Maps Places. Selecting these will automatically enable the Android, iOS, and Web API of Google Maps and Places for you:
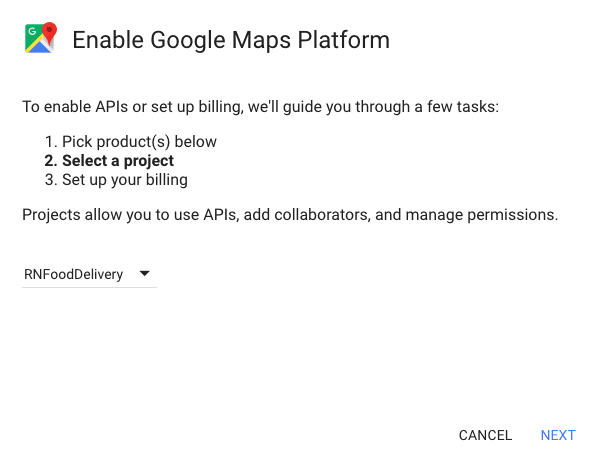
After that, you need to select a project. If you’re new to using any of the Google APIs, you will most likely have a project pre-created already. Just select that project or follow the instructions on how to create a new one:
After that, the final step is for you to setup billing.
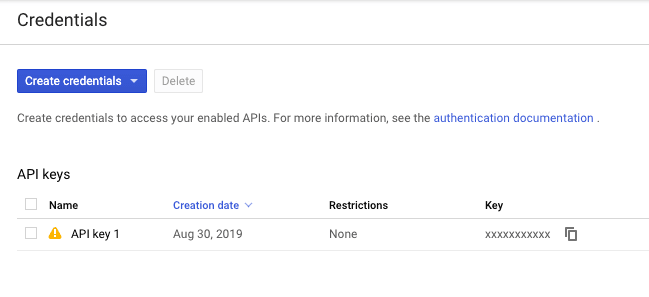
Once that’s done, you should be able to view your API keys from the Google Cloud Platform console by clicking on the hamburger icon at the top left of the screen. Then select APIs & Services > Credentials. This will list out all the API keys that you can use for connecting to the Google Maps and Google Maps Places API. Here’s how it looks like:
Bootstrapping the app
The next step is for us to bootstrap the app. I’ve already prepared a starter branch to make it easy for us to proceed with the important parts of the app. This branch contains the code for setting up the navigation as well as the code for the components and styles.
Clone the repo and switch to the starter branch:
1git clone https://github.com/anchetaWern/React-Native-Food-Delivery.git RNFoodDelivery 2 cd RNFoodDelivery 3 git checkout starter
After that, install all the dependencies. Note that this will only install the dependencies for this part of the series. We’ll install the dependencies for each part as we go:
yarn install
Here’s a what each of the packages are used for:
- axios - for making requests for the list of foods to the server.
- pusher-js - the JavaScript client library for Pusher. We use it as a realtime communication channel between the customer and the driver. This depends on
@react-native-community/netinfoto determine the network status. - react-native-config - for reading config in the
.envfiles. - react-navigation - for implementing navigation in the app. This depends on
react-navigation-stack,react-native-gesture-handler,react-native-reanimated, andreact-native-gesture-handler. - react-native-simple-stepper - used for rendering a stepper component for selecting the quantity for a specific order item.
- react-native-permissions - for requesting for permission to access geolocation data.
- react-native-geocoding - for converting coordinates to an actual place name.
- react-native-google-places - for rendering a place picker modal powered by Google Maps Places.
- react-native-geolocation-service - for getting the geolocation data.
- react-native-maps - for rendering maps and markers.
- react-native-maps-directions - for drawing a path between two coordinates.
Next, update the .env file at the roof of the project directory with your Channels and Google Maps API credentials:
1CHANNELS_APP_KEY="YOUR CHANNELS APP KEY" 2 CHANNELS_APP_CLUSTER="YOUR CHANNELS APP CLUSTER" 3 4 GOOGLE_API_KEY="YOUR GOOGLE API KEY" 5 6 NGROK_HTTPS_URL="YOUR NGROK HTTPS URL"
Next, update the android/settings.gradle file to include the native files for the packages that we’re using. We’re not including all of them because most of the packages that we’re using doesn’t have native code and a few others already supports Autolinking:
1rootProject.name = 'RNFoodDelivery' 2 3 // add these: 4 include ':react-native-permissions' 5 project(':react-native-permissions').projectDir = new File(rootProject.projectDir, '../node_modules/react-native-permissions/android') 6 7 include ':react-native-config' 8 project(':react-native-config').projectDir = new File(rootProject.projectDir, '../node_modules/react-native-config/android') 9 include ':react-native-google-places' 10 project(':react-native-google-places').projectDir = new File(rootProject.projectDir, '../node_modules/react-native-google-places/android')
Next, update the android/app/build.gradle file:
1apply plugin: "com.android.application" 2 3 apply from: project(':react-native-config').projectDir.getPath() + "/dotenv.gradle" // add this
Still on the same file, look for the dependencies and add the following:
1dependencies { 2 implementation fileTree(dir: "libs", include: ["*.jar"]) 3 implementation "com.facebook.react:react-native:+" // From node_modules 4 5 // add these (for various dependencies) 6 implementation project(':react-native-config') 7 implementation project(':react-native-google-places') 8 implementation project(':react-native-permissions') 9 10 // add these (for react-navigation): 11 implementation 'androidx.appcompat:appcompat:1.1.0-rc01' 12 implementation 'androidx.swiperefreshlayout:swiperefreshlayout:1.1.0-alpha02' 13 14 }
Next, update the android/app/src/main/AndroidManifest.xml file and include the permissions that we need. ACCESS_NETWORK_STATE is used by Channels to determine if the user is currently connected to the internet. While ACCESS_FINE_LOCATION is used for getting the user’s current location:
1<manifest xmlns:android="http://schemas.android.com/apk/res/android" 2 package="com.rnfooddelivery"> 3 <uses-permission android:name="android.permission.INTERNET" /> 4 5 <!-- add these --> 6 <uses-permission android:name="android.permission.ACCESS_NETWORK_STATE"/> 7 <uses-permission android:name="android.permission.ACCESS_FINE_LOCATION" /> 8 ... 9 </manifest>
Still on the same file, under <application>, add your Google API key config. This is required by React Native Maps in order to use Google Maps:
1<application> 2 <meta-data 3 android:name="com.google.android.geo.API_KEY" 4 android:value="YOUR GOOGLE API KEY" /> 5 </application>
Coding the ordering app
At this point, we’re now ready to start coding the app. As mentioned earlier, the navigation and styles have already been pre-coded. All we have to do now is add the code for the individual screens.
FoodList screen
First, we’ll go through the code for the FoodList screen. This screen displays the list of foods that are available for order from each of the restaurants that uses the app. Nothing too complex here. All we do is request the data from the server. As you’ll see later, the list of foods is also hard-coded.
Open the src/screens/FoodList.js file and add the following. If you’ve used React Native for a while, you should feel right at home. Basically, we’re just creating a list using the FlatList component and then filtering it by whatever the user has entered in the TextInput. The navigationOptions allows us to specify the settings for the navigation header for the current page. In this case, we include the title and a Button in the header for navigating to the OrderSummary screen. The React Navigation library takes care of these for us:
1// src/screens/FoodList.js 2 import React, {Component} from 'react'; 3 import {View, Text, Button, TextInput, FlatList, StyleSheet} from 'react-native'; 4 import axios from 'axios'; 5 import Config from 'react-native-config'; 6 7 import NavHeaderRight from '../components/NavHeaderRight'; 8 import ListCard from '../components/ListCard'; 9 10 const BASE_URL = Config.NGROK_HTTPS_URL; 11 12 class FoodList extends Component { 13 static navigationOptions = ({navigation}) => { 14 return { 15 title: 'Hungry?', 16 headerRight: <NavHeaderRight />, 17 }; 18 }; 19 20 state = { 21 foods: [], // list of foods to be rendered on the screen 22 query: '', 23 }; 24 25 async componentDidMount() { 26 // fetch the array of foods from the server 27 const foods_response = await axios.get('${BASE_URL}/foods'); 28 this.setState({ 29 foods: foods_response.data.foods, 30 }); 31 } 32 33 render() { 34 const {foods, query} = this.state; 35 return ( 36 <View style={styles.wrapper}> 37 <View style={styles.topWrapper}> 38 <View style={styles.textInputWrapper}> 39 <TextInput 40 style={styles.textInput} 41 onChangeText={this.onChangeQuery} 42 value={query} 43 placeholder={'What are you craving for?'} 44 /> 45 </View> 46 47 <View style={styles.buttonWrapper}> 48 <Button 49 onPress={() => this.filterList()} 50 title="Go" 51 color="#c53c3c" 52 /> 53 </View> 54 </View> 55 56 <FlatList 57 data={foods} 58 renderItem={this.renderFood} 59 contentContainerStyle={styles.list} 60 keyExtractor={item => item.id.toString()} 61 /> 62 </View> 63 ); 64 } 65 66 onChangeQuery = text => { 67 this.setState({ 68 query: text, 69 }); 70 }; 71 72 filterList = async () => { 73 // filter the list of foods by supplying a query 74 const {query} = this.state; 75 const foods_response = await axios.get(`${BASE_URL}/foods?query=${query}`); 76 77 this.setState({ 78 foods: foods_response.data.foods, 79 query: '', 80 }); 81 }; 82 83 viewItem = item => { 84 // navigate to the FoodDetails screen 85 this.props.navigation.navigate('FoodDetails', { 86 item, 87 }); 88 }; 89 90 renderFood = ({item}) => { 91 return <ListCard item={item} viewItem={this.viewItem} />; 92 }; 93 } 94 95 // <pre-coded styles here..> 96 97 export default FoodList;
FoodDetails screen
Next, let’s go through the code for the FoodDetails screen. This screen shows all the details for a specific food. It also allows the user to select the quantity to be ordered and add them to the cart. The PageCard component is used for rendering the entirety of the screen. All we do is supply it with the necessary props. The most relevant function here is the function for adding the item to the cart. This implements the rule that the user can only order foods from a single restaurant for each order. But the addToCart() method from this.context is the one that actually adds it to the cart. We’ll walk through what this context is shortly. For now, know that this uses React’s Context API to create a global app context for storing data and function that we need throughout the app:
1// src/screens/FoodDetails.js 2 import React, {Component} from 'react'; 3 import {View, Button, Alert} from 'react-native'; 4 5 import NavHeaderRight from '../components/NavHeaderRight'; 6 import PageCard from '../components/PageCard'; 7 8 import {AppContext} from '../../GlobalContext'; 9 10 class FoodDetails extends Component { 11 static navigationOptions = ({navigation}) => { 12 return { 13 title: navigation.getParam('item').name.substr(0, 12) + '...', 14 headerRight: <NavHeaderRight />, 15 }; 16 }; 17 18 static contextType = AppContext; // set this.context to the global app context 19 20 state = { 21 qty: 1, 22 }; 23 24 constructor(props) { 25 super(props); 26 const {navigation} = this.props; 27 this.item = navigation.getParam('item'); // get the item passed from the FoodList screen 28 } 29 30 qtyChanged = value => { 31 const nextValue = Number(value); 32 this.setState({qty: nextValue}); 33 }; 34 35 addToCart = (item, qty) => { 36 // prevent the user from adding items with different restaurant ids 37 const item_id = this.context.cart_items.findIndex( 38 el => el.restaurant.id !== item.restaurant.id, 39 ); 40 if (item_id === -1) { 41 Alert.alert( 42 'Added to basket', 43 `${qty} ${item.name} was added to the basket.`, 44 ); 45 this.context.addToCart(item, qty); // call addToCart method from global app context 46 } else { 47 Alert.alert( 48 'Cannot add to basket', 49 'You can only order from one restaurant for each order.', 50 ); 51 } 52 }; 53 54 render() { 55 const {qty} = this.state; 56 return ( 57 <PageCard 58 item={this.item} 59 qty={qty} 60 qtyChanged={this.qtyChanged} 61 addToCart={this.addToCart} 62 /> 63 ); 64 } 65 } 66 67 export default FoodDetails;
GlobalContext
As mentioned earlier, we’re using the React Context API to create a global context in which we store data and function that we need throughout the app. This allows us to avoid common problems when working with state such as prop drilling. All without having to use full-on state management libraries like Redux or MobX.
In this case, we need to make the cart items as well as the function for adding items available in the global app context. To do that, we create a context and export it. Then we create an AppContextProvider component. This will serve as a wrapper for the higher-order component that we’re going to create shortly. Thus, it is where we initialize the global state and include the function for adding items to the cart. The addToCart() method contains the logic that checks whether an item has already been added to the cart. If it is, then it will simply add the supplied quantity to the existing item:
1// GlobalContext.js 2 import React from 'react'; 3 import {withNavigation} from 'react-navigation'; 4 export const AppContext = React.createContext({}); // create a context 5 6 export class AppContextProvider extends React.Component { 7 state = { 8 cart_items: [], 9 10 user_id: 'wernancheta', 11 user_name: 'Wern Ancheta', 12 }; 13 14 constructor(props) { 15 super(props); 16 } 17 18 addToCart = (item, qty) => { 19 let found = this.state.cart_items.filter(el => el.id === item.id); 20 if (found.length == 0) { 21 this.setState(prevState => { 22 return {cart_items: prevState.cart_items.concat({...item, qty})}; 23 }); 24 } else { 25 this.setState(prevState => { 26 const other_items = prevState.cart_items.filter( 27 el => el.id !== item.id, 28 ); 29 return { 30 cart_items: [...other_items, {...found[0], qty: found[0].qty + qty}], 31 }; 32 }); 33 } 34 }; 35 36 // next: add render() 37 } 38 39 // last: export components
Here’s the render() method. This is where we use the Context Provider component to allow consuming components to subscribe to context value changes. The value is specified via the value prop. Using the Context Provider allows us to automatically re-render the consuming components everytime the value changes. In this case, we’re destructuring whatever is in the state and add the addToCart() method:
1render() { 2 return ( 3 <AppContext.Provider 4 value={{ 5 ...this.state, 6 addToCart: this.addToCart, 7 }}> 8 {this.props.children} 9 </AppContext.Provider> 10 ); 11 }
Once that’s done, we can now create the actual higher-order component and use the AppContextProvider to wrap whatever component will be passed to it:
1export const withAppContextProvider = ChildComponent => props => ( 2 <AppContextProvider> 3 <ChildComponent {...props} /> 4 </AppContextProvider> 5 );
If you’re having difficulty wrapping your head around higher-order components in React. Be sure to check out this article: How to develop your React superpowers with the HOC Pattern.
index.js
To use the higher-order component that we just created, open the index.js file at the root of the project directory then wrap the main App component with the withAppContextProvider:
1// index.js 2 import {AppRegistry} from 'react-native'; 3 import App from './App'; 4 import {name as appName} from './app.json'; 5 import {withAppContextProvider} from './GlobalContext'; // add this 6 7 AppRegistry.registerComponent(appName, () => withAppContextProvider(App)); // wrap App withAppContextProvider
Note that this doesn’t automatically provide us with whatever state is in the AppContextProvider component. As you’ve seen in the src/screens/FoodDetails.js file earlier, we had to include the AppContext:
import {AppContext} from '../../GlobalContext';
Then inside the component class, we had to set the contextType to the AppContext:
1class FoodDetails extends Component { 2 static contextType = AppContext; 3 // ... 4 }
This allowed us to access any of the values that were passed in the Context Provider component via this.context:
1this.context.cart_items; 2 this.context.addToCart(item, qty);
OrderSummary screen
Next, let’s proceed with the OrderSummary screen. This screen displays the items added to the cart and the payment breakdown. It also allows the user to change their delivery location.
Start by importing and initializing the packages we need:
1// src/screens/OrderSummary.js 2 import React, {Component} from 'react'; 3 import { 4 View, 5 Text, 6 Button, 7 TouchableOpacity, 8 FlatList, 9 StyleSheet, 10 } from 'react-native'; 11 import MapView from 'react-native-maps'; 12 import RNGooglePlaces from 'react-native-google-places'; 13 import {check, request, PERMISSIONS, RESULTS} from 'react-native-permissions'; 14 15 import Geolocation from 'react-native-geolocation-service'; 16 import Geocoder from 'react-native-geocoding'; 17 import Config from 'react-native-config'; 18 19 import {AppContext} from '../../GlobalContext'; 20 21 import getSubTotal from '../helpers/getSubTotal'; 22 23 import {regionFrom} from '../helpers/location'; 24 25 const GOOGLE_API_KEY = Config.GOOGLE_API_KEY; 26 27 Geocoder.init(GOOGLE_API_KEY);
Next, create the component class and initialize the state:
1class OrderSummary extends Component { 2 static navigationOptions = { 3 title: 'Order Summary', 4 }; 5 6 static contextType = AppContext; 7 8 state = { 9 customer_address: '', 10 customer_location: null, 11 restaurant_address: '', 12 restaurant_location: null, 13 }; 14 15 // next: add componentDidMount 16 }
Once the component is mounted, we check for the location permissions using the
React Native Permissions library. If the permission is denied, it means that it has not been requested (or is denied but still requestable) so we request for it from the user. If the user agrees, the permission becomes granted. From there, we get the user’s current location using the React Native Geolocation Services library. To get the name of the place, we use the React Native Geocoding library to transform the coordinates that we got back. The regionFrom() function gives us an object which we can supply to React Native Maps to render the location in the map. This function is included in the starter branch:
1let location_permission = await check( 2 PERMISSIONS.ANDROID.ACCESS_FINE_LOCATION, 3 ); 4 5 if (location_permission === 'denied') { 6 location_permission = await request( 7 PERMISSIONS.ANDROID.ACCESS_FINE_LOCATION, 8 ); 9 } 10 11 if (location_permission == 'granted') { 12 Geolocation.getCurrentPosition( 13 async position => { 14 const geocoded_location = await Geocoder.from( 15 position.coords.latitude, 16 position.coords.longitude, 17 ); 18 19 let customer_location = regionFrom( 20 position.coords.latitude, 21 position.coords.longitude, 22 position.coords.accuracy, 23 ); 24 25 this.setState({ 26 customer_address: geocoded_location.results[0].formatted_address, 27 customer_location, 28 }); 29 }, 30 error => { 31 console.log(error.code, error.message); 32 }, 33 { 34 enableHighAccuracy: true, 35 timeout: 15000, 36 maximumAge: 10000, 37 }, 38 ); 39 } 40 41 // next: add render()
Here’s the render() method:
1render() { 2 const subtotal = getSubTotal(this.context.cart_items); 3 const {customer_address, customer_location} = this.state; 4 5 return ( 6 <View style={styles.wrapper}> 7 <View style={styles.addressSummaryContainer}> 8 {customer_location && ( 9 <View style={styles.mapContainer}> 10 <MapView style={styles.map} initialRegion={customer_location} /> 11 </View> 12 )} 13 14 <View style={styles.addressContainer}> 15 {customer_address != '' && 16 this.renderAddressParts(customer_address)} 17 18 <TouchableOpacity 19 onPress={() => { 20 this.openPlacesSearchModal(); 21 }}> 22 <View style={styles.linkButtonContainer}> 23 <Text style={styles.linkButton}>Change location</Text> 24 </View> 25 </TouchableOpacity> 26 </View> 27 </View> 28 <View style={styles.cartItemsContainer}> 29 <FlatList 30 data={this.context.cart_items} 31 renderItem={this.renderCartItem} 32 keyExtractor={item => item.id.toString()} 33 /> 34 </View> 35 36 <View style={styles.lowerContainer}> 37 <View style={styles.spacerBox} /> 38 39 {subtotal > 0 && ( 40 <View style={styles.paymentSummaryContainer}> 41 <View style={styles.endLabelContainer}> 42 <Text style={styles.priceLabel}>Subtotal</Text> 43 <Text style={styles.priceLabel}>Booking fee</Text> 44 <Text style={styles.priceLabel}>Total</Text> 45 </View> 46 47 <View> 48 <Text style={styles.price}>${subtotal}</Text> 49 <Text style={styles.price}>$5</Text> 50 <Text style={styles.price}>${subtotal + 5}</Text> 51 </View> 52 </View> 53 )} 54 </View> 55 56 {subtotal == 0 && ( 57 <View style={styles.messageBox}> 58 <Text style={styles.messageBoxText}>Your cart is empty</Text> 59 </View> 60 )} 61 62 {subtotal > 0 && ( 63 <View style={styles.buttonContainer}> 64 <Button 65 onPress={() => this.placeOrder()} 66 title="Place Order" 67 color="#c53c3c" 68 /> 69 </View> 70 )} 71 </View> 72 ); 73 }
Here’s the renderAddressParts() method. All it does is render the individual parts of the address (street address, town name, etc.):
1renderAddressParts = customer_address => { 2 return customer_address.split(',').map((addr_part, index) => { 3 return ( 4 <Text key={index} style={styles.addressText}> 5 {addr_part} 6 </Text> 7 ); 8 }); 9 };
When the user clicks on the Change location button link, we use the React Native Google Places library to open a model which allows the user to pick a place. Note that this already gives us the actual name of the place so we don’t need to use the Geocoding library again:
1openPlacesSearchModal = async () => { 2 try { 3 const place = await RNGooglePlaces.openAutocompleteModal(); // open modal for picking a place 4 5 const customer_location = regionFrom( 6 place.location.latitude, 7 place.location.longitude, 8 16, // accuracy 9 ); 10 11 this.setState({ 12 customer_address: place.address, 13 customer_location, 14 }); 15 } catch (err) { 16 console.log('err: ', err); 17 } 18 };
Here’s the renderCartItem() method:
1renderCartItem = ({item}) => { 2 return ( 3 <View style={styles.cartItemContainer}> 4 <View> 5 <Text style={styles.priceLabel}> 6 {item.qty}x {item.name} 7 </Text> 8 </View> 9 <View> 10 <Text style={styles.price}>${item.price}</Text> 11 </View> 12 </View> 13 ); 14 };
Here’s the placeOrder() method. This extracts the customer location (coordinates) and address from the state, as well as the restaurant location and address from the context. We know that the user can only order from one restaurant, so we can simply get the first item and be assured that it’s the same for all the other items in the cart. Once we have all the required data, we simply pass it as a navigation param to the TrackOrder screen:
1placeOrder = () => { 2 const {customer_location, customer_address} = this.state; 3 4 const { 5 address: restaurant_address, 6 location: restaurant_location, 7 } = this.context.cart_items[0].restaurant; // get the address and location of the restaurant 8 9 this.props.navigation.navigate('TrackOrder', { 10 customer_location, 11 restaurant_location, 12 customer_address, 13 restaurant_address, 14 }); 15 };
TrackOrder screen
Next, we now proceed to the TrackOrder screen. This is where the user can keep track of the progress of their order via a map interface. The map displays markers for their location, the restaurant’s location, and the driver’s location. It also displays the path between those locations.
Start by importing the packages we need:
1// src/screens/TrackOrder.js 2 import React, {Component} from 'react'; 3 import {View, Text, Button, Alert, StyleSheet} from 'react-native'; 4 5 import MapView from 'react-native-maps'; 6 import Geolocation from 'react-native-geolocation-service'; 7 import MapViewDirections from 'react-native-maps-directions'; 8 import Pusher from 'pusher-js/react-native'; 9 10 import Config from 'react-native-config'; 11 12 const CHANNELS_APP_KEY = Config.CHANNELS_APP_KEY; 13 const CHANNELS_APP_CLUSTER = Config.CHANNELS_APP_CLUSTER; 14 const CHANNELS_AUTH_SERVER = 'YOUR NGROK HTTPS URL/pusher/auth'; 15 16 const GOOGLE_API_KEY = Config.GOOGLE_API_KEY; 17 18 import {regionFrom} from '../helpers/location'; 19 import {AppContext} from '../../GlobalContext';
Next, add the array which contains the status messages for the order. Each of these items will be displayed as the driver updates the order status on their side:
1const orderSteps = [ 2 'Finding a driver', 3 'Driver is on the way to pick up your order', 4 'Driver has picked up your order and is on the way to deliver it', 5 'Driver has delivered your order', 6 ];
Next, create the component class and initialize the state:
1class TrackOrder extends Component { 2 static navigationOptions = ({navigation}) => { 3 return { 4 title: 'Track Order', 5 }; 6 }; 7 8 static contextType = AppContext; 9 10 state = { 11 isSearching: true, // whether the app is still searching for a driver 12 hasDriver: false, // whether there's already a driver assigned to the order 13 driverLocation: null, // the coordinates of the driver's location 14 orderStatusText: orderSteps[0], // display the first message by default 15 }; 16 17 // next: add the constructor() 18 }
In the constructor, get the navigation params that we passed earlier from the OrderSummary screen. After that, initialize the instance variables that we will be using:
1constructor(props) { 2 super(props); 3 4 this.customer_location = this.props.navigation.getParam( 5 'customer_location', 6 ); // customer's location 7 this.restaurant_location = this.props.navigation.getParam( 8 'restaurant_location', 9 ); 10 11 this.customer_address = this.props.navigation.getParam('customer_address'); 12 this.restaurant_address = this.props.navigation.getParam( 13 'restaurant_address', 14 ); 15 16 this.available_drivers_channel = null; // the pusher channel where all drivers and customers are subscribed to 17 this.user_ride_channel = null; // the pusher channel exclusive to the customer and driver in a given order 18 this.pusher = null; // pusher client 19 } 20 21 // next: add componentDidMount()
On componentDidMount() is where we initialize the Pusher client and subscribe to the channel where we can look for available drivers. Once subscribed, we trigger an event to request for a driver. We’re putting it inside setTimeout() to ensure that the connection has really been initialized properly. The event contains all the relevant information that we got from the previous screen:
1componentDidMount() { 2 this.setState({ 3 isSearching: true, 4 }); 5 6 this.pusher = new Pusher(CHANNELS_APP_KEY, { 7 authEndpoint: CHANNELS_AUTH_SERVER, 8 cluster: CHANNELS_APP_CLUSTER, 9 encrypted: true, 10 }); 11 12 this.available_drivers_channel = this.pusher.subscribe( 13 'private-available-drivers', 14 ); 15 16 this.available_drivers_channel.bind('pusher:subscription_succeeded', () => { 17 // make a request to all drivers 18 setTimeout(() => { 19 this.available_drivers_channel.trigger('client-driver-request', { 20 customer: {username: this.context.user_id}, 21 restaurant_location: this.restaurant_location, 22 customer_location: this.customer_location, 23 restaurant_address: this.restaurant_address, 24 customer_address: this.customer_address, 25 }); 26 }, 2000); 27 }); 28 29 // next: subscribe to user-ride channel 30 }
Note: This is an overly simplified driver request logic. In a production app, you will need to filter the drivers so that the only one’s who receives the request are the one’s that are nearby the restaurant and the customer. The code above basically sends a request to all of the drivers.
Next, we subscribe to the current user’s own channel. This will be the means of communication between the driver (the one who responded to their request) and the customer. We listen for the client-driver-response event to be triggered from the driver’s side. When this happens, we send back a yes or no response. If the customer hasn’t found a driver yet, then we send a yes, otherwise no. Once the driver receives a yes response, they trigger the client-found-driver event on their side. This is then received by the customer and uses it to update the state with the driver’s location:
1this.user_ride_channel = this.pusher.subscribe( 2 'private-ride-' + this.context.user_id, 3 ); 4 5 this.user_ride_channel.bind('client-driver-response', data => { 6 // customer responds to driver's response 7 this.user_ride_channel.trigger('client-driver-response', { 8 response: this.state.hasDriver ? 'no' : 'yes', 9 }); 10 }); 11 12 this.user_ride_channel.bind('client-found-driver', data => { 13 // found driver, the customer has no say about this. 14 const driverLocation = regionFrom( 15 data.location.latitude, 16 data.location.longitude, 17 data.location.accuracy, 18 ); 19 20 this.setState({ 21 hasDriver: true, 22 isSearching: false, 23 driverLocation, 24 }); 25 26 Alert.alert( 27 'Driver found', 28 "We found you a driver. They're on their way to pick up your order.", 29 ); 30 }); 31 32 // next: subscribe to driver location change
As the driver goes to process the order, their location is constantly watched and sent to the customer via the client-driver-location event. We use this to update the marker on the map which represents the driver’s location:
1this.user_ride_channel.bind('client-driver-location', data => { 2 // driver location received 3 let driverLocation = regionFrom( 4 data.latitude, 5 data.longitude, 6 data.accuracy, 7 ); 8 9 // update the marker representing the driver's current location 10 this.setState({ 11 driverLocation, 12 }); 13 });
Next, listen for the client-order-update event. This uses the step value to update the order status. When the driver accepts an order, step 1 is sent. When the driver receives the order from the restaurant, they need to click a button to trigger step 2 to be sent, and so on:
1this.user_ride_channel.bind('client-order-update', data => { 2 this.setState({ 3 orderStatusText: orderSteps[data.step], 4 }); 5 });
Here’s the render() method:
1render() { 2 const {driverLocation, orderStatusText} = this.state; 3 4 return ( 5 <View style={styles.wrapper}> 6 <View style={styles.infoContainer}> 7 <Text style={styles.infoText}>{orderStatusText}</Text> 8 9 <Button 10 onPress={() => this.contactDriver()} 11 title="Contact driver" 12 color="#c53c3c" 13 /> 14 </View> 15 16 <View style={styles.mapContainer}> 17 <MapView 18 style={styles.map} 19 zoomControlEnabled={true} 20 initialRegion={this.customer_location}> 21 <MapView.Marker 22 coordinate={{ 23 latitude: this.customer_location.latitude, 24 longitude: this.customer_location.longitude, 25 }} 26 title={'Your location'} 27 /> 28 29 {driverLocation && ( 30 <MapView.Marker 31 coordinate={driverLocation} 32 title={'Driver location'} 33 pinColor={'#6f42c1'} 34 /> 35 )} 36 37 <MapView.Marker 38 coordinate={{ 39 latitude: this.restaurant_location[0], 40 longitude: this.restaurant_location[1], 41 }} 42 title={'Restaurant location'} 43 pinColor={'#4CDB00'} 44 /> 45 46 {driverLocation && ( 47 <MapViewDirections 48 origin={driverLocation} 49 destination={{ 50 latitude: this.restaurant_location[0], 51 longitude: this.restaurant_location[1], 52 }} 53 apikey={GOOGLE_API_KEY} 54 strokeWidth={3} 55 strokeColor="hotpink" 56 /> 57 )} 58 59 <MapViewDirections 60 origin={{ 61 latitude: this.restaurant_location[0], 62 longitude: this.restaurant_location[1], 63 }} 64 destination={{ 65 latitude: this.customer_location.latitude, 66 longitude: this.customer_location.longitude, 67 }} 68 apikey={GOOGLE_API_KEY} 69 strokeWidth={3} 70 strokeColor="#1b77fb" 71 /> 72 </MapView> 73 </View> 74 </View> 75 ); 76 }
Channels authentication server
Now let’s proceed with the authentication server. Start by updating the server/.env file with your Channels app instance credentials:
1PUSHER_APP_ID="YOUR PUSHER APP ID" 2 PUSHER_APP_KEY="YOUR PUSHER APP KEY" 3 PUSHER_APP_SECRET="YOUR PUSHER APP SECRET" 4 PUSHER_APP_CLUSTER="YOUR PUSHER APP CLUSTER"
Next, import the packages we need:
1// server/index.js 2 const express = require('express'); 3 const bodyParser = require('body-parser'); 4 const cors = require('cors'); 5 6 const Pusher = require('pusher');
Initialize the Node.js client for Channels:
1var pusher = new Pusher({ 2 appId: process.env.PUSHER_APP_ID, 3 key: process.env.PUSHER_APP_KEY, 4 secret: process.env.PUSHER_APP_SECRET, 5 cluster: process.env.PUSHER_APP_CLUSTER, 6 });
Import the foods data. This contains all of the data about a specific food that we’re going to need:
const {foods} = require('./data/foods.js');
Next, initialize the Express server with the request body parsers and CORS plugin. Also, set the static files location to the images folder. This allows us to serve the images from the /images path:
1const app = express(); 2 app.use(bodyParser.urlencoded({extended: false})); 3 app.use(bodyParser.json()); 4 app.use(cors()); 5 app.use('/images', express.static('images'));
Next, add the route for authenticating the users. The Channels client on the app makes a request to this route when it initializes the connection. This allows the user to trigger events directly from the client side. Note that this will authenticate the users immediately. This is only to simplify things. On a production app, you have to include your authentication code to check if the user who made the request is really a user of your app:
1app.post('/pusher/auth', function(req, res) { 2 var socketId = req.body.socket_id; 3 var channel = req.body.channel_name; 4 var auth = pusher.authenticate(socketId, channel); // authenticate the request 5 res.send(auth); 6 });
Lastly, expose the server:
1const PORT = 5000; 2 app.listen(PORT, err => { 3 if (err) { 4 console.error(err); 5 } else { 6 console.log(`Running on ports ${PORT}`); 7 } 8 });
Running the app
At this point we’re now ready to run the app. Start by running the server and exposing it via ngrok:
1node server/index.js 2 ~/Downloads/ngrok http 5000
Then update the .env file with your HTTPS URL.
Finally, run the app:
react-native run-android
As we haven’t created the driver app yet, you’ll only be able to test out the first three screens. The TrackOrder screen can only be tested once we create the driver app on the second part of this series.
Conclusion
That’s it for the first part of this series. In this part, you learned how to create a very simple food ordering app using React Native. Specifically, you learned how to use various packages for easily implementing such app. We used React Native Maps to indicate the user’s, restaurant’s, and driver’s location on the map. Then we used React Native Maps Directions to indicate the path between those points.
Stay tuned for part two where we will add the code for the driver app and feature for contacting the driver.
You can find the app’s code on this GitHub repo.


© 2025 Pusher Ltd. All rights reserved.
Pusher Limited is a company registered in England and Wales (No. 07489873) whose registered office is at MessageBird UK Limited, 3 More London Riverside, 4th Floor, London, United Kingdom, SE1 2AQ.