- Products

- Developers
- User stories
- Blog
- Pricing

End to end encryption in Node.js with Pusher Channels
Introduction
Privacy is a hot topic this days. Who has access to what and who can read my conversation with a friend. Pusher Channels offers three kinds of channels:
To get started with Pusher Channels, create a free sandbox Pusher account or sign in. Basically, all three perform the same functions - flexible pub/sub messaging and tons of other cool features. But there are few differences between them. Public channels do not require client-server authentication in order to subscribe to events. Private channels take it a step further by requiring client-server authentication. Encrypted channels build on top of private channels by introducing security in the form of encrypted data.
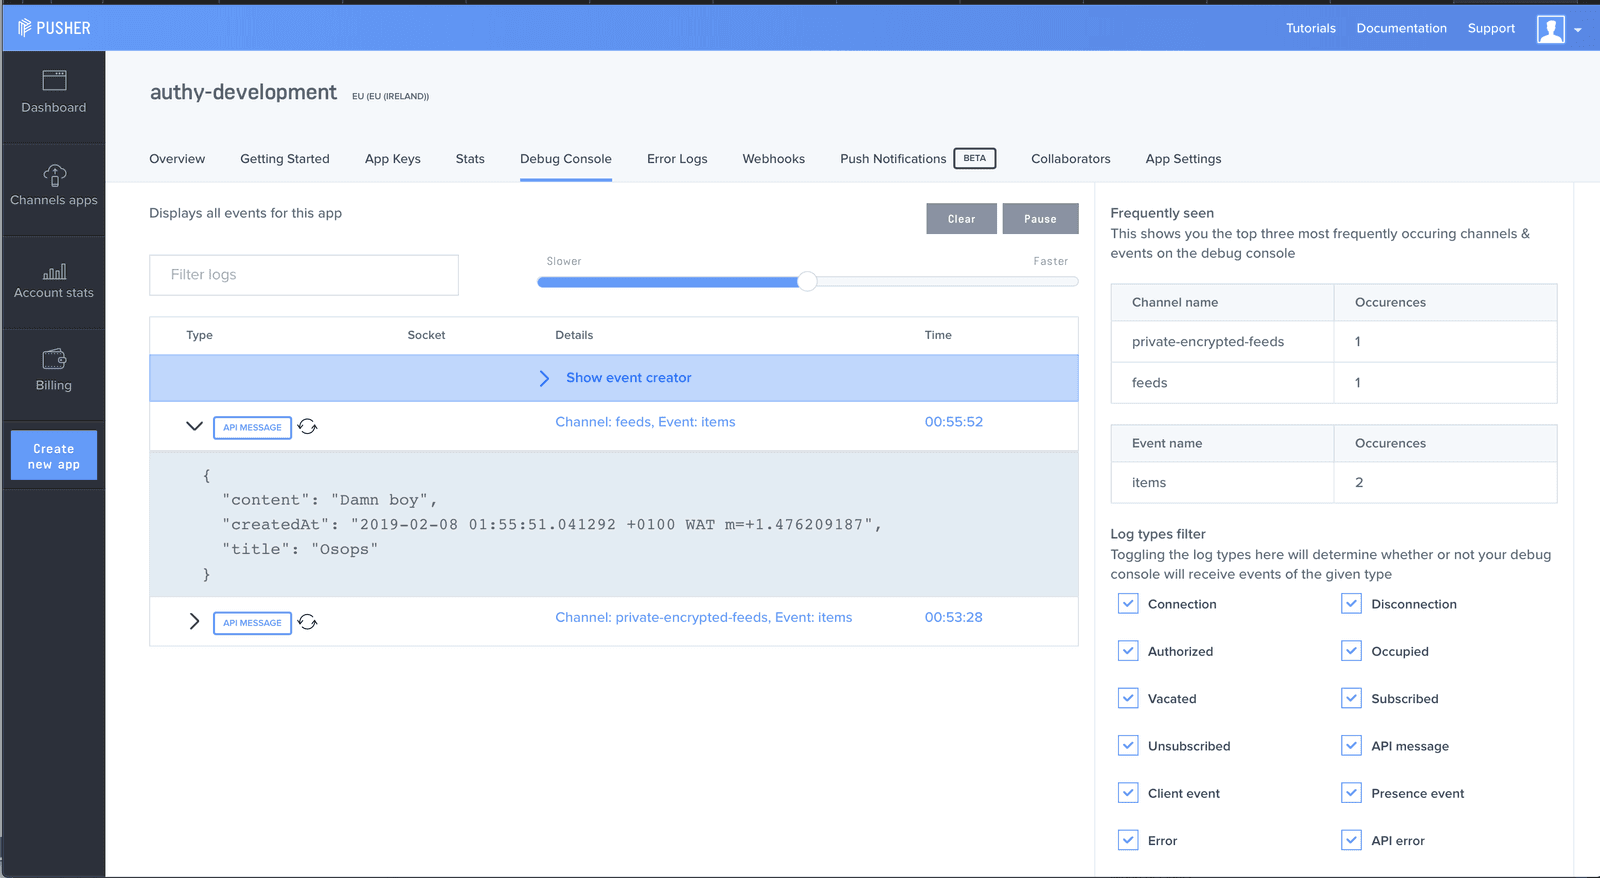
Below is a screenshot of the Debug Console showing an event published on a public channel.
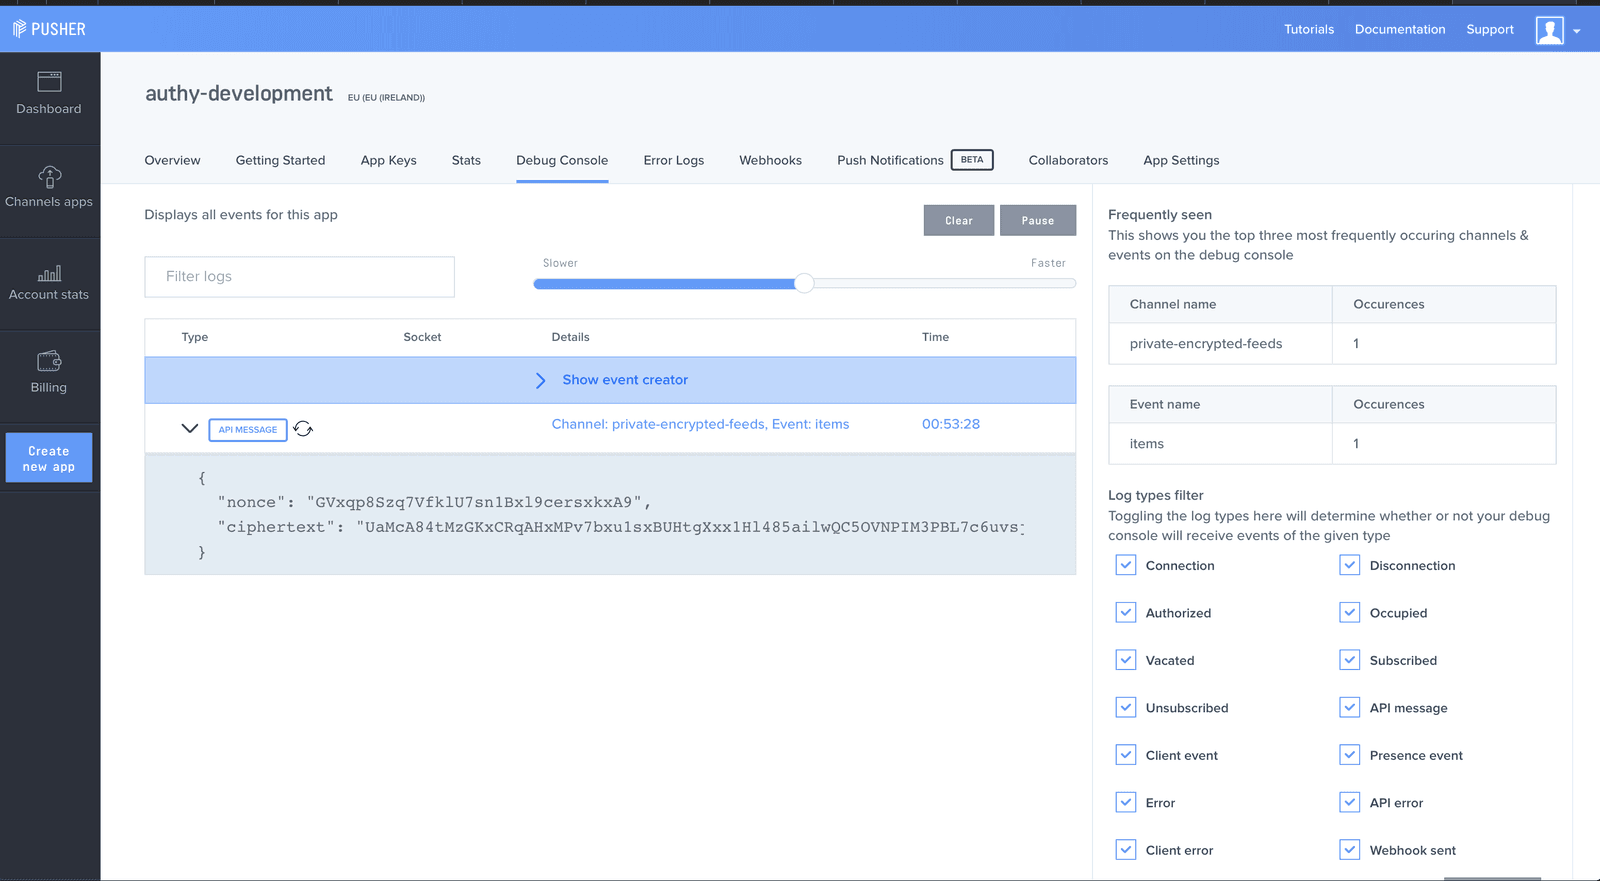
Below is a screenshot of the Debug Console showing an event published on an encrypted channel.

Kindly take a look at the images above and spot the difference. Seen any yet? In the first image which shows the Debug Console for a public channel, you can see the data being sent to Pusher Channels contains some fields - title, content and createdAt. Now take a look at the second image, you will notice those fields are no longer present but instead you have a bunch of non-human readable content your application obviously didn’t create. The field called ciphertext is what the data you sent to Pusher Channels was converted to. The word ciphertext outside this discourse refers to encrypted and/or garbled data.
Understanding encrypted channels
As depicted above, an advantage of an encrypted channel is the ability to send messages only the server SDK and any of your connected clients can read. No one else - including Pusher - will be able to read the messages.
Remember that a client has to go through the authentication process too.
Pusher Channels uses one of the current top encryption algorithms available and that is Secretbox. On the server side, the application author is meant to provide an encryption key to be used for the data encryption. This encryption key never gets to Pusher servers, which is why you are the only one that can read messages in an encrypted channel.
But a question. If the encryption key never gets to Pusher servers, how is a connected client able to subscribe to an event in an encrypted channel and read/decrypt the message? The answer resides in the authentication process. During authentication, a shared secret key is generated based off the master encryption key and the channel name. The generated shared secret key will be used to encrypt the data before being offloaded to Pusher Channels.
The shared secret is also sent as part of a successful authentication response as the client SDK will need to store it as it will be used for decrypting encrypted messages it receives. Again notice that since the encryption key never leaves your server, there is no way Pusher or any other person can read the messages if they don’t go through the authentication process - which is going to be done by the client side SDK.
NOTE: that this shared secret is channel specific. For each channel subscribed to, a new shared secret is generated.
Here is a sample response:
1{ 2 "auth": "3b65aa197f334949f0ef:ffd3094d43e1bb21d5eb849c3debcbba0f7dd32bddeb0bb7dd8441516029853d", 3 "channel_data": { 4 "user_id": "10", 5 "user_info": { 6 "random": "random" 7 } 8 }, 9 "shared_secret": "oB4frIyBUiYVzbUSBFCBl7U5BxzW8ni6wIrO4UaYIeo=" 10 }
Apart from privacy and security, another benefit encrypted channels provide is message authenticity and protection against forgery. So there is maximum guarantee that whatever message is being received was published by someone who has access to the encryption key.
Implementing encrypted channels
To show encrypted channels in practice, we will build a live feed application. The application will consist of a server and client. The server will be written in Node.
Before getting started, it will be nice to be aware of some limitations imposed by an encrypted channel. They are:
- Channel name(s) must begin with
private-encrypted-. Examples includeprivate-encrypted-dashboardorprivate-encrypted-grocery-list. If you provide an encryption key but fail to follow the naming scheme, your data will not be encrypted. - Client events cannot be triggered
- Channel and event names are not encrypted. This is for good reasons as events need to be dispatched to right clients and making sure an event in the Pusher Channels namespace -
pusher:- cannot be used.
Before proceeding, you will need to create a new directory called pusher-encrypted-channels-node . It can be done by issuing the following command in a terminal:
$ mkdir pusher-encrypted-channels-node
Prerequisites
- Node
>=8.0 - A Pusher account
- OpenSSL tool.
NOTE: If you are a Windows user, note that you can make use of Git Bash since it comes with the OpenSSL toolkit.
Building the server
The first thing to do is to create a Pusher Channels account if you don’t have one already. You will need to take note of your app keys and secret as we will be using them later on in the tutorial.
In the pusher-encrypted-channels-node directory, you will need to create another directory called server.
The next step of action is to create a .env file to contain the secret and key gotten from the dashboard. You should paste in the following contents:
1// pusher-encrypted-channels-node/server/variable.env 2 PUSHER_APP_ID="PUSHER_APP_ID" 3 PUSHER_APP_KEY="PUSHER_APP_KEY" 4 PUSHER_APP_SECRET="PUSHER_APP_SECRET" 5 PUSHER_APP_CLUSTER="PUSHER_APP_CLUSTER" 6 PUSHER_APP_SECURE="1" 7 PUSHER_CHANNELS_ENCRYPTION_KEY="PUSHER_CHANNELS_ENCRYPTION_KEY"
PUSHER_CHANNELS_ENCRYPTION_KEY will be the master encryption key used to generate the shared secret and it should be difficult to guess. It is also required to be a 32 byte encryption key. You can generate a suitable encryption key with the following command:
$ openssl rand -base64 24
You will also need to install some dependencies - the Pusher NodeJS SDK , Express and another for parsing the variable.env file you previously created. You can grab those dependencies by running:
1$ npm init -y 2 $ npm install express body-parser cors dotenv pusher -S
You will need to create an index.js file and paste in the following content:
1// pusher-encrypted-channels-node/server/index.js 2 3 require('dotenv').config({ path: 'variable.env' }); 4 5 const express = require('express'); 6 const bodyParser = require('body-parser'); 7 const cors = require('cors'); 8 const Pusher = require('pusher'); 9 10 const pusher = new Pusher({ 11 appId: process.env.PUSHER_APP_ID, 12 key: process.env.PUSHER_APP_KEY, 13 secret: process.env.PUSHER_APP_SECRET, 14 cluster: process.env.PUSHER_APP_CLUSTER, 15 useTLS: true, 16 encryptionMasterKey: process.env.PUSHER_CHANNELS_ENCRYPTION_KEY, 17 }); 18 19 const app = express(); 20 21 app.use(cors()); 22 app.use(bodyParser.json()); 23 app.use(bodyParser.urlencoded({ extended: true })); 24 25 const titles = []; 26 27 app.post('/pusher/auth', function(req, res) { 28 var socketId = req.body.socket_id; 29 var channel = req.body.channel_name; 30 var auth = pusher.authenticate(socketId, channel); 31 res.send(auth); 32 }); 33 34 app.post('/feed', (req, res) => { 35 const title = req.body.title; 36 const body = req.body.content; 37 38 if (title === undefined) { 39 res 40 .status(400) 41 .send({ message: 'Please provide your post title', status: false }); 42 return; 43 } 44 45 if (body === undefined) { 46 res 47 .status(400) 48 .send({ message: 'Please provide your post body', status: false }); 49 return; 50 } 51 52 if (title.length <= 5) { 53 res.status(400).send({ 54 message: 'Post title should be more than 5 characters', 55 status: false, 56 }); 57 return; 58 } 59 60 if (body.length <= 6) { 61 res.status(400).send({ 62 message: 'Post body should be more than 6 characters', 63 status: false, 64 }); 65 return; 66 } 67 68 const index = titles.findIndex(element => { 69 return element === title; 70 }); 71 72 if (index >= 0) { 73 res 74 .status(400) 75 .send({ message: 'Post title already exists', status: false }); 76 return; 77 } 78 79 titles.push(title.trim()); 80 pusher.trigger('private-encrypted-feeds', 'items', { 81 title: title.trim(), 82 body: body.trim(), 83 time: new Date(), 84 }); 85 86 res 87 .status(200) 88 .send({ message: 'Post was successfully created', status: true }); 89 }); 90 91 app.set('port', process.env.PORT || 5200); 92 const server = app.listen(app.get('port'), () => { 93 console.log(`Express running on port ${server.address().port}`); 94 });
In the above, we create an HTTP server with two endpoints:
/pusher/authfor authentication of client SDKs./feedfor the addition of a new feed item.
NOTE: The feed items will not be stored in a persistent database but in memory instead.
You should be able to run the server now. That can be done with:
$ node index.js
Building the client
The client is going to contain three pages:
- A dashboard page.
- A form page for adding new feed items.
- A feed page for displaying feed items in realtime as received from the encrypted channel.
You will need to create a directory called client. That can be done with:
$ mkdir client
To get started, we will need to build the form page to allow new items to be added. You will need to create a file called new.html with:
$ touch new.html
In the newly created new.html file, paste the following content:
1// pusher-encrypted-channels-node/client/new.html 2 3 <!DOCTYPE html> 4 <html> 5 <head> 6 <meta charset="utf-8"> 7 <meta name="viewport" content="width=device-width, initial-scale=1"> 8 <title>Pusher realtime feed</title> 9 <meta name="viewport" content="width=device-width, initial-scale=1" /> 10 <link rel="icon" type="image/x-icon" href="favicon.ico" /> 11 <base href="/" /> 12 <link rel="stylesheet" href="https://cdnjs.cloudflare.com/ajax/libs/bulma/0.7.2/css/bulma.min.css"> 13 <style> 14 .hidden { display: none } 15 </style> 16 <body> 17 <section class="section"> 18 <div class="container"> 19 <div class="columns"> 20 <div class="column is-5"> 21 <h3 class="notification">Create a new post</h3> 22 <div class="notification is-success hidden" id="success"></div> 23 <div class="is-danger notification hidden" id="error"></div> 24 <form id="feed-form"> 25 <div class="field"> 26 <label class="label">Title : </label> 27 <div class="control"> 28 <input 29 class="input" 30 type="text" 31 placeholder="Post title" 32 name="title" 33 id="title" 34 /> 35 </div> 36 </div> 37 38 <div><label>Message: </label></div> 39 <div> 40 <textarea 41 rows="10" 42 cols="70" 43 name="content" 44 id="content" 45 ></textarea> 46 </div> 47 48 49 <button id="submit" class="button is-info"> 50 Send 51 </button> 52 </form> 53 </div> 54 <div class="is-7"></div> 55 </section> 56 </body> 57 <script src="app.js"></script> 58 </html>
This is as simple as can be. We reference the Bulma CSS library, we create a form with an input and text field. Finally we link to a non-existent file called app.js - we will create that in a bit.
To view what this file looks like, you should navigate to the client directory and run the following command:
$ python -m http.server 8000
Here I used Python’s inbuilt server but you are free to use whatever. For example you can also make use of
http-serverwhich can be installed vianpm i http-serverafter which you should runhttp-server.
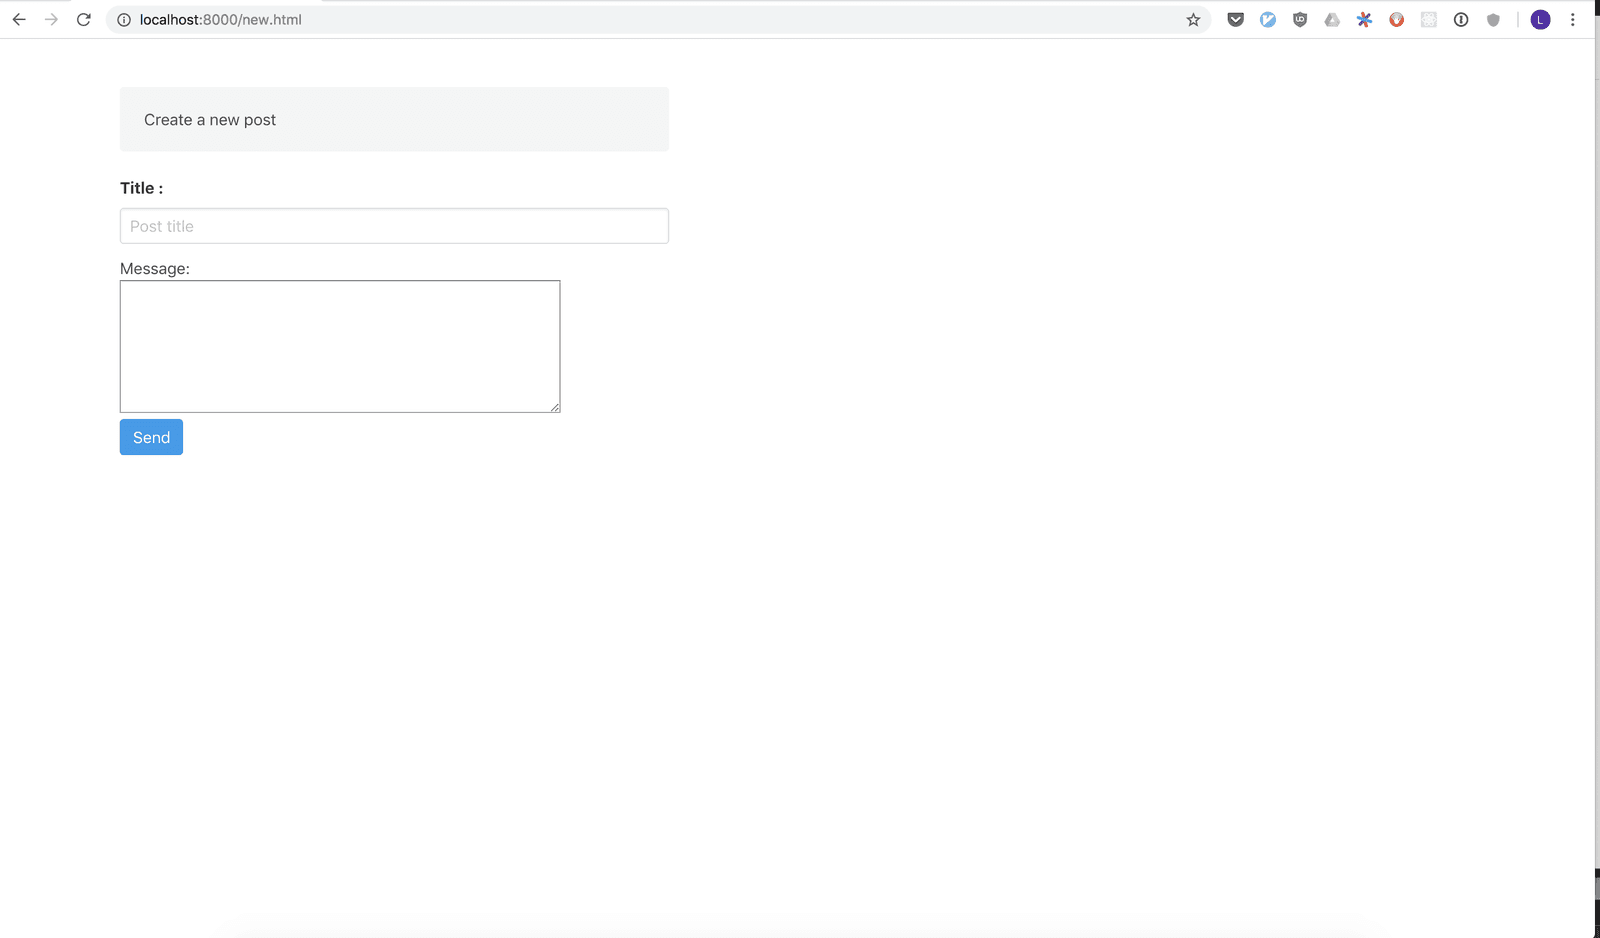
You should visit localhost:8000/new.html . You should be presented with something similar to the image below:
As said earlier, we linked to a non-existent file app.js, we will need to create it and fill it with some code. Create the app.js file with:
$ touch app.js
In the newly created file, paste the following:
1// pusher-encrypted-channels-node/client/app.js 2 3 (function() { 4 const submitFeedBtn = document.getElementById('feed-form'); 5 const isDangerDiv = document.getElementById('error'); 6 const isSuccessDiv = document.getElementById('success'); 7 8 if (submitFeedBtn !== null) { 9 submitFeedBtn.addEventListener('submit', function(e) { 10 isDangerDiv.classList.add('hidden'); 11 isSuccessDiv.classList.add('hidden'); 12 e.preventDefault(); 13 const title = document.getElementById('title'); 14 const content = document.getElementById('content'); 15 16 if (title.value.length === 0) { 17 isDangerDiv.classList.remove('hidden'); 18 isDangerDiv.innerHTML = 'Title field is required'; 19 return; 20 } 21 22 if (content.value.length === 0) { 23 isDangerDiv.classList.remove('hidden'); 24 isDangerDiv.innerHTML = 'Content field is required'; 25 return; 26 } 27 28 fetch('http://localhost:5200/feed', { 29 method: 'POST', 30 body: JSON.stringify({ title: title.value, content: content.value }), 31 headers: { 32 'Content-Type': 'application/json', 33 }, 34 }).then( 35 function(response) { 36 if (response.status === 200) { 37 isSuccessDiv.innerHTML = 'Feed item was successfully added'; 38 isSuccessDiv.classList.remove('hidden'); 39 setTimeout(function() { 40 isSuccessDiv.classList.add('hidden'); 41 }, 1000); 42 return; 43 } 44 45 response.json().then(data => { 46 isDangerDiv.innerHTML = data.message; 47 isDangerDiv.classList.remove('hidden'); 48 }); 49 }, 50 function(error) { 51 isDangerDiv.innerHTML = 'Could not create feed item'; 52 isDangerDiv.classList.remove('hidden'); 53 } 54 ); 55 }); 56 } 57 })();
In the above, we validate the form whenever the Send button is clicked. If the form contains valid data, it is sent to the Node server for processing. The server will store it and trigger a message to Pusher Channels.
Go ahead and submit the form. If successful and you are on the Debug Console, you will notice a JSON that contains a nonce and cipher text - the encrypted information. A visual reprensentation is presented below:
The next point of action will be to create the feeds page so entries can be viewed in realtime. You will need to create a file called feed.html. That can be done with:
$ touch feed.html
In the new file, paste the following HTML code:
1// pusher-encrypted-channels-node/client/feed.html 2 <!DOCTYPE html> 3 <html> 4 <head> 5 <meta charset="utf-8"> 6 <meta name="viewport" content="width=device-width, initial-scale=1"> 7 <title>Pusher realtime feed</title> 8 <meta name="viewport" content="width=device-width, initial-scale=1" /> 9 <link rel="icon" type="image/x-icon" href="favicon.ico" /> 10 <base href="/" /> 11 <link rel="stylesheet" href="https://cdnjs.cloudflare.com/ajax/libs/bulma/0.7.2/css/bulma.min.css"> 12 <body> 13 <section class="section"> 14 <div class="container"> 15 <h1 class="notification is-info">Your feed</h1> 16 <div class="columns"> 17 <div class="column is-7"> 18 <div id="feed"> 19 </div> 20 </div> 21 </div> 22 </div> 23 </section> 24 </body> 25 <script src="https://js.pusher.com/4.3/pusher.min.js"></script> 26 <script src="https://cdnjs.cloudflare.com/ajax/libs/handlebars.js/4.1.0/handlebars.min.js"></script> 27 <script src="app.js"></script> 28 </html>
This page is basically empty. It will be updated by the Channels client SDK as it receives data. We are linking to the Pusher Channels client SDK and Handlebars. Handlebars is used to compile templates we will inject into the page.
To be able to receive and update the feeds page with data the app.js file has to be updated to make use of Pusher Channels. In app.js , append the following code:
1// pusher-encrypted-channels-node/client/app.js 2 3 // Sample template to be injected 4 // below the code we already have in this file 5 const tmpl = ` 6 <div class="box"> 7 <article class="media"> 8 <div class="media-left"> 9 <figure class="image is-64x64"> 10 <img src="https://bulma.io/images/placeholders/128x128.png" alt="Image" /> 11 </figure> 12 </div> 13 <div class="media-content"> 14 <div class="content"> 15 <p> 16 <strong>{{title}}</strong> 17 <small>{{time}}</small> <br /> 18 {{body}} 19 </p> 20 </div> 21 </div> 22 </article> 23 </div> 24 `; 25 26 const APP_KEY = 'PUSHER_APP_KEY'; 27 const APP_CLUSTER = 'PUSHER_APP_CLUSTER'; 28 29 const pusher = new Pusher(APP_KEY, { 30 cluster: APP_CLUSTER, 31 authEndpoint: 'http://localhost:5200/pusher/auth', 32 }); 33 34 const channel = pusher.subscribe('private-encrypted-feeds'); 35 const template = Handlebars.compile(tmpl); 36 const feedDiv = document.getElementById('feed'); 37 38 channel.bind('items', function(data) { 39 console.log(data); 40 const html = template(data); 41 42 const divElement = document.createElement('div'); 43 divElement.innerHTML = html; 44 45 feedDiv.appendChild(divElement); 46 });
IMPORTANT: Remember to replace both
PUSHER_CLUSTERandPUSHER_KEYwith your credentials.
With the addition above, the entire app.js should look like:
1// pusher-encrypted-channels-node/client/app.js 2 3 (function() { 4 const submitFeedBtn = document.getElementById('feed-form'); 5 const isDangerDiv = document.getElementById('error'); 6 const isSuccessDiv = document.getElementById('success'); 7 8 if (submitFeedBtn !== null) { 9 submitFeedBtn.addEventListener('submit', function(e) { 10 isDangerDiv.classList.add('hidden'); 11 isSuccessDiv.classList.add('hidden'); 12 e.preventDefault(); 13 const title = document.getElementById('title'); 14 const content = document.getElementById('content'); 15 16 if (title.value.length === 0) { 17 isDangerDiv.classList.remove('hidden'); 18 isDangerDiv.innerHTML = 'Title field is required'; 19 return; 20 } 21 22 if (content.value.length === 0) { 23 isDangerDiv.classList.remove('hidden'); 24 isDangerDiv.innerHTML = 'Content field is required'; 25 return; 26 } 27 28 fetch('http://localhost:5200/feed', { 29 method: 'POST', 30 body: JSON.stringify({ title: title.value, content: content.value }), 31 headers: { 32 'Content-Type': 'application/json', 33 }, 34 }).then( 35 function(response) { 36 if (response.status === 200) { 37 isSuccessDiv.innerHTML = 'Feed item was successfully added'; 38 isSuccessDiv.classList.remove('hidden'); 39 setTimeout(function() { 40 isSuccessDiv.classList.add('hidden'); 41 }, 1000); 42 return; 43 } 44 45 response.json().then(data => { 46 isDangerDiv.innerHTML = data.message; 47 isDangerDiv.classList.remove('hidden'); 48 }); 49 }, 50 function(error) { 51 isDangerDiv.innerHTML = 'Could not create feed item'; 52 isDangerDiv.classList.remove('hidden'); 53 } 54 ); 55 }); 56 } 57 58 const tmpl = ` 59 <div class="box"> 60 <article class="media"> 61 <div class="media-left"> 62 <figure class="image is-64x64"> 63 <img src="https://bulma.io/images/placeholders/128x128.png" alt="Image" /> 64 </figure> 65 </div> 66 <div class="media-content"> 67 <div class="content"> 68 <p> 69 <strong>{{title}}</strong> 70 <small>{{time}}</small> <br /> 71 {{body}} 72 </p> 73 </div> 74 </div> 75 </article> 76 </div> 77 `; 78 79 const APP_KEY = 'PUSHER_APP_KEY'; 80 const APP_CLUSTER = 'PUSHER_APP_CLUSTER'; 81 82 const pusher = new Pusher(APP_KEY, { 83 cluster: APP_CLUSTER, 84 authEndpoint: 'http://localhost:5200/pusher/auth', 85 }); 86 87 const channel = pusher.subscribe('private-encrypted-feeds'); 88 const template = Handlebars.compile(tmpl); 89 const feedDiv = document.getElementById('feed'); 90 91 channel.bind('items', function(data) { 92 console.log(data); 93 const html = template(data); 94 95 const divElement = document.createElement('div'); 96 divElement.innerHTML = html; 97 98 feedDiv.appendChild(divElement); 99 }); 100 })();
You can go ahead to open the feed.html page on a tab and new.html in another. Watch closely as whatever data you submit in new.html appears in feed.html. You can also keep an eye on the Debug Console to make sure all data is encrypted.
To make this app a little more polished, add an index.html page. You can find the source code at the accompanying GitHub repository of this tutorial.
Conclusion
In this tutorial, I introduced you to a lesser known feature of Pusher Channels - end to end encryption with encrypted channels. We also built an application that uses encrypted channels instead of the regular public channels you might be used to. To learn more about encrypted channels, kindly visit its documentation.
As always, the entire code for this tutorial can be found on GitHub.


© 2026 Pusher Ltd. All rights reserved.
Pusher Limited is a company registered in England and Wales (No. 07489873) whose registered office is at MessageBird UK Limited, 3 More London Riverside, 4th Floor, London, United Kingdom, SE1 2AQ.