- Products

- Developers
- User stories
- Blog
- Pricing

Build a realtime counter using Swift
Introduction
One of the most common elements on applications (web or otherwise) is counters. YouTube, for instance, uses counters to see how many people have viewed a particular video. Facebook also does the same for videos on their platform.
Most of the counters on these sites, however, only update the count when you have refreshed the page. This leaves a lot to be desired, as sometimes you just want to see the number increase in realtime. This gives you the impression that the item is being viewed by many people at the moment.
In this article, we are going to explore how we can leverage the realtime nature of Pusher to create a counter that updates in realtime. We will be creating a video viewer iOS application with a realtime counter showing how many people have viewed the video.
To follow along, you will need basic knowledge of Swift, Xcode and command line. You will also need to set up a Pusher account, and create an application. You can do so here.
Basic setup
To get started you will need Cocoapods installed on your machine. Cocoapods is a package manager and we will be using this to manage the dependencies on the application. To install Cocoapods, type this in your command line:
$ gem install cocoapods
After you are done installing that, launch Xcode and create a new single page application project. Follow the set up wizard, and then once the Xcode project editor is open, close Xcode. cd to the root directory of your project and run the command:
$ pod init
This should create a Podfile in the root of your project. Open this file in your favorite editor and then update the contents of the file to the following:
1# Uncomment the next line to define a global platform for your project 2platform :ios, '9.0' 3 4target 'counter' do 5 # Comment the next line if you're not using Swift and don't want to use dynamic frameworks 6 use_frameworks! 7 8 # Pods for counter 9 pod 'Alamofire' 10 pod 'PusherSwift' 11 12end
In the file above we have specified two dependencies: PusherSwift and Alamofire. These will be useful later in the project. Now install these dependencies by running this command from your terminal:
$ pod install
Once this is complete, you should have a .xcworkspace file in the root directory of your project. Open this file and it should launch Xcode. (Make sure you don't have any instance of Xcode running for this project before opening the file or you will get an error.)
Creating the views for our realtime application
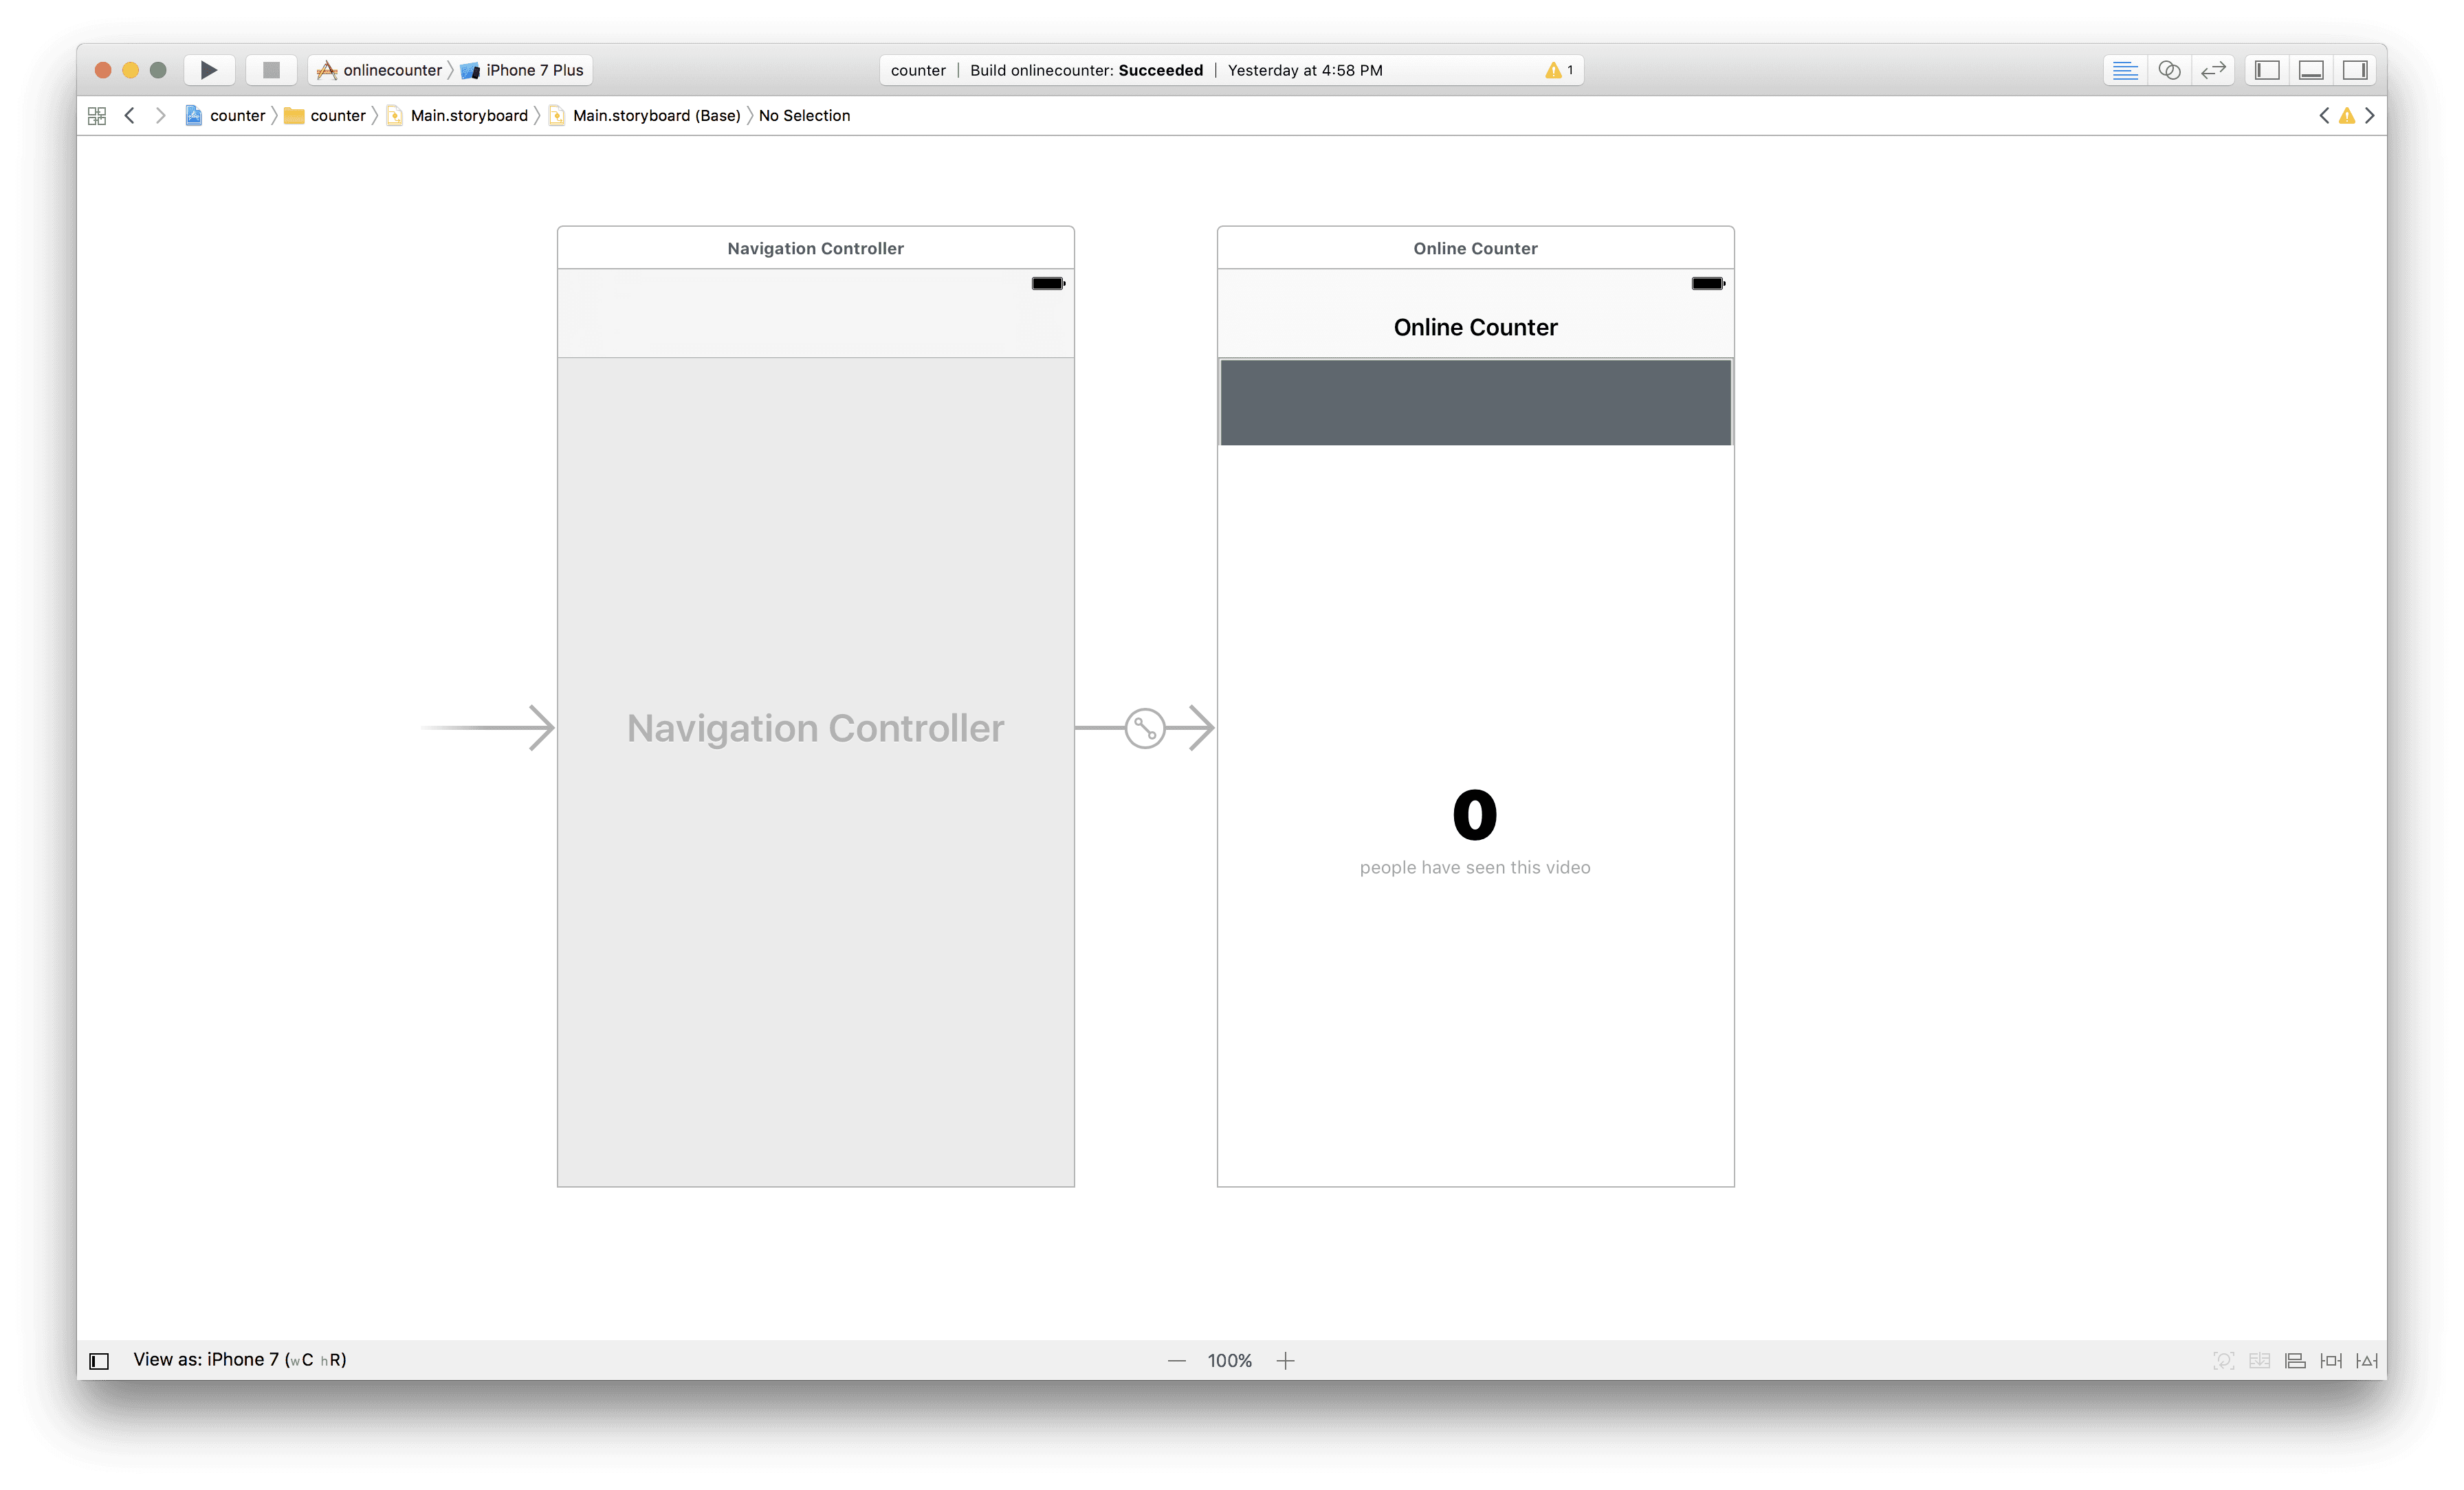
Now that the project is open, we will create some views for our application. Open the Main.storyboard file and in there we will create the views.
We want to create a navigation controller that will have a ViewController as the root controller of the navigation controller. Then in the new view controller, we will add a webview; this is where we will be embedding the video we want people to view. We will also add two labels, one for the counter and the other will just be a plain immutable message.
After we are done, this is what we have so far:
Adding our realtime feature to our application
Now that we have created the application, we can now add the code that will interact with the views and add the realtime support and the video also.
Create a new MainViewController class and link it to the view controller we created above. Then create a split view in Xcode and ctrl+drag from the webview to the view controller. This should create an @IBOutlet in the controller; do the same for the counter label so it creates another @IBOutlet. Our controller should now have two @IBOutlets one for the webview and one for the counter label. Great.
Now we are going to add the code to load our video. We are going to be using a YouTube video of a Pusher tutorial for this exercise. In the viewDidLoad method add the following:
1override func viewDidLoad() { 2 super.viewDidLoad() 3 loadYoutube(videoID:"xDQ8vzD0lzw") 4}
Now lets create the loadYoutube method and the other dependent methods:
1func loadYoutube(videoID:String) { 2 self.automaticallyAdjustsScrollViewInsets = false 3 webview.allowsInlineMediaPlayback = true 4 webview.mediaPlaybackRequiresUserAction = false 5 let embedHTML = getEmbedHTML(id:videoID); 6 7 let url: NSURL = NSURL(string: "https://www.youtube.com/embed/\(videoID)")! 8 webview.loadHTMLString(embedHTML as String, baseURL:url as URL ) 9} 10 11private func getEmbedHTML(id: String) -> String { 12 return "<html><head><style type=\"text/css\">body {background-color: transparent;color: white;}</style></head><body style=\"margin:0\"> <iframe webkit-playsinline width=\"100%\" height=\"100%\" src=\"https://www.youtube.com/embed/\(id)?feature=player_detailpage&playsinline=1\" frameborder=\"0\"></iframe>"; 13}
Now we have instructed the application to load a YouTube video automatically. However, the counter functionality does not yet work. Let's fix that.
Import the PusherSwift library and add a new method to update the counter using Pusher:
1func updateViewCount() { 2 let options = PusherClientOptions( 3 host: .cluster("PUSHER_CLUSTER") 4 ) 5 6 pusher = Pusher(key: "PUSHER_KEY", options: options) 7 8 let channel = pusher.subscribe("counter") 9 let _ = channel.bind(eventName: "new_user", callback: { (data: Any?) -> Void in 10 if let data = data as? [String: AnyObject] { 11 let viewCount = data["count"] as! NSNumber 12 self.count.text = "\(viewCount)" as String! 13 } 14 }) 15 pusher.connect() 16}
Note: Where it says
PUSHER_CLUSTERandPUSHER_KEY, you should replace with your actual Pusher cluster and key. You'll also need to import
Now you can just call the updateViewCount from the viewDidLoad method so it is called when the view is loaded.
One final thing we will do is use Alamofire to send a request to a backend so the counter can be updated and saved, so we do not lose the count of people who have viewed the video. Import Alamofire and add the following:
1func sendViewCount() { 2 Alamofire.request(endpoint, method: .post).validate().responseJSON { response in 3 switch response.result { 4 case .success: 5 if let result = response.result.value { 6 let data = result as! NSDictionary 7 let viewCount = data["count"] as! NSNumber 8 self.count.text = "\(viewCount)" as String! 9 } 10 case .failure(let error): 11 print(error) 12 } 13 } 14}
Now that we are done with that, theMainViewController should now look a little like this:
1import UIKit 2import Alamofire 3import PusherSwift 4 5class MainViewController: UIViewController { 6 7 @IBOutlet weak var count: UILabel! 8 @IBOutlet weak var webview: UIWebView! 9 10 var endpoint: String = "http://localhost:4000/update_counter" 11 12 var pusher : Pusher! 13 14 override func viewDidLoad() { 15 super.viewDidLoad() 16 loadYoutube(videoID:"xDQ8vzD0lzw") 17 sendViewCount() 18 updateViewCount() 19 } 20 21 func sendViewCount() { 22 Alamofire.request(endpoint, method: .post).validate().responseJSON { response in 23 switch response.result { 24 25 case .success: 26 if let result = response.result.value { 27 let data = result as! NSDictionary 28 let viewCount = data["count"] as! NSNumber 29 self.count.text = "\(viewCount)" as String! 30 } 31 case .failure(let error): 32 print(error) 33 } 34 } 35 } 36 37 func updateViewCount() { 38 let options = PusherClientOptions( 39 host: .cluster("PUSHER_CLUSTER") 40 ) 41 42 pusher = Pusher(key: "PUSHER_KEY", options: options) 43 44 let channel = pusher.subscribe("counter") 45 let _ = channel.bind(eventName: "new_user", callback: { (data: Any?) -> Void in 46 if let data = data as? [String: AnyObject] { 47 let viewCount = data["count"] as! NSNumber 48 self.count.text = "\(viewCount)" as String! 49 } 50 }) 51 pusher.connect() 52 } 53 54 func loadYoutube(videoID:String) { 55 self.automaticallyAdjustsScrollViewInsets = false 56 webview.allowsInlineMediaPlayback = true 57 webview.mediaPlaybackRequiresUserAction = false 58 let embedHTML = getEmbedHTML(id:videoID); 59 60 let url: NSURL = NSURL(string: "https://www.youtube.com/embed/\(videoID)")! 61 webview.loadHTMLString(embedHTML as String, baseURL:url as URL ) 62 } 63 64 private func getEmbedHTML(id: String) -> String { 65 return "<html><head><style type=\"text/css\">body {background-color: transparent;color: white;}</style></head><body style=\"margin:0\"> <iframe webkit-playsinline width=\"100%\" height=\"100%\" src=\"https://www.youtube.com/embed/\(id)?feature=player_detailpage&playsinline=1\" frameborder=\"0\"></iframe>"; 66 } 67}
If we load the application now, it would load the video but the counter will not work. This is because we have not yet set up a backend logic.
Creating the backend for our realtime counter iOS application
For the backend, we will be creating a very basic Node.js application. This application will simply have one endpoint that saves the counter state and sends a trigger to Pusher so other listeners subscribed to the channel event can pick it up and update in realtime.
To start, create a new directory for your application. In the application create two files:
File: package.json
1{ 2 "main": "index.js", 3 "dependencies": { 4 "body-parser": "^1.16.0", 5 "express": "^4.14.1", 6 "pusher": "^1.5.1" 7 } 8}
File: index.js
1var Pusher = require('pusher'); 2let express = require('express'); 3let bodyParser = require('body-parser'); 4let fs = require('fs'); 5 6let app = express(); 7 8let pusher = new Pusher({ 9 appId: 'PUSHER_ID', 10 key: 'PUSHER_KEY', 11 secret: 'PUSHER_SECRET', 12 cluster: 'PUSHER_CLUSTER', 13 encrypted: true 14}); 15 16app.use(bodyParser.json()); 17app.use(bodyParser.urlencoded({ extended: false })); 18 19app.post('/update_counter', function(req, res) { 20 let counterFile = './count.txt'; 21 22 fs.readFile(counterFile, 'utf-8', function(err, count) { 23 count = parseInt(count) + 1; 24 fs.writeFile(counterFile, count, function (err) { 25 pusher.trigger('counter', 'new_user', {count:count}); 26 res.json({count:count}); 27 }); 28 }); 29}); 30 31app.use(function(req, res, next) { 32 let err = new Error('Not Found'); 33 err.status = 404; 34 next(err); 35}); 36 37module.exports = app; 38 39app.listen(4000, function(){ 40 console.log('App listening on port 4000!') 41})
Finally, create the counter.txt file in the same directory and chmod it to be writable.
1$ echo "0" > count.txt 2$ chmod 0644 count.txt
Now run npm install to install all the dependencies that node needs to make the backend application work. When the dependencies are done installing, run node index.js to start your application.
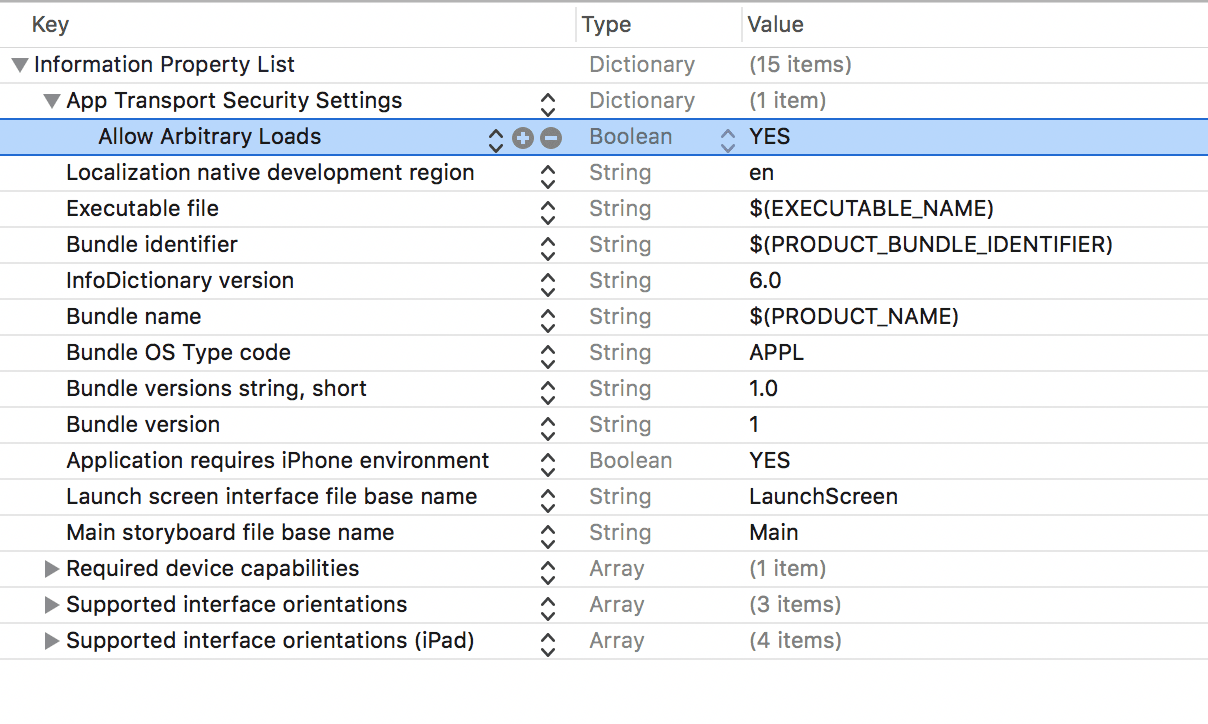
One last change we would need to make to allow our application interact with the localhost application is in our projects info.plist file. Make the changes below before launching the application:
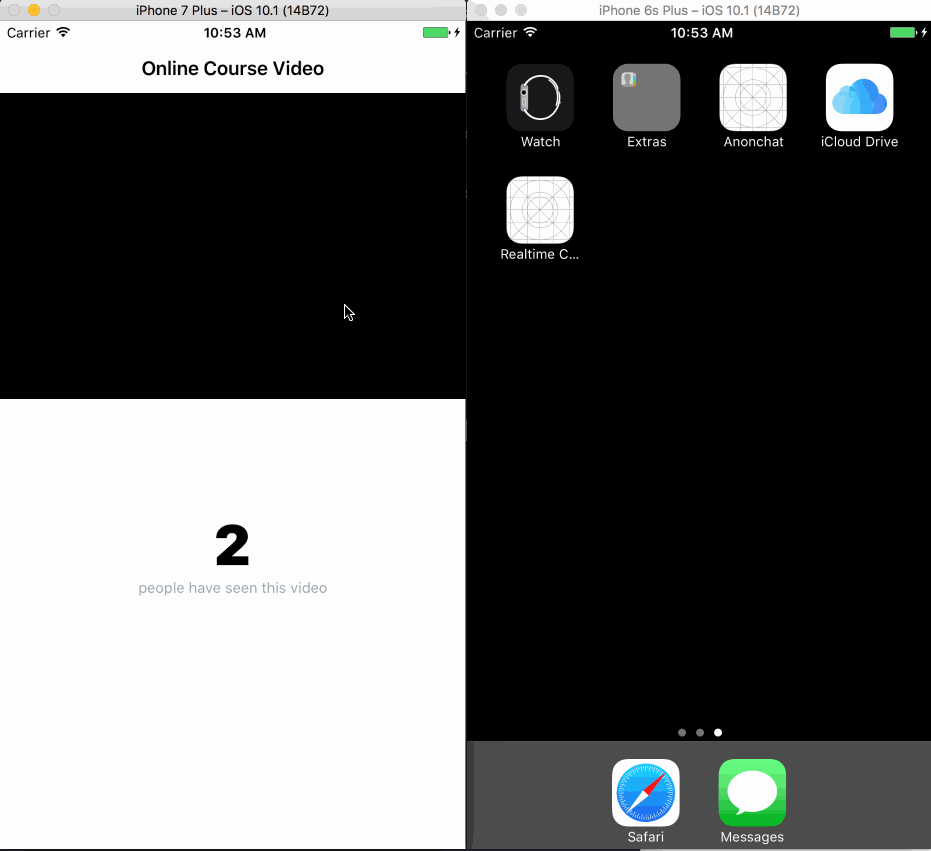
Now, when you launch the application you can see the counter increase, and if there is another instance of the application, they can see the counter increase in realtime. Neat!
Conclusion
In this article, we explored how you can create realtime counters using Pusher in your iOS applications. We are curious to see how you would incorporate this into your iOS application. If you have any other use cases you would like to see, or have any feedback, leave a comment below.


© 2026 Pusher Ltd. All rights reserved.
Pusher Limited is a company registered in England and Wales (No. 07489873) whose registered office is at MessageBird UK Limited, 3 More London Riverside, 4th Floor, London, United Kingdom, SE1 2AQ.