- Products

- Developers
- User stories
- Blog
- Pricing

Build a realtime counter using Kotlin
Introduction
It is important to show realtime updates of what is happening in an application, and one form of this is a realtime counter. A realtime counter can be used to show users of an app how other users are interacting with their content. For example, Instagram uses a realtime counter to show when viewers like a live video. This makes users of the application feel more engaged as they will be getting immediate feedback when things change.
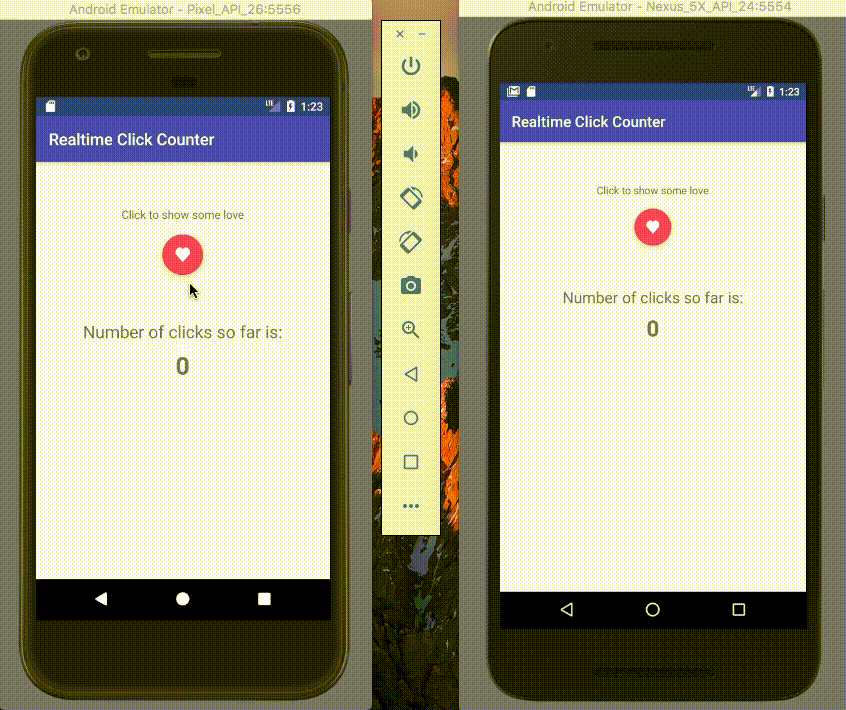
In this tutorial, I’ll show you how to use Pusher to create a realtime counter in Kotlin. We will be creating a simple Android application with a counter showing how many users have clicked on a button. This click count also updates in realtime when other users click on it. Below is a GIF of how the application will work:
We will be using Kotlin to develop both the realtime web server and the Android application, so a basic working knowledge of Kotlin and Android development will be required to follow this tutorial.
Overview
We will build a web server that keeps track of how many times a button has been clicked. The web server will also expose an endpoint which the Android application can call to send click events, the web server would then increment the click count and send a broadcast using Pusher to all clients currently subscribed to the click event.
So based on the above, this post is going to be in two sections:
- Building the realtime server using Kotlin
- Building the Android application using Kotlin
So lets get started.
Create a Pusher account
Before we get started, you would need to create a Pusher application. Go on to Pusher and create an account, but if you already have an account, just login. Then, create a new app from the dashboard and store the apps keys as we would be using them later in this post.
Building the realtime server
Kotlin is a very versatile language and one of its interesting features is its ability to be compiled to Javascript. We are going to use this feature to build a Kotlin server application that would be run with Node.js.
In order to compile Kotlin to Javascript and run on Node.js, you would need to have Node.js and Gradle installed on your computer. The remaining part of this tutorial will assume you have both installed on your machine.
First, run the command:
npm init
After entering the appropriate setup information, you should have your package.json file created for you in your directory.
Next, create a build.gradle file in the same directory and copy the following into the file:
1group 'kotlin-realtime-counter' 2 version '1.0' 3 buildscript { 4 ext.kotlin_version = '1.1.3' 5 repositories { 6 mavenCentral() 7 jcenter() 8 } 9 dependencies { 10 classpath "org.jetbrains.kotlin:kotlin-gradle-plugin:$kotlin_version" 11 } 12 } 13 apply plugin: 'kotlin2js' 14 repositories { 15 mavenCentral() 16 jcenter() 17 } 18 dependencies { 19 compile "org.jetbrains.kotlin:kotlin-stdlib-js:$kotlin_version" 20 } 21 compileKotlin2Js.kotlinOptions { 22 moduleKind = "commonjs" 23 outputFile = "build/app.js" 24 }
This build.gradle file would compile our Kotlin code into Javascript to run. Some things to note are:
- You can change the
groupandversionto something that suits your project. In this case it is set tokotlin-realtime-counter. - The
outputFileoption at the bottom of the file is used to set where the location of the Javascript file that our Kotlin code will be compiled into. In this case it would be compiled into thebuilddirectory inside anapp.jsfile.
Now in order for this build to work, all the Kotlin code needs to be put in the directory src/main/kotlin. This can be created with the following command:
mkdir -p src/main/kotlin
After executing the above command, your project directory structure should look like this:
1|- src 2 |- main 3 |- kotlin 4 |- build.gradle 5 |- package.json
So, let’s get down to coding our server. We need to install the following Node.js libraries using npm:
npm install --save kotlin express pusher
This will install the Kotlin.js library needed for our compiled Javascript code to work. It will also be installing express for creating our server and the Pusher library for making realtime event broadcasts.
Now, create a file named ClickCount.kt inside the src/main/kotlin folder, and write the following code in it:
data class ClickCount(val count: Int)
This ClickCount class will be used as a data object to encapsulate information about the number of times a click has be recorded. It’s importance will be seen later in the post.
Next, create a file named App.kt inside the src/main/kotlin folder. In the App.kt file, we need to first define some external functions and classes that would exist normally in the Node.js environment. This way, Kotlin would know the signature of these functions and not throw an error when they are being used.
1external fun require(module: String): dynamic 2 3 @JsModule("pusher") 4 external class Pusher(config: Any) { 5 fun trigger(channel: String, event: String, data: Any) 6 }
Here we define the following functions:
- require(): This is declaring the standard nodejs require function used to import modules. We will be using it later to import the express library. The
[dynamic](https://kotlinlang.org/docs/reference/dynamic-type.html)type only exists for Kotlin codes targeting Javascript. The most peculiar feature ofdynamicis that we are allowed to call any property or function with any parameters on it, hence giving us the dynamic typed feature of Javascript. - Pusher: Here we are declaring the Pusher class and the
Pusher.trigger()function we will be using later on. The[@JsModule](https://kotlinlang.org/api/latest/jvm/stdlib/kotlin.js/-js-module/index.html)indicates that this class should be imported from thepusherlibrary we added as a dependency earlier.
External functions and class declarations are generally used to declare functions or objects that exists on the Javascript global object.
External class declarations having the
@JsModuleare typically used to declare classes of external modules that need to be instantiated using thenewkeyword, as Kotlin doesn’t support thenewkeyword.
Next, we initialize our server and Pusher configuration values.
1val express = require("express") 2 val pusherConfig = object { 3 val appId = "YOUR_PUSHER_APP_ID" 4 val key = "YOUR_PUSHER_KEY" 5 val secret = "YOUR_PUSHER_SECRET" 6 val cluster = "YOUR_PUSHER_APP_CLUSTER" 7 val encrypted = true 8 } 9 val clickChannel = "click-channel" 10 val clickEvent = "click-event" 11 var currentClickCount = 0
You would need to update your pusherConfig object values with the keys you got from creating a Pusher application earlier. The currentClickCount variable will be used to keep track of the number of times a click has been recorded.
Next, we implement the main function that would be run when our code is executed.
1fun main(args: Array<String>) { 2 val app = express() 3 val pusher = Pusher(pusherConfig) 4 5 app.get("/counts", { _, res -> 6 res.json(ClickCount(currentClickCount)) 7 }) 8 app.post("/clicks", { _, res -> 9 currentClickCount++ 10 // broadcast new ClickCount 11 pusher.trigger(clickChannel, clickEvent, ClickCount(currentClickCount)) 12 res.status(200).send() 13 }) 14 15 app.listen(9999, { 16 println("Listening on port 9999") 17 }) 18 }
Here we initialize the express server and create a pusher object using the pusherConfig declared earlier. We then expose two endpoints:
GET /counts: HTTP GET requests will be sent to this endpoint to get the current click counts recorded so far. ThecurrentClickCountis then returned as a JSON object ofClickCount.POST /clicks: POST requests will be made to this endpoint to indicate that the button has been clicked. This will record the click count by incrementing thecurrentClickCountand then send a broadcast of the updatedcurrentClickCountusing pusher to all listeners of theclickEventon theclickChannel.
And lastly in the main() function, we expose the express server to listen on port 9999.
Now the server code is ready and we just need to compile to Javascript so we can run with node. To build, run the following Gradle command in the same directory containing the build.gradle file created earlier:
gradle build
On completion, this would generate a Javascript file in build/app.js. We just need to run this file using node like this:
node build/app.js
And voila 👏, you should have the realtime server now running on port 9999.
The whole code for this server can be found in this repository.
Now, let’s go on to build the Android application that would be interacting with this server.
Building the Android application
To make it easy to get started with Kotlin for Android development, we will be using Android Studio 3.0 as this version has the Kotlin plugin bundled with it. If you are using an Android Studio version less than than 3.0 refer here for detailed instructions to get started.
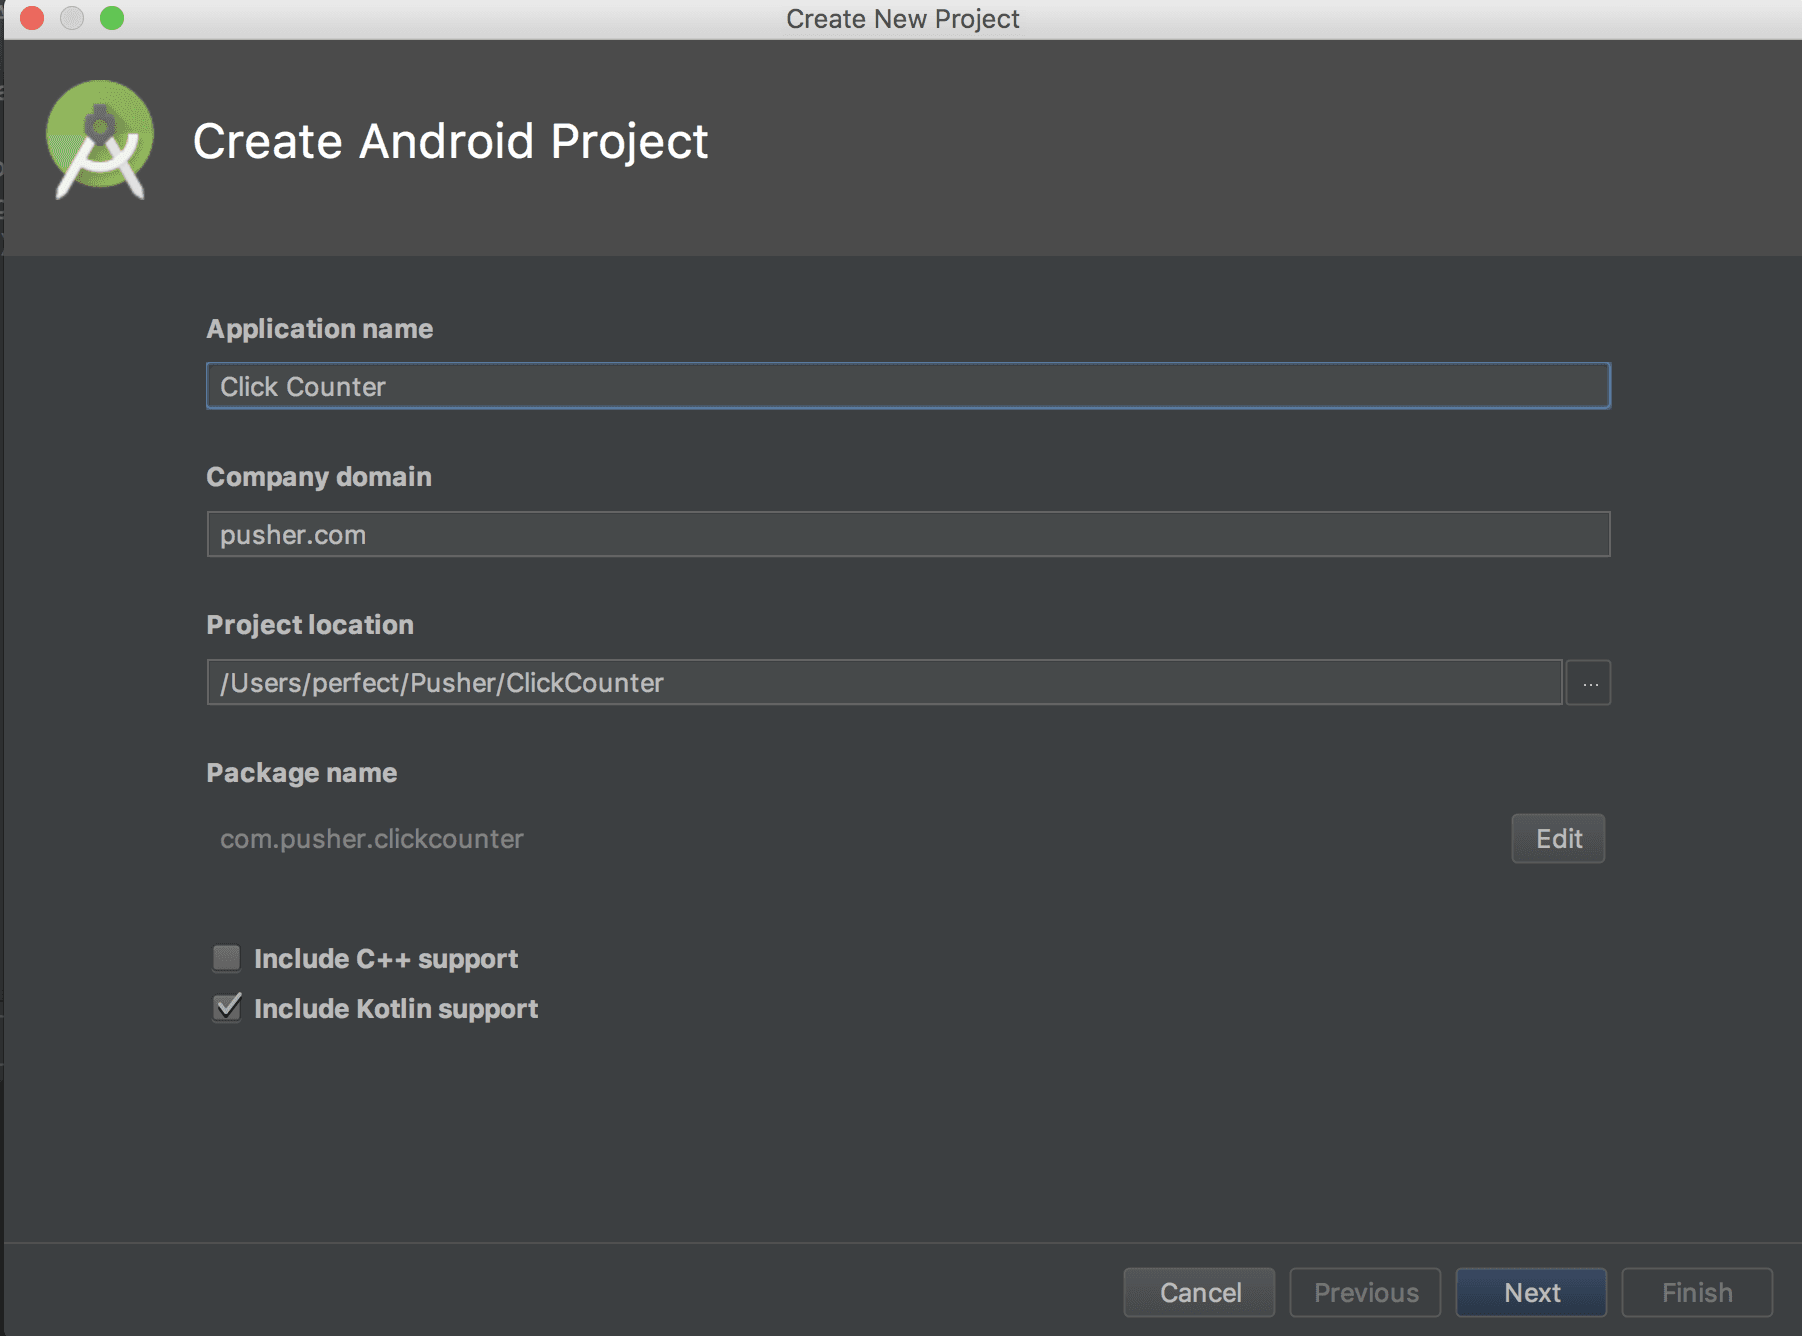
So launch your Android Studio 3.0 IDE and create a new project. You can give the project any name but for this tutorial we will name the project ‘Click Counter’. Also ensure that you check the Include Kotlin Support option as shown in the image below:
Click on Next several times and then Finish and the Android project will be created and setup.
After the project has finished building, open up your app module’s build.gradle file and add the following to the dependencies section:
1apply plugin: 'com.android.application' 2 apply plugin: 'kotlin-android' 3 apply plugin: 'kotlin-android-extensions' 4 5 android { 6 ... 7 } 8 9 dependencies { 10 ... 11 implementation "org.jetbrains.kotlin:kotlin-stdlib-jre7:$kotlin_version" 12 13 implementation 'com.pusher:pusher-java-client:1.5.0' 14 implementation 'com.squareup.okhttp3:okhttp:3.8.0' 15 implementation 'com.google.code.gson:gson:2.8.0' 16 }
If you are using an Android Studio version earlier than 3.0, you should replace
implementationwithcompile.implementationwas introduced with Gradle 3.0 andcompileis now being deprecated. You can read more about these changes here.Also ensure the applied ‘kotlin-android-extensions’ plugin is added to the
build.gradlefile if you are using an Android Studio version earlier than 3.0
Next, open up your AndroidManifest.xml file and add the Internet permission like so:
1<manifest xmlns:android="http://schemas.android.com/apk/res/android" 2 package="pusher.com.clickcounter"> 3 4 <uses-permission android:name="android.permission.INTERNET"/> 5 6 <application 7 ...> 8 ... 9 </application> 10 11 </manifest>
Next, let us design the interface of our application. The application would have a single activity which contains a single button and text view showing the current number of times the button has been clicked. So open your activity_main.xml layout file and update it with the following code:
1<?xml version="1.0" encoding="utf-8"?> 2 <android.support.design.widget.CoordinatorLayout 3 android:id="@+id/rootLayout" 4 xmlns:android="http://schemas.android.com/apk/res/android" 5 xmlns:app="http://schemas.android.com/apk/res-auto" 6 xmlns:tools="http://schemas.android.com/tools" 7 android:layout_width="match_parent" 8 android:layout_height="match_parent" 9 tools:context="pusher.com.clickcounter.MainActivity"> 10 <android.support.constraint.ConstraintLayout 11 android:layout_width="match_parent" 12 android:layout_height="match_parent"> 13 14 <TextView 15 android:id="@+id/descriptionText" 16 android:layout_width="wrap_content" 17 android:layout_height="wrap_content" 18 android:layout_marginTop="55dp" 19 android:text="Click to show some love" 20 app:layout_constraintEnd_toEndOf="parent" 21 app:layout_constraintStart_toStartOf="parent" 22 app:layout_constraintTop_toTopOf="parent" /> 23 24 <android.support.design.widget.FloatingActionButton 25 android:id="@+id/clickButton" 26 android:layout_width="50dp" 27 android:layout_height="50dp" 28 android:layout_marginTop="15dp" 29 android:src="@mipmap/heart" 30 app:fabSize="auto" 31 app:layout_constraintEnd_toEndOf="parent" 32 app:layout_constraintStart_toStartOf="parent" 33 app:layout_constraintTop_toBottomOf="@+id/descriptionText"/> 34 35 <TextView 36 android:id="@+id/textView" 37 android:layout_width="wrap_content" 38 android:layout_height="27dp" 39 android:layout_marginEnd="8dp" 40 android:layout_marginStart="8dp" 41 android:layout_marginTop="55dp" 42 android:text="Number of clicks so far is:" 43 android:textSize="21sp" 44 app:layout_constraintEnd_toEndOf="parent" 45 app:layout_constraintStart_toStartOf="parent" 46 app:layout_constraintTop_toBottomOf="@+id/clickButton" /> 47 48 <TextView 49 android:id="@+id/countTextView" 50 android:layout_width="wrap_content" 51 android:layout_height="wrap_content" 52 android:layout_marginEnd="8dp" 53 android:layout_marginStart="8dp" 54 android:layout_marginTop="8dp" 55 android:text="loading..." 56 android:textSize="30sp" 57 android:textStyle="bold" 58 app:layout_constraintEnd_toEndOf="parent" 59 app:layout_constraintStart_toStartOf="parent" 60 app:layout_constraintTop_toBottomOf="@+id/textView" /> 61 </android.support.constraint.ConstraintLayout> 62 </android.support.design.widget.CoordinatorLayout>
The layout is pretty straight forward, things to note are the FloatingActionButton with id clickButton and the countTextView to display the current click count.
Now, create a new Kotlin class named ClickCount inside the com.pusher.clickcounter and copy the following into the file:
1package pusher.com.clickcounter 2 3 data class ClickCount(val count: Int)
Next, open the MainActivity.kt class and lets write the code that ties all the functionality together. Inside this file, start by defining some configuration constants and initializing some required variables.
1package com.pusher.clickcounter 2 3 ... 4 5 class MainActivity : AppCompatActivity() { 6 companion object { 7 const val SERVER_URL = "http://NODE_JS_SERVER_ENDPOINT" 8 const val PUSHER_API_KEY = "PUSHER_API_KEY" 9 const val PUSHER_CLUSTER = "PUSHER_APP_CLUSTER" 10 const val CLICK_CHANNEL = "click-channel" 11 const val CLICK_EVENT = "click-event" 12 } 13 14 val pusherOptions = PusherOptions().setCluster(PUSHER_CLUSTER) 15 val pusher = Pusher(PUSHER_API_KEY, pusherOptions) 16 val httpClient = OkHttpClient() 17 18 ... 19 }
Note that you would have to set the SERVER_URL to the actual url where your realtime server is running. Also, update the PUSHER_API_KEY and PUSHER_CLUSTER values to your Pusher applications credentials.
Next, the onCreate() method should look like this:
1package com.pusher.clickcounter 2 3 ... 4 import kotlinx.android.synthetic.main.activity_main.* 5 ... 6 7 class MainActivity : AppCompatActivity() { 8 ... 9 10 override fun onCreate(savedInstanceState: Bundle?) { 11 super.onCreate(savedInstanceState) 12 setContentView(R.layout.activity_main) 13 14 fetchCurrentClickCount() 15 connectToRealtimeUpdates() 16 clickButton.setOnClickListener { postClick() } 17 } 18 19 ... 20 }
First, we fetch the current click count by invoking the fetchCurrentClickCount() method. Next, we connect to get realtime updates of when the click count changes. Finally we attach an onClickListener to the clickButton button.
We are able to get a reference to the
clickButtonbutton directly without having to usefindViewById()because of the Kotlin Android Extensions plugin we applied to this project in thebuild.gradlefile.
Now let us explore the contents of the fetchCurrentClickCount(), connectToRealtimeUpdates() and postClick() functions respectively.
The fetchCurrentClickCount() method
This method makes a GET request to the servers /counts endpoint and updates the countTextView's text with the count gotten from the servers response.
1private fun fetchCurrentClickCount() { 2 val getClickCountRequest = Request.Builder().url("$SERVER_URL/counts").build() 3 4 httpClient.newCall(getClickCountRequest) 5 .enqueue(object: Callback { 6 override fun onResponse(call: Call?, response: Response?) { 7 response?.body()?.also { body -> 8 val clickCount = Gson().fromJson(body.string(), ClickCount::class.java) 9 runOnUiThread { countTextView.text = clickCount.count.toString() } 10 } 11 } 12 13 override fun onFailure(call: Call?, e: IOException?) { 14 runOnUiThread { 15 showError("Network error loading current count", "Retry") { 16 fetchCurrentClickCount() 17 dismiss() 18 } 19 } 20 } 21 }) 22 }
If an error occurs while making the request, an error message will be displayed using the showError() function:
1private fun showError(msg: String, action: String, callback: Snackbar.(View) -> Unit) { 2 val errorSnackbar = Snackbar.make(rootLayout, msg, Snackbar.LENGTH_INDEFINITE) 3 errorSnackbar.setAction(action) { 4 callback(errorSnackbar, it) 5 } 6 errorSnackbar.show() 7 }
The showError() function displays a Snackbar containing the msg passed in and an action button. When the action button is clicked, the callback is invoked.
Notice the type of the
callbackfunction is an extension function on Snackbar ( i.e.Snackbar.(View) → Unit). This makes it easy for the calling code to have access the Snackbar instance without explicitly passing a reference to thecallback.
The connectToRealtimeUpdates() method
The connectToRealtimeUpdates() method subscribes to the Pusher CLICK_CHANNEL and binds an event listener to CLICK_EVENT' events on the channel.
1private fun connectToRealtimeUpdates() { 2 val pusherChannel = pusher.subscribe(CLICK_CHANNEL) 3 pusherChannel.bind(CLICK_EVENT) { _, _, data -> 4 val clickCount = Gson().fromJson(data, ClickCount::class.java) 5 runOnUiThread { countTextView.text = clickCount.count.toString() } 6 } 7 }
The event listener deserializes the data into a ClickCount object using Gson and then updates the countTextView's text with the count provided.
The postClick() method
The postClick() method is invoked when the clickButton is tapped. It sends a POST request to the servers /clicks endpoint.
1private fun postClick() { 2 val emptyBody = RequestBody.create(null, "") 3 val postClickRequest = Request.Builder().url("$SERVER_URL/clicks").post(emptyBody) 4 .build() 5 6 httpClient.newCall(postClickRequest) 7 .enqueue(object: Callback { 8 override fun onResponse(call: Call?, response: Response?) { } 9 10 override fun onFailure(call: Call?, e: IOException?) { 11 runOnUiThread { 12 showError("Network error sending click","Retry") { 13 postClick() 14 dismiss() 15 } 16 } 17 } 18 }) 19 }
If an error occurs while posting the click event, a error Snackbar is displayed via the showError() function.
And finally, in the activity we connect and disconnect pusher in the onResume() and onPause() lifecycle methods respectively.
1class MainActivity : AppCompatActivity() { 2 ... 3 4 override fun onResume() { 5 super.onResume() 6 pusher.connect() 7 } 8 9 override fun onPause() { 10 pusher.disconnect() 11 super.onPause() 12 } 13 }
There you have it. The realtime counter Android application is now ready. You can find the complete code for the Android application here.
Testing it out
To test it out, ensure that the realtime server we built earlier is running and the Android application’s SERVER_URL is updated accordingly.
Now, run the application on multiple devices. You would notice that as you click on the button, the count increases in realtime across all the devices.
Conclusion
It has been a long post, but we were able to see how Pusher can be used to build a realtime counter. We have also seen how we can use Kotlin’s super powers to supercharge our application.
Some additional things that can be done to improve this application include:
- Sharing similar Kotlin code between the server and Android application. For example, the
ClickCountclass can be moved out to a separate module and shared between the server and Android applications. Link to a sample project that achieved this can be found below. - Changing the data type for the counter from
Intto something likeBigIntegerto handle larger counts. - Persisting the
currentClickCountto a database. Note that this may give rise to some other issues that need consideration such as atomically incrementing the click count to avoid race conditions.
Let me know in the comments below if you have any questions or suggestions to improve this tutorial. I’ll love to hear your thoughts. Cheers!
Further Reading


© 2026 Pusher Ltd. All rights reserved.
Pusher Limited is a company registered in England and Wales (No. 07489873) whose registered office is at MessageBird UK Limited, 3 More London Riverside, 4th Floor, London, United Kingdom, SE1 2AQ.