- Products

- Developers
- User stories
- Blog
- Pricing

Build a realtime counter using ASP.NET
- Introduction
- Building the frontend for our realtime counter in .NET
- First, let’s start up Visual Studio
- Creating our new project
- Create the single web page
- Keeping track of views
- Adding realtime updates to our views counter with Pusher Channels
- Triggering event on the server-side
- Listening for the event on our client-side
- Conclusion
Introduction
It is common practice on websites and applications to make viewers aware of how many others have interacted with the same content e.g. YouTube videos. The practice of displaying this information emphasizes the relevance of the resource and draws more attention to it.
In this tutorial, we will emulate this practice by displaying the number of visits to a single page website. We will use C Sharp, C# for short, as our server-side language with ASP.NET MVC to build our webpage and Pusher to provide realtime updates of the page visits.
Let’s get started!
Building the frontend for our realtime counter in .NET
First, let’s start up Visual Studio
For this tutorial, we’ll be using Visual Studio. It’s an IDE that makes ASP.NET development easier and quicker. Visual Studio 2017 is free and available for the popularly used Operating Systems. You can find installation details here.
Creating our new project
We’ll start a new project by clicking New Project on the Visual Studio dashboard. Following the GUI prompts (in this order) we:
- Set C# as the language to use
- Select ASP.NET MVC Project as the template
- Include a Unit Test Project (this is optional and can be unticked)
- Fill in the Project name e.g. Notif (any name would do)
- Fill in the Solution name i.e. application name (again any name would do)
- Select the version control options to include git to the project
And then click Create.
The project gets created with a default HomeController.cs. This is the HomeController class file. For the purpose of this tutorial, being a single page website, this single Controller class will be enough.
💡 ASP.NET MVC routes follow the pattern of /{ControllerName}/{ActionName} i.e assuming our HomeController.cs has a method named Index the route would be viewdotnet.com/Home/Index. ASP.NET MVC provides Home as the default controller name and Index as the default action name so that a route ‘/’ i.e. viewdotnet.com/ maps to the Index method in the Home controller.
In our HomeController.cs we’ll have
1public ActionResult Index() 2 { 3 var mvcName = typeof(Controller).Assembly.GetName(); 4 var isMono = Type.GetType("Mono.Runtime") != null; 5 6 ViewData["Version"] = mvcName.Version.Major + "." + mvcName.Version.Minor; 7 ViewData["Runtime"] = isMono ? "Mono" : ".NET"; 8 9 return View(); 10 }
ActionResult is the return type of the method which specifies that it will return an action in the form of rendering a view, serving a streamed file, etc. ViewData is used to pass data from the method to the HTML file (our view file) that will be rendered. View() creates a view response which we return. Note that **Mono** is only available on a Mac OS machine.
💡 In ASP.NET MVC the views (html files) rendered by a Controller Class must exist in the View folder and either under the Shared folder or the Folder bearing the name of the Controller. i.e. for the HomeController views must be in either
Views/Home/*``.cshtmlorViews/Shared/*``.cshtml.Also when the view is unspecified in the View function it defaults to
index.cshtml; these views extend_Layout.cshtmlfound in the Shared folder.
Create the single web page
To achieve a quick and simple web page for our visitors to view we’ll be using Bootstrap.
1//_Layout.cshtml file 2 3 <html> 4 <head> 5 <title>@ViewBag.Title</title> 6 <link rel="stylesheet" href="https://maxcdn.bootstrapcdn.com/bootstrap/3.3.7/css/bootstrap.min.css"> 7 </head> 8 <body> 9 @RenderBody() 10 <script src="https://cdnjs.cloudflare.com/ajax/libs/jquery/3.2.1/jquery.min.js"> </script> 11 <script src="https://maxcdn.bootstrapcdn.com/bootstrap/3.3.7/js/bootstrap.min.js"></script> 12 </body> 13 </html>
We’ve used CDNs to include to Bootstrap CSS and JS files and also the jQuery JS file (it is needed for Bootstrap JS).
@ViewBag is another means of passing data to the view file from the controller @RenderBody is where our actual view
index.cshtmlwill be inserted in this base view
1// index.cshtml file 2 3 <div class="container"> 4 <div class="row"> 5 <h2>View Funny Memes, Have a good laugh</h2> 6 <div class="col-md-8"> 7 <img src="http://i.imgur.com/gRWkE0j.jpg"> 8 </div> 9 </div> 10 </div>
Our page has a header and a big image (pretty minimal stuff)
Keeping track of views
Now we’ll write the code to display the number of visitors to our page. We’ll need our code:
- To recognize a visit
- To store the visits so far (adding to this stored value every time someone visits)
- To pass the data (number of visitors) to our view to display
In our HomeController.cs we’ll add the code to retrieve the visits so far, increment it and pass it on to the view. To keep things light and simple, we’ll be using file storage as our store (i.e. reading and writing the number of visits to a file such as visitors.txt).
1//HomeController.cs 2 ... 3 using System.IO; 4 5 namespace notif.Controllers 6 { 7 public class HomeController : Controller 8 { 9 public ActionResult Index() 10 { 11 ViewBag.Title = "Views Dot Net | A pusher - .Net Tutorial"; 12 13 var visitors = 0; 14 15 if (System.IO.File.Exists("visitors.txt")) { 16 string noOfVisitors = System.IO.File.ReadAllText("visitors.txt"); 17 visitors = Int32.Parse(noOfVisitors); 18 } 19 20 ++visitors; 21 22 var visit_text = (visitors == 1) ? " view" : " views"; 23 System.IO.File.WriteAllText("visitors.txt", visitors.ToString()); 24 25 ViewData["visitors"] = visitors; 26 ViewData["visitors_txt"] = visit_text; 27 28 return View(); 29 } 30 ...
We create a visitors variable and initialize it to 0. Then we check if the visitors.txt file exists, if it does then we’ve been visited in the past and we read the content into the visitors variable. Next, we increment the value of visitors by 1 (the visitor we are currently serving) and save the new value back into our file.
💡 To check if a file exists, read, and write into it, we’ll use the File class (available from ASP.NET) which is a member of the System.IO namespace so at the top of our class file we’ve added
using System.IO;
Now that we have the number of visitors in a variable, we’ll pass it on to our view using ViewData. We’ve also added some supporting text based on the value of the visitors variable to improve readability. In our view file we’ll add some markup to display the visitors value and text we’re passing along.
1//index.cshtml 2 3 <div class="container"> 4 <div class="row"> 5 <h2>View Funny Memes, Have a good laugh</h2> 6 <div class="col-md-8"> 7 <img src="http://i.imgur.com/gRWkE0j.jpg"> 8 </div> 9 </div> 10 <br> 11 <div class="row"> 12 <div class="col-md-12"> 13 <div class="pull-left"> 14 <p> <b id="noOfVisitors">@ViewData["visitors"]</b> <span id="visitorsText"> @ViewData["visitors_txt"] </span> </p> 15 </div> 16 </div> 17 </div> 18 </div>
Now our page will look like:
Adding realtime updates to our views counter with Pusher Channels
While a user views our page we’d like them to know when more people visit the page by increasing the number of views without requiring a refresh. We will be using Pusher for this.
To start with, lets head over to the Pusher dashboard and create a Channels app. You can register for free if you haven’t got an account. Fill out the create app form with the information requested.
To make our app realtime, we’ll make each visit trigger an event via Channels on the server-side (i.e. backend) and have Channels listen and react to that event on the client-side (i.e. view using JavaScript).
Triggering event on the server-side
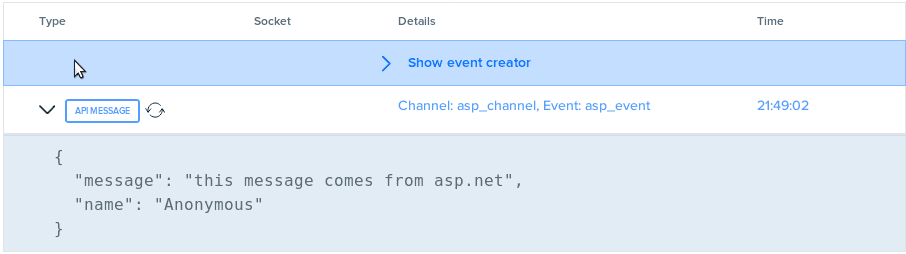
In our HomeController.cs, on every new visit using Pusher we’ll trigger a newVisit event on a channel we’ll call general which will broadcast the current number of visits.
To do this, we’ll install Pusher Channels via NuGet - *a packer manager for ASP.NET *- by:
- Right clicking the
*Packages*folder in our solution - Selecting
Add Packagesand; - Searching and selecting
Pusher Server
Next, we’ll initialize Pusher in our Controller using and trigger our newVisit event.
1//HomeController.cs 2 3 ... 4 using PusherServer; 5 6 public ActionResult Index() 7 { 8 ViewBag.Title = "Views Dot Net | A pusher - .Net Tutorial"; 9 var visitors = 0; 10 11 if (System.IO.File.Exists("visitors.txt")) { 12 string noOfVisitors = System.IO.File.ReadAllText("visitors.txt"); 13 visitors = Int32.Parse(noOfVisitors); 14 } 15 16 ++visitors; 17 var visit_text = (visitors == 1) ? " view" : " views"; 18 19 System.IO.File.WriteAllText("visitors.txt", visitors.ToString()); 20 21 var options = new PusherOptions(); 22 options.Cluster = "PUSHER_APP_CLUSTER"; 23 24 var pusher = new Pusher( 25 "PUSHER_APP_ID", 26 "PUSHER_APP_KEY", 27 "PUSHER_APP_SECRET", options); 28 29 pusher.TriggerAsync( 30 "general", 31 "newVisit", 32 new { visits = visitors.ToString(), message = visit_text }); 33 34 ViewData["visitors"] = visitors; 35 ViewData["visitors_txt"] = visit_text; 36 37 return View(); 38 }
💡 After Installing the
PusherServerpackage we use it in our controller by addingusing PusherServerat the top of our class definition.
After initializing Pusher using our PUSHER_APP_ID, PUSHER_APP_KEY, **PUSHER_APP_SECRET and PUSHER_APP_CLUSTER (be sure to replace these with the actual values from your dashboard), we will broadcast an object consisting of the number of visitors and the visitors supporting text with our pusher instance on the newVisit event via the general channel.
Listening for the event on our client-side
To react to our newVisit event and its corresponding data we’ll be using JavaScript and JQuery for DOM manipulation to display the event data.
1//_Layout.cshtml 2 3 ... 4 <script src="https://js.pusher.com/4.0/pusher.min.js"></script> 5 <script> 6 7 // Enable pusher logging - don't include this in production 8 Pusher.logToConsole = true; 9 10 var pusher = new Pusher('PUSHER_APP_KEY', { 11 cluster:'PUSHER_APP_CLUSTER' 12 }); 13 14 var channel = pusher.subscribe('general'); 15 16 channel.bind('newVisit', function(data) { 17 18 var visits = data.visits; 19 var message = data.message; 20 $('#noOfVisitors').text( visits ); 21 $('#visitorsText').text( message ); 22 }); 23 </script> 24 </body> 25 </html>
In the above code, we:
- Add the pusher library to our view via a CDN,
- Initialize Pusher passing in our PUSHER_APP_KEY,
- Subscribe to the
generalchannel - Bind the channel to the
newVisitevent also attaching a callback function to the binding.
In our callback function we retrieve the visits and message data, then using jQuery pass it into our markup.
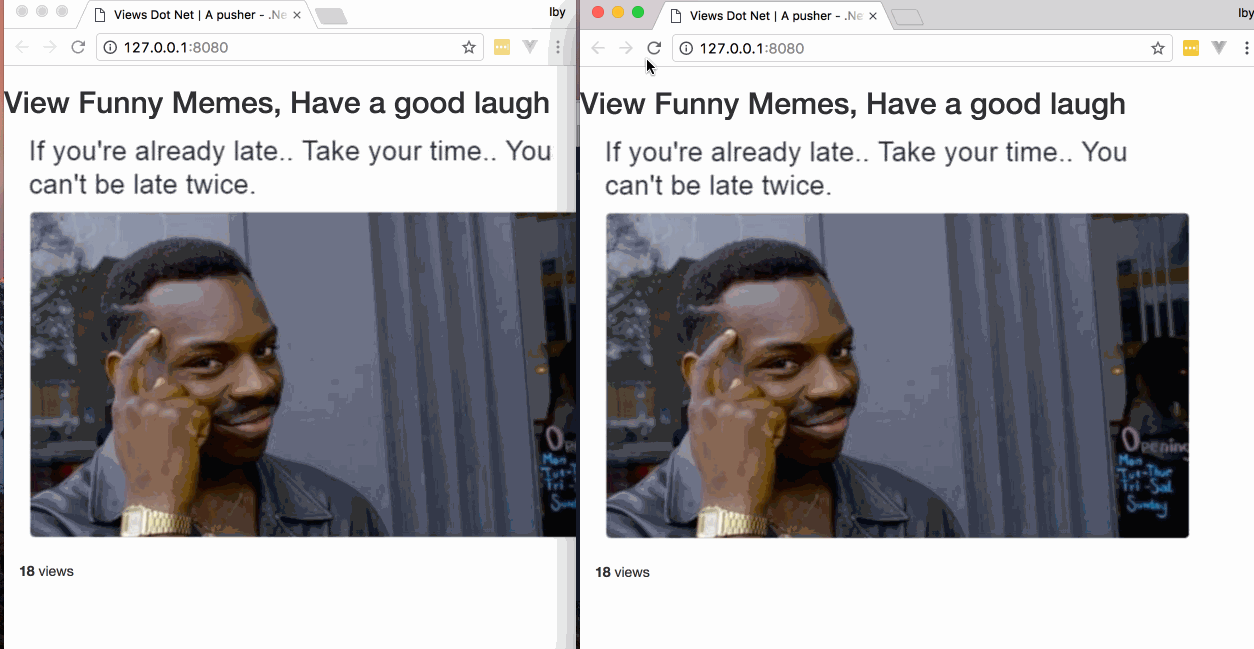
Now we run our application by clicking the play button in the top left corner of our IDE and here’s a glimpse of our resulting webpage.
Conclusion
In this tutorial, we’ve covered building a single web page with ASP.NET MVC in C# and how to implement realtime functionality in our web page using Pusher in both C# and JavaScript. There’s a lot more functionality we can achieve using ASP.NET and Pusher Channels together, feel free to extend the functionality of your web page.


© 2025 Pusher Ltd. All rights reserved.
Pusher Limited is a company registered in England and Wales (No. 07489873) whose registered office is at MessageBird UK Limited, 3 More London Riverside, 4th Floor, London, United Kingdom, SE1 2AQ.