- Products

- Developers
- User stories
- Blog
- Pricing

Getting started with continuous integration in React Native - Part 2: Starting CI with App Center
Introduction
This tutorial is the second part of the series on getting started with continuous integration in React Native. In this part, you’ll learn how to use Visual Studio App Center as a CI server for the React Native app. Specifically, you’re going to learn the following:
- How to setup a React Native project in App Center.
- How to configure the project build.
- How to run Jest tests.
- How to use custom build scripts.
Prerequisites
To follow this tutorial, you need to have basic knowledge of React and React Native. Knowledge of testing tools such as Jest will be helpful but not required.
We will be using Genymotion to test the builds, but you can use the Android emulator as well.
Reading part one of this series is optional if you already have some background with continuous integration.
These are the package versions that we will be using:
- Node 8.3.0
- React Native 0.50
- Yarn 1.7.0
For other dependencies, check out the package.json file of the project.
Initial project setup
Log in to your GitHub account and create a new repo named ReactNativeCI. This is where you will be pushing the project so that you can connect it to App Center.
After that, clone the project repo (the GitHub repo containing the starter project, not the one you just created) and switch to the starter branch:
1git clone https://github.com/anchetaWern/ReactNativeCI.git 2 cd ReactNativeCI 3 git checkout starter
We’re switching to the starter branch because the master branch contains the final output for the whole series. The starter branch contains the untouched version of the app that we will be working on.
Next, initialize a new React Native project using the same version I used. Copy the src folder and App.js file from the repo you cloned earlier and paste it into the project you just created:
1react-native init ReactNativeCI --version react-native@0.50 2 cd ReactNativeCI
Next, install the dependencies and link the native modules:
1yarn install 2 react-native link
Once that’s done, make sure that the app is still running. This is important because if it doesn’t run locally then it’s likely that it wouldn’t build properly on the CI server either:
1react-native run-android 2 react-native run-ios
If you want to have a brief overview of the app that we will be working on, be sure to check out part one of this series.
Setting up a project on App Center
If you haven’t done so already, sign up for a new account on the App Center website.
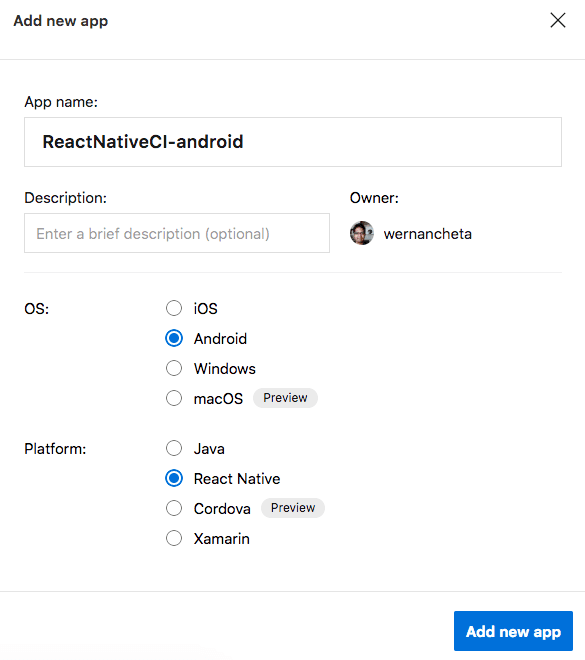
Once your account is created, create a new app.
The number of apps you need to create depends on which platforms you need to support. Here are the names I used for the apps:
- ReactNativeCI-android
- ReactNativeCI-ios
Don’t worry if you don’t have a Mac. App Center doesn’t need you to be on Mac in order for it to build an iOS app. The only problem is actually running the app that it’s going to build. Apple is very strict when it comes to these things. You need the app to be signed with a provisioning profile and distribution certificate from a paid Apple Developer account if you want to run it on your iOS device.
Once the app is created, it will show you the getting started guide:

Follow the steps on that page. This will ensure that your project will work well with App Center. Be sure to replace the npm commands with yarn like so:
yarn add appcenter
Note that if you’re working on iOS and you encounter any errors while following the steps mentioned on that page, scroll down to the Cocoapods issue in iOS section below.
If you’re planning to build for both Android and iOS, you should also create the other app on App Center if you haven’t done so already.
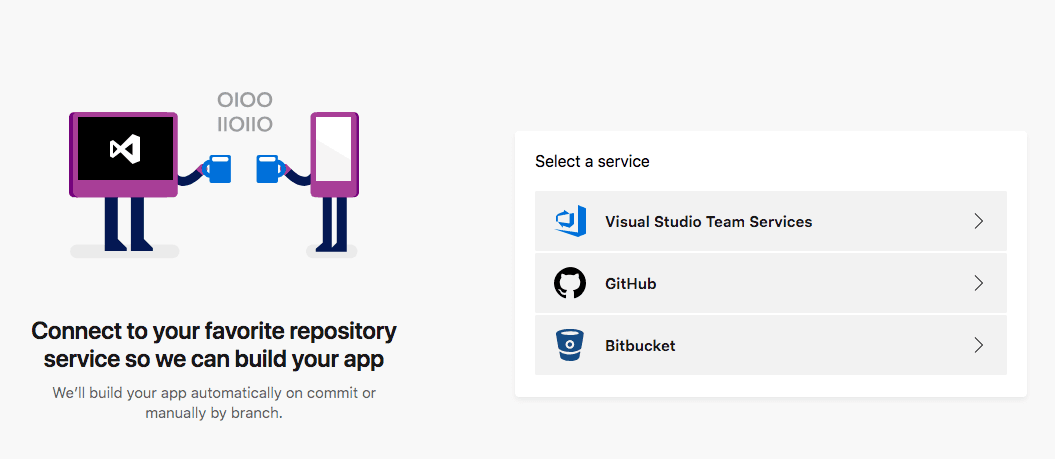
Next, switch back to App Center and click on the Build menu on the sidebar. It will ask you to connect your code repo. In this case, we’ll use a GitHub account:
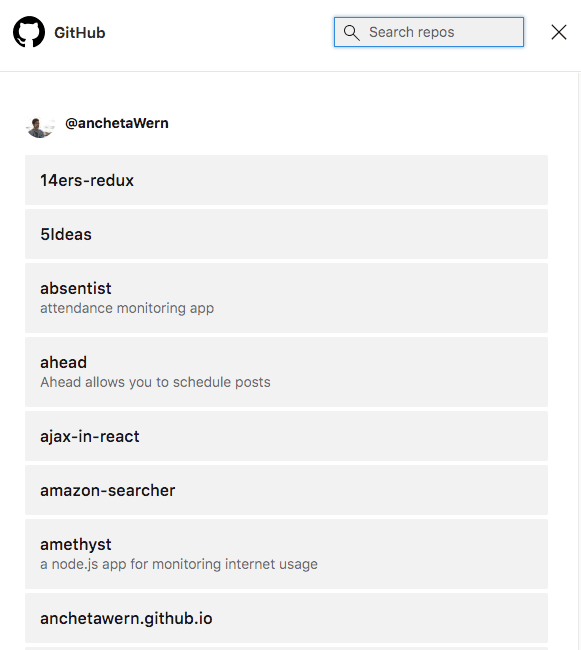
Once your GitHub account is connected, it will list all your GitHub repos. From there, search for the project you forked earlier and select it:
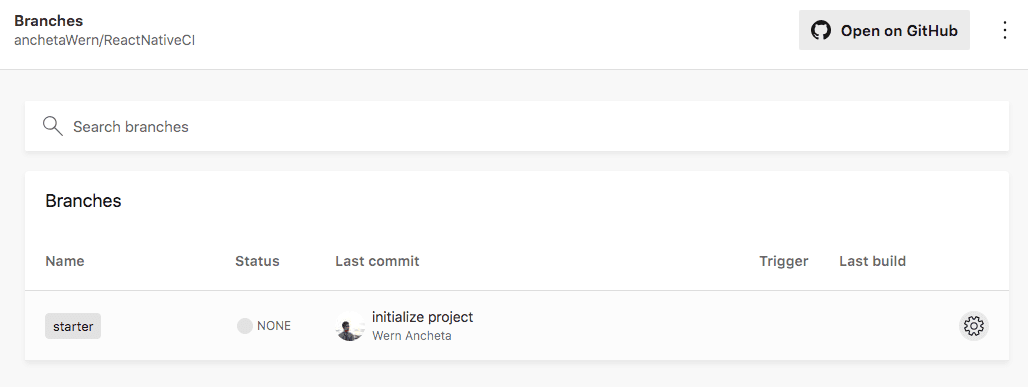
Once selected, it will show the following screen. Click on the gear icon to configure the build for this specific branch:
From the Build configuration screen, select the following options:
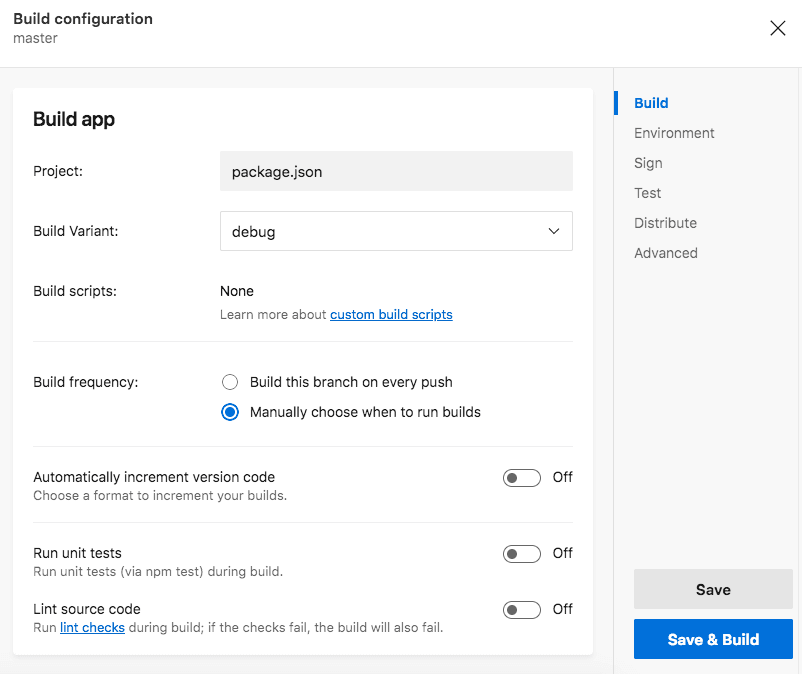
We’re setting the Build Variant to debug so we don’t have to supply a release keystore file. The Build frequency is set to manual because we don’t really want to trigger a new build everytime we push some changes to the repo as we’re just testing things out. All the toggle buttons should be set to Off for now.
Note that we’re only selecting these option so we can easily get a successful build. We’ll change these options later once we make sure that there are no problems with the build.
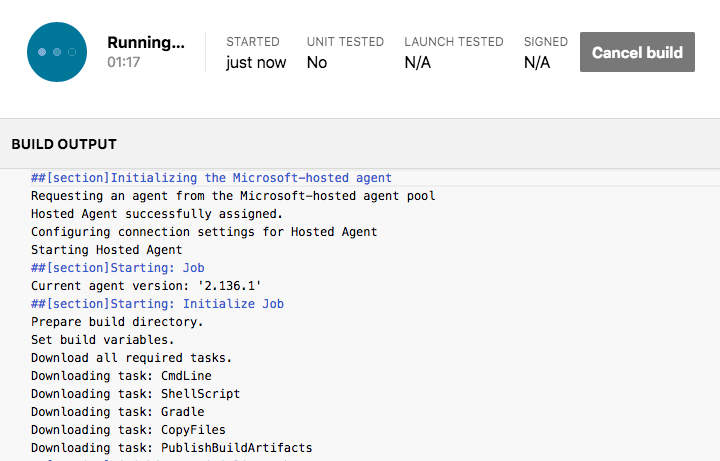
Once you’re done with the configuration, click on Save & Build. This will save your build configuration and start the build process immediately.
This process might take a while. In my case, it took four minutes, so go grab a drink if you want.
Once the build is complete, it should present you with a button to download the build (a .zip file containing the .apk file). But the app won’t really work because we haven’t signed it yet. All apps need to be signed with a distribution certificate, even if it’s not going to be released on any app store.
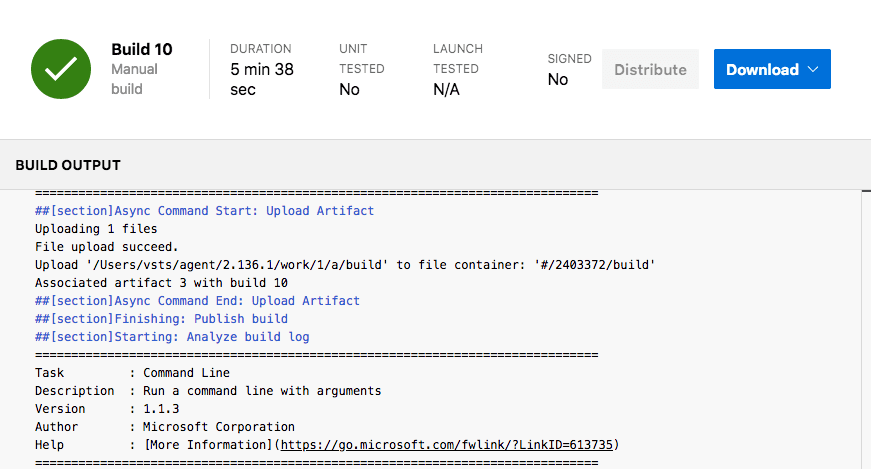
The only purpose of having you build is to make sure that the build succeeds and to get you acquainted with the App Center.
Cocoapods issue in iOS
If you’re trying to get this to work on iOS and you get the following error while trying to install the dependencies:
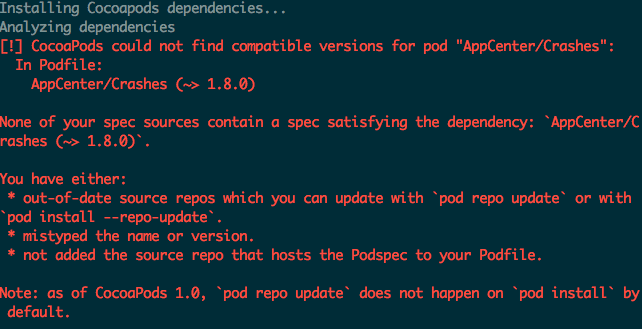
The solution is to navigate to the ios directory and update the outdated source repositories as mentioned in the error message:
1cd ios 2 pod repo update
After that, go back to the project’s root directory and uninstall the App Center dependencies and add them again. This allows Cocoapods to install the dependencies properly:
1cd .. 2 yarn remove appcenter 3 yarn add appcenter
Updating the app
To get you acquainted with the whole continuous integration process, we’ll be adding a minor update to the app. If you’re not familiar with Git workflows or branching models, be sure to read up on them. You can also check out the CI workflow in React Native section in the first part of this series, as we will be following the workflow mentioned there.
Start by creating a new branch called develop. This is the branch where all the developers of this app will merge the new features they implement:
git checkout -b develop
Next, create a new branch off of the develop branch called feature-improvements:
git checkout -b feature-improvements
At this point, we can now begin implementing a couple of improvements to the app:
- Add a margin at the bottom of the card list.
- Make the target area of the favorite button bigger.
First, let’s add the bottom margin:
1// src/components/CardList.js 2 class CardList extends Component { 3 render() { 4 return ( 5 <View style={styles.container}> 6 <FlatList 7 contentContainerStyle={styles.flatlist} 8 previous code here... 9 /> 10 </View> 11 ); 12 } 13 } 14 15 const styles = { 16 /* previous code here... */ 17 flatlist: { 18 marginBottom: 50 19 } 20 };
Next, update the app’s snapshot. This ensures that the snapshot tests wouldn’t fail the next time it is run. Jest has already been set up in the starter app so you don’t have to worry about it:
yarn test -u
Once that’s done, save the file and commit the changes:
1git add . 2 git commit -m "add bottom margin to CardList"
Next, we can make the target area bigger by wrapping the whole card in a TouchableOpacity so we can pass the action directly to its onPress prop. The IconButton is then replaced by the Icon component from react-native-vector-icons:
1// src/components/Card.js 2 import { View, Image, Text, Dimensions, TouchableOpacity } from "react-native"; // add TouchableOpacity 3 4 import Icon from "react-native-vector-icons/FontAwesome"; // add vector icon 5 6 // wrap the Card in TouchableOpacity 7 const Card = ({ image, text, is_favorite, action }) => { 8 const icon = is_favorite ? "heart" : "heart-o"; 9 return ( 10 <TouchableOpacity onPress={action}> 11 <View style={styles.card}> 12 <Text style={styles.text}>{text}</Text> 13 <Image source={image} resizeMode={"contain"} style={styles.image} /> 14 <Icon name={icon} size={30} color={"#333"} /> 15 </View> 16 </TouchableOpacity> 17 ); 18 };
After that, delete the src/components/IconButton.js file because it’s no longer needed.
Once again, don’t forget to update the app’s snapshot:
yarn test -u
At this point, you can now test the app to see if it’s still working.
Once you’re fairly sure you haven’t broken anything, commit the changes:
1git add . 2 git commit -m "make favorite button's target area larger"
Switch to the develop branch and merge the changes from your feature-improvements branch:
1git checkout develop 2 git merge feature-improvements
Once the merge is done, delete the feature-improvements branch:
git branch -d feature-improvements
Lastly, push the develop branch to the repo:
git push origin develop
Note that when pushing changes to your repo, you have to commit both android and ios directories as well. This way, App Center is able to run the build commands for both Android and iOS.
Configure the build
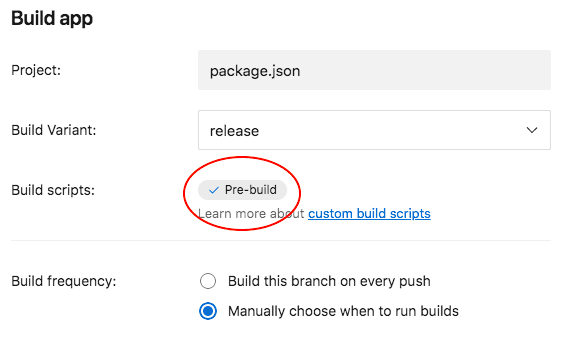
If you go back to the Build page of the app you created earlier, a develop branch should be listed as one of the branches. Click on the gear icon for that to configure the build. This time, select the following options:
- Build variant: release
- Build frequency: Manually choose when to run builds
- Automatically increment version code: On
- Build number format: Build ID
- Run unit tests: On
- Sign builds: On
The rest of the toggle buttons should be set to Off.
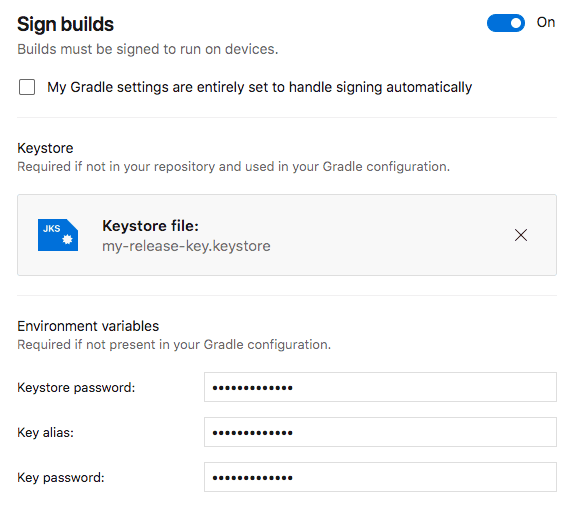
Sign builds for Android
If you’re configuring the build settings for Android, for the build signing, you have to generate a keystore file so you can upload it to the field that’s asking for it:
To generate a keystore file, execute the following from any directory:
keytool -genkey -v -keystore my-release-key.keystore -alias my-key-alias -keyalg RSA -keysize 2048 -validity 10000
If you’re on Windows, you might not have the keytool in your path. You can usually find it in the C:\Program Files\Java\jdkx.x.x_x\bin directory. You can either add that path to your environment path or just open a new command line window inside that directory and execute the command above.
Executing the command should ask you a few questions:
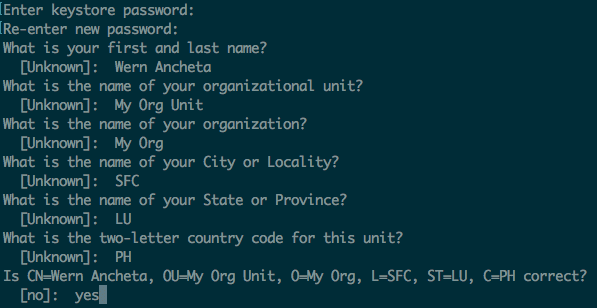
You can find more information about this on the documentation for Generating Signed APK.
Once the keystore file is generated, upload it to App Center and enter the keystore password, key alias, and key password. If you used the exact same command to generate the keystore file, the key alias is my-key-alias. And if you used the same password as your keystore password for the key password, then enter the same value for both.
Once that’s done click on the Save & Build button to start the build. Once the build succeeds, you should be able to downlod, extract and drag it over to Genymotion. Since the .apk file is now signed, you should be able to run it without problems.
Sign builds for iOS
If you’re configuring the build settings for iOS, I hate to break the bad news but you won’t be able to install or run the resulting .ipa file if you’re not an Apple Developer Program member (the one which you have to pay 99 USD per year).
You can still have a free provisioning profile and certificate if you have a free developer account. But if you’re planning to distribute your app for beta testing with TestFlight or TestFairy, you’re still out of luck because only provisioning profiles and certificates from a paid Apple developer account will work. That means that apps signed with a certificate from a free developer account won’t work.
As I mentioned in the first part of this series, we won’t really be covering Continuous Deployment in this series so I’ll just leave you with two links that will help you configure the distribution setting in App Center:
- iOS - Creating an Ad Hoc Distribution Provisioning Profile
- iOS - Creating a Distribution Certificate and .p12 File
For those of you who are not a member of the Apple Developer program, the only thing you’ll get out of using App Center is making sure that the iOS app builds successfully.
Custom build scripts
One important thing you need to enable to have full control over your builds is custom build scripts. These are Bash scripts which can be executed throughout the lifecycle of the entire build:
- post-clone - executed right after your code repo has been cloned.
- pre-build - executed right before App Center begins the build process for your app. This is usually right after the dependencies for your project are installed.
- post-build - executed right after your app is built.
To have more idea on what I’m talking about above, you can actually scroll through the build output to inspect what App Center is doing behind the scenes. Generally, here’s how the process goes:
- Clone the repo.
- Install the dependencies.
- Link packages (
react-native link). - Execute post-clone scripts (if you have one).
- Execute pre-build scripts (if you have one).
- Install keystore.
- Build the app (
react-native run-androidorreact-native run-ios). - Execute post-build scripts (if you have one).
- Run tests (
npm test).
There’s also code linting, but that’s mainly for native Android development, so I didn’t include it in the steps above.
Adding a custom build script
Adding a custom build script is fairly straightforward. All you have to do is create any of these files inside the root of your project directory (same level as your package.json file):
appcenter-post-clone.shappcenter-pre-build.shappcenter-post-build.sh
In our case, all we want to do is update the app snapshot for valid changes that we make. But how can we tell App Center that we want to update the snapshots? Well, the simplest way of implementing these kinds of checks is through environment variables. Each build can have their own environment variable so it’s the perfect place to put these kinds of custom config.
To add an environment variable, click on the gear icon of the branch you want to configure. In this case, we want to configure the develop branch.
From the build configuration screen, click on the Environment tab and enable Environment variables. Once enabled, you should be able to put UPDATE_JEST_SNAPSHOTS for the name, and then true for the value:
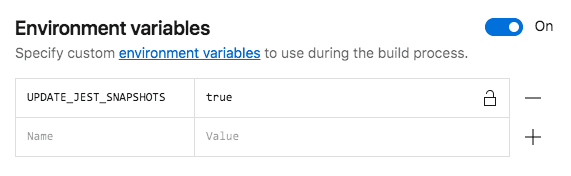
Note that you have to set this value to false (or any value that’s not true) if you didn’t make any change to the component tree (for example: updating the styles, removing or adding a prop, removing or adding a component). Otherwise, snapshot testing will be pointless. I realize that this can be inefficient and prone to mistakes, but I can’t really find any other solution to this one.
Going back to creating the custom build script, create an appcenter-pre-build.sh file if you haven’t done so already. Once created, add the following code to it:
1#!/usr/bin/env bash 2 3 echo "MY CUSTOM PRE-BUILD SCRIPT..." 4 if($UPDATE_JEST_SNAPSHOTS == "true") 5 then 6 echo "Now updating the snapshots..." 7 npm test -u 8 echo "Done updating the snapshots" 9 fi
What this does is check whether the value of UPDATE_JEST_SNAPSHOTS that we’ve set on App Center earlier is true. If it does, we execute the code for updating the snapshots. That way, by the time it gets to running the actual test (if you have enabled it in the build configuration), it won’t fail. Note that even if the build succeeded, and your tests didn’t, the build is still labeled as “failed”.
Once that’s done, save the file, commit the changes, and push it to the repo:
1git add . 2 git commit -m "add pre-build script" 3 git push origin develop
Next, refresh the Build page in App Center and click on the gear icon for the develop branch. At this point, you should see that it recognizes the pre-build script that you’ve added:
Once you see that, you should be fairly confident that the script will be executed on your next build.
You can find more information about build scripts here:
Conclusion
That’s it! In this tutorial, you learned how to use App Center to easily setup continuous integration for a React Native app. Specifically, you learned how to build and test the app using App Center. You also learned how to use a custom build script to update the Jest snapshots.
App Center is great if you’re just getting started with continuous integration. But as soon as your needs grow, you’ll need a more customizable and powerful solution. So stay tuned for part three where we will use Bitrise as the CI service for the app.
You can find the source code used in this tutorial on its GitHub repo. Don’t forget to switch to the part2 branch for the final output of this part.


© 2026 Pusher Ltd. All rights reserved.
Pusher Limited is a company registered in England and Wales (No. 07489873) whose registered office is at MessageBird UK Limited, 3 More London Riverside, 4th Floor, London, United Kingdom, SE1 2AQ.