- Products

- Developers
- User stories
- Blog
- Pricing

Getting started with ConstraintLayout in Kotlin - Part 4: using MotionLayout for animations
Introduction
In the previous part of this series, we talked about helpers available to you when using ConstraintLayout. In this part, we will focus on using animations when working with ConstraintLayouts.
We all love animations, but building animations on Android appears daunting at first. Many times we have to settle for less than what we want or none at all. Before now, Android already offered various ways of implementing animations in our apps:
- View Animations: these were used specifically to animate the visual properties of views like opacity and transparency. This is the initial way animations were implemented on Android.
- Property Animations: this helps us to alter properties of
view objectsto perform various view animations. View properties that can be altered include its translate, scale, and rotate properties. - Drawable Animations: this uses an XML file to specify a list of drawables and runs them one after another to make an animation.
- Layout Transitions: this enables us to easily implement fade/move/resize animations when items are added to or removed from a
ViewGroup, usually with just one line of code. - ConstraintLayout with
[ConstraintSet](https://developer.android.com/reference/android/support/constraint/ConstraintSet)s - this gives us the ability to animate between two sets of constraints through the TransitionManager). TheTranstionManagerhelps manage transitions when there is a change of scene. A scene represents either the entire user interface or a subset of the layout represented by aViewGroup.
Prerequisites
For you to follow along in the entire series, you need to have the following requirements:
- Completed previous parts of the series.
- Android Studio (v3.0 or higher) installed on your machine. Download here.
- Ability to navigate the Android Studio IDE.
- Ability to use the layout editor provided by the Android Studio IDE.
- A basic understanding of Android development, especially layouts.
Let’s get started.
The MotionLayout
Compared to the other methods of creating animations on Android, MotionLayout offers us a lot more flexibility in specifying animations for our apps.
A MotionLayout is actually a subclass of the ConstraintLayout and allows you to make animations between two sets of constraints. As we already know, constraints are the building blocks for the layout, and every view must have constraints.
The MotionLayout is also fully declarative. This means you can easily describe, in your XML file, how a transition should occur without any Java or Kotlin code. It can also animate any property of the system, not just layout attributes.
As shown in the image below, the background color of the info button crossfades between the image being animated:

Finally MotionLayout supports touch events and keyframes. This makes it possible to easily customize transitions to your own needs. In later parts of this article, we will see how this works using some examples.
Difference between ConstraintLayout and MotionLayout
Although MotionLayout is a part of ConstraintLayout, there are some key differences. One key difference between ConstraintLayout and MotionLayout, at the XML level, is that the description of what MotionLayout will do is not necessarily contained in the same layout file. It is instead kept in a separate XML file, a MotionScene, that it references. This description will take precedence over the description in the layout file.
This approach is very helpful as the layout file will contain only the views and their properties and not their positioning or movement.
The MotionLayout is only available as part of the ConstraintLayout version 2.0 and above. As at the time of writing this article, this version of the library is still in its alpha stage.
To add support for MotionLayout on your project, add the following code to your app modules build.gradle file:
1dependencies { 2 // [...] 3 4 implementation 'com.android.support.constraint:constraint-layout:2.0.0-alpha1' 5 6 // [...] 7 }
Sync your gradle files after that to make the library available for use.
Making a simple animation with MotionLayout
Before diving deep into making animations with MotionLayout, it is important we understand the purpose of the motion. The material design guideline says:
Motion provides meaning. Objects are presented to the user without breaking the continuity of experience even as they transform and reorganize.
For our very first animation with MotionLayout, we are going to try to achieve the animation below. The ImageView increases in size as it moves to the bottom of the layout.
In order to achieve this animation, we have to create two layout files, one for the initial position of the image and another for the final position of the image.
For the initial position of the image, our layout looks like this:
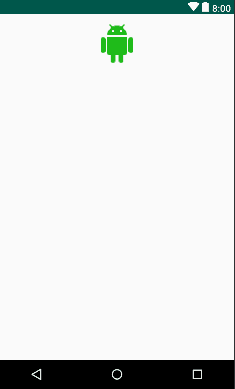
This layout was named: motion_one_img_start. And this is how the XML code looks like:
1<!-- File: app/res/layout/motion_one_img_start.xml --> 2 <android.support.constraint.ConstraintLayout 3 xmlns:android="http://schemas.android.com/apk/res/android" 4 xmlns:app="http://schemas.android.com/apk/res-auto" 5 xmlns:tools="http://schemas.android.com/tools" 6 android:layout_width="match_parent" 7 android:layout_height="match_parent"> 8 9 <ImageView 10 android:id="@+id/imageView" 11 android:layout_width="64dp" 12 android:layout_height="64dp" 13 android:layout_marginTop="16dp" 14 app:layout_constraintEnd_toEndOf="parent" 15 app:layout_constraintStart_toStartOf="parent" 16 app:layout_constraintTop_toTopOf="parent" 17 app:srcCompat="@drawable/ic_android_black_24dp" /> 18 19 </android.support.constraint.ConstraintLayout>
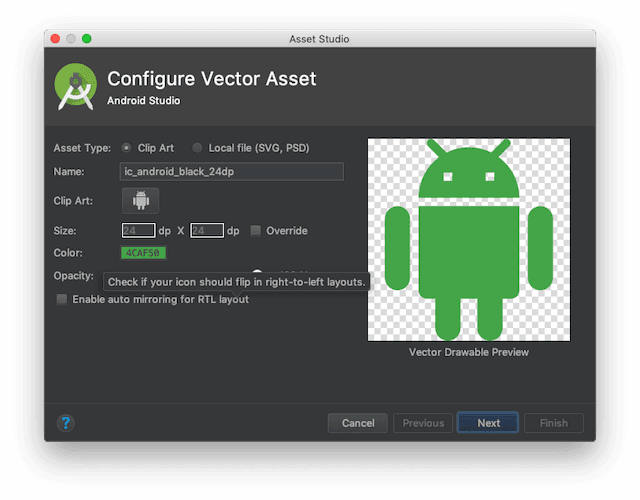
Next, let’s create the Android vector drawable. To do so, make sure the app directory in the Android file list is selected then click File > New > Vector Asset then set the hex color to #4CAF50 then click Next > Finish.
For our final image position our layout looks like this:

This layout was named motion_one_img_end and this is the supporting XML code:
1<!-- File: app/res/layout/motion_one_img_end.xml --> 2 <android.support.constraint.ConstraintLayout 3 xmlns:android="http://schemas.android.com/apk/res/android" 4 xmlns:app="http://schemas.android.com/apk/res-auto" 5 android:layout_width="match_parent" 6 android:layout_height="match_parent"> 7 8 <ImageView 9 android:id="@+id/imageView" 10 android:layout_width="180dp" 11 android:layout_height="180dp" 12 app:layout_constraintBottom_toBottomOf="parent" 13 app:layout_constraintEnd_toEndOf="parent" 14 app:layout_constraintStart_toStartOf="parent" 15 app:layout_constraintTop_toTopOf="parent" 16 app:layout_constraintVertical_bias="0.75" 17 app:srcCompat="@drawable/ic_android_black_24dp" /> 18 19 </android.support.constraint.ConstraintLayout>
Now that we have defined our initial and final position for our images, we need to create a MotionLayout layout file, we will call it motion_layout_01. This file will be very similar to our initial layout file except that instead of the root layout being a ConstraintLayout we will replace it with a MotionLayout.
Here are the changes:
1<!-- File: app/res/layout/motion_layout_01.xml --> 2 <android.support.constraint.motion.MotionLayout 3 xmlns:android="http://schemas.android.com/apk/res/android" 4 xmlns:app="http://schemas.android.com/apk/res-auto" 5 xmlns:tools="http://schemas.android.com/tools" 6 android:layout_width="match_parent" 7 android:layout_height="match_parent" 8 app:layoutDescription="@xml/motion_scene_01" 9 app:showPaths="true"> 10 11 <ImageView 12 android:id="@+id/imageView" 13 android:layout_width="64dp" 14 android:layout_height="64dp" 15 android:layout_marginTop="16dp" 16 app:layout_constraintEnd_toEndOf="parent" 17 app:layout_constraintStart_toStartOf="parent" 18 app:layout_constraintTop_toTopOf="parent" 19 app:srcCompat="@drawable/ic_android_black_24dp" /> 20 21 </android.support.constraint.motion.MotionLayout>
We also introduced two new attributes that we didn’t declare in our initial layout file. The app:layoutDescription and app:showPaths attributes. The showPaths attribute was used here to show the animation path in our example. This attribute is mainly for debugging and should not be used in a production app.
The layoutDescription attribute references an XML file called motion_scene_01. It is the MotionScene element that will tell the MotionLayout how to transition between the initial layout and final layout. All MotionScene files should be kept in res/xml directory:
Create a new file in the res/xml directory named motion_scene_01 and paste this:
1<!-- File: app/res/xml/motion_scene_01.xml --> 2 <MotionScene xmlns:motion="http://schemas.android.com/apk/res-auto"> 3 <Transition 4 motion:constraintSetStart="@layout/motion_one_img_start" 5 motion:constraintSetEnd="@layout/motion_one_img_end" 6 motion:duration="1000"> 7 <OnClick 8 motion:target="@+id/imageView" 9 motion:mode="toggle" /> 10 </Transition> 11 </MotionScene>
Here we defined the default transition by specifying the constraintSetStart, constraintSetEnd and duration attributes.
- The
constraintSetStartattribute tellsMotionLayoutthe constraints for the initial position of the layout filemotion_one_img_startwe created earlier. - The
constraintSetEndattribute tellsMotionLayoutthe constraints for the final position of the layout filemotion_one_img_endwe created earlier. - The
durationattribute specifies the duration of the transition between the initial and final position.
Finally to we used the OnClick event with a handler to instruct MotionLayout to start its transition. On the OnClick we specified the ID of the view that triggers the animation using the target attribute and the mode attribute.
The mode attribute specifies the direction for the target view to move the animation. We used the toggle mode here so we can achieve a smooth back and forth transition between the initial and final position. Other available modes include: transitionToEnd, transitionToStart, jumpToEnd, jumpToStart.
Finally, open the MainActivity class and change the setContentView parameter from R.layout.activity_main to R.layout.motion_layout_01 in the onCreate method.
1import android.support.v7.app.AppCompatActivity 2 import android.os.Bundle 3 4 class MainActivity : AppCompatActivity() { 5 override fun onCreate(savedInstanceState: Bundle?) { 6 super.onCreate(savedInstanceState) 7 setContentView(R.layout.motion_layout_01) 8 } 9 }
We can now run our app. When we click on the image it will transition between the initial and final positions as seen in our GIF below:
Deeper dive into MotionScene
As mentioned before, the MotionScene drives the animation for MotionLayout by instructing the MotionLayout what to do. It is the engine room of our animations.
To specify an animation, the MotionScene element could contain:
- A
StateSetelement that describes the states supported by the system. Astatecan be used to define the position of a layout before, during, and after the transition. - A
ConstraintSetthat encapsulates all the positioning rules for your layout. It is always important to make sure that eachConstraintSetelement contains all the constraints you want to apply to the view. It’s important because each constraint set will replace all existing constraints of the affected views. - A
Transitionelement that describes the transition between twostatesorConstraintSets. Under the transition element, you can also specify event triggers likeOnClickorOnSwipeand aKeyFrameSet.
Below is a typical structure of a MotionScene file:
1<MotionScene> 2 <Transition> 3 <OnClick /> 4 <OnSwipe /> 5 <KeyFrameSet > 6 <KeyPosition /> 7 <KeyAttribute /> 8 <KeyCycle /> 9 </KeyFrameSet> 10 </Transition> 11 12 <ConstraintSet> 13 <Constraint > 14 <CustomAttribute/> 15 </Constraint> 16 </ConstraintSet> 17 18 <StateSet> 19 <State> 20 <Variant /> 21 </State> 22 </StateSet> 23 </MotionScene>
Using ConstraintSet to replace Multiple Layout files
While making our first animation with MotionLayout above, we defined two layout files. One for the initial position, and one for the final position. An alternative to doing this is we can specify what constraints the initial and final layout positions will use directly in our MotionScene file.
To do this we use the ConstraintSet element and define the initial constraints and the final constraints to be applied during the transition.
Let's look at the example below of how it could look:
1<MotionScene xmlns:motion="http://schemas.android.com/apk/res-auto" 2 xmlns:android="http://schemas.android.com/apk/res/android"> 3 <Transition 4 motion:constraintSetStart="@+id/start" 5 motion:constraintSetEnd="@+id/end" 6 motion:duration="1000"> 7 <OnClick 8 motion:target="@+id/imageView" 9 motion:mode="toggle" /> 10 </Transition> 11 12 <ConstraintSet android:id="@+id/start"> 13 <Constraint 14 android:id="@+id/imageView" 15 android:layout_width="64dp" 16 android:layout_height="64dp" 17 android:layout_marginTop="16dp" 18 motion:layout_constraintEnd_toEndOf="parent" 19 motion:layout_constraintStart_toStartOf="parent" 20 motion:layout_constraintTop_toTopOf="parent" 21 motion:srcCompat="@drawable/ic_android_black_24dp"/> 22 </ConstraintSet> 23 24 <ConstraintSet android:id="@+id/end"> 25 <Constraint 26 android:id="@+id/imageView" 27 android:layout_width="180dp" 28 android:layout_height="180dp" 29 motion:layout_constraintBottom_toBottomOf="parent" 30 motion:layout_constraintEnd_toEndOf="parent" 31 motion:layout_constraintStart_toStartOf="parent" 32 motion:layout_constraintTop_toTopOf="parent" 33 motion:layout_constraintVertical_bias="0.75" 34 motion:srcCompat="@drawable/ic_android_black_24dp" /> 35 </ConstraintSet> 36 </MotionScene>
Above, we have defined two ConstraintSet elements. One for our initial layout with an ID - start, and one for our final layout with ID - end.
If we compare this to the animation we created earlier, we see that the constraint attributes for our start constraint set is similar to the constraint declared for the ImageView in our initial layout position in the file motion_one_img_start earlier. The same goes for our end ConstraintSet attributes.
Finally instead of constraintSetStart and constraintSetEnd referencing the initial and final layouts we now reference the ids of the ConstraintSet for the initial and final constraint declared in our MotionScene file.
One major reason to use a single file to manage our constraints is future-proofing. The upcoming MotionEditor in Android Studio will likely only support self-contained MotionScene files.
Custom attributes
Earlier, we mentioned that with MotionLayout we can perform transitions on attributes that are not related to the position only - these are called custom attributes.
One example of such an attribute is the background color:
In the image above, you can see how the background color gradually changes during the animation and not just an abrupt change. Let’s see an example of how we can achieve this.
First create a new XML file in the res/layouts directory named motion_layout_02.xml and paste this:
1<!-- File: app/res/layout/motion_layout_02.xml --> 2 <android.support.constraint.motion.MotionLayout 3 xmlns:android="http://schemas.android.com/apk/res/android" 4 xmlns:app="http://schemas.android.com/apk/res-auto" 5 xmlns:tools="http://schemas.android.com/tools" 6 android:layout_width="match_parent" 7 android:layout_height="match_parent" 8 app:layoutDescription="@xml/motion_scene_02" 9 app:showPaths="true"> 10 11 <View 12 android:id="@+id/view" 13 android:layout_width="64dp" 14 android:layout_height="64dp" 15 android:layout_marginTop="8dp" 16 app:layout_constraintEnd_toEndOf="parent" 17 app:layout_constraintStart_toStartOf="parent" 18 app:layout_constraintTop_toTopOf="parent" /> 19 20 </android.support.constraint.motion.MotionLayout>
A key thing to notice is that the view element we are going to apply the background color on has no backgroundColor attribute. We will instead declare this in our MotionScene file.
For the contents of our MotionScene, create a new file named motion_scene_02 in the res/xml directory and paste this:
1<!-- File: app/res/xml/motion_scene_02.xml --> 2 <MotionScene xmlns:android="http://schemas.android.com/apk/res/android" 3 xmlns:motion="http://schemas.android.com/apk/res-auto"> 4 5 <Transition 6 motion:constraintSetEnd="@+id/end" 7 motion:constraintSetStart="@+id/start" 8 motion:duration="1000" 9 motion:interpolator="linear"> 10 <OnClick 11 motion:target="@+id/view" 12 motion:mode="toggle" /> 13 </Transition> 14 15 <ConstraintSet android:id="@+id/start"> 16 <Constraint 17 android:id="@+id/view" 18 android:layout_width="64dp" 19 android:layout_height="64dp" 20 android:layout_marginTop="8dp" 21 motion:layout_constraintEnd_toEndOf="parent" 22 motion:layout_constraintStart_toStartOf="parent" 23 motion:layout_constraintTop_toTopOf="parent"> 24 <CustomAttribute 25 motion:attributeName="backgroundColor" 26 motion:customColorValue="#000000" /> 27 </Constraint> 28 </ConstraintSet> 29 30 <ConstraintSet android:id="@+id/end"> 31 <Constraint 32 android:id="@+id/view" 33 android:layout_width="180dp" 34 android:layout_height="180dp" 35 motion:layout_constraintBottom_toBottomOf="parent" 36 motion:layout_constraintEnd_toEndOf="parent" 37 motion:layout_constraintStart_toStartOf="parent" 38 motion:layout_constraintTop_toTopOf="parent" 39 motion:layout_constraintVertical_bias="0.90" > 40 <CustomAttribute 41 motion:attributeName="backgroundColor" 42 motion:customColorValue="#0e0e96" /> 43 </Constraint> 44 </ConstraintSet> 45 46 </MotionScene>
When defining a custom attribute, you need to define it both at the start and end ConstraintSet. A custom attribute is specified with an attributeName - this is case sensitive and must match the getter/setter methods of an object such that:
- getter - getAttributeName (e.g getBackgroundColor)
- setter - setAttributeName (e.g setBackgroundColor)
The value type of the setter also needs to be specified. The following value types are supported:
1customColorValue 2 customIntegerValue 3 customFloatValue 4 customStringValue 5 customDimension 6 customBoolean
We can now update the MainActivity to use the motion_layout_02 and run our app to see the animation replicated.
KeyFrames
So far we have only made transitions between two states - the start and end state. Sometimes we want the start state to pass through intermediary states before arriving at the end state as seen below:
This is the same animation we implemented in our first example. The difference here is that before arriving at the final state, the image moves to the left and rotates at an angle before reaching the final state.
To achieve this sort of animation, MotionLayout offers us keyframes. Keyframes allow us to specify a point on the timeline of the animation where we can make additional changes to the animation.
In the example above, we specified that at 50% of the animation timeline, the image should move to the left of the screen and rotate before arriving at the final state. To do this we will need to add the KeyFrameSet element to our MotionScene. Let’s consider how we would do this.
Open the motion_scene_01 file and add the KeyFrameSet between the Transition tag as seen below:
1<!-- File: app/res/xml/motion_scene_01.xml --> 2 [...] 3 4 <Transition 5 motion:constraintSetStart="@layout/motion_one_img_start" 6 motion:constraintSetEnd="@layout/motion_one_img_end" 7 motion:duration="1000"> 8 9 [...] 10 11 <KeyFrameSet> 12 <KeyPosition 13 motion:type="parentRelative" 14 motion:percentX="0.25" 15 motion:framePosition="50" 16 motion:target="@+id/imageView"/> 17 <KeyAttribute 18 android:rotation="-45" 19 motion:framePosition="50" 20 motion:target="@id/imageView" /> 21 </KeyFrameSet> 22 23 </Transition> 24 25 [...]
To make a position change during the transition, we need to add a KeyPosition element under the KeyFrameSet. Above we specify the type and the direction, which is percentX for the x-axis, percentY for the y-axis.
To make an attribute change during the transition, we add a KeyAttribute element to the KeyFrameSet. We can add any attribute of the view, widget or layout that we want to change here. For this example, we only want to change the rotation of the ImageView.
Finally, the framePosition attribute is used to specify at what time during the animation the changes should be applied. Notice we did not need to change anything in our MotionLayout. We only specified the changes to be made in our MotionScene file.
Here is what that file now contains:
1<!-- File: app/res/xml/motion_scene_01.xml --> 2 <MotionScene xmlns:motion="http://schemas.android.com/apk/res-auto" 3 xmlns:android="http://schemas.android.com/apk/res/android"> 4 <Transition 5 motion:constraintSetStart="@+id/start" 6 motion:constraintSetEnd="@+id/end" 7 motion:duration="1000"> 8 <OnClick 9 motion:target="@+id/imageView" 10 motion:mode="toggle" /> 11 12 <KeyFrameSet> 13 <KeyPosition 14 motion:type="parentRelative" 15 motion:percentX="0.25" 16 motion:framePosition="50" 17 motion:target="@+id/imageView"/> 18 <KeyAttribute 19 android:rotation="-45" 20 motion:framePosition="50" 21 motion:target="@id/imageView" /> 22 </KeyFrameSet> 23 </Transition> 24 25 </MotionScene>
Limitations of MotionLayout
With great power comes great responsibility. However, so far MotionLayout will only provide its capabilities for its direct children . TransitionManager mentioned earlier can work with nested layout hierarchies as well as Activity transitions.
Conclusion
In this article, we learned how to make a simple animation using MotionLayout. We also learned how the motion scene file helps MotionLayout drive animations. Making animations in Android has never been easier. Can’t wait to see what crazy animations you do with MotionLayout.
In the final part of this series, we will concatenate all the knowledge we learned in all previous parts and build an application using ConstraintLayout.
You can find the repository for this project here.


© 2026 Pusher Ltd. All rights reserved.
Pusher Limited is a company registered in England and Wales (No. 07489873) whose registered office is at MessageBird UK Limited, 3 More London Riverside, 4th Floor, London, United Kingdom, SE1 2AQ.