- Products

- Developers
- User stories
- Blog
- Pricing

Build a comments app with Ruby on Rails
- Introduction
- What we’ll build
- Requirements
- Building the application
- Creating controller and routes
- Specifying our routes
- Adding controller logic
- Creating a database
- Creating the Comment model and running migrations
- Storing new comments
- Adding realtime functionality using Pusher
- Install Pusher via Ruby Gems
- Trigger events from controller
- Displaying comments on the client side
- Conclusion
Introduction
You see the way the web world is set up now yeah? No one wants to have to reload their pages anymore to get updates as to what is going one with their applications. You probably would have experienced realtime features like this (seeing realtime the number of likes and re-tweets on a particular tweet on twitter)! Imagine not having to swipe down again to see a new tweet! Having such interesting features are some of the advantages of having realtime functionality on your applications.
What we’ll build
In this article, we will build a realtime commenting Ruby on Rails application using Pusher. This application has a simple interface. The user loads a page and can see existing comments on the page. The user can also add comments and see as comments are being made in realtime. Because this article is primarily to show how to add realtime functionality to your application, less emphasis will be placed on Rails syntax and more on making your application realtime
Requirements
For you to successfully follow through this article, you need to have the following set up:
- Ruby installed on your machine
- Rails installed on your machine
To confirm your installation, run the following :
1ruby -v 2 rails --version
If you get version numbers as result then it means you’re good to go!
Building the application
To get started, generate a new project using rails by running the command :
rails new pusher-realtime-ruby
This gives us a starter project with this structure to work with. The starter project has the following structure.
Creating controller and routes
For this application, we have two basic routes :
/- displays the homepage with an image and existing comments/comment/store- this route handles the logic for when a new comment is made on the page
Create a new controller by running :
rails generate controller Comment store
This creates a Comment controller with an action called store .
Specifying our routes
Now, we need to define the routes we mentioned earlier so the rails server can know to handle requests made by users. To do this, edit the config/routes.rb file:
1// config/routes.rb 2 3 Rails.application.routes.draw do 4 post 'comment/store' 5 root 'welcome#index' 6 end
The comment/store route accepts a post request from the user and the root of the application is set to the welcome#index view.
We will look at the
welcome#indexview in depth later on in the article
Adding controller logic
Now that the comment/store route has been defined, the next thing to do is to edit the controller logic to do update the comments. The controller looks like this:
1# app/controllers/comment_controller.rb 2 class CommentController < ApplicationController 3 def store 4 render plain: params[:comment].inspect 5 end 6 end
At the moment, this just renders the new comment on a new page. The intended feature is to store the comments in the database and update the comments in realtime.
Creating a database
To store comments in a database, a database driver is needed. With Ruby on Rails, SQLite is used as the default database driver, and for simplicity, we are going to continue with that.
To create your database, run the command:
rake db:create
This creates the databases for the application in the db/ directory.
Creating the Comment model and running migrations
To populate the database, there need to be tables. Rails is an MVC based Framework and developers can create models to represent entities and structures in their database. To do this, run the command below:
rails generate model Comment comment:text
This creates a Comment model with a single property comment. Running this command will also automatically generate a migration file for the model at db/migrate/{timestamp}_create_comments.rb. Let’s take a look at the migration file:
1class CreateComments < ActiveRecord::Migration[5.1] 2 def change 3 create_table :comments do |t| 4 t.text :comment 5 t.timestamps 6 end 7 end 8 end
We can see from above that the comment field is also created. Now that we are satisfied with the migration, you can use a command to run it:
rails db:migrate
Once the run is complete, you get a result that looks like this:
1rails db:migrate 2 == 20180408165733 CreateComments: migrating =================================== 3 -- create_table(:comments) 4 -> 0.0022s 5 == 20180408165733 CreateComments: migrated (0.0023s) ==========================
This means the comments table has successfully been created in the database.
Storing new comments
Now, let’s go back to the comment controller. To save the comments in the database, change the store action to look like this:
1class CommentController < ApplicationController 2 def store 3 @comment = Comment.new(comment_params) 4 @comment.save 5 redirect_to '/' 6 end 7 8 private 9 def comment_params 10 params.require(:comment).permit(:comment) 11 end 12 end
This creates a new comment, saves it in the database and then reloads the home page to the user showing the existing comments
Creating the HomePage view
Now, let’s take a quick look at the welcome#index view. To display the view, there is a welcome controller created, with an action called index.
rails generate controller Welcome index
Edit the created controller to look like this:
1# app/controllers/welcome_controller.rb 2 class WelcomeController < ApplicationController 3 def index 4 @comments = Comment.all 5 end 6 end
This fetches all the comments from the database and then passes it to the view being generated.
The index view should be edited to look like this:
1# app/views/welcome/index.html.rb 2 3 <h1 style="text-align:center">Real-time Comments!</h1> 4 <div class="wrapper"> 5 <img src="https://image4.owler.com/logo/pusher_owler_20160228_200254_large.png" height="150"alt="Pusher" /> 6 <div class="top"> 7 <%= form_with scope: :comment, url: '/comment/store', local: true do |form| %> 8 <div class="form-group"> 9 <%= form.label :comment %> 10 <%= form.text_field :comment %> 11 <%= form.submit %> 12 </div> 13 14 <% end %> 15 </div> 16 <div class="bottom" id="comment_section"> 17 <h2>Comments</h2> 18 <% @comments.each do |comment| %> 19 <p><%= comment.comment %></p> 20 <% end %> 21 </div> 22 </div>
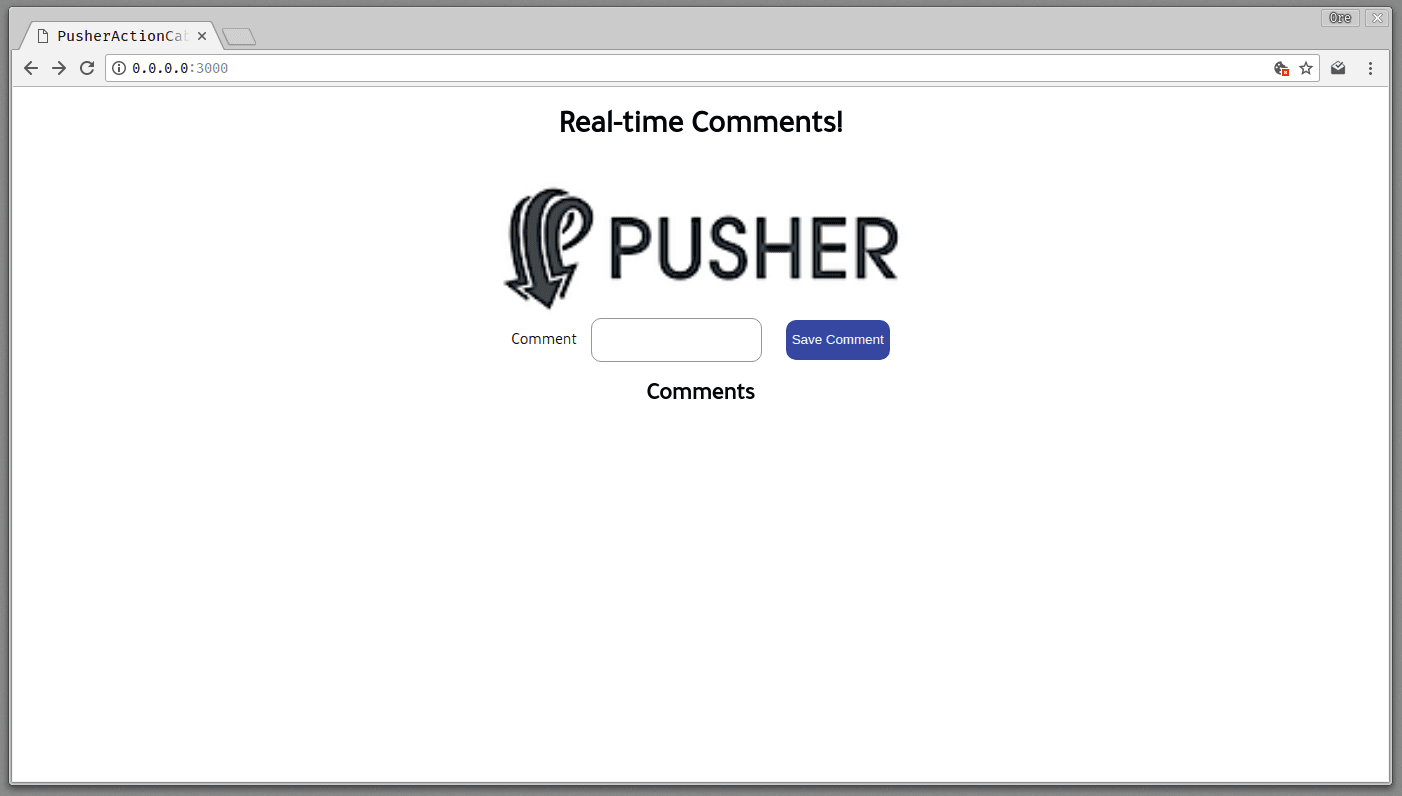
The view displays an image and a form where users can comment on the image. When the submit button is clicked, the /comment/store route handles the request. In the same view, we also have a listing of all the existing comments that are saved in the database.
To add some minimal styling to the page, edit the app/assets/stylesheets/welcome.scss file to look like this:
1// app/assets/stylesheets/welcome.scss 2 .wrapper{ 3 display: flex; 4 justify-content: space-around; 5 flex-direction: column; 6 align-items: center; 7 } 8 9 .top{ 10 display: flex; 11 justify-content: space-around; 12 } 13 14 .bottom{ 15 display: flex; 16 justify-content: center; 17 flex-direction: column; 18 } 19 20 input[type=submit]{ 21 background-color: rgb(27, 96, 160); 22 border : 0px; 23 border-radius: 10px; 24 color: white; 25 height: 40px; 26 margin-left: 20px; 27 } 28 29 input[type=text]{ 30 height: 40px; 31 border-radius: 10px; 32 border: 1px solid rgb(155, 147, 147); 33 } 34 35 label{ 36 height: 40px; 37 margin-right: 10px; 38 } 39 h2{ 40 margin-bottom : 0px; 41 }
To see the application at work, start the rails server using the command:
rails server --binding=127.0.0.1
This starts up a rails server with the port shown to you - in this case 127.0.0.1:3000 as specified with the --binding flag. When you visit the application, this is what you see:
What we want are the comments to be updated in realtime for all users as changes are being made. Let’s take a look at how to do this.
Adding realtime functionality using Pusher
Let’s see how to add realtime functionality using Pusher. Pusher allows to seamlessly add realtime features to your applications without worrying about infrastructure.
To get started, create a developer account. Once that is done, create your application and obtain your application keys.
To use Pusher with your rails application, you need to do a couple of things.
Install Pusher via Ruby Gems
Add pusher to your Gemfile
1# Gemfile 2 [...] 3 4 gem 'pusher' 5 6 [...]
And then install the new gem:
bundle install
To confirm your installation run:
bundle info pusher
You should get a result like this:
1$ bundle info pusher 2 * pusher (1.3.1) 3 Summary: Pusher API client 4 Homepage: http://github.com/pusher/pusher-http-ruby 5 Path: /home/captog/.rvm/gems/ruby-2.4.1/gems/pusher-1.3.1
Import the Pusher package
Create the config/initializers/pusher.rb file and edit it to look like this:
1# config/initializers/pusher.rb 2 require 'pusher' 3 4 Pusher.app_id = 'PUSHER_APP_ID' 5 Pusher.key = 'PUSHER_APP_KEY' 6 Pusher.secret = 'PUSHER_APP_SECRET' 7 Pusher.cluster = 'PUSHER_APP_CLUSTER' 8 Pusher.logger = Rails.logger 9 Pusher.encrypted = true
The PUSHER_APP_ID, PUSHER_APP_KEY, PUSHER_APP_SECRET and PUSHER_APP_CLUSTER can all be obtained from the dashboard of your application.
Trigger events from controller
Earlier on in the article, the Comment controller saved comments to the database and then rendered the homepage. Now, let’s tweak it a bit to trigger a new event. The comment controller will look like this:
1# app/controllers/comment_controller.rb 2 class CommentController < ApplicationController 3 def store 4 @comment = Comment.new(comment_params) 5 @comment.save 6 # broadcasting comments using pusher 7 Pusher.trigger('comment-channel','new-comment', { 8 comment: @comment.comment 9 }) 10 redirect_to '/' 11 end 12 13 private 14 def comment_params 15 params.require(:comment).permit(:comment) 16 end 17 end
After the comment is saved, then a new event named new-comment is triggered in the comment-channel. From the Pusher dashboard, you can see when events are being triggered for debugging purpose.

Displaying comments on the client side
So far, we have seen how to trigger events from the server. For the users to get the realtime experience, they need to be able to see the new comments pop up on their pages. To integrate Pusher to the front end of the application, you need to do the following:
First, include the Pusher script in the header of the application in the app/views/layouts/application.html.erb
1# app/views/layouts/application.html.erb 2 [...] 3 <head> 4 [...] 5 6 <script src="https://js.pusher.com/4.1/pusher.min.js"></script> 7 8 [...] 9 </head> 10 [...]
Next thing to do is to create a Pusher Client in the application header:
1# app/views/layouts/application.html.erb 2 [...] 3 <head> 4 [...] 5 // add pusher script 6 <script> 7 var pusher = new Pusher('PUSHER_APP_KEY', { 8 cluster: 'eu', 9 encrypted: true 10 }); 11 </script> 12 13 [...] 14 </head> 15 [...]
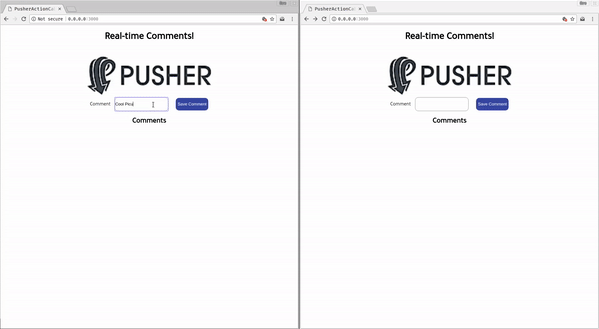
Finally, subscribe to the comment-channel and listen for new-comment events. You can do this in the welcome#index view of the application. Tweak the view to look like this:
1# app/views/welcome/index.html.erb 2 [...] 3 <div class="bottom" id="comment_section"> 4 <h2>Comments</h2> 5 <% @comments.each do |comment| %> 6 <p><%= comment.comment %></p> 7 <% end %> 8 </div> 9 <script> 10 var channel = pusher.subscribe('comment-channel'); 11 channel.bind('new-comment', function(data) { 12 let comment = data.comment; 13 var div = document.getElementById('comment_section'); 14 div.innerHTML += `<p> ${comment} </p>`; 15 }); 16 </script> 17 </div>
In the above, we subscribe to the comment-channel and listen for a new-comment event. Once we get that, the new comment is appended to the comment section of the page.
Now, when you visit the page again, you get this:
Conclusion
In this article, we looked at how to add Realtime functionality to your Rails application without any hassle. Feel free to implement this for any other use cases you deem fit. Here’s a link to the full GitHub repository if you’re interested.


© 2026 Pusher Ltd. All rights reserved.
Pusher Limited is a company registered in England and Wales (No. 07489873) whose registered office is at MessageBird UK Limited, 3 More London Riverside, 4th Floor, London, United Kingdom, SE1 2AQ.