- Products

- Developers
- User stories
- Blog
- Pricing

Build a collaborative painting application with Angular
Introduction
We’ll be creating a realtime paint application. Using our application, users can easily collaborate while working on the application and receive changes in realtime. We’ll be using Pusher’s pub/sub pattern to get realtime updates and Angular for templating.
To follow this tutorial a basic understanding of Angular and Node.js is required. Please ensure that you have Node and npm installed before you begin.
If you have no prior knowledge of Angular, kindly follow the tutorial here. Come back and finish the tutorial when you’re done.
We’ll be using these tools to build our application:
Here’s a demo of the final product:
Initializing the application and installing dependencies
To get started, we will use the CLI (command line interface) provided by the Angular team to initialize our project.
First, install the CLI by running npm install -g @angular/cli. NPM is a package manager used for installing packages. It will be available on your PC if you have Node installed.
To create a new Angular project using the CLI, open a terminal and run:
ng new angular-realtime-paintapp
This command is used to initialize a new Angular project.
Next, run the following command in the root folder of the project to install dependencies.
1// install depencies required to build the server 2 npm install express body-parser dotenv pusher 3 4 // front-end dependencies 5 npm install pusher-js uuid @types/uuid
Start the Angular development server by running ng serve in a terminal in the root folder of your project.
Building our server
We’ll build our server using Express. Express is a fast, unopinionated, minimalist web framework for Node.js.
Create a file called server.js in the root of the project and update it with the code snippet below
1// server.js 2 3 require('dotenv').config(); 4 const express = require('express'); 5 const bodyParser = require('body-parser'); 6 const Pusher = require('pusher'); 7 8 const app = express(); 9 const port = process.env.PORT || 4000; 10 const pusher = new Pusher({ 11 appId: process.env.PUSHER_APP_ID, 12 key: process.env.PUSHER_KEY, 13 secret: process.env.PUSHER_SECRET, 14 cluster: 'eu', 15 }); 16 17 app.use(bodyParser.json()); 18 app.use(bodyParser.urlencoded({extended: false})); 19 app.use((req, res, next) => { 20 res.header('Access-Control-Allow-Origin', '*'); 21 res.header( 22 'Access-Control-Allow-Headers', 23 'Origin, X-Requested-With, Content-Type, Accept' 24 ); 25 next(); 26 }); 27 28 app.listen(port, () => { 29 console.log(`Server started on port ${port}`); 30 });
The calls to our endpoint will be coming in from a different origin. Therefore, we need to make sure we include the CORS headers (Access-Control-Allow-Origin). If you are unfamiliar with the concept of CORS headers, you can find more information here.
To get started with Pusher Channels, sign up for a free Pusher account. Then go to the dashboard and create a new Channels app. Get your appId, key and secret.
Create a file in the root folder of the project and name it .env. Copy the following snippet into the .env file and ensure to replace the placeholder values with your Pusher credentials.
1// .env 2 3 // Replace the placeholder values with your actual pusher credentials 4 PUSHER_APP_ID=PUSHER_APP_ID 5 PUSHER_KEY=PUSHER_KEY 6 PUSHER_SECRET=PUSHER_SECRET
We’ll make use of the dotenv library to load the variables contained in the .env file into the Node environment. The dotenv library should be initialized as early as possible in the application.
Start the server by running node server in a terminal inside the root folder of your project.
Draw route
Let’s create a post route named draw, the frontend of the application will send make a request to this route containing the mouse events needed to show the updates of a guest user.
1// server.js 2 require('dotenv').config(); 3 ... 4 5 app.use((req, res, next) => { 6 res.header('Access-Control-Allow-Origin', '*'); 7 ... 8 }); 9 10 11 app.post('/draw', (req, res) => { 12 pusher.trigger('painting', 'draw', req.body); 13 res.json(req.body); 14 }); 15 16 ...
- The request body will be sent as the data for the triggered Pusher event. The same object will be sent as a response to the user.
- The trigger is achieved using the
triggermethod which takes the trigger identifier(painting), an event name (draw), and a payload.
Canvas view
We’ll be attaching a directive to the canvas element. Using the directive, we’ll listen for events on the host element and also bind attributes to it.
Run ng generate directive canvas to create the canvas directive.
Open the canvas.directive.ts file and update it with the content below.
1// canvas.directive.ts 2 import { 3 Directive, 4 ElementRef, 5 HostListener, 6 HostBinding, 7 AfterViewInit, 8 } from '@angular/core'; 9 import { v4 } from 'uuid'; 10 import { HttpClient } from '@angular/common/http'; 11 12 declare interface Position { 13 offsetX: number; 14 offsetY: number; 15 } 16 @Directive({ 17 selector: '[myCanvas]', 18 }) 19 export class CanvasDirective implements AfterViewInit { 20 constructor( 21 private el: ElementRef, 22 private http: HttpClient 23 ) { 24 // We use the ElementRef to get direct access to the canvas element. Here we set up the properties of the element. 25 this.canvas = this.el.nativeElement; 26 this.canvas.width = 1000; 27 this.canvas.height = 800; 28 // We create a canvas context. 29 this.ctx = this.canvas.getContext('2d'); 30 this.ctx.lineJoin = 'round'; 31 this.ctx.lineCap = 'round'; 32 this.ctx.lineWidth = 5; 33 } 34 canvas: HTMLCanvasElement; 35 ctx: CanvasRenderingContext2D; 36 // Stroke styles for user and guest 37 userStrokeStyle = '#FAD8D6'; 38 guestStrokeStyle = '#CD5334'; 39 position: { 40 start: {}; 41 stop: {}; 42 }; 43 // This will hold a list of positions recorded throughout the duration of a paint event 44 line = []; 45 // Since there's no auth setup, we'll need to able to tell users and guests apart.v4 creates a unique id for each user 46 userId = v4(); 47 // This object will hold the start point of any paint event. 48 prevPos: Position = { 49 offsetX: 0, 50 offsetY: 0, 51 }; 52 // This will be set to true when a user starts painting 53 isPainting = false; 54 55 @HostListener('mousedown', ['$event']) 56 onMouseDown({ offsetX, offsetY }) { 57 this.isPainting = true; 58 // Get the offsetX and offsetY properties of the event. 59 this.prevPos = { 60 offsetX, 61 offsetY, 62 }; 63 } 64 @HostListener('mousemove', ['$event']) 65 onMouseMove({ offsetX, offsetY }) { 66 if (this.isPainting) { 67 const offSetData = { offsetX, offsetY }; 68 // Set the start and stop position of the paint event. 69 this.position = { 70 start: { ...this.prevPos }, 71 stop: { ...offSetData }, 72 }; 73 // Add the position to the line array 74 this.line = this.line.concat(this.position); 75 this.draw(this.prevPos, offSetData, this.userStrokeStyle); 76 } 77 } 78 @HostListener('mouseup') 79 onMouseUp() { 80 if (this.isPainting) { 81 this.isPainting = false; 82 // Send a request to the server at the end of a paint event 83 this.makeRequest(); 84 } 85 } 86 @HostListener('mouseleave') 87 onmouseleave() { 88 if (this.isPainting) { 89 this.isPainting = false; 90 this.makeRequest(); 91 } 92 } 93 @HostBinding('style.background') background = 'black'; 94 95 makeRequest() { 96 // Make a request to the server containing the user's Id and the line array. 97 this.http 98 .post('http://localhost:4000/draw', { 99 line: this.line, 100 userId: this.userId, 101 }) 102 .subscribe((res) => { 103 this.line = []; 104 }); 105 } 106 // The draw method takes three parameters; the prevPosition, currentPosition and the strokeStyle 107 draw( 108 { offsetX: x, offsetY: y }: Position, 109 { offsetX, offsetY }: Position, 110 strokeStyle 111 ){ 112 // begin drawing 113 this.ctx.beginPath(); 114 this.ctx.strokeStyle = strokeStyle; 115 // Move the the prevPosition of the mouse 116 this.ctx.moveTo(x, y); 117 // Draw a line to the current position of the mouse 118 this.ctx.lineTo(offsetX, offsetY); 119 // Visualize the line using the strokeStyle 120 this.ctx.stroke(); 121 this.prevPos = { 122 offsetX, 123 offsetY, 124 }; 125 } 126 ngAfterViewInit() {} 127 }
Note: a paint event in this context is the duration from when the mousedown event is triggered to when the mouse is up or when the mouse leaves the canvas area. Also remember to rename the directive selector property from
appCanvastomyCanvas
There’s quite a bit going on in the file above. Let’s walk through it and explain each step.
We are making use of HostListener decorators to listen for mouse events on the host elements. Methods are defined for each event.
-
In the
onMouseDownmethod, we set theisPaintingproperty to true and then we get theoffsetXandoffsetYproperties of the event and store it in theprevPosobject. -
The
onMouseMovemethod is where the painting takes place. Here we check ifisPaintingis set to true, then we create anoffsetDataobject to hold the currentoffsetXandoffsetYproperties of the event. We update thepositionobject with the previous and current positions of the mouse. We then append thepositionto thelinearray and then we call thedrawmethod with the current and previous positions of the mouse as parameters. -
The
onMouseUpandonMouseLeavemethods both check if the user is currently painting. If true, theisPaintingproperty is set to false to prevent the user from painting until the nextmousedownevent is triggered. ThemakeRequestmethod is the called to send the paint event to the server. -
makeRequest: this method sends a post request to the server containing theuserIdand thelinearray as the request body. The line array is then reset to an empty array after the request is complete. -
In the
drawmethod, three parameters are required to complete a paint event. The previous position of the mouse, current position and the strokeStyle. We used object destructuring to get the properties of each parameter. Thectx.moveTofunction takes the x and y properties of the previous position. A line is drawn from the previous position to the current mouse position using thectx.lineTofunction.ctx.strokevisualizes the line.
We made reference to the HttpClient service. To make use of this in the application, we’ll need to import the HttpClientModule into the app.module.ts file.
1// app.module.ts 2 ... 3 import { CanvasDirective } from './canvas.directive'; 4 import { HttpClientModule } from '@angular/common/http'; 5 6 @NgModule({ 7 ... 8 imports: [BrowserModule, HttpClientModule], 9 ... 10 }) 11 12 ...
Now that the directive has been set up, let’s add a canvas element to the app.component.html file and attach the myCanvas directive to it. Open the app.component.html file and replace the content with the following:
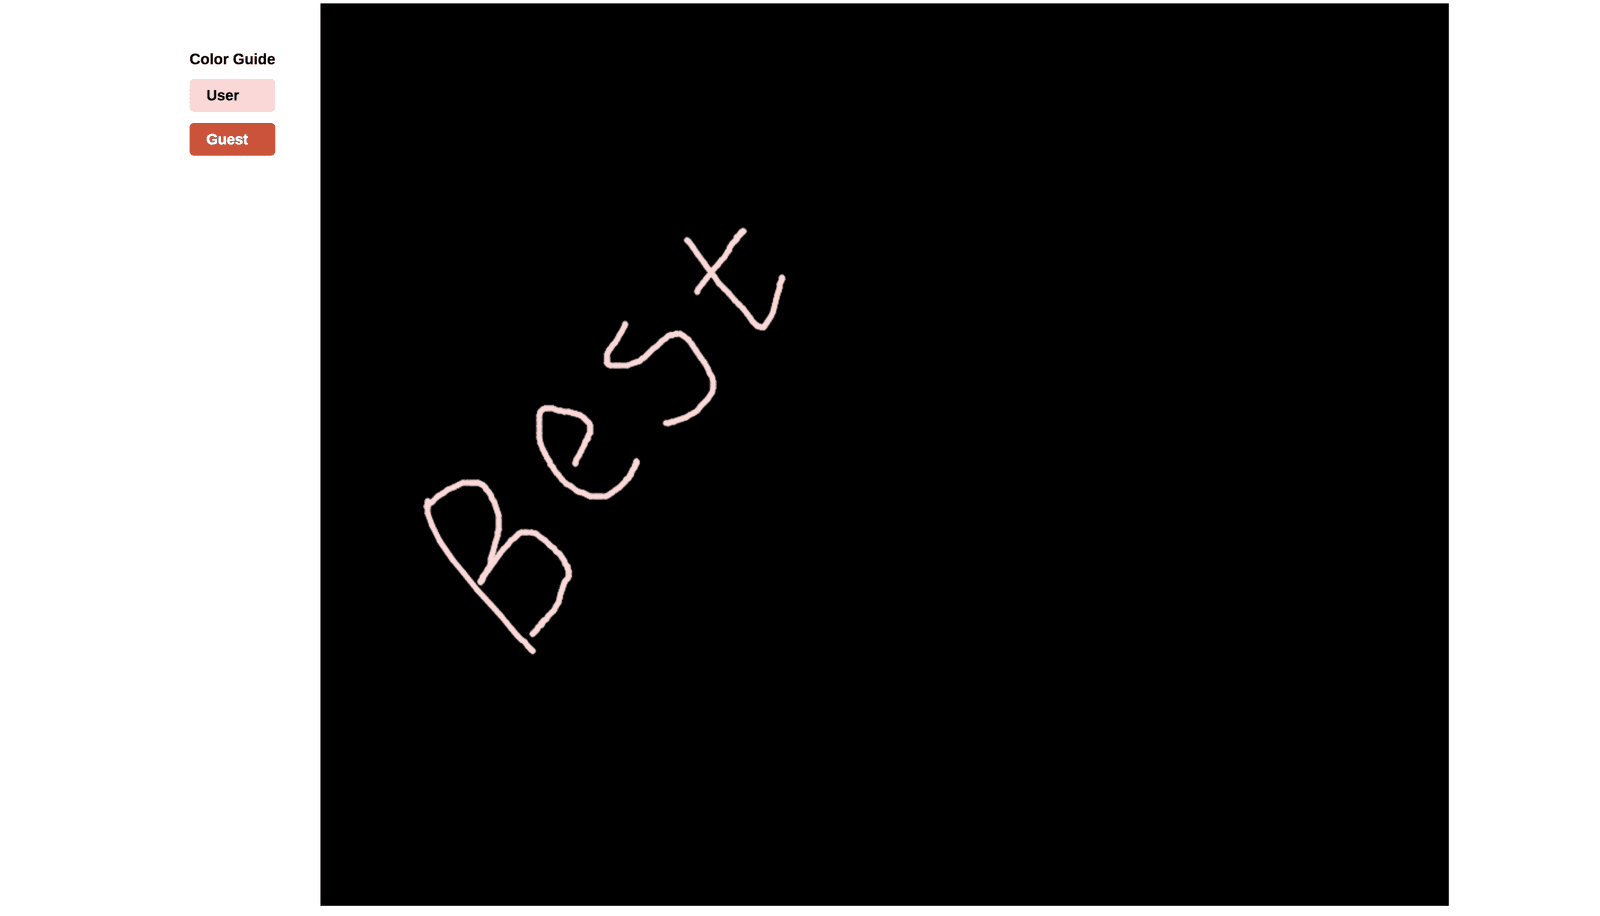
1<!-- app.component.html --> 2 <div class="main"> 3 <div class="color-guide"> 4 <h5>Color Guide</h5> 5 <div class="user user">User</div> 6 <div class="user guest">Guest</div> 7 </div> 8 <canvas myCanvas></canvas> 9 </div>
Add the following styles to the app.component.css file:
1// app.component.css 2 .main { 3 display: flex; 4 justify-content: center; 5 font-family: 'Arimo', sans-serif; 6 } 7 .color-guide { 8 margin: 20px 40px; 9 } 10 h5{ 11 margin-bottom: 10px; 12 } 13 .user { 14 padding: 7px 15px; 15 border-radius: 4px; 16 color: black; 17 font-size: 13px; 18 font-weight: bold; 19 background: #fad8d6; 20 margin: 10px 0; 21 } 22 .guest { 23 background: #cd5334; 24 color: white; 25 }
We’re making use of an external font; so let’s include a link to the stylesheet in the index.html file.
1<!-- index.html --> 2 <head> 3 ... 4 <link rel="icon" type="image/x-icon" href="favicon.ico"> 5 <link href="https://fonts.googleapis.com/css?family=Arimo:400,700" rel="stylesheet"> 6 </head>
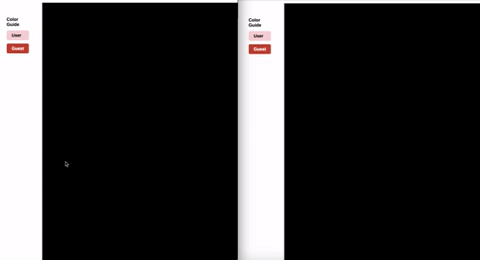
Run ng serve in your terminal and visit http://localhost:4200/ to have a look of the application. It should be similar to the screenshot below:
Introducing Pusher
To make the Pusher library available in our project, add the library as a third party script to be loaded by Angular CLI. All CLI config is stored in .angular-cli.json file. Modify the scripts property to include the link to pusher.min.js.
1// .angular-cli.json 2 ... 3 "scripts": [ 4 "../node_modules/pusher-js/dist/web/pusher.min.js" 5 ] 6 ...
After updating this file, you’ll need to restart the Angular server so the CLI compiles the new script file added.
Create a Pusher service using the Angular CLI by running the following command:
ng generate service pusher
This command simply tells the CLI to generate a service named pusher. Now open the pusher.service.ts file and update it with the code below.
1// pusher.service.ts 2 import { Injectable } from '@angular/core'; 3 declare const Pusher: any; 4 @Injectable() 5 export class PusherService { 6 constructor() { 7 const pusher = new Pusher('PUSHER_KEY', { 8 cluster: 'eu', 9 }); 10 this.channel = pusher.subscribe('painting'); 11 } 12 channel; 13 public init() { 14 return this.channel; 15 } 16 }
- First, we initialize Pusher in the constructor.
- The
initmethod returns the Pusher property we created.
Note: ensure you replace the
PUSHER_KEYstring with your actual Pusher key.
To make the service available application wide, import it into the app.module.ts file.
1// app.module.ts 2 ... 3 import { HttpClientModule } from '@angular/common/http'; 4 import {PusherService} from './pusher.service'; 5 6 @NgModule({ 7 .... 8 providers: [PusherService], 9 .... 10 }) 11 12 ...
Realtime painting
Let’s include the Pusher service in the canvas.directive.ts file to make use of the realtime functionality made available using Pusher. Update the canvas.directive.ts to include the new Pusher service.
1// canvas.directive.ts 2 ... 3 import { HttpClient } from '@angular/common/http'; 4 import { PusherService } from './pusher.service'; 5 6 ... 7 constructor( 8 private el: ElementRef, 9 private http: HttpClient, 10 private pusher: PusherService 11 ) { 12 ... 13 } 14 15 ... 16 17 ngAfterViewInit() { 18 const channel = this.pusher.init(); 19 channel.bind('draw', (data) => { 20 if (data.userId !== this.userId) { 21 data.line.forEach((position) => { 22 this.draw(position.start, position.stop, this.guestStrokeStyle); 23 }); 24 } 25 }); 26 } 27 }
In the AfterViewInit lifecycle, we initialized the Pusher service and listened for the draw event. In the event callback, we check if the there’s a distinct userId. Then we loop through the line property of the data returned from the callback. Wed proceed to draw using the start and stop objects properties of each position contained in the array.
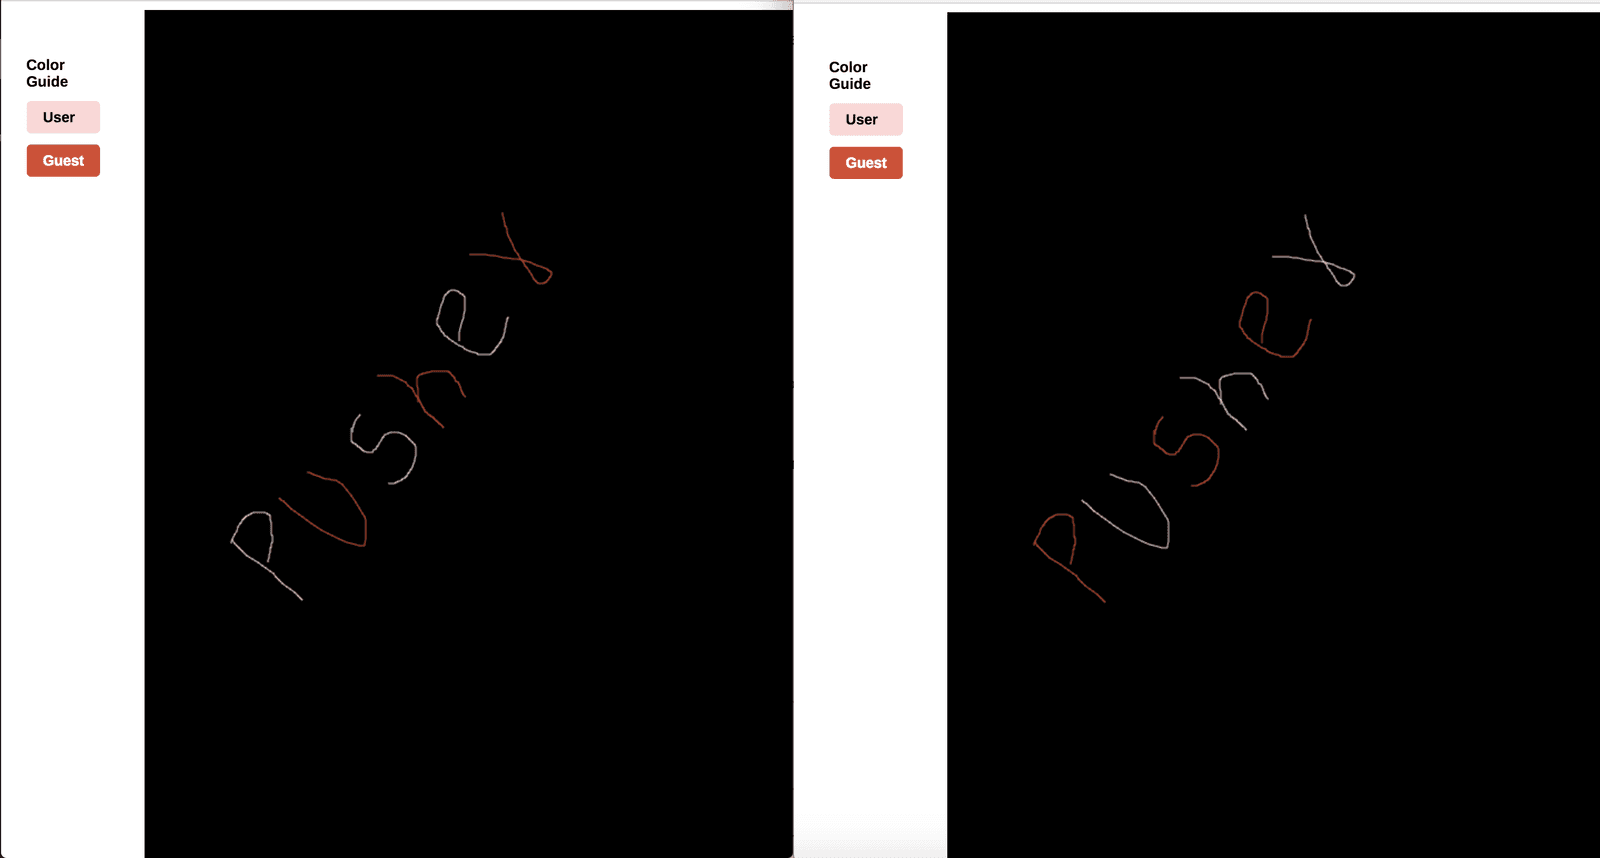
Open two browsers side by side to observe the realtime functionality of the application. A line drawn on one browser should show up on the other. Here’s a screenshot of two browsers side by side using the application:
Note: Ensure both the server and the Angular dev server are up by running
ng serveandnode serveron separate terminal sessions.
Conclusion
We’ve created a collaborative drawing application in Angular, using Pusher to provide realtime functionality. You can check out the repo containing the demo on GitHub.


© 2026 Pusher Ltd. All rights reserved.
Pusher Limited is a company registered in England and Wales (No. 07489873) whose registered office is at MessageBird UK Limited, 3 More London Riverside, 4th Floor, London, United Kingdom, SE1 2AQ.