- Products

- Developers
- User stories
- Blog
- Pricing

Building a chat app with Kotlin for Android
Introduction
Mobile messaging apps are popular, but they don’t have to be difficult to implement.
In this tutorial, you’ll learn how to build a basic but good-looking chat app for Android using Kotlin and Pusher.
In the first screen, the user enters a username. Then, when the user enters a message, the application sends it to an endpoint of server-side API, which publishes the information of the message to a Pusher channel so all the connected clients can receive it.
You’ll use Spring Boot and Kotlin to build the endpoint of the API.
For reference, here is a GitHub repository with all the code shown in this tutorial and instructions to run it.
Prerequisites
Here’s what you need to have installed/configured to follow this tutorial:
- Java JDK (8 or superior)
- Gradle (4.7 or superior)
- The latest version of Android Studio (at the time of this writing 3.1.2)
- Two Android emulators or two devices to test the app (because there’s no fun in chatting alone)
- Optionally, a Java IDE with Kotlin support like IntelliJ IDEA Community Edition
I also assume that you are familiar with:
- Android development (an upper-beginner level at least)
- Kotlin
- Android Studio
Now let’s start by creating a Pusher application.
Creating a Pusher application
If you haven’t already, create a free account at Pusher.
Then, go to your dashboard and create a Channels app, choosing a name, the cluster closest to your location, and optionally, Android as the frontend tech and Java as the backend tech:
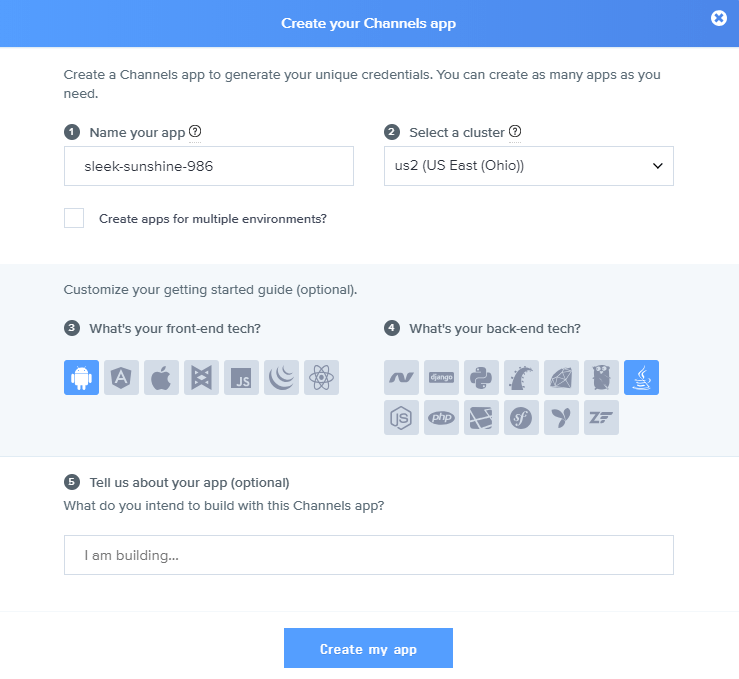
This won’t lock you in an Android/Java stack, it will only give you some sample code to get started:
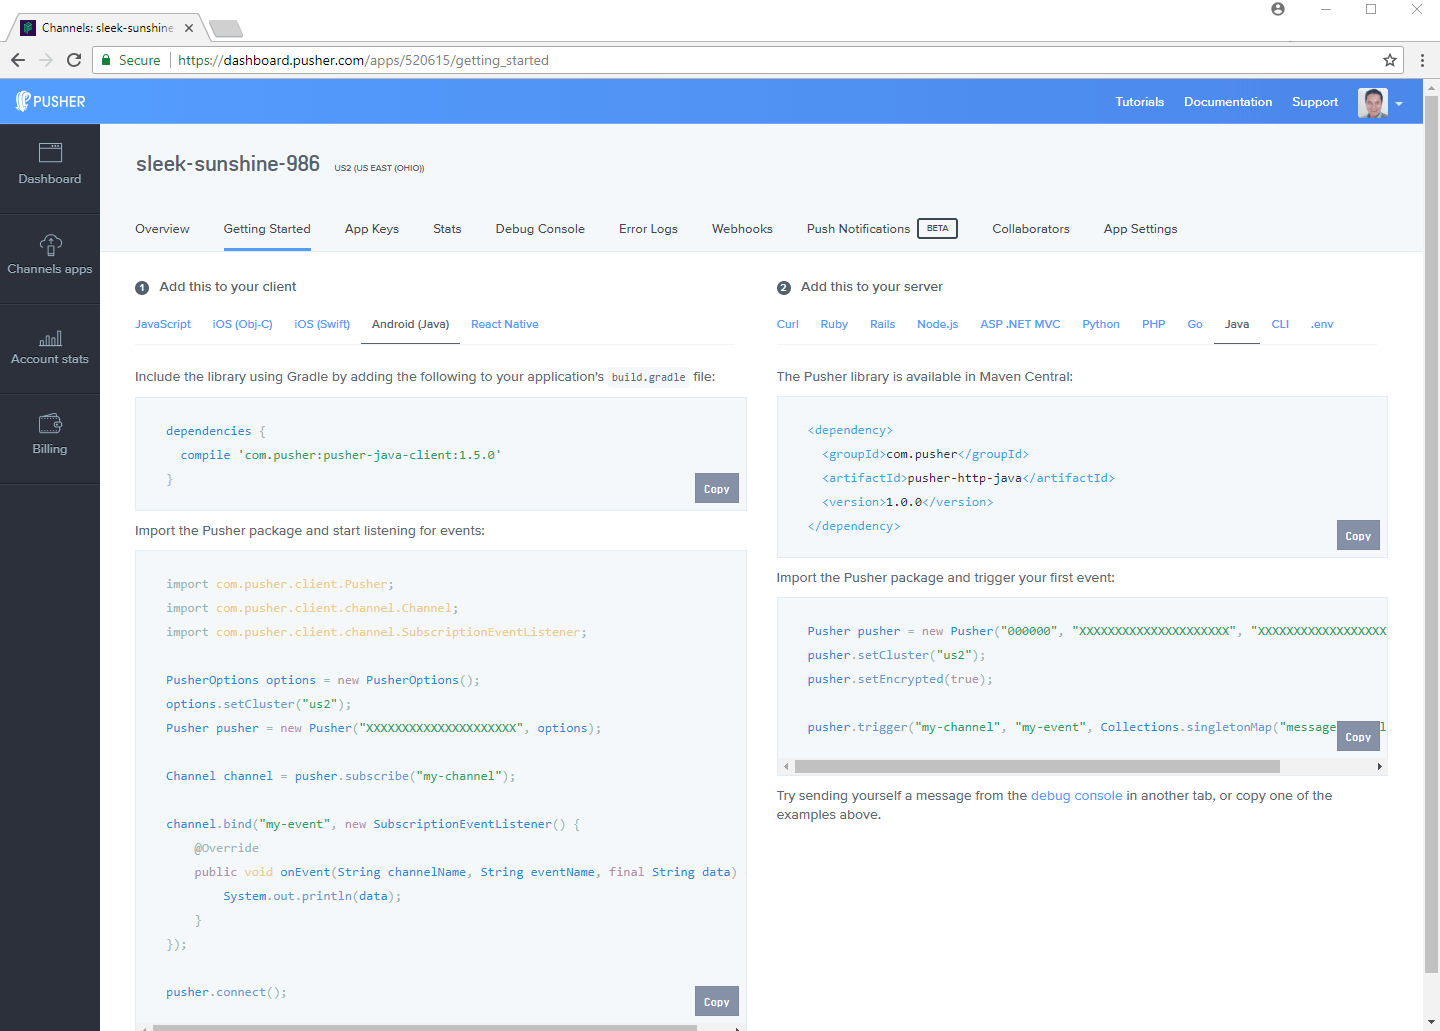
Save your app id, key, secret and cluster values, you’ll need them later. You can also find them in the App Keys tab.
Building the server-side API
Go to https://start.spring.io/ and choose to create a project with the following options:
- A Gradle project
- With Kotlin
- Spring Boot 2.0.1 (or above version)
- The project metadata of your preference
- And the
Webdependency
This is how the screen should look like:
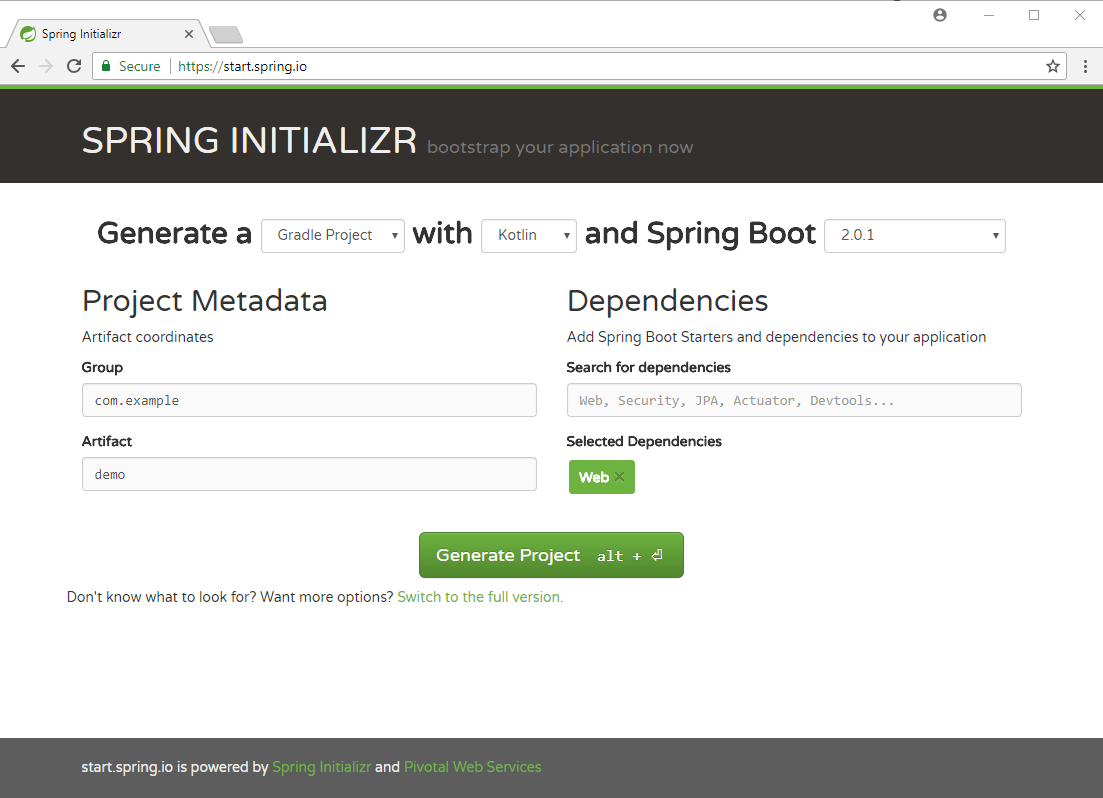
Generate the project and unzip the downloaded file.
You can open the project in an IDE but it’s not really necessary. You’re only going to make three changes to the project.
Firs, add the Pusher dependency at the end of the file build.gradle:
1dependencies { 2 ... 3 compile("com.pusher:pusher-http-java:1.0.0") 4 }
Next, in src/main/kotling/com/example/demo, create the classes Message.kt and MessageController.kt.
Message.kt is a data class for the chat messages:
1data class Message(var user:String, 2 var message:String, 3 var time:Long) 4 5`MessageController.kt` is a REST controller that defines a POST endpoint to publish the received message object to a Pusher channel (`chat`): 6 7 import com.pusher.rest.Pusher 8 import org.springframework.http.ResponseEntity 9 import org.springframework.web.bind.annotation.* 10 11 @RestController 12 @RequestMapping("/message") 13 class MessageController { 14 private val pusher = Pusher("PUSHER_APP_ID", "PUSHER_APP_KEY", "PUSHER_APP_SECRET") 15 16 init { 17 pusher.setCluster("PUSHER_APP_CLUSTER") 18 } 19 20 @PostMapping 21 fun postMessage(@RequestBody message: Message) : ResponseEntity<Unit> { 22 pusher.trigger("chat", "new_message", message) 23 return ResponseEntity.ok().build() 24 } 25 }
As you can see, the Pusher object is configured when the class is initialized, just replace your app information from your dashboard.
And that’s it.
Now let’s build the Android app.
Setting up the Android project
Open Android Studio and create a new project with Kotlin support:
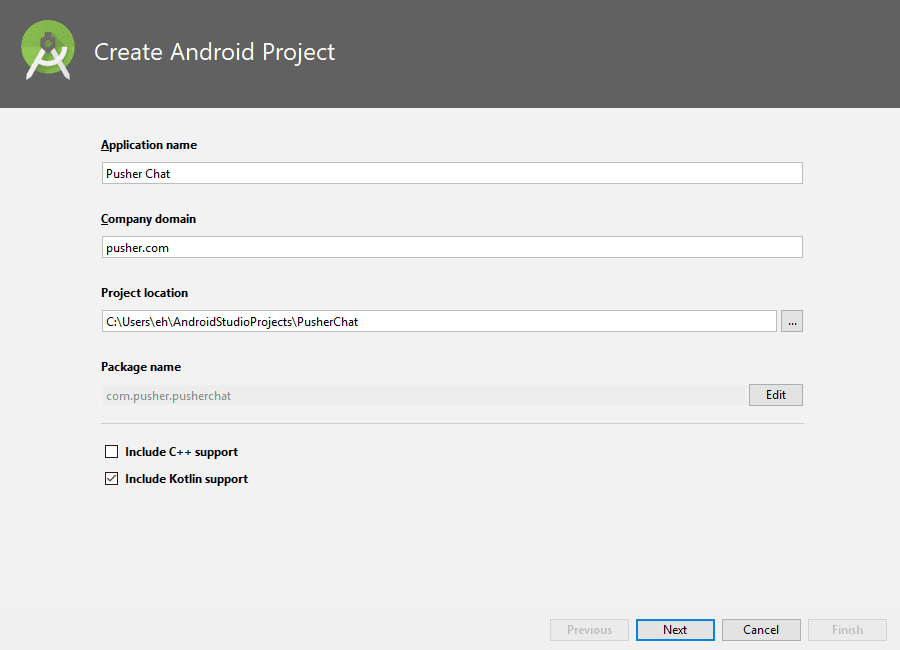
We're not going to use anything special, so we can safely support a low API level:
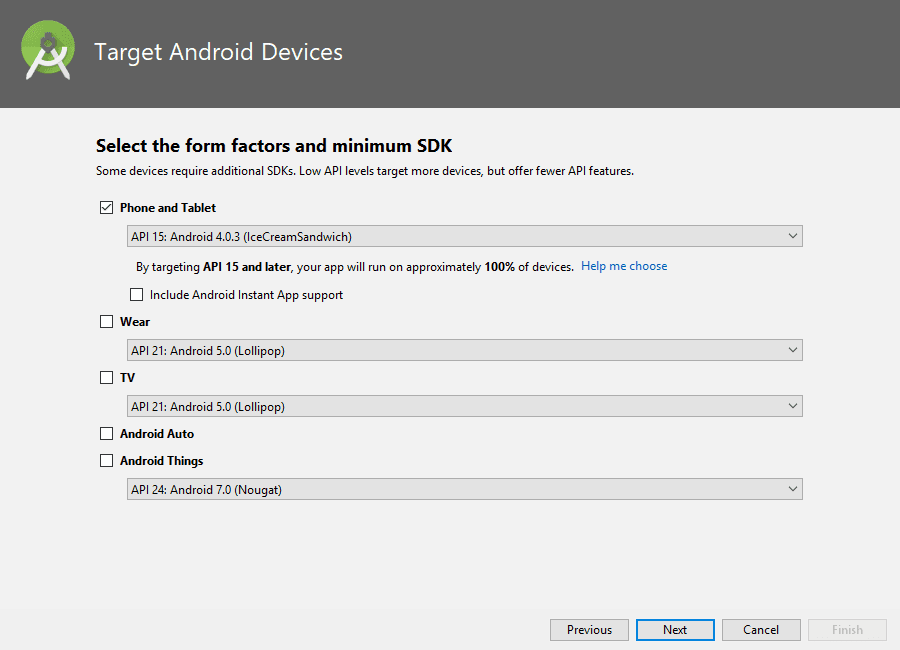
Next, create an initial empty activity:
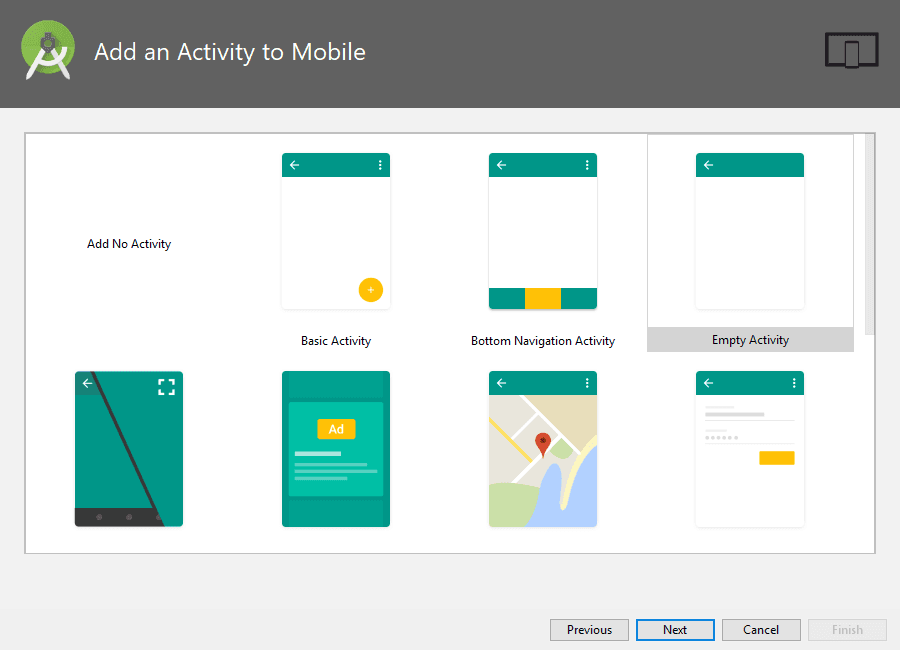
And use the default name of MainActivity with backward compatibility:
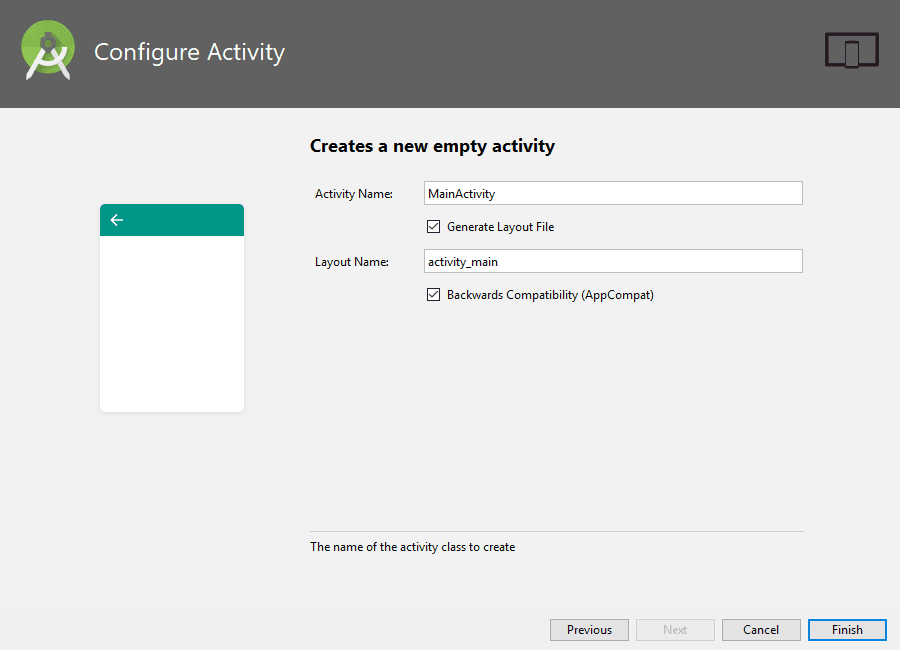
Once everything is set up, let's install the dependencies the app is going to use. In the dependencies section of the build.gradle file of your application module add:
1dependencies { 2 ... 3 4 implementation 'com.pusher:pusher-java-client:1.8.0' 5 implementation 'com.android.support:recyclerview-v7:27.1.1' 6 implementation 'com.squareup.retrofit2:retrofit:2.4.0' 7 implementation 'com.squareup.retrofit2:converter-moshi:2.4.0' 8 9 ... 10 }
At the time of writing, the latest SDK version is 27, so that's my target SDK version when specifying the RecyclerView's version.
Make sure this version number matches the version of the appcompat library:
1dependencies { 2 ... 3 // The version of this library 4 implementation 'com.android.support:appcompat-v7:27.1.1' 5 ... 6 // And the version of this library should match 7 implementation 'com.android.support:recyclerview-v7:27.1.1' 8 9 ... 10 }
Besides Pusher and RecyclerView to show the chat messages, the app is going to use Retrofit to make a request to the API with Moshi for serialization to and from JSON.
Sync the Gradle project so the modules can be installed and the project built.
Now let's add the INTERNET permission to the AndroidManifest.xml file. This is required so we can connect to Pusher and get the events in realtime:
1<?xml version="1.0" encoding="utf-8"?> 2 <manifest xmlns:android="http://schemas.android.com/apk/res/android" 3 package="com.pusher.pusherchat"> 4 5 <uses-permission android:name="android.permission.INTERNET" /> 6 7 <application 8 ... 9 </application> 10 11 </manifest>
And the project is all set up. Let’s start building the app.
Building the Android app
In the java directory, let’s create the data class for the messages, com.pusher.pusherchat.Messages.kt , with the same properties as the API version:
1data class Message(var user:String, 2 var message:String, 3 var time:Long)
If you haven’t work with Retrofit, you must know it works by turning an API into an interface.
So create the interface com.pusher.pusherchat.ChatService (your package may be different) and paste the following code:
1import retrofit2.Call 2 import retrofit2.Retrofit 3 import retrofit2.converter.moshi.MoshiConverterFactory 4 import retrofit2.http.POST 5 import retrofit2.http.Body 6 7 interface ChatService { 8 @POST("/message") 9 fun postMessage(@Body body:Message): Call<Void> 10 11 companion object { 12 private const val BASE_URL = "http://10.0.2.2:8080/" 13 14 fun create(): ChatService { 15 val retrofit = Retrofit.Builder() 16 .baseUrl(BASE_URL) 17 .addConverterFactory(MoshiConverterFactory.create()) 18 .build() 19 return retrofit.create(ChatService::class.java) 20 } 21 } 22 }
The interface contains the method postMessage that mimics the endpoint of the API.
As the endpoint doesn’t return a value (only a status code that will be obtained with the Responseobject), the method defines Call<Void> as the method return type.
If you’re wondering why it the type isn’t Call<Unit>, Retrofit doesn’t support this type natively yet. Follow this issue for more information.
The interface also includes a companion object that creates a Retrofit instance with the Moshi converter and an implementation of the API.
Notice the use of 10.0.2.2 instead of localhost. This is how the Android emulator sees localhost. If you’re going to test the app on a device or if your API endpoint resides on another server, update the IP accordingly.
Also, by default, the API will run on port 8080.
The first screen of the app will allow the user to enter a username. In the directory res/layout open the file activity_main and replace the content with the following:
1<?xml version="1.0" encoding="utf-8"?> 2 <android.support.constraint.ConstraintLayout xmlns:android="http://schemas.android.com/apk/res/android" 3 xmlns:app="http://schemas.android.com/apk/res-auto" 4 xmlns:tools="http://schemas.android.com/tools" 5 android:layout_width="match_parent" 6 android:layout_height="match_parent" 7 tools:context=".MainActivity"> 8 9 <TextView 10 android:layout_width="wrap_content" 11 android:layout_height="wrap_content" 12 android:text="Login" 13 android:textSize="25dp" 14 android:id="@+id/loginLabel" 15 android:gravity="center" 16 app:layout_constraintBottom_toTopOf="@id/username" 17 app:layout_constraintLeft_toLeftOf="parent" 18 app:layout_constraintRight_toRightOf="parent" 19 app:layout_constraintTop_toTopOf="parent" 20 app:layout_constraintVertical_chainStyle="packed" /> 21 22 <EditText 23 android:id="@+id/username" 24 android:layout_width="match_parent" 25 android:layout_height="wrap_content" 26 android:hint="Username" 27 android:inputType="text" 28 android:maxLines="1" 29 app:layout_constraintTop_toBottomOf="@id/loginLabel" 30 app:layout_constraintBottom_toTopOf="@id/btnLogin" /> 31 32 <Button 33 android:id="@+id/btnLogin" 34 android:layout_width="match_parent" 35 android:layout_height="wrap_content" 36 android:text="Enter" 37 app:layout_constraintTop_toBottomOf="@+id/username" 38 app:layout_constraintBottom_toBottomOf="parent"/> 39 40 </android.support.constraint.ConstraintLayout>
Using a ConstraintLayout, it will show a label with the text Login, a text box to enter the username, and a button to log the user in.
For this app, the username will be stored in an App class (com.pusher.pusherchat.App.kt) that will be available for all activities:
1import android.app.Application 2 3 class App:Application() { 4 companion object { 5 lateinit var user:String 6 } 7 }
In a more complex application, you might want to save the username to the shared preferences or in an SQLite database.
This way, the code for the main activity (com.pusher.pusherchat.MainActivity.kt) will look like this:
1package com.pusher.pusherchat 2 3 import android.content.Intent 4 import android.support.v7.app.AppCompatActivity 5 import android.os.Bundle 6 import android.widget.Toast 7 import kotlinx.android.synthetic.main.activity_main.* 8 9 class MainActivity : AppCompatActivity() { 10 11 override fun onCreate(savedInstanceState: Bundle?) { 12 super.onCreate(savedInstanceState) 13 setContentView(R.layout.activity_main) 14 15 btnLogin.setOnClickListener { 16 if (username.text.isNotEmpty()) { 17 val user = username.text.toString() 18 19 App.user = user 20 startActivity(Intent(this@MainActivity, ChatActivity::class.java)) 21 } else { 22 Toast.makeText(applicationContext,"Username should not be empty", Toast.LENGTH_SHORT).show() 23 } 24 } 25 } 26 }
If the username textbox is not empty, it stores the username and starts the next activity (the chat). Otherwise, an error message is shown.
Now we need the ChatActivity class, so right-click your main package (com.pusher.pusherchat in my case) and choose from the contextual menu the option New → Activity → Empty Activity to create the activity class:

This chat app will format in a different way the messages from the current user and the messages from the other users.
In the res/drawable directory, create a new drawable resource file, my_message_bubble.xml with the following content:
1<?xml version="1.0" encoding="utf-8"?> 2 3 <shape xmlns:android="http://schemas.android.com/apk/res/android" 4 android:shape="rectangle"> 5 6 <solid android:color="#9d48e4"></solid> 7 8 <corners android:topRightRadius="5dp" android:radius="40dp"></corners> 9 10 </shape>
This will give you a rectangle with rounded corners, however, in the case of the top right corner, the radius is smaller to give the effect that the bubble is coming from the right:
For messages coming from other users, create another file in the res/drawable directory, other_message_bubble.xml, with the following content:
1<?xml version="1.0" encoding="utf-8"?> 2 3 <shape xmlns:android="http://schemas.android.com/apk/res/android" 4 android:shape="rectangle"> 5 6 <solid android:color="#ff00ff"></solid> 7 8 <corners android:topLeftRadius="5dp" android:radius="40dp"></corners> 9 10 </shape>
This changes the color and the radius on the top left corner to differentiate the messages of the users.
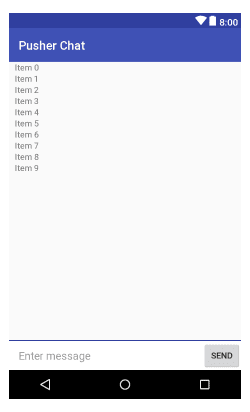
Open the layout file that was created for the ChatActivity (res/layout/activity_chat.xml) and replace its contents with the following:
1<?xml version="1.0" encoding="utf-8"?> 2 <android.support.constraint.ConstraintLayout xmlns:android="http://schemas.android.com/apk/res/android" 3 xmlns:app="http://schemas.android.com/apk/res-auto" 4 xmlns:tools="http://schemas.android.com/tools" 5 android:layout_width="match_parent" 6 android:layout_height="match_parent" 7 tools:context=".ChatActivity"> 8 9 <android.support.v7.widget.RecyclerView 10 android:id="@+id/messageList" 11 android:layout_width="match_parent" 12 android:layout_height="match_parent" 13 android:layout_marginBottom="55dp" 14 android:layout_marginLeft="10dp" 15 android:layout_marginStart="10dp" 16 android:scrollbars="vertical" 17 app:layout_constraintTop_toTopOf="parent" 18 app:layout_constraintLeft_toLeftOf="parent" 19 app:layout_constraintRight_toRightOf="parent"> 20 </android.support.v7.widget.RecyclerView> 21 22 <View 23 android:layout_width="0dp" 24 android:layout_height="2dp" 25 android:background="@color/colorPrimaryDark" 26 android:layout_marginBottom="0dp" 27 app:layout_constraintBottom_toTopOf="@+id/layout_messageArea" 28 app:layout_constraintLeft_toLeftOf="parent" 29 app:layout_constraintRight_toRightOf="parent"/> 30 31 <LinearLayout 32 android:id="@+id/layout_messageArea" 33 android:layout_width="0dp" 34 android:layout_height="wrap_content" 35 android:orientation="horizontal" 36 android:minHeight="48dp" 37 android:background="#ffffff" 38 app:layout_constraintBottom_toBottomOf="parent" 39 app:layout_constraintRight_toRightOf="parent" 40 app:layout_constraintLeft_toLeftOf="parent"> 41 42 <EditText 43 android:id="@+id/txtMessage" 44 android:hint="Enter message" 45 android:background="@android:color/transparent" 46 android:layout_gravity="center" 47 android:layout_marginLeft="16dp" 48 android:layout_marginRight="16dp" 49 android:layout_width="0dp" 50 android:layout_weight="1" 51 android:layout_height="wrap_content" 52 android:maxLines="6"/> 53 54 <Button 55 android:id="@+id/btnSend" 56 android:text="SEND" 57 android:textSize="14dp" 58 android:clickable="true" 59 android:layout_width="64dp" 60 android:layout_height="48dp" 61 android:gravity="center" 62 android:layout_gravity="bottom" /> 63 64 </LinearLayout> 65 66 </android.support.constraint.ConstraintLayout>
This defines:
- A
RecyclerViewto show the chat messages - A
Viewthat acts as a line separator - A
LinearLayoutthat contains:- An
EditTextwhere the users enter their message - A
Buttonto send the message
- An
It should look like this:
Now, the app is going to present different information for the messages sent by the current user and the messages sent by the rest of the users.
So create two new layout resource files for the messages of the users:
1<!-- res/layout/my_message.xml --> 2 <?xml version="1.0" encoding="utf-8"?> 3 <android.support.constraint.ConstraintLayout 4 xmlns:android="http://schemas.android.com/apk/res/android" 5 xmlns:app="http://schemas.android.com/apk/res-auto" 6 android:layout_width="match_parent" 7 android:layout_height="wrap_content"> 8 9 <TextView 10 android:id="@+id/txtMyMessage" 11 android:text="Hi, my message" 12 android:background="@drawable/my_message_bubble" 13 android:layout_width="wrap_content" 14 android:layout_height="wrap_content" 15 android:maxWidth="240dp" 16 android:padding="15dp" 17 android:elevation="5dp" 18 android:textColor="#ffffff" 19 android:layout_marginRight="10dp" 20 android:layout_marginTop="5dp" 21 app:layout_constraintRight_toRightOf="parent" 22 app:layout_constraintTop_toTopOf="parent" /> 23 24 <TextView 25 android:id="@+id/txtMyMessageTime" 26 android:text="12:00 PM" 27 android:layout_width="wrap_content" 28 android:layout_height="wrap_content" 29 android:textSize="10sp" 30 android:textStyle="bold" 31 android:layout_marginRight="10dp" 32 app:layout_constraintBottom_toBottomOf="@+id/txtMyMessage" 33 app:layout_constraintRight_toLeftOf="@+id/txtMyMessage" /> 34 35 </android.support.constraint.ConstraintLayout>
And:
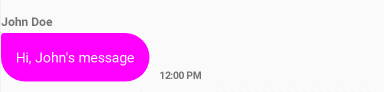
1<!-- res/layout/other_message.xml --> 2 <?xml version="1.0" encoding="utf-8"?> 3 <android.support.constraint.ConstraintLayout 4 xmlns:android="http://schemas.android.com/apk/res/android" 5 xmlns:app="http://schemas.android.com/apk/res-auto" 6 android:layout_width="match_parent" 7 android:layout_height="wrap_content" 8 android:paddingTop="8dp"> 9 10 <TextView 11 android:id="@+id/txtOtherUser" 12 android:text="John Doe" 13 android:layout_width="wrap_content" 14 android:layout_height="wrap_content" 15 android:textSize="12sp" 16 android:textStyle="bold" 17 app:layout_constraintTop_toTopOf="parent" 18 android:layout_marginTop="5dp" /> 19 20 <TextView 21 android:id="@+id/txtOtherMessage" 22 android:text="Hi, John's message" 23 android:background="@drawable/other_message_bubble" 24 android:layout_width="wrap_content" 25 android:layout_height="wrap_content" 26 android:maxWidth="240dp" 27 android:padding="15dp" 28 android:elevation="5dp" 29 android:textColor="#ffffff" 30 android:layout_marginTop="4dp" 31 app:layout_constraintTop_toBottomOf="@+id/txtOtherUser" /> 32 33 <TextView 34 android:id="@+id/txtOtherMessageTime" 35 android:text="12:00 PM" 36 android:layout_width="wrap_content" 37 android:layout_height="wrap_content" 38 android:textSize="10sp" 39 android:textStyle="bold" 40 app:layout_constraintLeft_toRightOf="@+id/txtOtherMessage" 41 android:layout_marginLeft="10dp" 42 app:layout_constraintBottom_toBottomOf="@+id/txtOtherMessage" /> 43 44 </android.support.constraint.ConstraintLayout>
For the current user messages, the app shows the time the message was sent and the message itself, using the bubble defined earlier as background:

For the other user’s messages, in addition to the previous information, the app shows the username of the user:
The RecyclerView will need an Adapter to provide the views that represent the messages. So let’s create a Kotlin class, com.pusher.pusherchat.MessageAdapter.kt, and go step by step building it.
First, let’s add all the import statements we’ll need after the package declaration:
1package com.pusher.pusherchat 2 3 import android.content.Context 4 import android.support.v7.widget.RecyclerView 5 import android.view.LayoutInflater 6 import android.view.View 7 import android.view.ViewGroup 8 import android.widget.TextView 9 import kotlinx.android.synthetic.main.my_message.view.* 10 import kotlinx.android.synthetic.main.other_message.view.*
Next, outside the class, let’s define two private constants to represent the two types of chat messages:
1private const val VIEW_TYPE_MY_MESSAGE = 1 2 private const val VIEW_TYPE_OTHER_MESSAGE = 2
Usually, constants are placed in a companion object inside the class, which makes them equivalent to public static final fields in Java. But for simple use cases, like this one, you can also define them this way.
Moving on, let’s specify that this class is a subclass of a class of type RecyclerView.Adapter<MessageViewHolder>, and define MessageViewHolder as an open class that extends RecyclerView.ViewHolder and from which the two types of messages will derive:
1//... 2 class MessageAdapter (val context: Context) : RecyclerView.Adapter<MessageViewHolder>() { 3 } 4 5 open class MessageViewHolder (view: View) : RecyclerView.ViewHolder(view) { 6 open fun bind(message:Message) {} 7 }
This way, inside the MessageAdapter class, we can define these two subclasses that represent the views defined in the layouts:
1class MessageAdapter (val context: Context) : RecyclerView.Adapter<MessageViewHolder>() { 2 3 inner class MyMessageViewHolder (view: View) : MessageViewHolder(view) { 4 private var messageText: TextView = view.txtMyMessage 5 private var timeText: TextView = view.txtMyMessageTime 6 7 override fun bind(message: Message) { 8 messageText.text = message.message 9 timeText.text = DateUtils.fromMillisToTimeString(message.time) 10 } 11 } 12 13 inner class OtherMessageViewHolder (view: View) : MessageViewHolder(view) { 14 private var messageText: TextView = view.txtOtherMessage 15 private var userText: TextView = view.txtOtherUser 16 private var timeText: TextView = view.txtOtherMessageTime 17 18 override fun bind(message: Message) { 19 messageText.text = message.message 20 userText.text = message.user 21 timeText.text = DateUtils.fromMillisToTimeString(message.time) 22 } 23 } 24 }
Of course, you’ll need the class DateUtils to convert the time from milliseconds (this is how the time will be handled internally) to a readable time string. This is the definition:
1import java.text.SimpleDateFormat 2 import java.util.* 3 4 object DateUtils { 5 fun fromMillisToTimeString(millis: Long) : String { 6 val format = SimpleDateFormat("hh:mm a", Locale.getDefault()) 7 return format.format(millis) 8 } 9 }
Back to the MessageAdapter class, let’s add an ArrayList to store the messages and a method to add new messages to it:
1//... 2 class MessageAdapter (val context: Context) : RecyclerView.Adapter<MessageViewHolder>() { 3 private val messages: ArrayList<Message> = ArrayList() 4 5 fun addMessage(message: Message){ 6 messages.add(message) 7 notifyDataSetChanged() 8 } 9 10 //... 11 }
This way, you can implement the method to get the item count:
1class MessageAdapter (val context: Context) : RecyclerView.Adapter<MessageViewHolder>() { 2 //... 3 4 override fun getItemCount(): Int { 5 return messages.size 6 } 7 8 //... 9 }
And using the username entered in the first screen, return either the VIEW_TYPE_MY_MESSAGE constant or VIEW_TYPE_OTHER_MESSAGE in the getItemViewType method:
1class MessageAdapter (val context: Context) : RecyclerView.Adapter<MessageViewHolder>() { 2 //... 3 4 override fun getItemViewType(position: Int): Int { 5 val message = messages.get(position) 6 7 return if(App.user == message.user) { 8 VIEW_TYPE_MY_MESSAGE 9 } 10 else { 11 VIEW_TYPE_OTHER_MESSAGE 12 } 13 } 14 15 //... 16 }
So in the method onCreateViewHolder, you can inflate the view according to the type of message using the appropriate layout:
1class MessageAdapter (val context: Context) : RecyclerView.Adapter<MessageViewHolder>() { 2 //... 3 4 override fun onCreateViewHolder(parent: ViewGroup, viewType: Int): MessageViewHolder { 5 return if(viewType == VIEW_TYPE_MY_MESSAGE) { 6 MyMessageViewHolder( 7 LayoutInflater.from(context).inflate(R.layout.my_message, parent, false) 8 ) 9 } else { 10 OtherMessageViewHolder( 11 LayoutInflater.from(context).inflate(R.layout.other_message, parent, false) 12 ) 13 } 14 } 15 16 //... 17 }
This way, the only thing that the method onBindViewHolder has to do is to invoke the bind method of the MessageViewHolder instance it receives as an argument:
1class MessageAdapter (val context: Context) : RecyclerView.Adapter<MessageViewHolder>() { 2 //... 3 4 override fun onBindViewHolder(holder: MessageViewHolder, position: Int) { 5 val message = messages.get(position) 6 7 holder?.bind(message) 8 } 9 10 //... 11 }
And that’s the adapter.
Now in the class com.pusher.pusherchat.ChatActivity, after the package declaration, add the import statements the class will need and a constant (for logging):
1package com.example.deborah.pusherchat 2 3 import android.support.v7.app.AppCompatActivity 4 import android.os.Bundleimport android.content.Context 5 import android.support.v7.widget.LinearLayoutManager 6 import android.util.Log 7 import android.view.inputmethod.InputMethodManager 8 import android.widget.Toast 9 import kotlinx.android.synthetic.main.activity_chat.* 10 import java.util.* 11 import com.pusher.client.Pusher 12 import com.pusher.client.PusherOptions 13 import org.json.JSONObject 14 import retrofit2.Call 15 import retrofit2.Callback 16 import retrofit2.Response 17 18 private const val TAG = "ChatActivity" 19 20 class ChatActivity : AppCompatActivity() { 21 22 //... 23 }
Also in the ChatActivity class, configure a MessageAdapter instance in the following way:
1//... 2 class ChatActivity: AppCompatActivity() { 3 private lateinit var adapter: MessageAdapter 4 5 override fun onCreate(savedInstanceState: Bundle?) { 6 super.onCreate(savedInstanceState) 7 setContentView(R.layout.activity_chat) 8 9 messageList.layoutManager = LinearLayoutManager(this) 10 adapter = MessageAdapter(this) 11 messageList.adapter = adapter 12 } 13 }
Now, when the button to send a message is pressed, if the message box is not empty, you need to:
- Build a
Messageobject - Call the API endpoint to publish the message to a Pusher channel
- Reset the input and hide the keyboard
Otherwise, show and/or log the corresponding errors.
This is done with the following code:
1class ChatActivity: AppCompatActivity() { 2 private lateinit var adapter: MessageAdapter 3 4 override fun onCreate(savedInstanceState: Bundle?) { 5 //... 6 7 btnSend.setOnClickListener { 8 if(txtMessage.text.isNotEmpty()) { 9 val message = Message( 10 App.user, 11 txtMessage.text.toString(), 12 Calendar.getInstance().timeInMillis 13 ) 14 15 val call = ChatService.create().postMessage(message) 16 17 call.enqueue(object : Callback<Void> { 18 override fun onResponse(call: Call<Void>, response: Response<Void>) { 19 resetInput() 20 if (!response.isSuccessful) { 21 Log.e(TAG, response.code().toString()); 22 Toast.makeText(applicationContext,"Response was not successful", Toast.LENGTH_SHORT).show() 23 } 24 } 25 26 override fun onFailure(call: Call<Void>, t: Throwable) { 27 resetInput() 28 Log.e(TAG, t.toString()); 29 Toast.makeText(applicationContext,"Error when calling the service", Toast.LENGTH_SHORT).show() 30 } 31 }) 32 } else { 33 Toast.makeText(applicationContext,"Message should not be empty", Toast.LENGTH_SHORT).show() 34 } 35 } 36 } 37 38 private fun resetInput() { 39 // Clean text box 40 txtMessage.text.clear() 41 42 // Hide keyboard 43 val inputManager = 44 getSystemService(Context.INPUT_METHOD_SERVICE) as InputMethodManager 45 inputManager.hideSoftInputFromWindow( 46 currentFocus!!.windowToken, InputMethodManager.HIDE_NOT_ALWAYS 47 ) 48 } 49 }
Finally, you need to set up a Pusher instance to listen for messages and add them to the RecyclerView when one is received:
1class ChatActivity: AppCompatActivity() { 2 private lateinit var adapter: MessageAdapter 3 4 override fun onCreate(savedInstanceState: Bundle?) { 5 //... 6 setupPusher() 7 } 8 9 private fun setupPusher() { 10 val options = PusherOptions() 11 options.setCluster("PUSHER_APP_CLUSTER") 12 13 val pusher = Pusher("PUSHER_APP_KEY", options) 14 val channel = pusher.subscribe("chat") 15 16 channel.bind("new_message") { channelName, eventName, data -> 17 val jsonObject = JSONObject(data) 18 19 val message = Message( 20 jsonObject["user"].toString(), 21 jsonObject["message"].toString(), 22 jsonObject["time"].toString().toLong() 23 ) 24 25 runOnUiThread { 26 adapter.addMessage(message) 27 // scroll the RecyclerView to the last added element 28 messageList.scrollToPosition(adapter.itemCount - 1); 29 } 30 31 } 32 33 pusher.connect() 34 } 35 //... 36 }
Just set your Pusher app cluster and key and you’ll be ready to test the app.
Testing the app
First of all, run the API by executing the following Gradle command in the root directory of the Spring Boot application:
gradlew bootRun
Or if you’re using an IDE, execute the main class of the application, the one annotated with @SpringBootApplication (com.example.demo.DemoApplication in my case).
Then, in Android Studio, execute your application on two Android emulators.
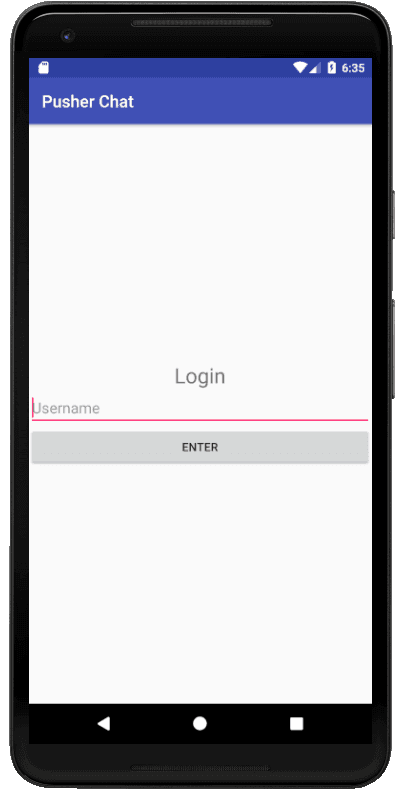
This is how the first screen should look like:
And start playing with the app:
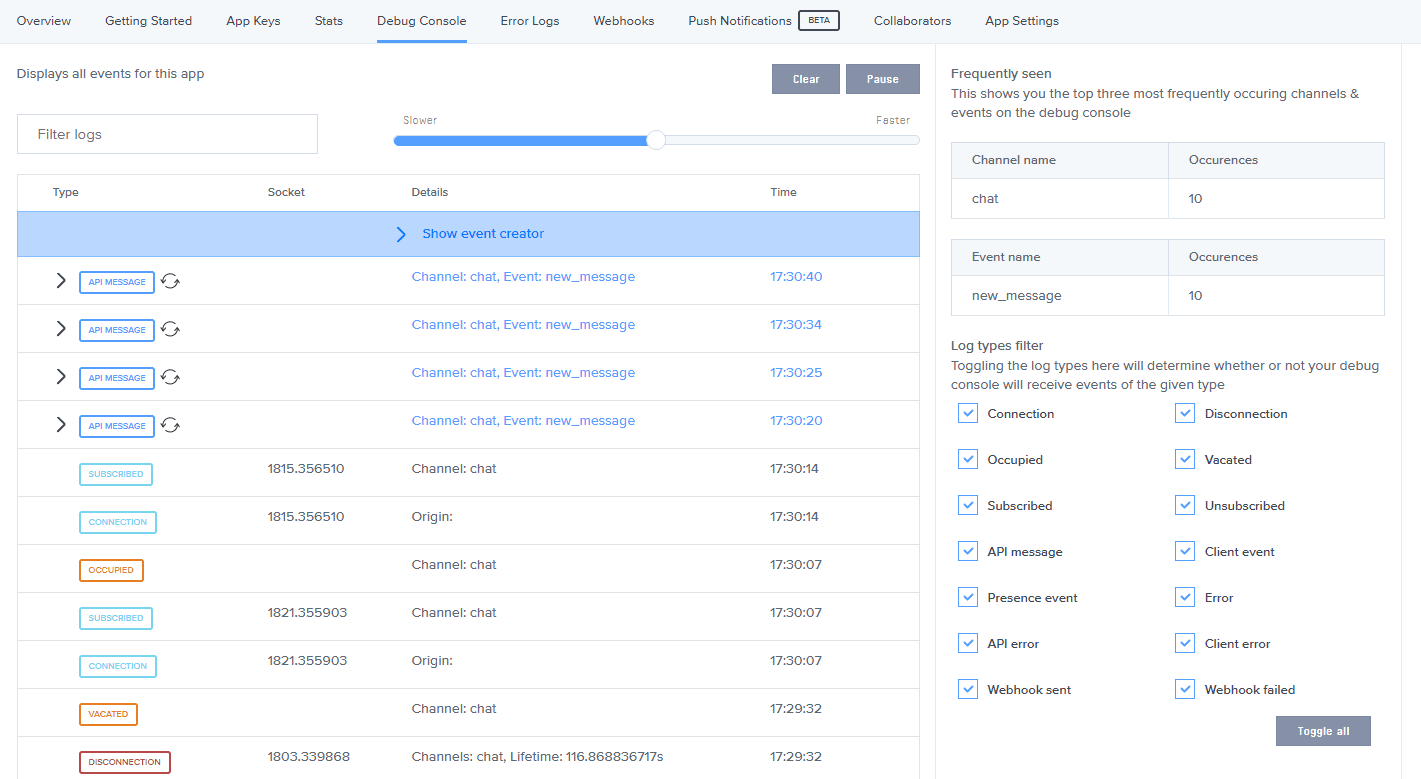
You can also monitor the messages sent to Pusher in the Debug Console of your dashboard:
Conclusion
You have learned the basics of how to create a chat app with Kotlin and Pusher for Android.
From here, you can extend it in many ways:
- Change the design
- Show more information
- Save the messages to a database
- Implement a real authentication
- Use presence channels to be aware of who is subscribed to the channel
- Change the implementation of the API or add more functionality
Remember that all of the source code for this application is available at Github.


© 2025 Pusher Ltd. All rights reserved.
Pusher Limited is a company registered in England and Wales (No. 07489873) whose registered office is at MessageBird UK Limited, 3 More London Riverside, 4th Floor, London, United Kingdom, SE1 2AQ.