- Products

- Developers
- User stories
- Blog
- Pricing

Build a chat app in Flask and Vue with sentiment analysis - Part 2: Building the chat interface
Introduction
In this part, we are going to design/create the database, build the chat interface and also implement the login and registration endpoints. The code is available on GitHub.
This is the second part of this tutorial series. In the first part, we set up our working environment and also created the project. We were able to communicate with Flask from the Vue app.
Creating the chat interface
Vue enables us to build reusable components which make up our app user interface. We’ll split the app UI into smaller components so we can build them separately:
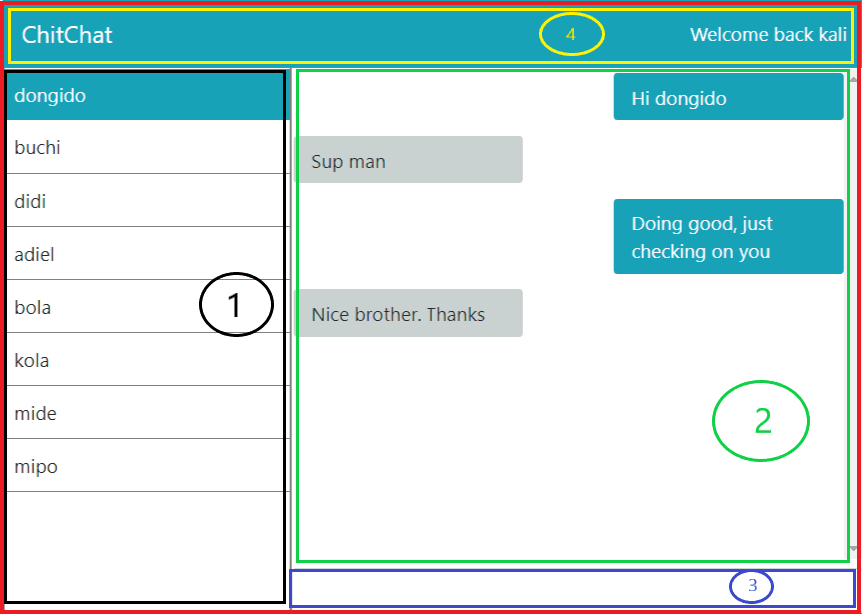
In the image above we have:
- The area with the red border is our base component which will house other components. This is the entire app component area that Vue creates by default. The file is located in
src/App.vue. - [1] -
Userscomponent. This component will be responsible for listing all our registered users. - [2] -
Messagescomponent. This component renders messages. - [3] -
MessageInputcomponent. This is the input form for sending messages. - [4] -
NavBarcomponent. This is the navigation bar at the top of the app.
If you go through the Vue app in the project root folder, you will see a couple of files already created.
Since we are building a one-to-one private chat, we need a way to uniquely identify every user of our app. We’ll do so using their username. This means they have to log in to use the app. Once they are logged in, they’d be able to see the chat interface above.
We’ll also create a Login component which will build up the login page.
Before we start building these components, let's add Bootstrap-vue to speed up the design process. Bootstrap-vue project already structures our normal Bootstrap into components which will be easy for us. You can read more on the documentation here.
Adding Bootstrap-vue
Add bootstrap-vue using Vue command from the one-to-one root folder:
$ vue add bootstrap-vue
1📦 Installing vue-cli-plugin-bootstrap-vue... 2 3 + vue-cli-plugin-bootstrap-vue@0.1.0 4 added 1 package from 1 contributor and audited 13896 packages in 71.714s 5 found 0 vulnerabilities 6 7 ✔ Successfully installed plugin: vue-cli-plugin-bootstrap-vue 8 9 ? Use babel/polyfill? No 10 11 🚀 Invoking generator for vue-cli-plugin-bootstrap-vue... 12 📦 Installing additional dependencies...
Vue will handle all the configuration settings for us. If the command ran successfully, you will notice a new folder named plugins in src folder. In this folder, you will also find a file named bootstrap-vue.js that imports the Bootstrap files.
App.vue component
As mentioned earlier, the src/App.vue file is the main entry components housing all other components in the app. This means we’re going to import every other component to this file.
Also, we are using the single file component structure approach to create our components, which have three sections:
<template>section. This section holds all markup, basically our HTML markup.<script>section. This is where our JavaScript code resides.<style>section. For adding styles such as CSS.
A component file looks like this:
1<template> 2 <div> 3 Some HTML markup 4 </div> 5 </template> 6 7 <script> 8 console.log("Some JavaScript code"); 9 </script> 10 11 <style> 12 /* Styles */ 13 .style { 14 color: lime; 15 } 16 </style>
Now, replace the content in the <template> section of the src/App.vue file with the below markup:
1<template> 2 <div id="app"> 3 <Login /> 4 <b-container> 5 <NavBar :logged_user="logged_user_username" /> 6 <b-row class="main-area"> 7 <b-col cols="4" class="users"> 8 <Users /> 9 </b-col> 10 <b-col cols="8" class="messages-area"> 11 <div class="messages-main"> 12 <div 13 v-if="!current_chat_channel" 14 class="select-chat text-center" 15 > 16 Select a user to start chatting... 17 </div> 18 <Messages 19 v-else 20 :active_chat="active_chat_id" 21 :messages="messages[current_chat_channel]" 22 /> 23 </div> 24 <MessageInput /> 25 </b-col> 26 </b-row> 27 </b-container> 28 </div> 29 </template>
This is our whole chat interface we have defined with some HTML, the bootstrap-vue components and our app components, which we have broken down in the image above earlier.
We’re yet to create the files for our components, let’s do so now. Create the below files in the src/components/ folder:
- Login.vue
- NavBar.vue
- Users.vue
- MessageInput.vue
- Messages.vue
Next, import and register the components. Replace the content in the <script> section in src/App.vue file with the below code:
1<script> 2 import MessageInput from "./components/MessageInput.vue"; 3 import Messages from "./components/Messages.vue"; 4 import NavBar from "./components/NavBar.vue"; 5 import Login from "./components/Login.vue"; 6 import Users from "./components/Users.vue"; 7 import Pusher from "pusher-js"; 8 9 // Declare pusher variable so it's global to this file. 10 let pusher; 11 12 export default { 13 name: "app", 14 components: { 15 MessageInput, 16 NavBar, 17 Messages, 18 Users, 19 Login 20 }, 21 data: function() {}, 22 methods: {}, 23 }; 24 </script>
When you import a component, you need to let Vue know of the component, which is what we did in the components: { block. We also imported the Pusher JavaScript library, which we are going to use to communicate with Pusher from our client.
Next, add some styling. Update the styles in the <style> section with the below code in src/App.vue:
1<style> 2 .messages-main { 3 overflow-y: scroll; 4 height: 90%; 5 } 6 .users { 7 padding: 0px !important; 8 border: 1px solid gray; 9 } 10 .no-margin { 11 margin: 0px; 12 } 13 .messages-area { 14 border: 1px solid gray; 15 padding: 0px !important; 16 max-height: calc(100vh - 4em) !important; 17 } 18 .input-message { 19 height: 40px; 20 } 21 .active { 22 background: #17a2b8 !important; 23 border: #17a2b8 !important; 24 } 25 .select-chat { 26 margin-top: 35vh; 27 padding: 8px; 28 } 29 .main-area { 30 margin: 0px; 31 min-height: calc(100vh - 5em) !important; 32 } 33 .logged_user { 34 color: white; 35 } 36 </style>
Now load up the Vue app in your browser again to see what we have. You should notice the page is almost empty but without any error:
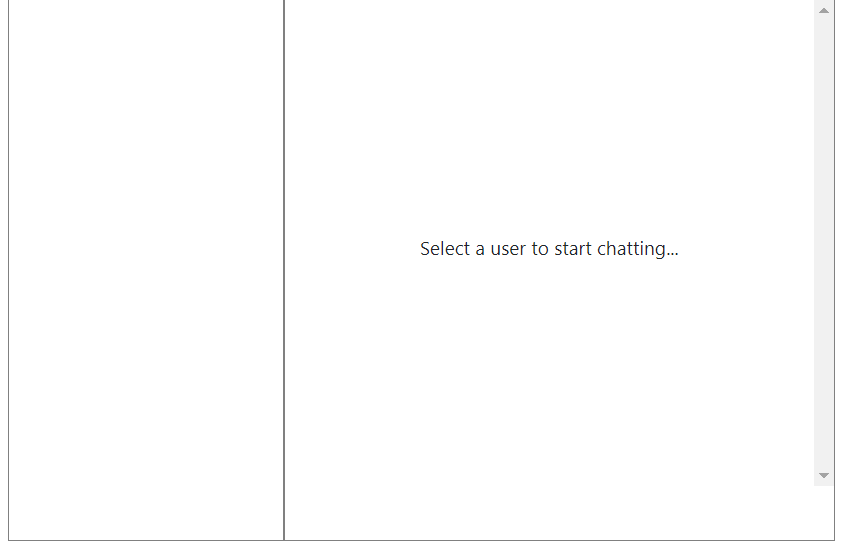
That's a good sign 🙂.
The components we have created are all empty. The next thing we will do is to build up the components and then observe the chat interface come to life as we build along.
You can leave the page open on your browser and observe the changes to the page when we update the component files.
Login.vue
Add the below code to src/components/Login.vue:
1<template> 2 <div class="login"> 3 <div v-if="proccessing" class="text-center"> Please wait... </div> 4 <div v-if="message" class="text-center"> {{message}} </div> 5 6 <b-form-input 7 v-model="username" 8 type="text" 9 class="input-form" 10 placeholder="Username"> 11 </b-form-input> 12 13 <b-form-input 14 v-model="password" 15 class="input-form" 16 type="password" 17 placeholder="Password"> 18 </b-form-input> 19 20 <b-button 21 v-on:click="login" 22 variant="primary" 23 class="btn-block" 24 > 25 Log me in 26 </b-button> 27 28 </div> 29 </template> 30 31 <script> 32 export default { 33 name: "Login", 34 data() { 35 return { 36 username: "", 37 password: "", 38 proccessing: false, 39 message: "" 40 }; 41 }, 42 }; 43 </script> 44 45 <style scoped> 46 .login { 47 width: 500px; 48 border: 1px solid #cccccc; 49 background-color: #ffffff; 50 margin: auto; 51 margin-top: 200px; 52 padding: 20px; 53 } 54 .input-form { 55 margin-bottom: 9px; 56 } 57 </style>
Here we added two input fields: username and password and a button to submit the form. Then we bind the input fields to our data. In the <script> section, we exported an object defining data for the component.
NavBar.vue
Next, add the content for the NavBar component to src/components/NavBar.vue:
1<template> 2 <b-navbar toggleable="md" type="dark" variant="info" class="nav-bar"> 3 <b-navbar-toggle target="nav_collapse"></b-navbar-toggle> 4 <b-navbar-brand href="#">ChitChat</b-navbar-brand> 5 <b-collapse is-nav id="nav_collapse"> 6 <b-navbar-nav class="ml-auto logged_user" > 7 Welcome back {{logged_user}} 8 </b-navbar-nav> 9 </b-collapse> 10 </b-navbar> 11 </template> 12 13 <script> 14 export default { 15 name: "NavBar", 16 props: { 17 logged_user: String 18 } 19 }; 20 </script> 21 22 <style scoped> 23 .nav-bar { 24 border-bottom: 1px solid #17a2b8; 25 } 26 </style>
Users.vue
Add the below code to src/components/Users.vue for the Users component:
1<template> 2 <div style="margin-top: 0px;"> 3 <div v-for="(user, id) in users" v-bind:key="id"> 4 <div 5 v-bind:class="[activeUser == user.id ? 'user active' : 'user']" 6 v-on:click="chat(user.id)" 7 > 8 {{user.userName}} 9 <span v-if="user.has_new_message" class="has_new_message">New message</span> 10 </div> 11 </div> 12 </div> 13 </template> 14 <script> 15 export default { 16 name: "Users", 17 props: { 18 users: Array 19 }, 20 data() { 21 return { 22 activeUser: null 23 }; 24 }, 25 methods: { 26 chat: function(id) { 27 this.activeUser = id; 28 this.$emit("chat", id); 29 } 30 } 31 }; 32 </script> 33 <style scoped> 34 .user { 35 margin: 0px !important; 36 padding: 10px 4px 10px 8px; 37 border-bottom: 1px solid gray; 38 } 39 .active { 40 background: #17a2b8; 41 color: white; 42 } 43 .has_new_message { 44 background-color: #17a2b8; 45 border-radius: 4px; 46 display: inline-block; 47 color: white; 48 margin-bottom: -4px; 49 font-size: 10px; 50 margin: 4px; 51 padding: 3px; 52 font-weight: bolder; 53 } 54 </style>
Notice the v-for directive we are using to render our users. The users array will be passed from the src/App.vue component as property.
We are also using the v-on (v-on:click="chat(user.id)") directive to listen for click events when a user is clicked. If a user is clicked, we then call the chat function we have defined in the methods property.
Also, in the chat function, we are emitting an event to src/App.vue so that the chat for that user can be initialized.
Also, <span v-if="user.has_new_message" class="has_new_message" will display
the text: “New message” on the users tab whenever they get a message from a user they are not currently chatting with.
Messages.vue
Add the below code to src/components/Messages.vue for the Messages component:
1<template> 2 <div> 3 <div v-for="(message, id) in messages" v-bind:key="id"> 4 <div class="chat-message col-md-5" 5 v-bind:class="[(message.from_user == active_chat) ? 'to-message' : 'from-message offset-md-7']"> 6 {{message.message}} 7 </div> 8 </div> 9 </div> 10 </template> 11 <script> 12 export default { 13 name: "Messages", 14 props: { 15 messages: Array, 16 active_chat: Number 17 } 18 }; 19 </script> 20 <style> 21 .from-message { 22 background: #17a2b8; 23 color: white; 24 border-radius: 3px; 25 padding: 8px 2px; 26 margin-bottom: 4px; 27 } 28 .to-message { 29 background: rgb(201, 209, 209); 30 color: rgb(41, 53, 52); 31 border-radius: 3px; 32 padding: 8px 2px; 33 margin-bottom: 4px; 34 } 35 </style>
MessageInput.vue
Add the below code to src/components/MessageInput.vue for the MessageInput component:
1<template> 2 <div class="message-input"> 3 <b-form-input 4 v-model="message_input" 5 type="text" 6 placeholder="Enter your message" 7 v-on:keyup.enter.native="send_message" 8 > 9 </b-form-input> 10 </div> 11 </template> 12 13 <script> 14 export default { 15 name: "MessageInput", 16 data() { 17 return { 18 message_input: "" 19 }; 20 }, 21 methods: { 22 send_message() { 23 this.$emit("send_message", this.message_input); 24 this.message_input = ""; 25 } 26 } 27 }; 28 </script> 29 30 <style scoped> 31 .message-input { 32 position: absolute; 33 bottom: 0px; 34 width: 100%; 35 } 36 </style>
We now have our chat interface.
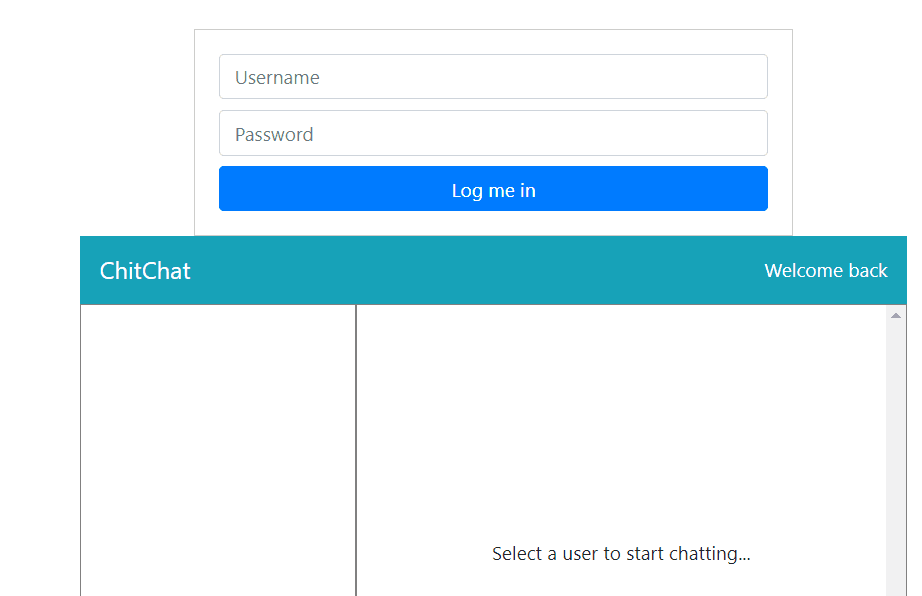
Don’t worry that the login form and the chat area are together, we’ll fix it in the next part.
The database
We will use SQLite for the database.
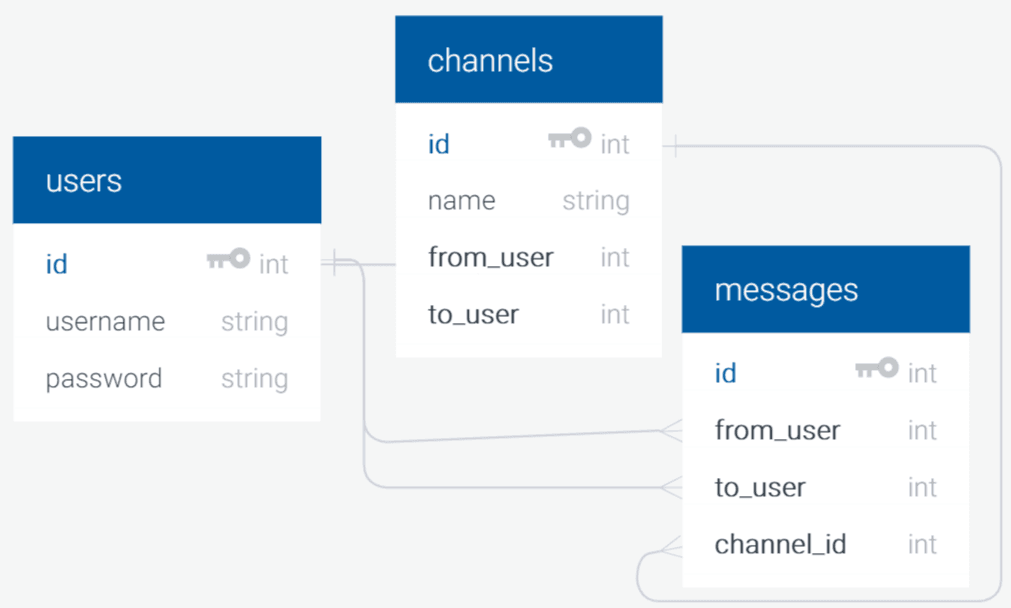
For our chat app, we’ll create three tables:
- users — This will hold all the users in the application.
- channels — Once two users start a conversation, we will create a new channel for them and store the channel name to the database. So that for subsequent conversation, we don’t need to create a new channel for them.
- messages — We’ll store every conversation to this table. We don’t want a situation where a user logs out and logs in again to find out their previous messages are missing.
Add the below code to api/database.py to prepare the database connection:
1from sqlalchemy import create_engine 2 from sqlalchemy.orm import scoped_session, sessionmaker 3 from sqlalchemy.ext.declarative import declarative_base 4 engine = create_engine('sqlite:///database.db', convert_unicode=True) 5 db_session = scoped_session(sessionmaker(autocommit=False, 6 autoflush=False, 7 bind=engine)) 8 Base = declarative_base() 9 Base.query = db_session.query_property() 10 def init_db(): 11 import models 12 Base.metadata.create_all(bind=engine)
We are using SQLAlchemy to initialize our database connection.
In the init_db() function, we imported our models and finally call Base.metadata.create_all to create all the tables specified in the model’s file.
Create the models
Let’s create a model for easy CRUD operations.
Add the model definition to api/models.py:
1from sqlalchemy import Column, Integer, String, Text, ForeignKey 2 from database import Base 3 4 class User(Base): 5 __tablename__ = 'users' 6 id = Column(Integer, primary_key=True) 7 username = Column(String(50), unique=True) 8 password = Column(String(128)) 9 def __init__(self, username=None, password=None): 10 self.username = username 11 self.password = password 12 13 def __repr__(self): 14 return '<User %r>' % (self.username) 15 16 class Channel(Base): 17 __tablename__ = 'channels' 18 id = Column(Integer, primary_key=True) 19 name = Column(String(60)) 20 from_user = Column(Integer, ForeignKey('users.id')) 21 to_user = Column(Integer, ForeignKey('users.id')) 22 23 class Message(Base): 24 __tablename__ = 'messages' 25 id = Column(Integer, primary_key=True) 26 message = Column(Text) 27 from_user = Column(Integer, ForeignKey('users.id')) 28 to_user = Column(Integer, ForeignKey('users.id')) 29 channel_id = Column(Integer, ForeignKey('channels.id'))
In this file, we create three classes which define the structure of the tables our app will be using.
Now import the files to api/app.py:
1# ./api/app.py 2 3 # [...] 4 from database import db_session 5 from models import User, Channel, Message 6 # [...]
Next, let’s close the connection to the database once an operation is complete. Add the following code to api/app.py after app = Flask(__name__) line:
1@app.teardown_appcontext 2 def shutdown_session(exception=None): 3 db_session.remove()
Create the database and tables
Now, let’s create the database and tables. Open up a new command window and change your directory to the project’s root folder, activate your virtualenv and then run the below commands:
1# Go to the Flask app 2 $ cd api 3 4 # Activate your virtualenv 5 6 # Enter python interactive shell 7 $ python 8 >>> from database import init_db 9 >>> init_db()
If there is no error, a new file named database.db will be created in the api folder.
⚠️ You might get an error if your virtualenv is not activated. You need to activate your virtualenv before running the above command.
Authentication Route
We are almost done. We need some endpoints for adding and authenticating our users.
The Werkzeug is a Python utility library which Flask depends on. Since we have installed Flask, we’ll also have access to the library.
Import the function for generating and checking password hash from the Werkzeug library to api/app.py file:
1#app.py 2 3 #[...] 4 from werkzeug.security import generate_password_hash, check_password_hash 5 #[...]
Register
Next, add the route for adding new users to api/app.py:
1@app.route('/api/register', methods=["POST"]) 2 def register(): 3 data = request.get_json() 4 username = data.get("username") 5 password = generate_password_hash(data.get("password")) 6 7 try: 8 new_user = User(username=username, password=password) 9 db_session.add(new_user) 10 db_session.commit() 11 except: 12 return jsonify({ 13 "status": "error", 14 "message": "Could not add user" 15 }) 16 17 return jsonify({ 18 "status": "success", 19 "message": "User added successfully" 20 }), 201
Here we created a new route named /api/register which is only available via a POST request. It will accept JSON object containing the new user details - username and password.
Finally, we added the user to the database. If an error occurred while adding, we inform the user with a JSON response:
1return jsonify({ 2 "status": "error", 3 "message": "Could not add user" 4 })
Else we respond with a success message:
1return jsonify({ 2 "status": "success", 3 "message": "User added successfully" 4 }), 201
Using a REST client like Postman, you can now register a new user:

To register users using Postman, open up the Postman app then,
- Close the first pop up that appears.
- Select POST as the request method.
- Add http://localhost:5000/api/register to the request URL field.
- Click on the Body tab right below the URL field.
- Then choose raw in the options that appear after the Body tab you just selected.
- In the same line with the raw option, select JSON (application/json) in the drop down.
- Now, add the user’s information you want to register to the text field that appears after the option you just selected:
1{ 2 "username": "<username>", 3 "password": "<password>" 4 }
Make sure to replace <username> and <password> placeholders with the information of the user you want to register.
-
Finally, click on the Send button to send the request to the server.
Register a couple of users and note down their credentials. We’ll use it to test the app later.
Login
One way of securing APIs and single page applications is by using JWT. It’s an encrypted token generated to securely transfer information between services. To implement JWT for our app, we will use the Flask-JWT-extended package. We have already installed the package so we’ll go ahead and use it.
Import the package and configure it to use Flask app in api/app.py:
1from flask_jwt_extended import ( 2 JWTManager, jwt_required, create_access_token, 3 get_jwt_identity 4 )
From the package, we imported the following functions:
- JWTManager — The Python class for configuring the package to use Flask app config.
- jwt_required — A decorator for authenticating our routes.
- created_access_token — A function for generating a token.
- get_jwt_identity — A function for getting the identity (in our case the username) from a token.
Next, let’s configure the package to use Flask app config. Add the below code to api/app.py immediately after app = Flask(__name__) line:
1app.config['JWT_SECRET_KEY'] = 'something-super-secret' # Change this! 2 jwt = JWTManager(app)
Next, add the login route to api/app.py:
1@app.route('/api/login', methods=["POST"]) 2 def login(): 3 data = request.get_json() 4 username = data.get("username") 5 password = data.get("password") 6 user = User.query.filter_by(username=username).first() 7 8 if not user or not check_password_hash(user.password, password): 9 return jsonify({ 10 "status": "failed", 11 "message": "Failed getting user" 12 }), 401 13 14 # Generate a token 15 access_token = create_access_token(identity=username) 16 17 return jsonify({ 18 "status": "success", 19 "message": "login successful", 20 "data": { 21 "id": user.id, 22 "token": access_token, 23 "username": user.username 24 } 25 }), 200
With this, we now have our login route - /api/login which is available via a POST requests. The route expects a expects a JSON object to be passed along that contains the details of the user.
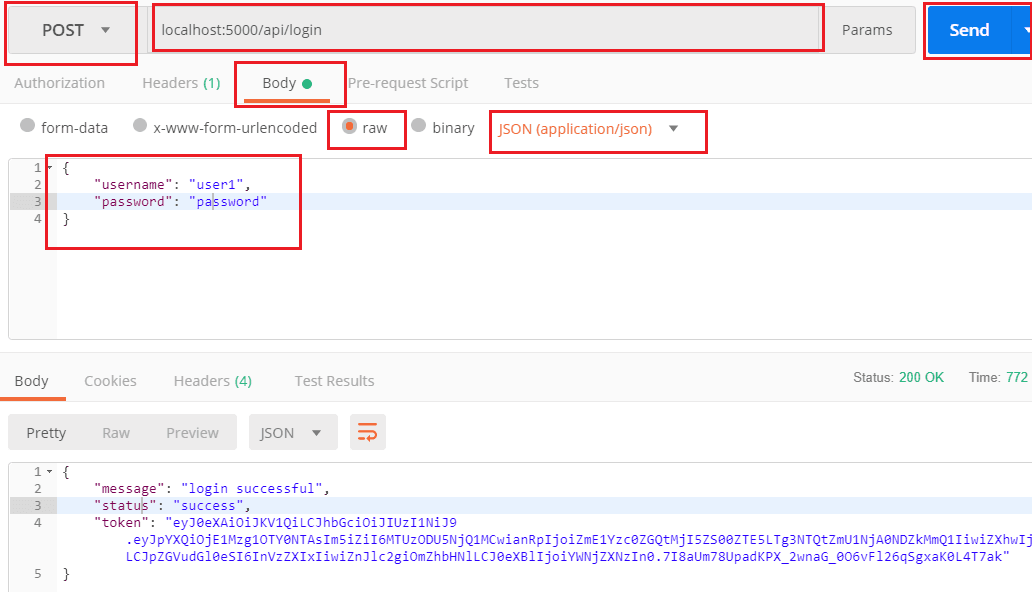
To test the login route, use the details of the user you just registered.
Conclusion
In this tutorial, we created our chat interface that was composed of Vue components. We also created the database for the chat application using SQLAlchemy.
Finally, we created a login and registration endpoint and also setup JWT for authenticating users and protecting our routes.


© 2026 Pusher Ltd. All rights reserved.
Pusher Limited is a company registered in England and Wales (No. 07489873) whose registered office is at MessageBird UK Limited, 3 More London Riverside, 4th Floor, London, United Kingdom, SE1 2AQ.