- Products

- Developers
- User stories
- Blog
- Pricing

Build a chat app with Angular
Introduction
In this tutorial, we are going to build a basic chat web application using Pusher and Angular, a popular Javascript framework.
What we are going to be building
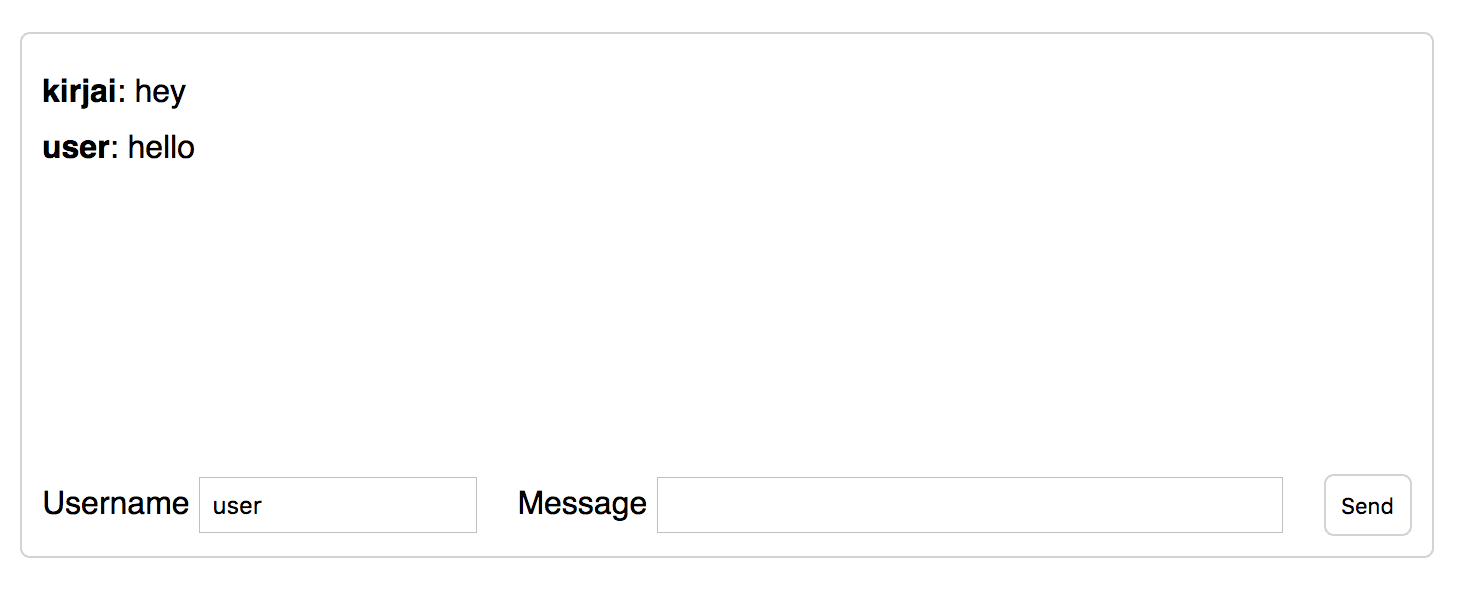
Using our application, users will be able to view and send messages using a private channel.
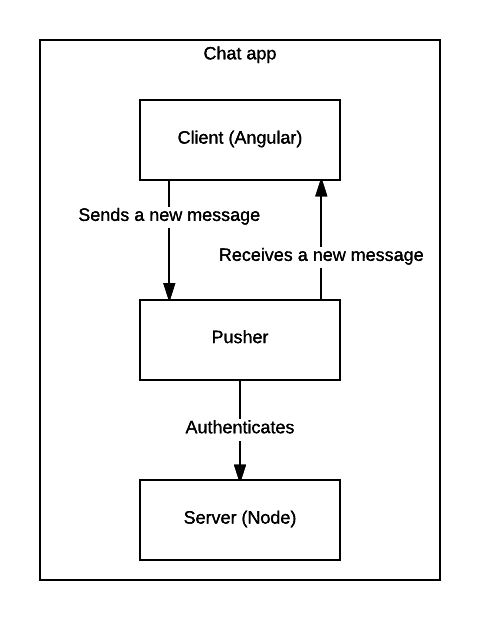
To achieve this, we are going to be using the Pusher API for sending and receiving messages in realtime. So make sure you have your Pusher account at hand, or sign up for free here. We will also write a tiny server-side Node app that will be used by Pusher to authenticate channel subscriptions received from our Angular front end. Let's look at how these three parts (Pusher, Server, Client) fit together.
Project structure
You can find the full code used in this post in this Github repo
We are going to keep our server-side and client-side apps separate in their respective directories.
1chat-app/ 2 chat-app-client/ 3 chat-app-server/
Building a Node app
First, let's get the server app out of the way by creating its directory and initializing npm.
1$ mkdir chat-app-server 2$ cd chat-app-server 3$ npm init
This will create a package.json file for our app. Now let's install our dependencies.
$ npm i --save body-parser express pusher
Note that we are installing the pusher Node library as a dependency.
It's also a good practice to define a npm start script. In our package.json file, let's replace the default scripts property with the following.
1// package.json 2"scripts": { 3 "start": "node server.js" 4}
This maps the command node server.js to an npm start command. However, server.js doesn't exist as a file yet, so let's create it next.
1// server.js 2const express = require('express'); 3const http = require('http'); 4const bodyParser = require('body-parser'); 5const api = require('./api.js'); 6const port = process.env.PORT || '3000'; 7const app = express(); 8 9// define middleware 10app.use(bodyParser.json()); 11app.use(bodyParser.urlencoded({ extended: false })); 12app.use((req, res, next) => { 13 res.header("Access-Control-Allow-Origin", "*") 14 res.header("Access-Control-Allow-Headers", "Origin, X-Requested-With, Content-Type, Accept") 15 next(); 16}); 17app.use('/', api); 18app.set('port', port); 19 20const server = http.createServer(app); 21server.listen(port, () => console.log(`Running on port ${port}`));
The calls to our endpoint will be coming in from a different origin, therefore we need to make sure we include the CORS headers (Access-Control-Allow-Origin). If you are unfamiliar with the concept of CORS headers, you can find more information here.
This all is standard Node application configuration, nothing specific to our app.
API Routes
In our server.js file we are referencing a non-existent file api.js on line 5. That's the file where we will define our API routes and the logic behind them.
1// api.js 2const express = require('express'); 3const router = express.Router(); 4const Pusher = require('pusher'); 5 6router.get('/', (req, res) => { 7 res.send('all good'); 8}); 9 10module.exports = router;
We've defined one route for our app: /, that returns an all goodresponse. Now, let's take a step back and define what we want our API to do based on our requirements.
Pusher Channel Authentication
Considering that we will be triggering Pusher events directly from our client, we need to implement an authentication endpoint. This endpoint will be called by Pusher directly in order to authenticate any subscription it receives from our front end.
Pusher will be making a POST request to an endpoint that we will provide. Therefore, let's create a POST /pusher/auth endpoint.
1// api.js 2router.post('/pusher/auth', (req, res) => { 3 console.log('POST to /pusher/auth'); 4});
Whenever Pusher calls the authentication endpoint, it sends a socket_id and channel_name that we will use to authenticate the incoming subscription.
1// api.js 2router.post('/pusher/auth', (req, res) => { 3 console.log('POST to /pusher/auth'); 4 const socketId = req.body.socket_id; 5 const channel = req.body.channel_name; 6});
Next step is to authenticate the subscription using the extracted socketId and channel values from the request. Since we will be telling Pusher to authenticate the subscription, we need to initialize Pusher by instantiating it with our Pusher account credentials first. Let's do that at the top of our api.js file.
1// api.js 2const pusher = new Pusher({ 3 appId: 'xxxxxx', 4 key: 'xxxxxxxxxxxxxxxxxxxx', 5 secret: 'xxxxxxxxxxxxxxxxx', 6});
You can find these values by navigating to a specific Pusher application from your personal Pusher dashboard.
We now have an instance of Pusher available to us that we can use for authenticating subscriptions.
1// api.js 2router.post('/pusher/auth', (req, res) => { 3 const socketId = req.body.socket_id; 4 const channel = req.body.channel_name; 5 const auth = pusher.authenticate(socketId, channel); 6 res.send(auth); 7});
That is all the logic we need to write for our Node app. All that is left now is to run it so that it's ready to start serving requests. We start our app by running npm start.
Building an Angular web app
As you remember, the client app's responsibility is to send and receive new messages from Pusher in real time. Let's get going.
Angular app initialization
We are going to use Angular CLI to quickly scaffold our application. You can follow the installation instructions if you don't have Angular CLI installed already.
After you've installed Angular CLI, it's time to initialize our Angular application. Navigate to the chat-app directory and run the following command to scaffold an application.
$ ng new chat-app-client --skip-tests --routing
After the installation is finished we need to install Pusher's client library.
$ npm i --save pusher-js
Installing the library isn't enough, as we also want to include it on our page. In order to do that we need to add the library to third party scripts to be loaded by Angular CLI. All CLI config is stored in .angular-cli.json file. Modify the scripts property to include the link to pusher.min.js.
1// .angular-cli.json 2"scripts": ["../node_modules/pusher-js/dist/web/pusher.min.js"]
We are now ready to write some more code. However, let's take a step back and figure out the application structure.
Angular application structure
Nothing is stopping us from writing the whole app inside the AppComponent, however, if we want to follow best practices (and we do), then we need to avoid that. AppComponent is best left for any startup initialization we need to do for our app.
Considering that our app is basic, I can only see one other component we can create - MessagesComponent that will be in charge of displaying existing messages, as well as collecting user input and sending new messages.
There will also be one service that we'll need to create - a PusherService that deals with Pusher.
With CLI, we can easily generate components and services. In our instance, we want to run the following commands.
1$ ng g c messages 2$ ng g s pusher
Note:
gis an alias for ageneratecommand,cis an alias for component andsis an alias for a service
We now have all our components in place. Even though our service has been created, it hasn't been provided. Therefore we need to manually add it as a provider to the correct application module. However, because we only have one module, AppModule, we can only provide it in there.
1// app.module.ts 2import { PusherService } from './pusher.service'; 3... 4@NgModule({ 5 providers: [PusherService], 6 ... 7})
Pusher initialization
First, let's initialize Pusher. When we were initializing Pusher on the server, we needed three properties: appId, key and secret, however, we only need the key on the client.
In a real world application, you are likely to use different Pusher keys depending on the environment you are in (like development or production), therefore it is a good idea to store our Pusher key as a property on the environment constant.
Angular CLI creates an environment.ts file that is used to store environment-specific variables. Let's store our Pusher key there.
1// environment.ts 2export const environment = { 3 pusher: { 4 key: '<YOUR_PUSHER_KEY>', 5 } 6};
Now we can use the environment variable in our PusherService when initializing an instance of Pusher. Upon initialization, we will store it in a property on the service that any other component can use.
1// pusher.service.ts 2import { environment } from '../environment/environment'; 3... 4export class PusherService { 5 pusher: any; 6 7 constructor() { 8 // replace xxxx's with your Pusher application key 9 this.pusher = new Pusher(environment.pusher.key); 10 } 11}
At this point, Typescript will complain about our new Pusher(..) expression, because we haven't imported Pusher. However, we don't need to import it, as it exists in the Window object in the browser because we're including the pusher-js library in our index.html. Therefore, to silence the Typescript compiler, we need to declare Pusher at the top of the file along with other imports.
1// pusher.service.ts 2declare const Pusher: any; 3...
In addition to the application key, we also need to instantiate Pusher with our authentication endpoint that we created with Node.
1constructor() { 2 // replace xxxx's with your Pusher application key 3 this.pusher = new Pusher('xxxxxxxxxxxx', { 4 authEndpoint: 'http://localhost:3000/pusher/auth', 5 }); 6}
localhost:3000is where our Node application is running.
Now we can have access to our pusher instance through the PusherService class.
Pusher works by publishing events to a specific channel. Whoever is subscribed to that channel will receive the published event. Events can have data associated with them. Our client will be receiving and triggering events to a predefined channel. On top of storing the Pusher instance as a property on the PusherService, let's also store the channel that we will be receiving and triggering messages on.
1// pusher.service.ts 2... 3export class PusherService { 4 ... 5 messagesChannel: any; 6 7 constructor() { 8 ... 9 this.messagesChannel = this.pusher.subscribe('private-messages'); 10 } 11}
It is at this point, during the subscription to a channel that Pusher sends an authentication request to our specified endpoint.
In the snippet above, private-messages is the name of our channel. Triggering events on the front end only works with private or presence channels, therefore we have to prefix our channel's name with private.
MessagesComponent
Our Angular project was initialized with routing because we passed a --routing flag with the initialization command. However, we need to tell Angular to use our MessagesComponent for the default route. Routing is configured in app-routing.module.ts.
1// app-routing.module.ts 2import { MessagesComponent } from './messages/messages.component'; 3... 4 5const routes: Routes = [ 6 { 7 path: '', 8 component: MessagesComponent, 9 } 10]; 11...
Now that MessagesComponent loads for our default route, let's work on it.
One of this component's responsibilities is to display existing messages. We could achieve that with an array of messages that we are looping through in the view and display them.
1// messages.component.ts 2... 3interface Message { 4 text: string; 5 user: string; 6} 7export class MessagesComponent { 8 messages: Array<Message>; 9 constructor() { 10 this.messages = []; 11 } 12}
Note: one of the most powerful Typescript features is (obviously) types. They are there to help you, so make sure you use them. Like in the snippet above, I created an interface for an individual message object. As a result, I can specify that
messagesproperty is an array ofMessageand if I try putting anything else in it - Typescript will not allow me to.
We can now loop over the messages array to display individual messages.
1// messages.component.html 2<div *ngFor="let message of messages"> 3 <b>{{ message.user }}</b>: {{ message.text }} 4</div>
Because the messages property is initialized to an empty array, nothing will be displayed. Now that we have a way of storing all messages, let's write the logic to populate our storage.
Realtime messages from Pusher
New messages are going to be coming in via Pusher. We have the channel that will be transmitting messages and it's stored in the PusherService. So what we want to do is start listening for events on that channel and handle whenever an event is received.
Because we want to start listening for events on the channel as soon as the MessagesComponent is initialized, we need to use Angular component lifecycle hooks. Specifically, we are interested in the OnInit lifecycle hook, as it is triggered as soon as the component initialization is finished.
Before we use it, we need to let Angular know that we want to be using this hook by specifying that our component implements the OnInit interface.
1// messages.component.ts 2import { OnInit } from '@angular/core'; 3... 4export class MessagesComponent implements OnInit { 5 ... 6 7 ngOnInit() {} 8}
ngOnInit is the method that will be run when the OnInit lifecycle hook is triggered by Angular. That makes it a perfect place to run any sort of initialization logic, in this case, start listening for events. For that, we need to get access to the messagesChannel property on the PusherService
Before we can use PusherService inside our component, we need to inject it as a dependency of this component.
1// messages.component.ts 2import { PusherService } from '../pusher.service'; 3 4export class MessagesComponent { 5 ... 6 constructor(private pusherService: PusherService) {...} 7}
Now we can start listening for events on the messagesChannel property of PusherService.
1// messages.component.ts 2... 3export class MessagesComponent { 4 ... 5 ngOnInit() { 6 this.pusherService.messagesChannel.bind('client-new-message', (message) => { 7 this.messages.push(message); 8 }); 9 } 10}
In the snippet above, we are listening for client-new-message events on the messages channel. The second parameter of the bind is the callback function. It is a function that will be called whenever an event is received with the event data. In our case, the data associated with the event will be the message, therefore we are pushing the new message into our array of messages.
Triggering Pusher events
In the MessagesComponent we need to collect the user's username and message text in order to send it as a new event to Pusher. First, let's add two input fields in our HTML.
1// messages.component.html 2... 3<label for="userName">Username</label> 4<input type="text" id="userName" [(ngModel)]="userName"> 5 6<label for="message">Message</label> 7<input type="text" id="message" [(ngModel)]="messageText"> 8 9<button (click)="sendMessage(userName, messageText)">Send</button>
Two things to note here:
- We are using Angular's two-way binding with
ngModelto record user input. - We have added a click handler on the button that calls a method
sendMessageon our component (this method doesn't exist yet, we will write it soon) with theuserNameandmessageTextvalues.
Because we will be are triggering events directly from the client, we need to prefix the event name with
client.There are also other restrictions that apply when triggering events from the client. Even though I will be pointing them out as we go in this article, I suggest you read the Pusher documentation on the topic to avoid confusion.
Before we can start triggering events from the client, we need to tell Pusher that we intend to do so. You can do that by navigating to your application's settings on your Pusher dashboard.

Inside our sendMessage method, we will want to trigger an event named client-new-message with the message assembled from this method's arguments. On top of that, we need to add this message to our array of messages.
1// message.component.ts 2... 3export class MessagesComponent implements OnInit { 4 ... 5 6 sendMessage(user: string, text: string) { 7 const message: Message = { 8 user: user, 9 text: text, 10 } 11 this.pusherService.messagesChannel.trigger('client-new-message', message); 12 this.messages.push(message); 13 } 14}
Finally, we can send messages and display realtime messages!
You might wonder why are we adding the message that we just triggered an event with to our messages array. Surely, it should come back to us as in our event listener that we've defined in the OnInit lifecycle hook of this component?
Well, not exactly. What our event listener does is listen for events on the channel that originated somewhere else, that is a very important aspect. An event from the same origin will not be received on the channel subscription in the same origin.
How can we see our application in all its glory? First, we need to make sure our server is running. Remember, to run it we simply need to run npm start from our chat-app-server directory. Second, we need to run our front-end application, which we can easily do with Angular CLI, by running ng serve from its root directory. By default, the application will be run on localhost:4200.
Now in order to actually test that our chat application is fully operational, we can open two browser tabs/windows side by side with our Angular application running. Messages sent from one window will appear in another window. Voila, our chat app is fully functional! ?
Congratulations, you have built a chat app with Node, Angular and Pusher!


© 2026 Pusher Ltd. All rights reserved.
Pusher Limited is a company registered in England and Wales (No. 07489873) whose registered office is at MessageBird UK Limited, 3 More London Riverside, 4th Floor, London, United Kingdom, SE1 2AQ.