- Products

- Developers
- User stories
- Blog
- Pricing

Build a streaming platform and watch videos with your friends
- Introduction
- Prerequisites
- Features used
- Implementation steps
- Step 1: Set up Channels
- Create an app
- Step 2: Enable Watchlist events and Subscription Count features
- Step 3: Get App Keys
- Step 4: Set up the codebase
- Step 5: Building the backend
- Step 6: Building the frontend
- Set up the connection page
- Set up the dashboard
- Set up Watchlist Online Status and Subscription Counting events
- Step 7: Test the app
- See it all in action
- Conclusion
- Pro tips
Introduction
When building applications that allow multiple users to interact with one another, it is essential to display their online presence. That way each user gets an idea of how many other users are currently online.
Presence channels are a great solution to keep track of who is subscribed to a channel and notify channel members when someone joins or leaves. However, Presence channels are limited to 100 members. What if you have more users than that?
Instead of Presence channels, you can use Subscription Counting events to get updates about the number of people watching a video stream.
Now, what if end users want to know more than just the number of users watching a stream? With the Watchlist Online Status feature, you can build the presence functionality at the app level. This means end users will get notified when the people they follow are online.
In this tutorial, we explain how to build a live streaming application that displays the online status of users you are interested in and who are currently streaming a video.
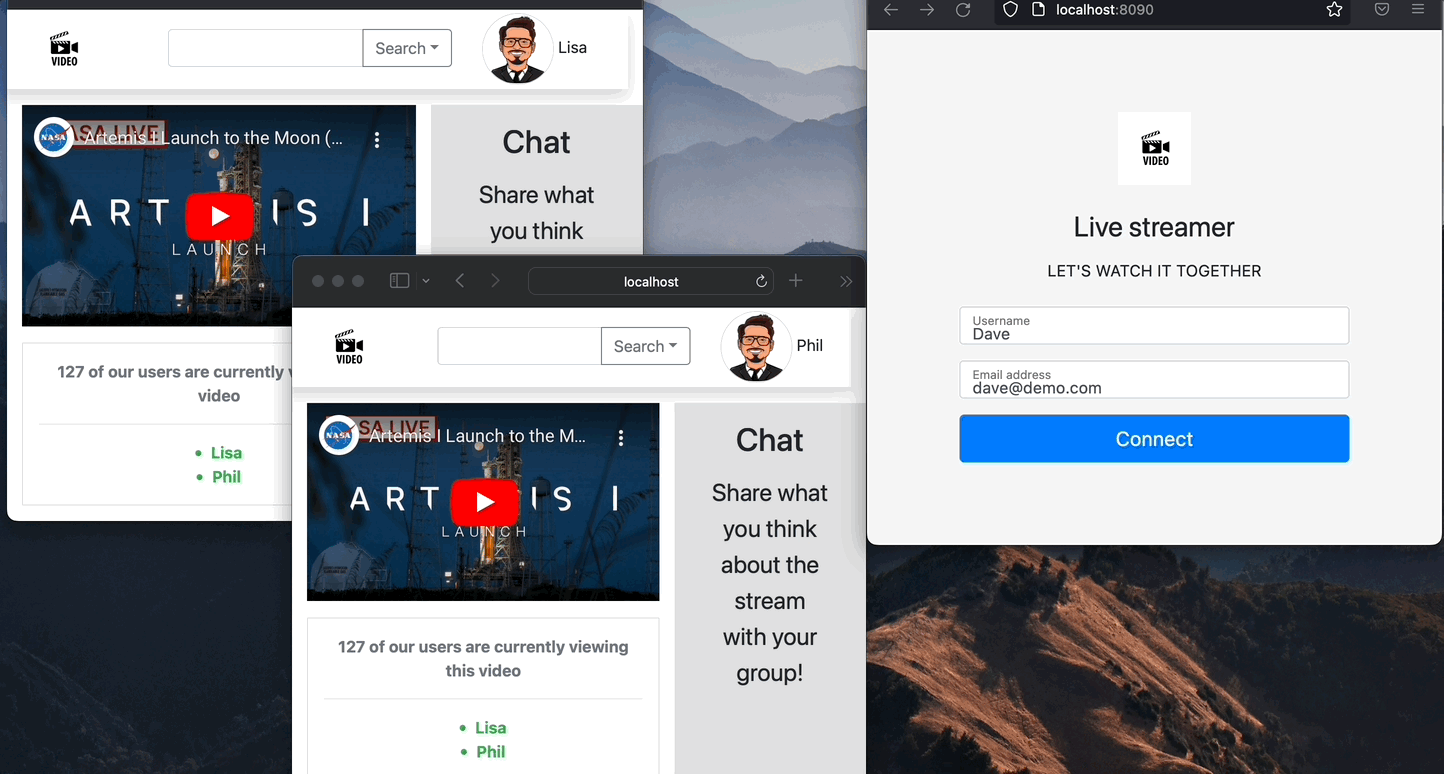
Here’s a demo of the final application:
Prerequisites
Before you can start implementing this tutorial, you need the following:
- An IDE of your choice, e.g., Visual Studio Code.
- Go (version >= 0.10.x) installed on your computer. Check out the Installation guide.
- JavaScript (Vue) installed on your computer. Go to the Installation guide
Features used
Implementation steps
Here's how to build a streaming platform using Pusher Channels.
Step 1: Set up Channels
This section exlains how to set up Pusher Channels.
Create an app
- If you don’t have a Pusher account, sign up for free. If you are already familiar with Channels and have an account, skip this step and sign in.
NOTE: The Pusher sandbox plan is free and fully featured. It comes with 200,000 messages per day and 100 concurrent connections (total number of simultaneous connections across your app). This plan is more than sufficient for this tutorial app.
Navigate to Channels > Create app.
Configure your app by proving the following information:
- App name - Name your app. This is just for your reference and you can change this name later.
- Cluster - The physical location of the servers that handle requests from your Channels app. You cannot change the cluster afterward. Read more about Cluster configuration.
- Choose a tech stack you intend to integrate Pusher with for a better setup experience (optional).
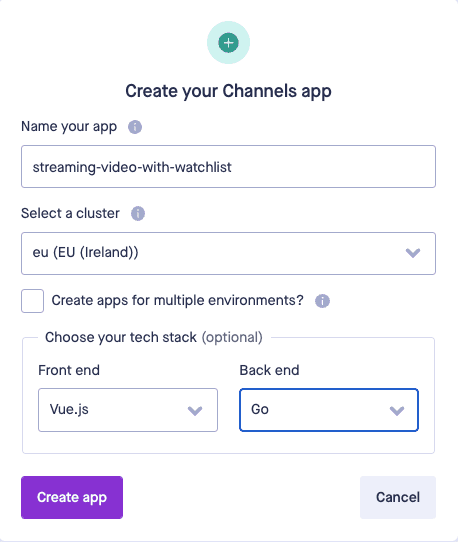
4. Click Create app to proceed.
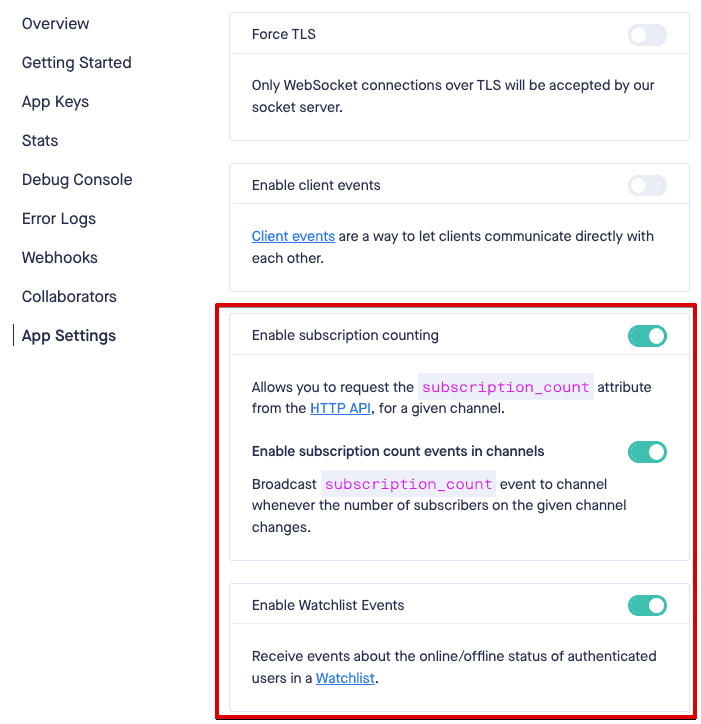
Step 2: Enable Watchlist events and Subscription Count features
To build this particular use case, we’ve mentioned we are using Subscription Counting, and Watchlist events. To use them, you have to enable them both in the Pusher dashboard.
To enable these features, navigate to the channel app you are currently building, go to App Settings, and toggle the Enable subscription counting and Enable Watchlist Events options.
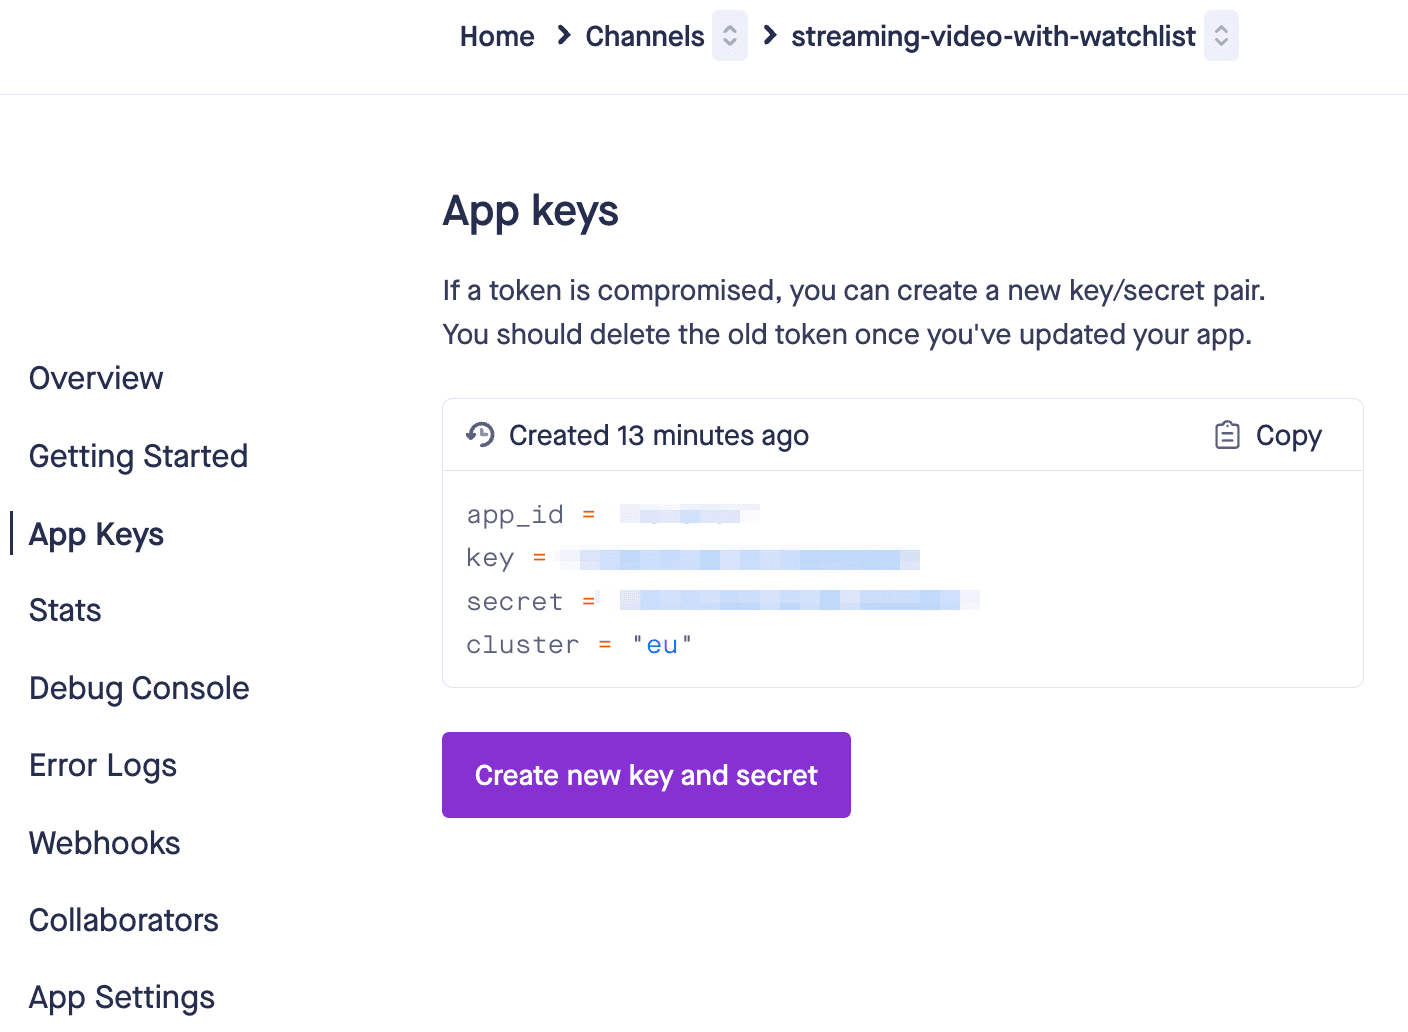
Step 3: Get App Keys
To use Channels, you need app keys for your application. Go to App Keys and copy and save these keys for later.
Step 4: Set up the codebase
We will build the backend server in Go.
- Create a new project directory, let’s call this directory
streaming-video-with-watchlist.
1$ mkdir streaming-video-with-watchlist 2$ cd streaming-video-with-watchlist
- Save Pusher App credentials and create a new
.envfile.
touch .env
- Paste in the following contents to the newly created file, and update values with your app credentials obtained from the dashboard. Refer back to Step 3 - Get App Keys.
1PUSHER_APP_ID="YOUR_PUSHER_APP_ID" 2PUSHER_APP_KEY="YOUR_PUSHER_APP_KEY" 3PUSHER_APP_SECRET="YOUR_PUSHER_APP_SECRET" 4PUSHER_APP_CLUSTER="YOUR_PUSHER_APP_CLUSTER"
- Create a new Go file and call it server.go, this file will be where our entire backend server logic will be.
$ touch server.go
- Pull in the latest Go Pusher and godotenv packages with these commands:
1$ go mod init 2 $ go get github.com/pusher/pusher-http-go/v5 3 $ go get github.com/joho/godotenv
Step 5: Building the backend
Open the server.go file and paste in the following contents to the newly created file:
1package main 2 3import ( 4"encoding/json" 5 "fmt" 6 "io/ioutil" 7 "log" 8 "net/http" 9 "os" 10 "github.com/joho/godotenv" 11 "github.com/pusher/pusher-http-go/v5" 12) 13 14var teams = map[string][]string{ 15 "group-Dave": {"Dave", "Lisa", "Phil", "Britney", "Phil"}, 16 "group-Lora": {"Lora", "Frank", "Peter", "Janine"}, 17} 18 19type user struct { 20 Username string `json:"username" xml:"username" from:"username" query:"username" 21 Email string `json:"email" xml:"email" form:"email" query:"email" 22} 23 24var loggedInUser user 25var client = pusher.Client{} 26 27func main() { 28 err := godotenv.Load(".env") 29 if err != nil { 30 log.Fatal("Error loading .env file") 31 } 32 33 client = pusher.Client{ 34 AppID: os.Getenv("PUSHER_APP_ID") 35 Key: os.Getenv("PUSHER_APP_KEY") 36 Secret: os.Getenv("PUSHER_APP_SECRET"), 37 Cluster: os.Getenv("PUSHER_APP_CLUSTER"), 38 } 39 40 http.Handle("/", http.FileServer(http.Dir("./static"))) 41 http.HandleFunc("/isLoggedIn", isUserLoggedIn) 42 http.HandleFunc("/new/user", NewUser) 43 http.HandleFunc("/pusher/user-auth", pusherUserAuth) 44 45 log.Fatal(http.ListenAndServe(":8090", nil)) 46}
The code above:
- Imports all the packages that are required for the application to work, including Pusher.
- Instantiates the Pusher client that we will use to authenticate users from the client side. It uses credentials we have saved in the .env file recently.
- Defines a user struct and gives it two properties—username and email—so that the app knows how to handle incoming payloads and correctly bind it to a user info object.
- Creates the global struct to store user names and their friends’ list. This is a very naive implementation of observing group of people logic.
NOTE For optimal use of this feature, a watchlist should be short. Otherwise, the user may be bombarded with events about many users going online and offline.
- Creates a global instance of the user struct so that we can use it to store a user’s name and email. This instance is going to somewhat serve the purpose of a session on a server, we will check that it is set before allowing a user to access the dashboard of this application.
The main function registers four endpoints:
/— Loads all the static files from the static directory./isLoggedIn— Checks if a user is logged in and returns a fitting message./new/user— Connects a new user and initializes the global user instance./pusher/user-auth— Pusher user authentication endpoint.
- In the same file, just above the main function, add the code for the handlers function of the
/isLoggedInand/new/userendpoints:
1func isUserLoggedIn(rw http.ResponseWriter, req *http.Request) { 2 if loggedInUser.Username != "" && loggedInUser.Email != "" { 3 json.NewEncoder(rw).Encode(loggedInUser) 4 } else { 5 json.NewEncoder(rw).Encode("false") 6 } 7} 8 9func NewUser(rw http.ResponseWriter, req *http.Request) { 10 body, err := ioutil.ReadAll(req.Body) 11 12 if err != nil { 13 panic(err) 14 } 15 16 err = json.Unmarshal(body, &loggedInUser) 17 18 if err != nil { 19 panic(err) 20 } 21 22 json.NewEncoder(rw).Encode(loggedInUser) 23}
To decide who joins the streaming, we want to collect some data about the user. The app receives a new user’s details in a POST request and binds it to an instance of the user struct. We further use this user instance to check if a user is logged in or not.
Since your servers are the authority on who your users are, and what they can access, Pusher client libraries can make calls to endpoints of your choice to supply signed authentication tokens for the bearing user.
The user object passed to the authenticateUser method includes:
- ID – A non-empty string is required
- Email - Optional field
- Watchlist - An array of user IDs. These user IDs represent a circle of interest (e.g., friends or followers) whose online/offline presence will be exposed to the user.
- As the last step of backend-side implementation, let’s add the code for the
/pusher/user-authendpoint:
1func pusherUserAuth(res http.ResponseWriter, req *http.Request) { 2 params, _ := ioutil.ReadAll(req.Body) 3 4 userData := map[string]interface{}{ 5 "id": loggedInUser.Username, 6 "email": loggedInUser.Email, 7 "watchlist": getUserWatchlist(loggedInUser.Username), 8 } 9 10 response, err := client.AuthenticateUser(params, userData) 11 if err != nil { 12 panic(err) 13 } 14 15 fmt.Fprintf(res, string(response)) 16} 17 18func getUserWatchlist(userName string) []string { 19 for key := range teams { 20 for _, v := range teams[key] { 21 if v == userName { 22 return teams[key] 23 } 24 } 25 } 26 return []string{} 27}
Pusher authenticates a user once per connection session. Authenticating a user gives your application access to user-based features in Pusher Channels.
For example, for sending events to a user based on user id or enables you to build presence functionality at the app level via Online Status events.
Step 6: Building the frontend
- In the root directory of the project, create a
staticfolder and enter it by using the commands:
1$ mkdir static 2$ cd static
- Create two files in the directory,
index.htmlanddashboard.html.
1$ touch index.html 2$ touch dashboard.html
Set up the connection page
In the index.html file, we will write the HTML code that allows users to connect to the application using their name and email.
Open the index.html file, copy the code from here, and paste it in (take your time to go through it before continuing).
NOTE: Video is an embed from YouTube and may not play depending on your region.
The script you just pasted above submits user data to the backend Go server and navigates the browser’s location to the dashboard’s URL.
Now it’s high time to build the dashboard!
Set up the dashboard
- Open the
dashboard.htmlfile and like before, copy the source code from here and paste it in (take your time to go through it before continuing).
NOTE: Replace the YOUR__PUSHER_APP_* values with your app credentials obtained from the dashboard. Refer back to Step 3: Get App Keys.
Also, Video is an embed from YouTube and may not play depending on your region.
Set up Watchlist Online Status and Subscription Counting events
Let's go through the contents of the <script> tag in the dashboard.html snippet you pasted above.
We created some Vue data variables to display reactive updates.
1var app = new Vue({ 2 el: '#app', 3 data: { 4 username: '', 5 count: 0, 6 addedMember: '', 7 removedMember: '', 8 connectedMembers: [] 9},
We also registered a created() lifecycle hook that checks if a user is connected to the backend server and eligible to view the dashboard before calling the onLogin() method.
1created: function(){ 2 let that = this; 3 4 fetch('/isLoggedIn', { 5 method: 'GET', 6 headers: { 7 'Accept': 'application/json', 8 'Content-Type': 'application/json' 9 } 10 }) 11 .then(function(res){ return res.json(); }) 12 .then(function(data){ 13 if(data != 'false'){ 14 that.username = data.username; 15 } else { 16 window.location.replace( "/" ); 17 } 18 }); 19 20 this.onLogin() 21},
The onLogin() method first configures a Pusher instance using the keys provided on the dashboard. Then we subscribe to Watchlist Online Status events. This practically means that when anybody from the user’s watchlist appears online or goes offline your user gets a notification.
1methods: { 2 onLogin: function(){ 3 let that = this 4 5 const pusher = new Pusher('YOUR_PUSHER_APP_KEY', { 6 userAuthentication: { 7 endpoint: "/pusher/user-auth", 8 }, 9 cluster: 'YOUR_PUSHER_APP_CLUSTER' 10 }); 11 12 pusher.user.watchlist.bind('online', (event) => { 13 event.user_ids.forEach(member => { 14 if (that.username !== member) { 15 that.addedMember = member 16 that.$refs.added.classList.add('visible'); 17 that.$refs.added.classList.remove('invisible'); 18 19 setTimeout(function() { 20 that.$refs.added.classList.remove('visible'); 21 that.$refs.added.classList.add('invisible'); 22 }, 3000) 23 } 24 25 that.connectedMembers.push(member) 26 }); 27 }); 28 29 pusher.user.watchlist.bind('offline', (event) => { 30 event.user_ids.forEach(member => { 31 if (that.username !== member) { 32 that.removedMember = member 33 34 that.$refs.removed.classList.add('visible'); 35 that.$refs.removed.classList.remove('invisible'); 36 37 setTimeout(function() { 38 that.$refs.removed.classList.remove('visible'); 39 that.$refs.removed.classList.add('invisible'); 40 }, 3000) 41 } 42 43 var index = that.connectedMembers.indexOf(member); 44 if (index > -1) { that.connectedMembers.splice(index, 1) } 45 }); 46 }); 47 ...
- Call
pusher.signin()to authenticate the user and notify all their followers that the user is online now.
1... 2 pusher.signin() 3...
- Subscribe to the public channel and bind to the subscription counting events. So we can track the current number of viewers.
1... 2let channel = pusher.subscribe('my-channel'); 3 4channel.bind('pusher:subscription_count', (data) => { 5 that.count = data.subscription_count; 6});
Step 7: Test the app
Here we are. We are done with building the app!
We can test the application by compiling down the Go source code and running it with this command from the root of the project:
1$ cd ../ 2$ go mod tidy 3$ go run server.go
The app should be running now and you can access it through http://127.0.0.1:8090.
Here’s a display of how the application should look:
See it all in action
Check out the GitHub repo for this project to see the demo code altogether.
Conclusion
In this tutorial, we have learned how to leverage Pusher to build a realtime application where users can see which of their friends are online, and see how many users are watching the live stream.
This demo app gives you an idea of how you can build realtime apps with Pusher Channels and provide a great user experience.
The source code for this tutorial is available on GitHub.
Pro tips
Our tutorials serve to showcase what can be done with our developer APIs. To further inspire you, here are a few ways how you can level up this use case!
- Implement actual logic for user watchlist creation.
- Add the ability to chat with other viewers.
- Add the ability to send messages to particular users.
Sign up for a Pusher account and get started with this tutorial.


© 2026 Pusher Ltd. All rights reserved.
Pusher Limited is a company registered in England and Wales (No. 07489873) whose registered office is at MessageBird UK Limited, 3 More London Riverside, 4th Floor, London, United Kingdom, SE1 2AQ.