- Products

- Developers
- User stories
- Blog
- Pricing

Using Pusher Beams to notify users of a new release of your iOS app
Introduction
In this tutorial, we are going to look into building a todo iOS app with React Native. The most interesting part of this tutorial is the fact that we will be implementing push notifications via Pusher Beams. Every time an updated version of the app is released to the App Store, all devices that have the app installed will get a notification informing them of the available upgrade.
Prerequisites
To follow along in this tutorial you need the following things:
- Xcode installed on your machine. Download Xcode.
- Know your way around the Xcode IDE.
- React Native. Find out how to install it. You will need to follow the section Building Projects with Native Code.
- Carthage installed on your machine. Install it with
brew install carthage. - A Pusher Beams account. Sign up for a free Pusher account or log in
If you happen not to have
brewinstalled, you can do so by running/usr/bin/ruby -e "$(curl -fsSL https://raw.githubusercontent.com/Homebrew/install/master/install)".
Creating the iOS project
We will be naming our project todoApp. To do that we will be needing to make use of the react-native CLI tool to create a new iOS project. Open a terminal and run the following command:
$ react-native init todoApp
Depending on your internet connection, the above command should take some time. Once it is done, we are ready to add functionality to our iOS app.
The first thing we need to do is to actually build a useful app - the to-do app. Open up the project in your favorite editor, then create a file called Todo.js. It will serve as the model for our project. In Todo.js, you will have to paste the following code:
1// todoApp/Todo.js 2 3 import { AsyncStorage } from 'react-native'; 4 5 export default class Todos { 6 constructor() { 7 this.tasks = { 8 items: [], 9 }; 10 11 this.all(() => {}); 12 } 13 14 // register a callback event passing the items found in the store 15 // as it's arguments 16 all = callback => { 17 AsyncStorage.getItem('pushertutorial', (err, allTasks) => { 18 if (err !== null) { 19 return; 20 } 21 22 if (allTasks === null) { 23 return; 24 } 25 26 this.tasks = JSON.parse(allTasks); 27 callback(this.tasks.items); 28 }); 29 }; 30 31 // saves a new item to the store 32 save = item => { 33 this.tasks.items.push(item); 34 return AsyncStorage.setItem('pushertutorial', JSON.stringify(this.tasks)); 35 }; 36 37 // deletes an item based off an index from the store. 38 delete = index => { 39 this.all(items => { 40 const tasks = { 41 items: items.filter((task, idx) => { 42 return idx !== index; 43 }), 44 }; 45 AsyncStorage.setItem('pushertutorial', JSON.stringify(tasks)); 46 }); 47 }; 48 }
The above code uses the default key-value pair storage system bundled with React Native called AsyncStorage to retrieve and save our to-do items. Read more about AsyncStorage.
Moving on, we will have to actually make use of the Todo model we created earlier. To do this, you will need to edit the App.js file already created by React Native during the installation earlier. You should edit App.js and paste in the following:
1// todoApp/App.js 2 3 import React, { Component } from 'react'; 4 import { 5 AppRegistry, 6 StyleSheet, 7 Text, 8 View, 9 FlatList, 10 AsyncStorage, 11 Button, 12 TextInput, 13 Keyboard, 14 Platform, 15 } from 'react-native'; 16 import Todos from './Todo'; 17 18 export default class TodoList extends Component { 19 constructor(props) { 20 super(props); 21 22 this.state = { 23 tasks: [], 24 text: '', 25 }; 26 27 this.todos = new Todos(); 28 this.syncTodos(); 29 } 30 31 syncTodos = () => { 32 this.todos.all(items => { 33 this.setState({ 34 tasks: items, 35 text: '', 36 }); 37 }); 38 }; 39 40 updateTaskText = text => { 41 this.setState({ text: text }); 42 }; 43 44 addTask = () => { 45 let notEmpty = this.state.text.trim().length > 0; 46 47 if (notEmpty) { 48 let { tasks, text } = this.state; 49 50 this.todos.save({ text }); 51 this.syncTodos(); 52 } 53 }; 54 55 deleteTask = i => { 56 this.todos.delete(i); 57 this.setState({ 58 tasks: this.state.tasks.filter((task, index) => { 59 return index !== i; 60 }), 61 }); 62 }; 63 64 render() { 65 return ( 66 <View style={[styles.container, { paddingBottom: 10 }]}> 67 <FlatList 68 style={{ width: '100%' }} 69 data={this.state.tasks} 70 keyExtractor={(item, index) => item.text} 71 renderItem={({ item, index }) => ( 72 <View key={index}> 73 <View 74 style={{ 75 flexDirection: 'row', 76 alignItems: 'center', 77 justifyContent: 'space-between', 78 }} 79 > 80 <Text 81 style={{ 82 paddingTop: 2, 83 paddingBottom: 2, 84 fontSize: 18, 85 }} 86 > 87 {item.text} 88 </Text> 89 <Button title="X" onPress={() => this.deleteTask(index)} /> 90 </View> 91 </View> 92 )} 93 /> 94 <TextInput 95 style={styles.input} 96 onChangeText={this.updateTaskText} 97 onSubmitEditing={this.addTask} 98 value={this.state.text} 99 placeholder="Add a new Task" 100 returnKeyType="done" 101 returnKeyLabel="done" 102 /> 103 </View> 104 ); 105 } 106 } 107 108 const styles = StyleSheet.create({ 109 container: { 110 flex: 1, 111 justifyContent: 'center', 112 alignItems: 'center', 113 backgroundColor: '#F5FCFF', 114 padding: 10, 115 paddingTop: 20, 116 }, 117 input: { 118 height: 40, 119 paddingRight: 10, 120 paddingLeft: 10, 121 borderColor: 'gray', 122 borderWidth: 1, 123 width: '100%', 124 }, 125 });
While the above code is simple and straightforward, I would like to explain deleteTask. After deleting an item from the database, we remove the app from the local state too. This is to allow a UI update.
You can now run this app by either:
react-native run-ios- Clicking the play button in Xcode. ( highly recommended ).
At this stage, you should have the following:
Push notifications
You have worked hard into this new release of your app, it wouldn’t make any sense to have just 2% of your existing users making use of the newer release - including critical bug fixes and some UI improvements probably. Sending push notifications to users can be a good way to keep your users informed.
In this section, we will configure and add Pusher Beams to our application to help us deliver push notifications about updates to users who have the app installed.
We will be making use of two packages to achieve this.
- The official iOS SDK. GitHub Repo.
- The React Native bridge for the official iOS SDK. GitHub Repo.
Using the React Native bridge requires the installation of the official SDK.
We will start by installing the official iOS SDK. We will make use of Carthage for this. Carthage makes use of a Cartfile to track dependencies to install, so we will need to create that file.
1$ # Assuming you are at the root directory which is todoApp 2 $ cd ios 3 $ touch Cartfile
The next thing to do is to specify the exact dependencies you want installed. This is as easy as pasting the following content in the Cartfile:
1// todoApp/ios/Cartfile 2 github "pusher/push-notifications-swift"
Once the dependencies have been specified, the next point of action is to actually install them. To do that, you will need to run the below command in a terminal:
1# This assumes you are in the todoApp/ios directory 2 $ carthage update
Once carthage is done installing, you will need to:
- In Xcode, visit the General settings tab of the application’s target, in the “Linked Frameworks and Libraries” section, drag and drop the
PushNotifications.frameworkfrom the Carthage/Build folder on disk.
A directory called Carthage will be created next to the
**Cartfile**. You will need to locate**PushNotifications.framework**in the iOS folder too.
-
On your application targets’ Build Phases settings tab, click the + icon and choose New Run Script Phase. Create a run script in which you specify your shell (ex:
/bin/sh), add the following contents to the script area below the shell:/usr/local/bin/carthage copy-frameworks
-
Add the path below to
PushNotifications.frameworkunder “Input Files".$(SRCROOT)/Carthage/Build/iOS/PushNotifications.framework
-
Add the path below to
PushNotifications.frameworkunder the “Output Files”.$(BUILT_PRODUCTS_DIR)/$(FRAMEWORKS_FOLDER_PATH)/PushNotifications.framework
The next step is to now install the React Native bridge which will allow us access native code (the official iOS SDK in this case ) from JavaScript. To do that, you need to run the following command
$ npm install react-native-pusher-push-notifications
- In Xcode, in the project navigator, right click Libraries ➜ Add Files to todoApp.
- Go to node_modules ➜ react-native-pusher-push-notifications and add RNPusherPushNotifications.xcodeproj
- In Xcode, in the project navigator, select your project. Add libRNPusherPushNotifications.a to your project's Build Phases ➜ Link Binary With Libraries
Open the AppDelegate.m to register the device for push notifications. Append the following contents to the file:
1// todoApp/ios/AppDelegate.m 2 3 // Add this to the top of the file where other imports are placed. 4 #import "RNPusherPushNotifications.h" 5 6 - (void)application:(UIApplication *)application didRegisterForRemoteNotificationsWithDeviceToken:(NSData *)deviceToken { 7 NSLog(@"Registered for remote with token: %@", deviceToken); 8 [[RNPusherPushNotifications alloc] setDeviceToken:deviceToken]; 9 } 10 11 - (void)application:(UIApplication *)application didReceiveRemoteNotification:(NSDictionary *)userInfo fetchCompletionHandler:(void (^)(UIBackgroundFetchResult))completionHandler { 12 [[RNPusherPushNotifications alloc] handleNotification:userInfo]; 13 } 14 15 -(void)application:(UIApplication *)application didFailToRegisterForRemoteNotificationsWithError:(NSError *)error { 16 NSLog(@"Remote notification support is unavailable due to error: %@", error.localizedDescription); 17 }
As a final step, you will need to add the following to your Header search path **under Build Settings, $(SRCROOT)/../node_modules/react-native-pusher-push-notifications/ios.
If you receive an error such as “dyld: Library not loaded:”, you should go to Build Settings and set Always Embed Swift Standard Libraries to yes.
Login or create an account to access your Pusher Beams dashboard here. Create a new Pusher Beams instance using the dashboard.
Complete only step one of the iOS setup guide and follow the onscreen instructions to upload (and how to find) your APN key and Team ID. Then press the X to exit the setup guide and you will be returned to your dashboard for that instance. Scroll to the bottom of this page and you will find your Pusher Beams instance ID and secret key, make note of these you will need them later.
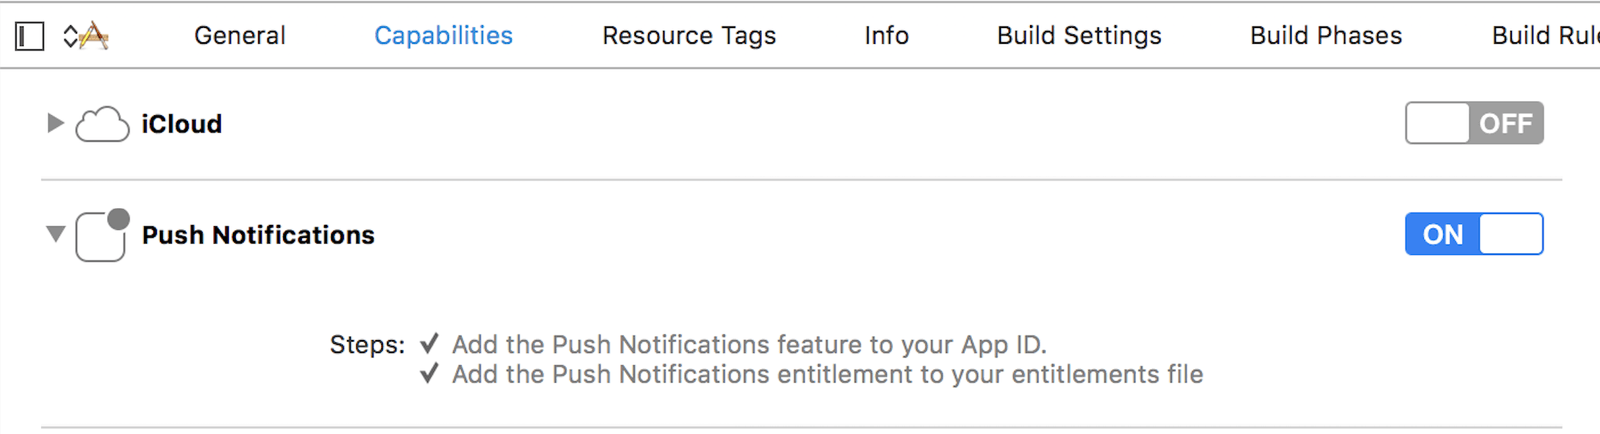
As a final step, you will need to enable push notifications capabilities for the project. You will also need to set the correct team and bundle ID as without those, push notifications capabilities cannot be enabled.
You will need to edit the index.js file to ask the user for permissions to send notifications and also subscribe to the updates topic.
1// todoApp/index.js 2 3 import { Alert, Linking, AppRegistry, Platform } from 'react-native'; 4 import App from './App'; 5 import { name as appName } from './app.json'; 6 import RNPusherPushNotifications from 'react-native-pusher-push-notifications'; 7 8 const appUpdateInterest = 'debug-updates'; 9 10 // Initialize notifications 11 export const init = () => { 12 // Set your app key and register for push 13 RNPusherPushNotifications.setInstanceId( 14 'YOUR_PUSHER_INSTANCE_KEY' 15 ); 16 17 // Init interests after registration 18 RNPusherPushNotifications.on('registered', () => { 19 subscribe(appUpdateInterest); 20 }); 21 22 // Setup notification listeners 23 RNPusherPushNotifications.on('notification', handleNotification); 24 }; 25 26 // Handle notifications received 27 const handleNotification = notification => { 28 if (Platform.OS === 'ios') { 29 Alert.alert('App update', notification.userInfo.aps.alert.body, [ 30 { text: 'Cancel', onPress: () => {} }, 31 { 32 text: 'Update now', 33 onPress: () => 34 // Just open up Apple's Testlight in the app store. 35 // Ideally we will replace this if the app has been previously released to 36 // the app store 37 Linking.openURL( 38 'itms-apps://itunes.apple.com/ng/app/testflight/id899247664?mt=8' 39 ), 40 }, 41 ]); 42 } 43 }; 44 45 // Subscribe to an interest 46 const subscribe = interest => { 47 console.log(interest); 48 RNPusherPushNotifications.subscribe( 49 interest, 50 (statusCode, response) => { 51 console.error(statusCode, response); 52 }, 53 () => { 54 console.log('Success'); 55 } 56 ); 57 }; 58 59 init(); 60 61 AppRegistry.registerComponent(appName, () => App);
The above piece of code is really easy to understand as it all does is configure the PushNotifications library to make use of the key we got from the dashboard earlier. When the device has been registered with Pusher Beams, we subscribe the user to the debug-updates topic as all notifications for updating the app will be published to that topic.
In handleNotification , we show an alert dialog that provides the user with two options. One is to cancel, the other is to actually update. Clicking on the option to update the app will take the user to the Apple app store.
Since this is an hypothetical app, we will forward the user to Apple’s Testflight app. You can replace the link to that of a real app if the app already exists on the app store.
Sending push notifications to the device
The bulk of the entire work has been done. All is that is left now is to actually test that push notifications are delivered to the user. To do this, you will need to visit your instance page on the dashboard. You will want to navigate to the Debug console.
You will need to run the app on a real device as push notifications do not work on a simulator.
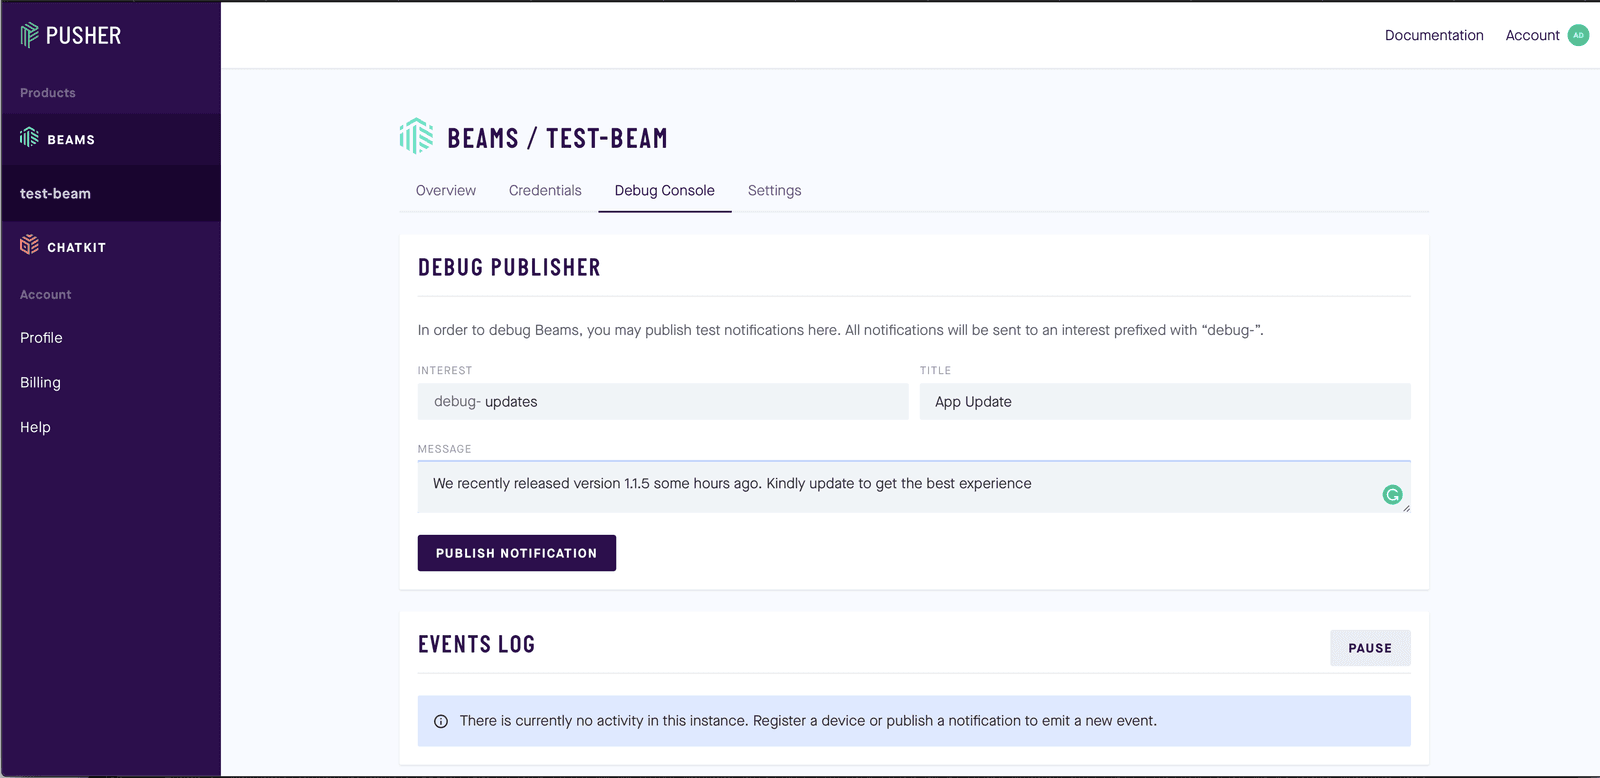
Once you have filled the above form, click on the Publish Notifications button. You will get an alert on your device in less than a second.
Here is an example of how the app works. You should be able to replicate this behavior on your device.
Conclusion
In this tutorial, we have built a mechanism for informing users of updates to our app with the help of Pusher Beams.
The source code can be found on GitHub.


© 2025 Pusher Ltd. All rights reserved.
Pusher Limited is a company registered in England and Wales (No. 07489873) whose registered office is at MessageBird UK Limited, 3 More London Riverside, 4th Floor, London, United Kingdom, SE1 2AQ.