- Products

- Developers
- User stories
- Blog
- Pricing

Getting started with Auto Layout in Swift - Part 3: Understanding constraints
Introduction
In this part of the series, we will take a closer look at constraints and how they work. We will look at constraint priorities, implicit and explicit constraints and more.
Constraints are very essential to Auto Layout and understanding constraints is essential to knowing Auto Layout.
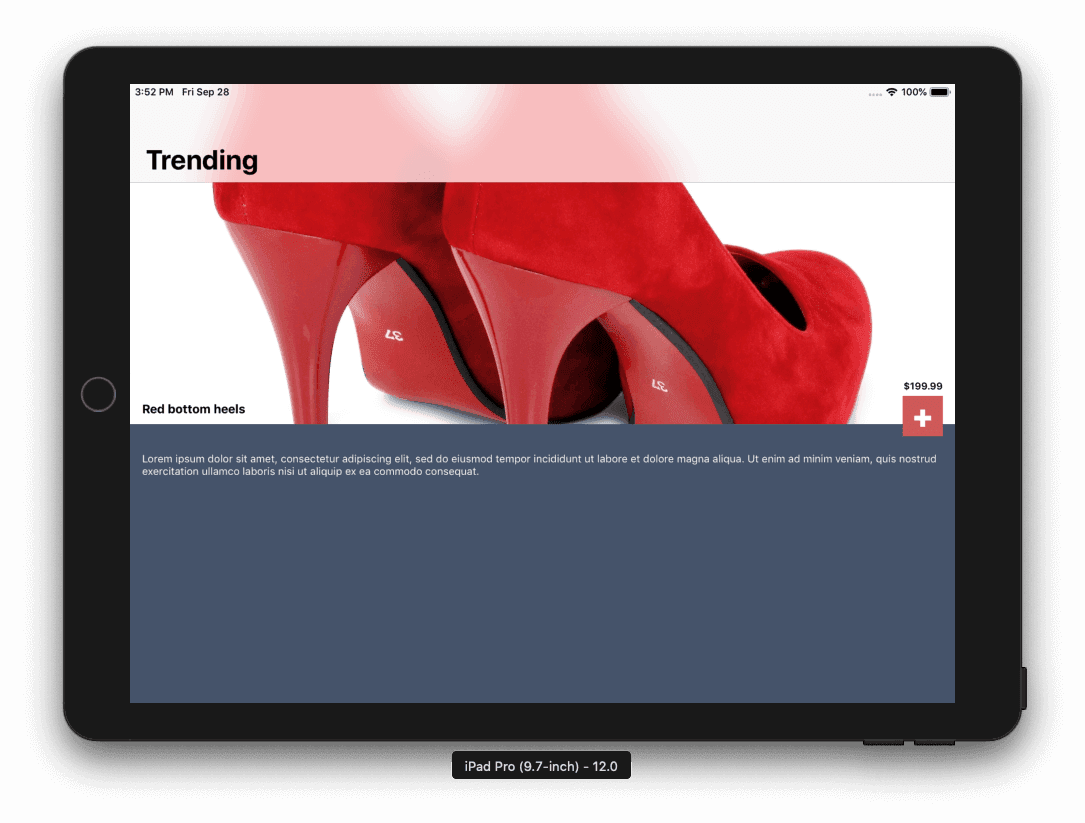
In the previous part, we built a simple layout using Auto Layout and the Xcode user interface. We were able to use constraints while building our layout. Here is a screenshot of what we built in the last part:
Prerequisites
To get started, you need the following:
- To have completed part two of the series.
- Xcode installed on your machine. Download here.
- Knowledge of the Xcode interface builder.
Let’s get started.
What is a constraint?
As explained in the first part of this series, user layouts created using Auto Layout define constraints. Constraints define the relationship between views in the user interface you are building.
When the application is being run, the Auto Layout engine inspects the constraints and then calculates the size and position of the views based on the defined constraints.
A constraint is actually a linear equation describing the relationship between two items in the view hierarchy. The Auto Layout engine then evaluates the equation. This evaluation should always result in one possible layout. Your goal is to declare a series of equations that has one and only one possible solution.
Anatomy of a constraint
This is what a constraint looks like:
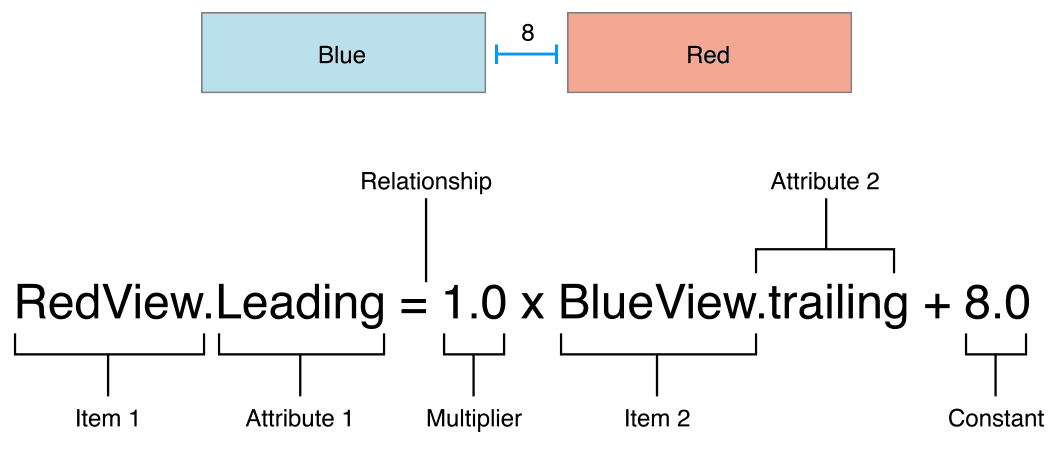
As seen above, the constraint defined describes the relationship between the RedView and the BlueView.
Let’s consider the parts that make up a constraint.
Item
The item is a view or layout guide that is part of the view hierarchy. An example can be a view that is dropped into the view controller in a storyboard. A layout guide can be the safe area guides that come with a view controller.
Attribute
This refers to the attributes of the items that are constrained. Some available attributes are:
- Top
- Bottom
- Left or Leading
- Right or Trailing
- Width
- Height
- CenterX
- CenterY
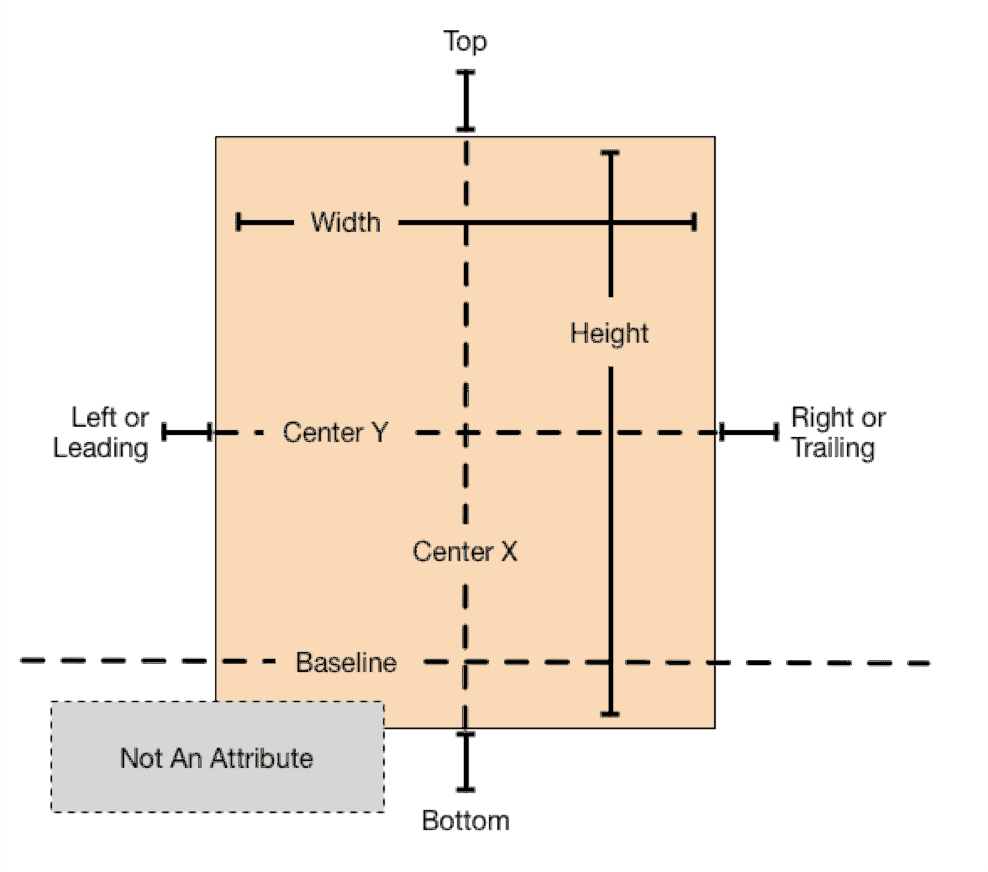
For more attributes, check out the NSLayoutAttribute enum.
Relationship
The relationship defines how the two sides of the relationship relate to one another. You can have the following relationships:
- Equal to (=).
- Greater than or equal to (>=).
- Less than or equal to (<=).
The operators above defines the relationship between the left and right side of the equation.
Multiplier
This is the value the right attribute is multiplied by.
Constant
The constant of the equation is the value added to the right attribute. It’s usually used as an offset for the right attribute.
Real-life examples
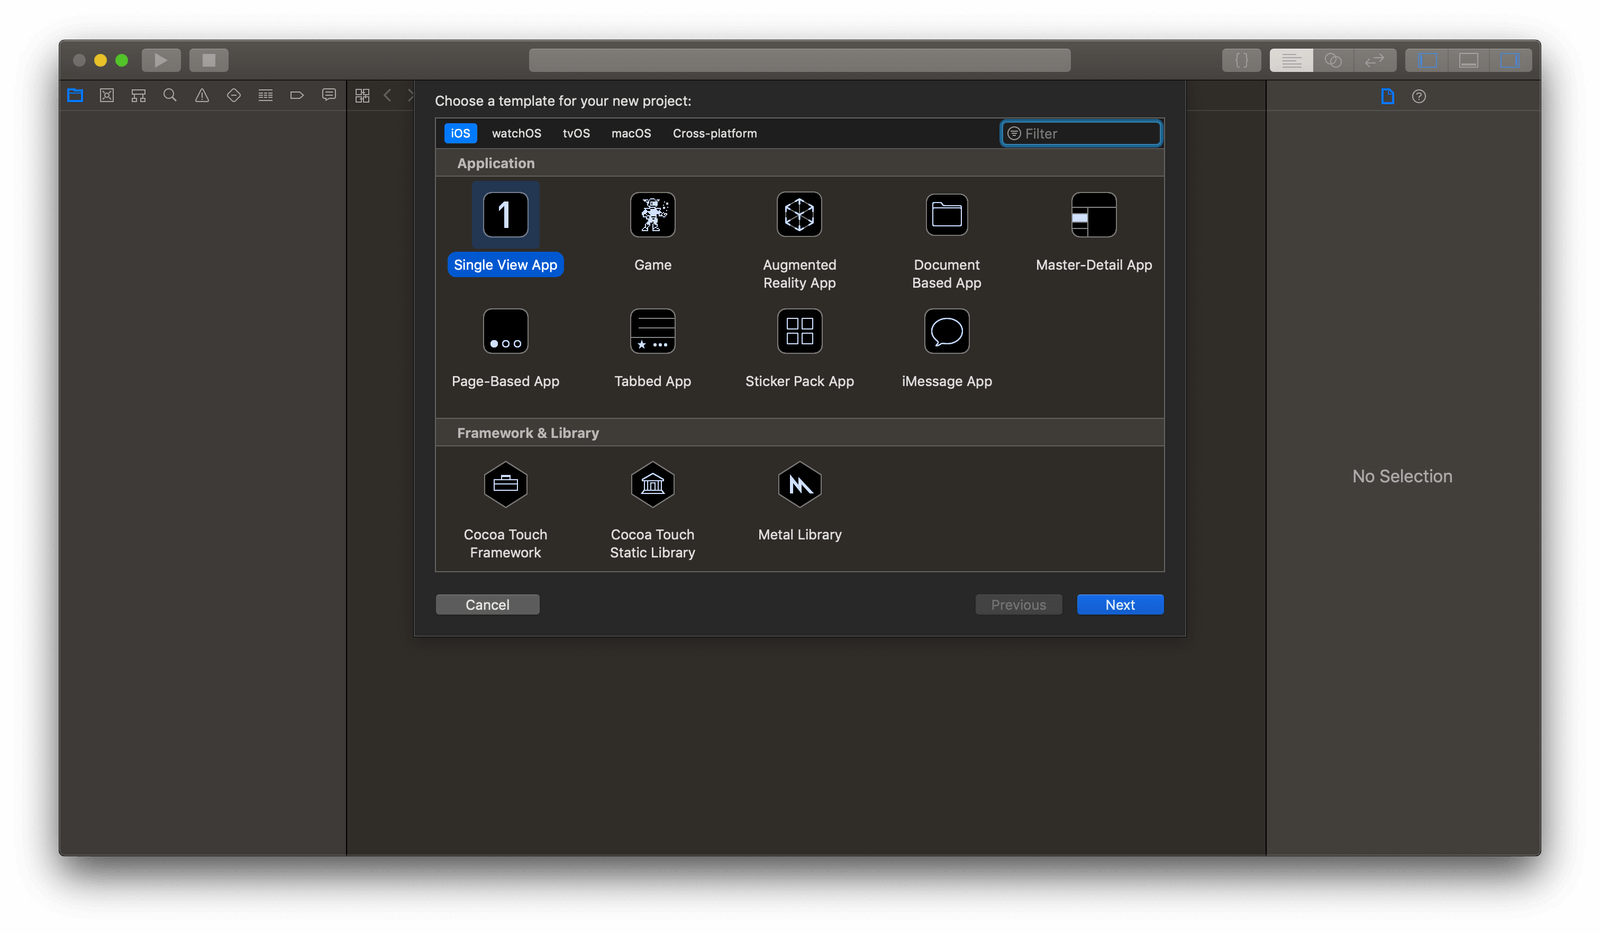
Let’s see some examples and see how it will be translated by the Auto Layout engine. Launch Xcode and click Create a new Xcode project. Next, select Single View App in Xcode.
In the project, open the Main.storyboard file. We will be using the storyboard to play around with views and layouts.
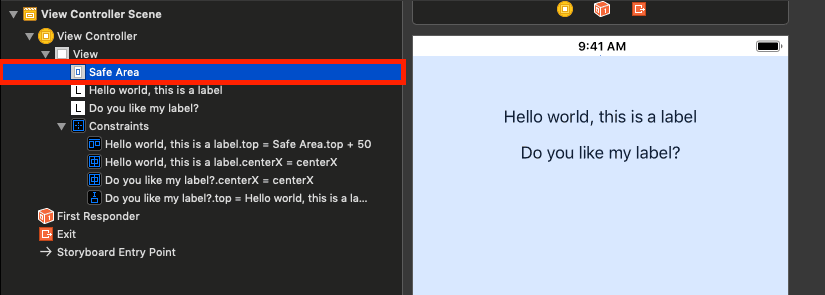
In the main storyboard, we are going to define two labels, one above the other and add some constraints to the labels.
The first constraint will be a top spacing of 50 and the second constraint will be applied to the second label as a top spacing from the first label with a value of 15.
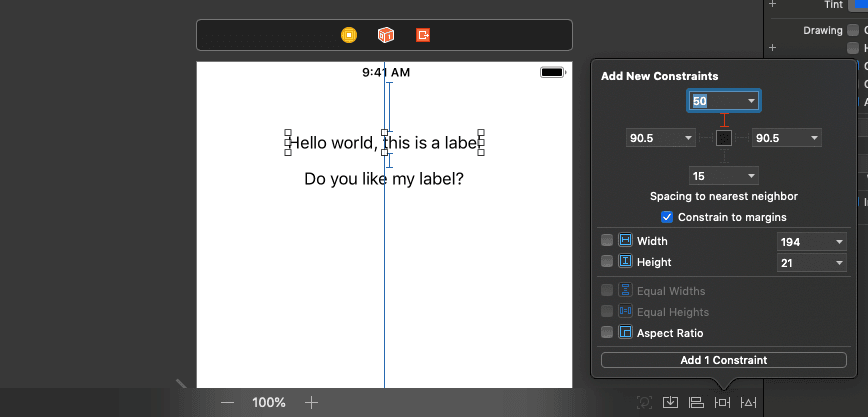

In addition to the top spacing constraints, we added alignment constraints to both labels. To add an alignment constraint, click the object you want to align and click the Align button beside the Add New Constraint button. Check the Horizontal in Container checkbox to align the object horizontally.
For the top constraint of the label we have the following equation:
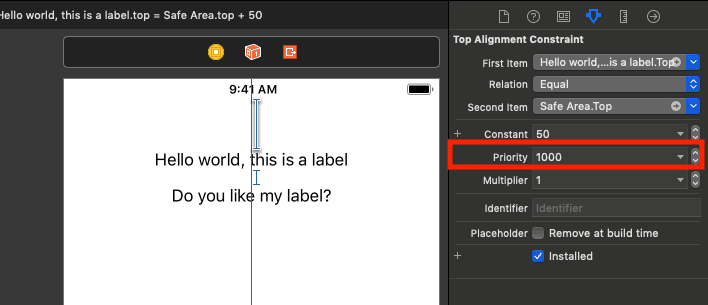
HelloLabel.top = 1.0 x SafeAreaLayoutGuide.top + 50.0
This means that the HelloLabel's top edge must be 50 points below the top edge of the SafeAreaLayoutGuide.
For the top constraint of the second layout, we have the following equation:
QuestionLabel.top = 1.0 x HelloLabel.bottom + 15.0
This means that the QuestionLabel's top edge must be 15 points below the bottom edge of the HelloLabel.
Constraint priorities
Every constraint has a priority attached to it. Priorities help the Auto Layout engine determine important constraints and how to resolve constraints when there are two or more conflicting constraints.
In the previous part of the series, when we were building the application, we changed the priority of one of the constraints to 250 from 1000. When we did this, we basically told the Auto Layout engine to deprioritize that constraint while evaluating the constraints attached to the view.
Let’s see how constraint priorities work. Open the project you created earlier. Now, click on the top constraint of the HelloLabel you should see the priority of the constraint:
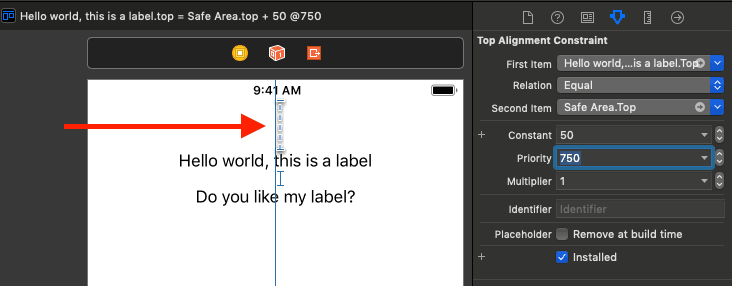
If you expand the select box, you will see some preset priorities. If you reduce the priority of 1000, which is the maximum, to any other number, the constraint becomes optional.
Required constraints are required and must be resolved, while optional constraints do not have to be resolved. So if the Auto Layout engine attempts to resolve a constraint that is optional but cannot, it will skip the constraint entirely. A layout is considered unsatisfiable if one or more required constraints cannot be satisfied.
With the constraint selected, reduce the priority to 750. You should see that the solid line in the interface builder will become a dashed line. This is how you know a constraint is optional.
To really understand how to use constraint priorities in our layouts, let’s create a make-believe layout.
First, delete all the labels in the view and add a new view to the layout with a distinct background color. Next, add the following constraints:
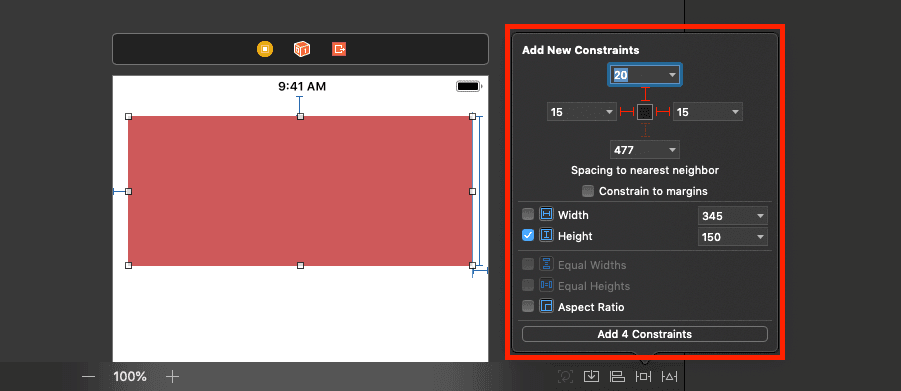
This will make the view 15pts from the left and right SafeAreaLayoutGuide and 20pts from the top of the SafeAreaLayoutGuide. In essence, the view will contract and expand to make sure it satisfies all the required constraints, regardless of the device screen size.
Now, add a new width constraint to the view. Set the constraint to 300pts. When you add this constraint, you should immediately see an error in Xcode:
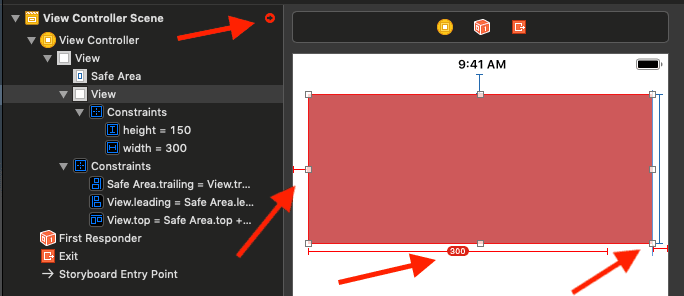
Clicking the icon beside the View Controller Scene will show the problem.
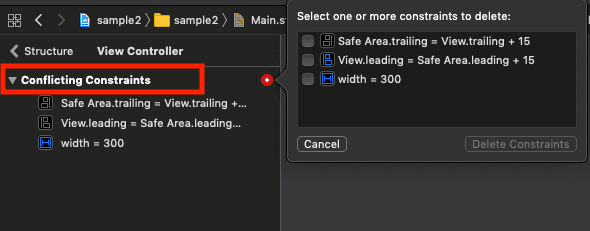
As seen above, there are conflicting constraints and so the layout is unsatisfiable. First, we are telling the view to be 15pts from the edge of the SafeAreaLayoutGuide on both the left and right. We are also saying the width of the image must be 300pts. These constraints are unsatisfiable because, to reach 15pts from the edge, the view must be wider than 300pts.
We can fix these using constraint priorities. To do this, select the width constraint in the view and change the priority to 750. Once you do this, the layout will be satisfiable by the Auto Layout engine.
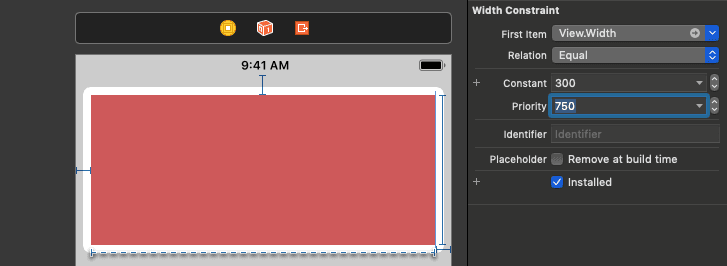
So what does this change mean? It means while evaluating, the Auto Layout engine will evaluate all the required constraints. It will make sure the view is 15pts from both left and right edges, and then if it is possible to make the width of the view 300pts while keeping the required constraints, it will do so. If it’s not possible, it will disregard the width constraint.
Now let’s try something else. We want the view to be 375pts wide or less regardless of the device screen size. We also want the view to have 15pts spacing on both left and right edges of the device screen size is smaller than 375pts.
Click the width constraint and set the Relation to Less than or equal, set the Constant to 375, and set the Priority to 1000. Next, click on the trailing constraint of the view and set the Priority to 750. Do the same for the leading constraint. By changing the priority to a number lower than 1000, we make the constraint optional. In the next part, we will dive deeper into optional and required constraints. For now, let’s keep going.
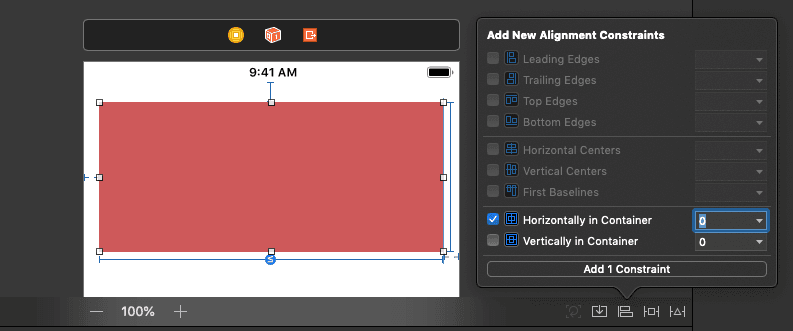
Now, to make the view centered horizontally, select the view and click the Align button close to the Add New Constraint button. Tick the Horizontally in Container checkbox.
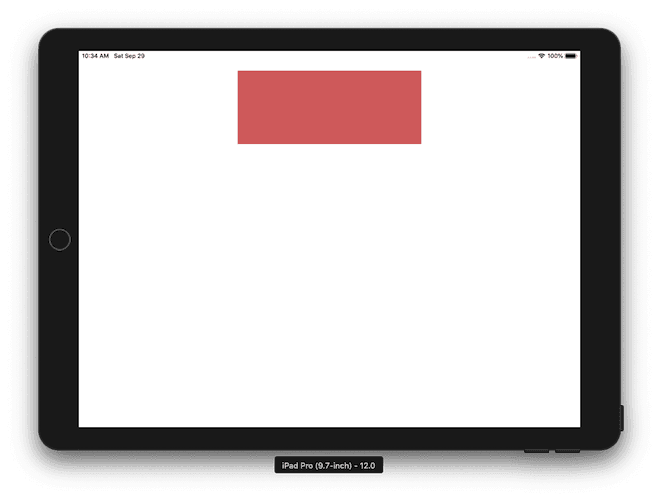
Now, if we launch the application on an iPad pro with a considerably larger screen, we can see that both the leading and trailing constraints that were marked as optional were ignored since they were not satisfiable. While the width of the view is 375pts.
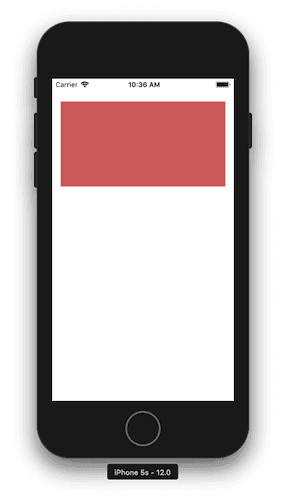
However, if we launch the application on a smaller screen like the iPhone 5s, we would see that the leading and trailing constraints are honored. This is because we set the required width constraint to be less than or equal to 375pts. So if the Auto Layout engine tried to satisfy the optional trailing and leading constraints, it would still be able to satisfy the required width constraint.
Conclusion
In this tutorial of the series, we have looked into constraints in Auto Layout. We know now that every constraint has a priority, a constraint is required if the priority is equal to 1000 and optional if it is below. We also learned that a layout is unsatisfiable if one or more required constraints cannot be satisfied. If several required constraints conflict, we get an ambiguous layout.
In the next tutorial of this series, we look deeper into constraints. We will be explaining constraint priorities and more.
The source code to the application built in this series is available on GitHub.


© 2026 Pusher Ltd. All rights reserved.
Pusher Limited is a company registered in England and Wales (No. 07489873) whose registered office is at MessageBird UK Limited, 3 More London Riverside, 4th Floor, London, United Kingdom, SE1 2AQ.