- Products

- Developers
- User stories
- Blog
- Pricing

Authentication with server side Dart
- Introduction
- Introduction
- Prerequisites
- Basic HTTP authentication
- Authorization header
- Overview
- Dart server implementation
- Start the server
- Test with Postman
- Security upgrade
- Using HTTPS
- Validating user input
- Storing the hashed password
- Token based authentication
- JSON Web Token
- Dart server implementation
- Test with Postman
- Token security
- Conclusion
- Further reading
Introduction
Introduction
In my last series of tutorials, Becoming a Backend Developer, I showed how to build a backend server and connect to it from a mobile app. It would be nice if everyone in the world were trustworthy and we could just leave our backend API open for everyone to use. Unfortunately, there are malicious attackers out there who take advantage of whatever they can. Even honest users can make mistakes that hurt the server or other users. For that reason, we need to protect our backend server by limiting who is able to use it and what they are able to do.
Authentication is how we trust that a user is who they say they are. Once we trust them, we can authorize them to do certain tasks or access protected resources. Last time I showed how to build a server with both Node.js and Server Side Dart, but this time I will just focus on Dart. If you prefer Node.js, check out this excellent YouTube series.
We'll go over two different ways to set up authentication, basic HTTP authentication and token based authentication. As we go along I’ll also address various security concerns. Although we won’t cover OAuth today, the concepts you learn here will directly apply to understanding it.
Prerequisites
You should understand basic client-server communication topics like HTTP, REST, and JSON. You should also know how to create a basic Dart server and how to use Postman to test it. If you need to review any of these topics, read the following two tutorials:
- Becoming a backend developer - Part 1: Foundational concepts
- Becoming a backend developer - Part 2: Building the server
You will need to have the following software installed:
This tutorial was tested with Dart 2.2, Aqueduct 3.2, and Postman 7.0.
Basic HTTP authentication
Basic authentication means that the client app sends the user name and password to the server in the HTTP request. When the server receives the request, it first checks that the user exists and that the password is correct. If so, then the server fulfills the request. Because the server is stateless, the username and password must be included in every single request.
Authorization header
Rather than including the credentials in the body of a request, there is a special authorization header that you can add the username and password to when making an HTTP request. The authorization line in a raw request would look something like this:
Authorization: Basic Ym9iOnBhc3MxMjM=
That last bit is the username and password. It looks encrypted but it’s not. It's plain text encoded in Base64. You can easily decode it to see the password and username programmatically or on a website like this. Base64 sounds like a number base system (like binary or hexadecimal), but it's actually just a way to encode binary data in string format using 64 printable ASCII characters. So, when decoded, the above line looks like this:
Authorization: Basic bob:pass123
The username is bob and the password is pass123.
Overview
The communication between the client and the app will look like this:
- Client signs up with user name and password
- Server adds user to database
- Client uses username and password to request protected resource
- Server provides resource if username and password are valid
We will implement the server tasks now and do the client tasks in Postman later.
Dart server implementation
Create a new Dart server using Aqueduct. I'll call the project dart_auth.
aqueduct create dart_auth
In the lib folder, add two subfolders called controllers and helpers. We will be creating the files indicated in red below and modifying the file indicated in yellow.
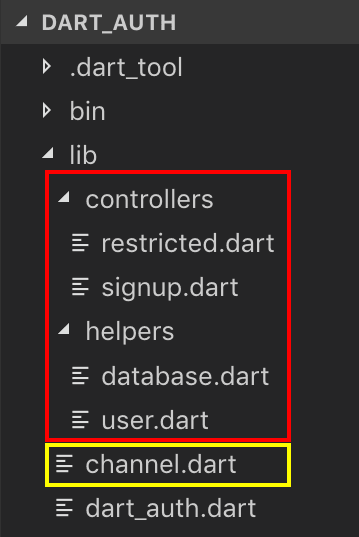
First replace channel.dart with the following code. This will route client signup requests to the SignupController and requests for restricted resources to the RestrictedController. (Don’t worry about the errors for now. We will be adding the missing files soon.)
1// dart_auth/channel.dart 2 3 import 'package:dart_auth/controllers/signup.dart'; 4 import 'package:dart_auth/controllers/restricted.dart'; 5 import 'dart_auth.dart'; 6 7 class DartAuthChannel extends ApplicationChannel { 8 9 @override 10 Future prepare() async { 11 logger.onRecord.listen((rec) => print("$rec ${rec.error ?? ""} ${rec.stackTrace ?? ""}")); 12 } 13 14 @override 15 Controller get entryPoint { 16 final router = Router(); 17 18 router 19 .route('/signup') 20 .link(() => SignupController()); 21 22 router 23 .route('/restricted') 24 .link(() => RestrictedController()); 25 26 return router; 27 } 28 }
Now lets add the two controllers to the controllers folder. The SignupController in adds a user to the database. Create a file called signup.dart and paste in the following content:
1// dart_auth/lib/controllers/signup.dart 2 3 import 'dart:async'; 4 import 'package:aqueduct/aqueduct.dart'; 5 import 'package:dart_auth/helpers/user.dart'; 6 import 'package:dart_auth/helpers/database.dart'; 7 8 class SignupController extends ResourceController { 9 10 @Operation.post() 11 Future<Response> signup() async { 12 13 // get user info from request body 14 final map = await request.body.decode<Map<String, dynamic>>(); 15 final User user = User.fromJson(map); 16 17 // check if the user exists 18 final Database database = MockDatabase(); 19 final User foundUser = database.queryEmail(user.email); 20 if (foundUser != null) { 21 return Response.forbidden(); 22 } 23 24 // add user to database 25 database.addUser(user); 26 27 // send a response 28 return Response.ok('user added'); 29 } 30 }
The other controller, RestrictedController, provides resources to users who have previously signed up. Create a file in the controllers folder called called restricted.dart and paste in the following content:
1// dart_auth/lib/controllers/restricted.dart 2 3 import 'dart:async'; 4 import 'dart:convert'; 5 import 'package:aqueduct/aqueduct.dart'; 6 import 'package:dart_auth/helpers/user.dart'; 7 import 'package:dart_auth/helpers/database.dart'; 8 9 class RestrictedController extends ResourceController { 10 11 @Operation.get() 12 Future<Response> restricted(@Bind.header("authorization") String authHeader) async { 13 14 // only allow with correct username and password 15 if (!_isAuthorized(authHeader)) { 16 return Response.forbidden(); 17 } 18 19 // We are returning a string here, but this could be 20 // a file or data from the database. 21 return Response.ok('restricted resource'); 22 } 23 24 // parse the auth header 25 bool _isAuthorized(String authHeader) { 26 final parts = authHeader.split(' '); 27 if (parts == null || parts.length != 2 || parts[0] != 'Basic') { 28 return false; 29 } 30 return _isValidUsernameAndPassword(parts[1]); 31 } 32 33 // check username and password 34 bool _isValidUsernameAndPassword(String credentials) { 35 36 // this user 37 final String decoded = utf8.decode(base64.decode(credentials)); 38 final parts = decoded.split(':'); 39 final User user = User(parts[0], parts[1]); 40 41 // database user 42 final Database database = MockDatabase(); 43 final User foundUser = database.queryEmail(user.email); 44 45 // check for match 46 return foundUser != null && 47 foundUser.password == user.password; 48 } 49 }
For simplicity's sake we are using a list of users rather than an actual database. In the helpers folder create a file called database.dart and add the following content:
1// dart_auth/lib/helpers/database.dart 2 3 import 'package:dart_auth/helpers/user.dart'; 4 5 abstract class Database { 6 int addUser(User user); 7 User queryEmail(String email); 8 } 9 10 class MockDatabase implements Database { 11 12 // singleton 13 factory MockDatabase(){ return _instance; } 14 MockDatabase._privateConstructor(); 15 static final MockDatabase _instance = MockDatabase._privateConstructor(); 16 17 static final List<User> _users = []; 18 19 @override 20 int addUser(User user) { 21 final id = _users.length; 22 user.id = id; 23 _users.add(user); 24 return id; 25 } 26 27 @override 28 User queryEmail(String email) { 29 for (User user in _users) { 30 if (user.email == email) { 31 return user; 32 } 33 } 34 return null; 35 } 36 }
Finally, we need the User model class. In the helpers folder create a file called user.dart and paste in the following content:
1class User { 2 3 User(this.email, this.password); 4 5 factory User.fromJson(Map<String, dynamic> json) { 6 if (json == null) { 7 throw const FormatException('Null JSON in User constructor'); 8 } 9 return User( 10 json['email'] as String, 11 json['password'] as String, 12 ); 13 } 14 15 int id; 16 String email; 17 String password; 18 19 Map<String, dynamic> toJson() { 20 return { 21 'email': email, 22 'password': password, 23 }; 24 } 25 }
Make sure that you have saved all of these files.
Start the server
We will run the server with only one isolate since we are using an in-memory mock database for this tutorial. Because we aren't specifying a port, Aqueduct defaults to port 8888. At the command prompt type:
aqueduct serve --isolates 1
Test with Postman
We will use Postman as a substitute for a client app, so let’s review what needs to happen:
- Client signs up with user name and password
- Server adds user to database
- Client uses username and password to request protected resource
- Server provides resource if username and password are valid
The server is ready, so we just need to test step one and three with Postman.
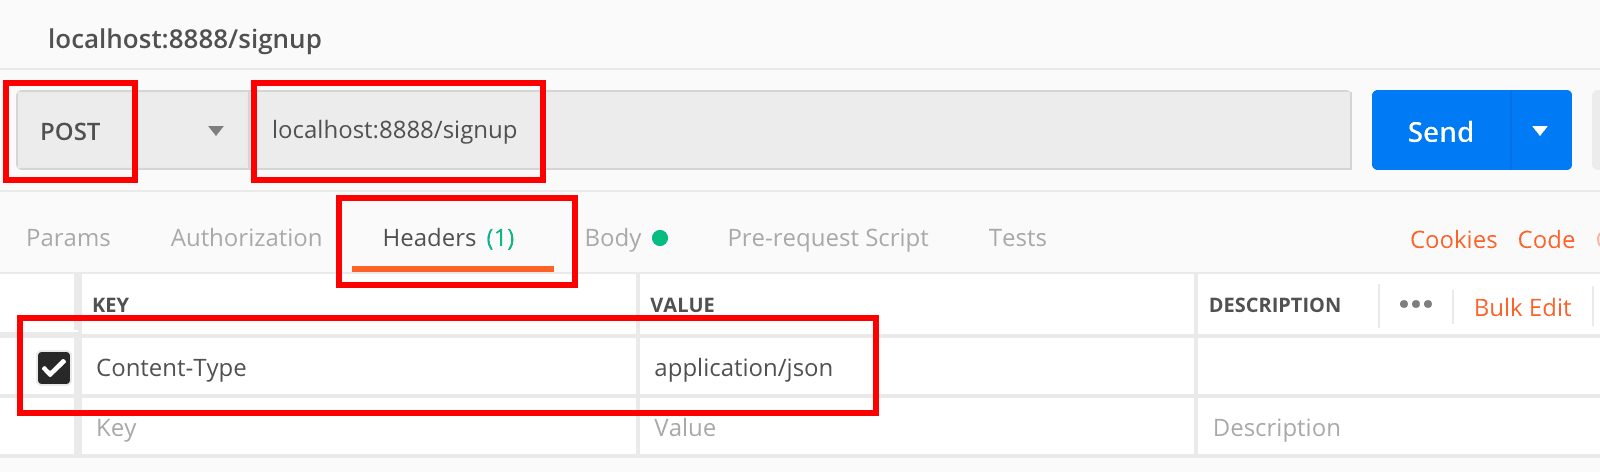
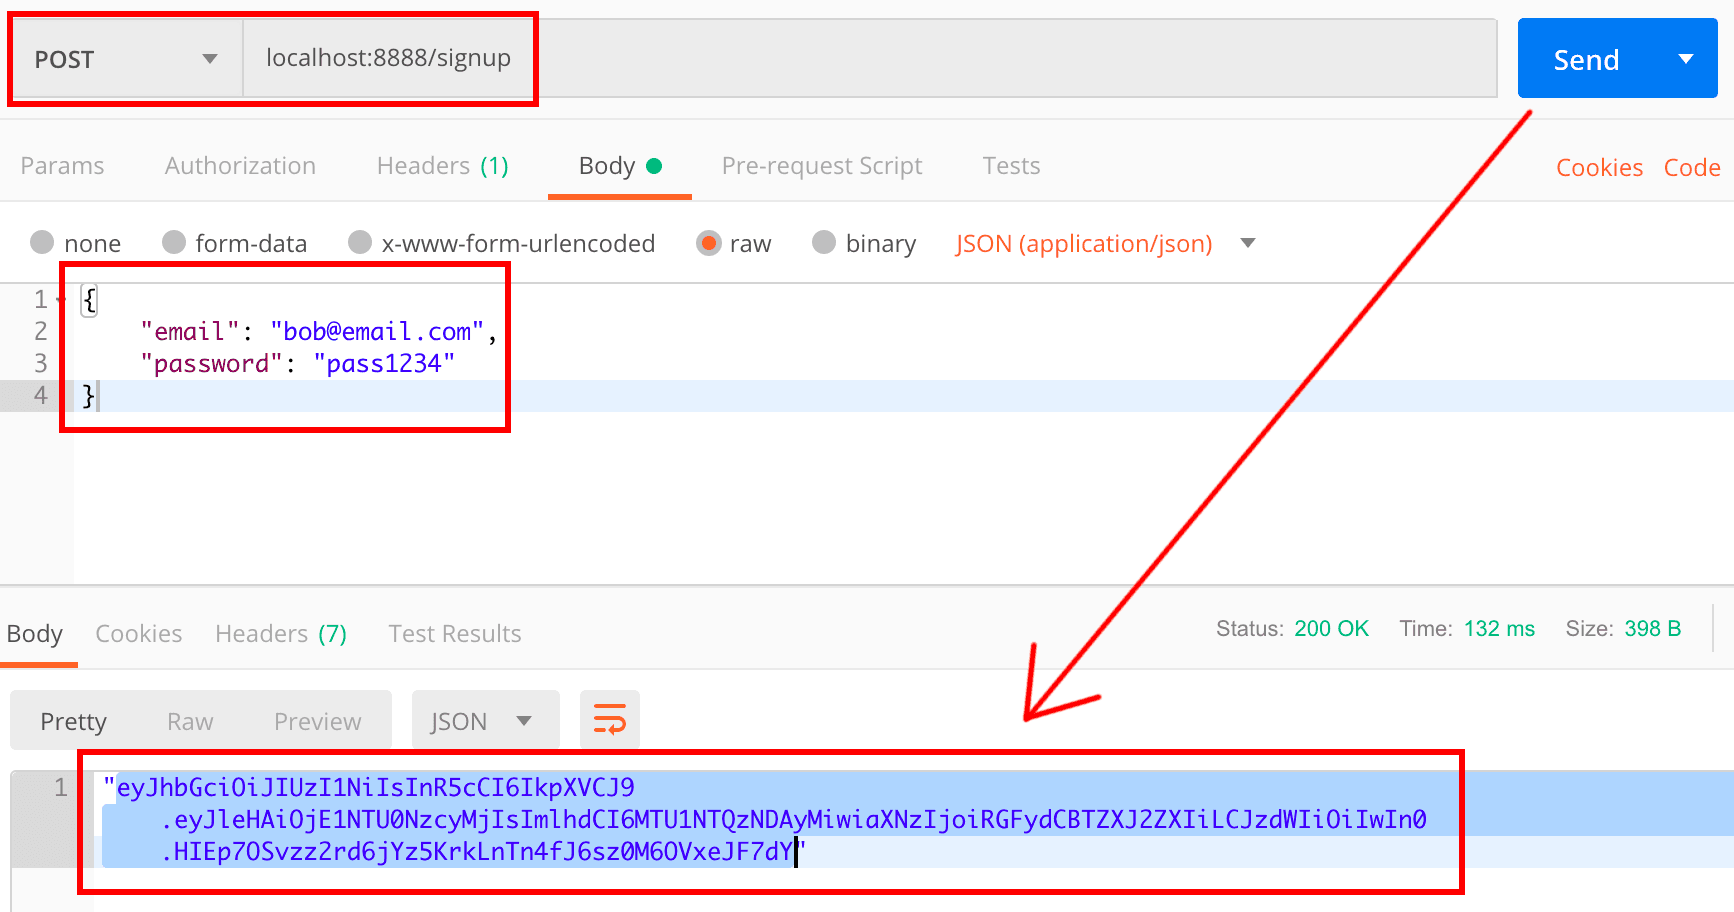
To sign up a user, make a POST request to the route localhost:8888/signup. Set the Content-Type header to application/json.
In the body, add a user in JSON format:
1{ 2 "email": "bob@email.com", 3 "password": "pass123" 4 }
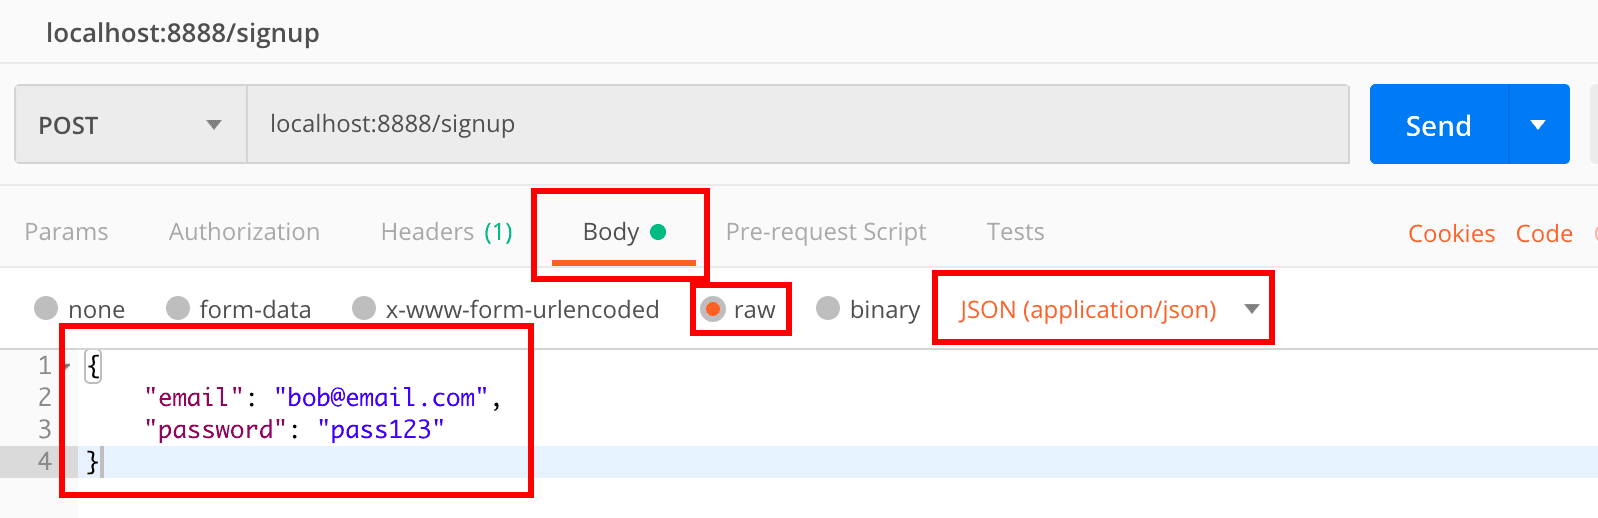
When you press Send you should get a 200 OK response with "user added" in the body. Pressing Send again will not allow a duplicate user to be added.
Now lets check if we have access to restricted resources. Create a GET request for the route localhost:8888/restricted. Set the Authorization header to Basic Auth and make the username and password the same as before.
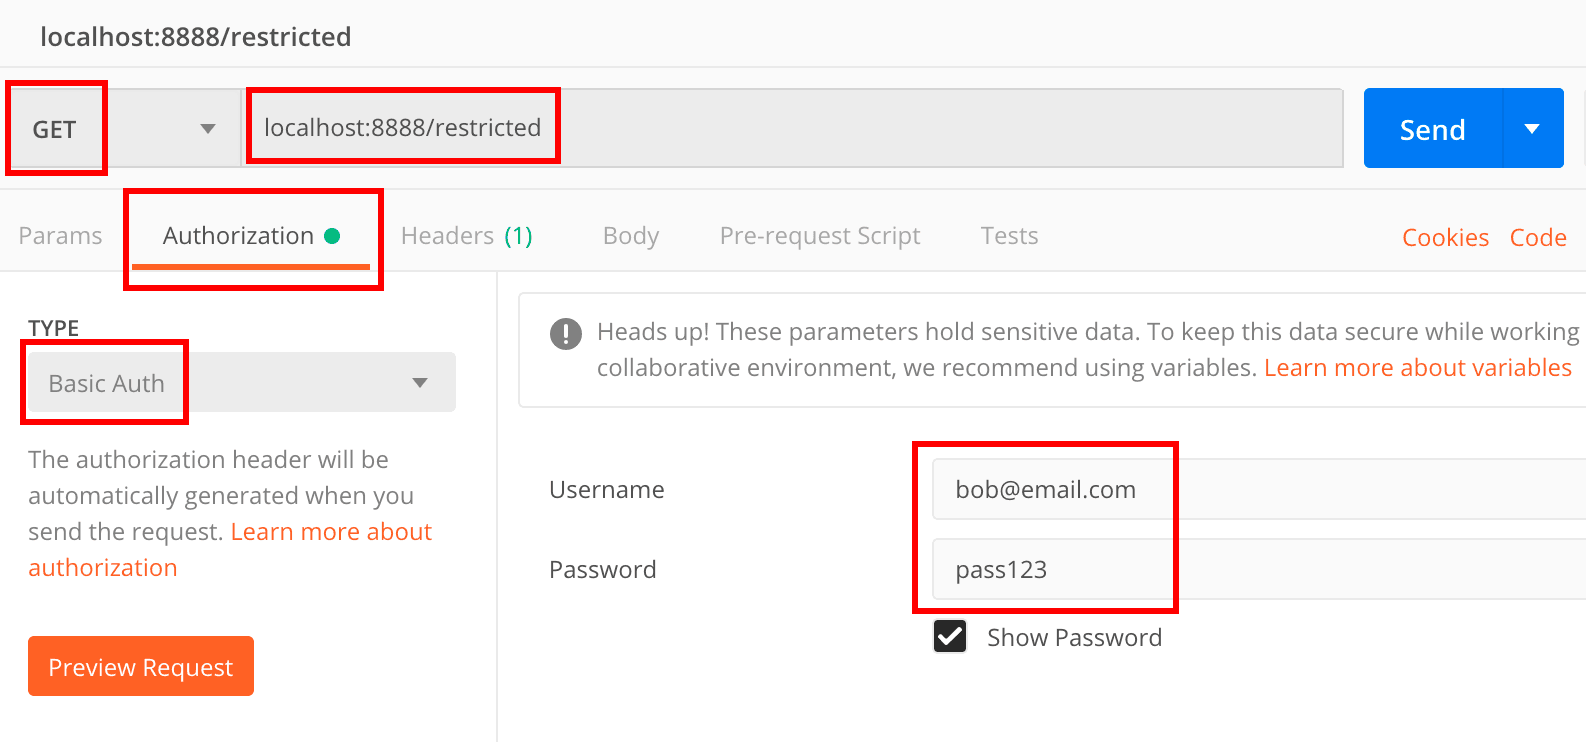
When you press Send you should get a 200 OK response with the text "restricted resource" in the body. Changing the password should cause a 403 Forbidden response.
If you are experiencing any problems, check out the GitHub repo.
Security upgrade
Our basic authentication is working, but you probably noticed some major security problems.
- The most critical problem is that we are using HTTP and not HTTPS. That means the username and password are sent in plain text on every request. It would be very easy for someone to steal them on a public wifi connection with a tool like Wireshark.
- We expect the username to be an email, but we aren't enforcing that. We need to validate anything that a client sends us. We should also put some minimum requirements on the password.
- A server should never save passwords in plain text. If the server gets hacked, then the attacker has access to everyone's password. Many people use the same password for multiple sites, so we have also compromised the users' other accounts, too.
Using HTTPS
For a REST API, it is an absolute must to send requests over an HTTPS encrypted connection. To do this we need to get a certificate from a trusted certificate authority. You can get a free one from Let's Encrypt.
As for implementing HTTPS on our server, we have two options. The first is to let Aqueduct manage the HTTPS connection. You can read about how to do that in the Aqueduct documentation.
The other option is to use a reverse proxy server like NGINX. With this setup, traffic between the client and NGINX is sent over HTTPS, but then NGINX forwards the requests using HTTP to Aqueduct listening on localhost. You can find directions for how to do that here.
There is a security trade off with both options. Leaving the traffic between NGINX and Aqueduct unencrypted could be an issue if anyone has access to that traffic. On the other hand, NGINX is far more established and tested as an HTTPS server than Aqueduct is. While Aqueduct is probably fine handling HTTPS traffic directly, it hasn’t been tested in the wild as much as NGINX has.
I’m going to choose the reverse proxy option. Since we will have the NGINX server running on the same machine as Aqueduct, as far as I know the only ones who could view the unencrypted traffic between them are those with login access to that machine. Choosing the reverse proxy option also allows us to leave our Aqueduct setup in this tutorial as it is and defer configuring NGINX until some later date. So there is nothing more that we need to do at this time regarding HTTPS. When you do deploy to a public server, though, don’t forget to route all traffic securely through NGINX.
Validating user input
We want to make sure that only valid email addresses can be submitted as a username. We should also make sure that the password isn't too short. We'll use the string_validator package to help us do those things.
Note: I published the string_validator package myself by forking and updating an old unmaintained package. As time goes on and the Dart ecosystem grows, keep an eye out for the best validation library. As always, pay attention to the popularity, health, and maintenance of the packages you use.
In pubspec.yaml add the dependency:
1dependencies: 2 string_validator: ^0.1.3
Then open signup.dart. Add the string_validator import and a check for the username and password.
1// dart_auth/lib/controllers/signup.dart 2 3 ... 4 import 'package:string_validator/string_validator.dart'; 5 6 class SignupController extends ResourceController { 7 8 @Operation.post() 9 Future<Response> signup() async { 10 ... 11 final User user = User.fromJson(map); 12 13 // check that username is email and password long enough 14 if (!_isValid(user)) { 15 return Response.badRequest(); 16 } 17 18 ... 19 } 20 21 bool _isValid(User user) { 22 if (user == null || user.email == null || user.password == null) { 23 return false; 24 } 25 if (!isEmail(user.email)) { 26 return false; 27 } 28 if (!isLength(user.password, 8)) { 29 return false; 30 } 31 return true; 32 } 33 }
Unchanged code from the last section has been omitted. You can find the full source code here.
Storing the hashed password
Next we want to make sure that we aren't storing passwords in plain text. Instead we will save a salted hash of the password. To explain what I’m are doing, let's say we have a plain text password like this:
p@$$w0rd123
We are going to hash the password. A hash is a one way algorithm that gives a unique string. It's like a juicer. You put in an apple and you get out apple juice. There's no possible way to get the apple back after you have the juice. A hash is the same. You put in a string and you get out a hashed string. There is no way to get the original string from the hashed string. (Well, that’s the theory, anyway. Keep reading.)
There are different kinds of hashing algorithms. We'll use the SHA-256 algorithm. Hashing our password above gives:
d109123103061d6a20c5b427883a45e52b0513ad4d65473ad8ce69344dbec0b0
The problem with this hash is that our password was bad to start with. Although hashing a string is a one way function, the same string always gives the same hash. There are hash tables online with millions of pre-computed hashes. So for common passwords, you can just do a reverse lookup. Try looking up the hash above at CrackStation, for example.
To make a hash that can't be looked up in a table, you should salt the password before you hash it. Salting just means adding a (random) string to the password before hashing it. For example:
1password = p@$$w0rd123 2 salt = 5b427883a45e52 3 saltedPassword = 5b427883a45e52p@$$w0rd123 4 hash = 9feff86d40ffb8b70f2cf61a73ba057e95887a31526c63c26677bcc6d988398c
You won't find that hash in a lookup table. (But you might find it on Google now that I used it here.)
You should use a different random salt every time you store a password hash. Save the salt, and save the hash, but discard the password.
The way to check if a password is right is to add the saved salt to a submitted password, hash it, and then check if the new hash is the same as the saved hash. If it’s the same, then the password is correct. Here is the pseudo code for an incorrect password:
1submittedPassword = pass123 2 savedSalt = 5b427883a45e52 3 saltedPassword = 5b427883a45e52pass123 4 newHash = 308082e23743951813e85904b1faec65abe3fddceabbf467da2b76ccc269a0a5 // wrong! 5 savedHash = 9feff86d40ffb8b70f2cf61a73ba057e95887a31526c63c26677bcc6d988398c
Saving hashed salted passwords is much better than saving plain text passwords, but if an attacker gets a hold of the hash and the salt, they can still try to brute force it by trying dictionary lists of common passwords. That’s why it’s important make good, long passwords. One defense against a brute force attack is to make it take longer by repeatedly hashing the hash many times. Bcrypt is an example of this, and dbcrypt is a Dart implementation.
OK, let's apply what we have learned about hashing to our server. We'll use the crypto package to do the SHA-256 hash and we're borrowing a utility from Aqueduct to generate a random salt. In signup.dart make the following changes.
1// dart_auth/lib/controllers/signup.dart 2 3 ... 4 // add these two additional imports 5 import 'dart:convert'; // for utf8 encoding 6 import 'package:crypto/crypto.dart'; 7 8 class SignupController extends ResourceController { 9 10 @Operation.post() 11 Future<Response> signup() async { 12 ... 13 // salt and hash the password 14 user.password = _hashPassword(user.password); 15 // add user to database 16 ... 17 } 18 19 ... 20 String _hashPassword(String password) { 21 final salt = AuthUtility.generateRandomSalt(); 22 final saltedPassword = salt + password; 23 final bytes = utf8.encode(saltedPassword); 24 final hash = sha256.convert(bytes); 25 // store the salt with the hash separated by a period 26 return '$salt.$hash'; 27 } 28 }
Full source code can be found here.
In the RestrictedController is where we will compare a user submitted password with our saved hash. Make the following changes:
1// dart_auth/lib/controllers/restricted.dart 2 3 ... 4 // Add these two imports 5 import 'dart:convert'; 6 import 'package:crypto/crypto.dart'; 7 8 class RestrictedController extends ResourceController { 9 ... 10 11 bool _isValidUsernameAndPassword(String credentials) { 12 ... 13 14 // check for match 15 return foundUser != null && 16 _passwordHashMatches(foundUser.password, user.password); 17 } 18 19 bool _passwordHashMatches(String saltHash, String password) { 20 21 // previously saved password hash 22 final parts = saltHash.split('.'); 23 final salt = parts[0]; 24 final savedHash = parts[1]; 25 26 // user submitted password hash 27 final saltedPassword = salt + password; 28 final bytes = utf8.encode(saltedPassword); 29 final newHash = sha256.convert(bytes).toString(); 30 return savedHash == newHash; 31 } 32 }
Full code can be found here.
Restart the server and test adding users and accessing restricted content as you did in the previous section. Note that you will have to use a longer password this time.
Token based authentication
Even with HTTPS encryption enabled, sending the password with every request is not a great idea. Instead, a common practice is to use a token that will expire or can be invalidated. A token is just a string that contains encoded (but not encrypted) information.
JSON Web Token
A JWT (pronounced "jot"), or JSON Web Token, is one of the more popular token formats in use today. It is composed of three parts: a header, the payload, and the signature. In Base64Url encoding (which is like Base64 but only uses characters that are valid in a URL), it looks like this:
eyJhbGciOiJIUzI1NiIsInR5cCI6IkpXVCJ9.eyJleHAiOjE1NTU1NjM0NjEsImlhdCI6MTU1NTUyMDI2MSwiaXNzIjoiRGFydCBTZXJ2ZXIiLCJzdWIiOiIyMyJ9.8adXe9g_E7d9AcZxItx2rNBEDoGDQfCkL0bL5GDnGNg
When decoded the content is in JSON format. The payload usually contains a user ID to authorize that user to do something. Here is what a header and payload might look like (comments excluded):
1{ 2 "alg": "HS256", // HMAC SHA-256 algorithm 3 "typ": "JWT" // type of token 4 } 5 { 6 "exp": 1555563461, // expiration time 7 "iat": 1555520261, // issued at 8 "iss": "Dart Server", // issuer 9 "sub": "23" // subject (user id) 10 }
The signature is a hash of the header and payload plus a secret string. This is similar to how we created the password hash in the last section. Only those who know the secret can create or verify a token. This guarantees that the content hasn't been changed. (If you changed the user ID in the payload, for example, the signature hash would no longer match.)
Dart server implementation
Let's incorporate tokens into our server now. Our new flow will look like this:
- Client signs up (or signs in) with username and password
- Server returns a token to the client (if username and password are valid)
- Client uses token to request protected resource
- Server gives resource (if token is valid)
To create tokens we will use the jaguar_jwt package. Add it to the dependencies in your pubspec.yaml file.
1dependencies: 2 jaguar_jwt: ^2.1.6
First we will handle signup requests. Open the signup.dart file that you made before. Instead of returning a "user added" string, we will return a JWT token.
1// dart_auth/lib/controllers/signup.dart 2 3 ... 4 import 'package:jaguar_jwt/jaguar_jwt.dart'; 5 import 'package:dart_auth/helpers/config.dart'; 6 7 class SignupController extends ResourceController { 8 9 @Operation.post() 10 Future<Response> signup() async { 11 ... 12 // get the token 13 final String token = _signToken(user.id); 14 15 // send the token back to the user 16 return Response.ok(token); 17 } 18 19 // creates a JWT with the user ID, expires in 12 hours 20 String _signToken(int userId) { 21 final claimSet = JwtClaim( 22 issuer: 'Dart Server', 23 subject: '$userId', 24 issuedAt: DateTime.now(), 25 maxAge: const Duration(hours: 12) 26 ); 27 const String secret = Properties.jwtSecret; 28 return issueJwtHS256(claimSet, secret); 29 } 30 ... 31 }
You notice that I used Properties.jwtSecret. I could have just written the secret string right there, but since I don't want the secret exposed on GitHub, I will put it in a config file that isn't checked into version control. Let’s do that now.
Create a file called config.dart in the helpers directory. Paste in the following content:
1// dart_auth/lib/helpers/config.dart 2 // Include this file in .gitignore 3 4 class Properties { 5 static const String jwtSecret = 'CF77232612BE37C0FFE9A165F86D9BE67EEB2E3E39B259969A01DE4C6BB6A392'; 6 }
You can change the secret to be whatever secure string you like. A number of online sites will generate one for you, for example this one. To ensure that we don’t leak the secret on GitHub, add the following line to your projects .gitignore file:
config.dart
The client is going to include the token in the authorization header when it requests a restricted resource, so the server needs to check that the token is valid when it gets a request. The good news is that we don't need to worry about the username and password anymore. Replace restricted.dart with the following content:
1// dart_auth/lib/controllers/restricted.dart 2 3 import 'dart:async'; 4 import 'package:aqueduct/aqueduct.dart'; 5 import 'package:jaguar_jwt/jaguar_jwt.dart'; 6 import 'package:dart_auth/helpers/config.dart'; 7 8 class RestrictedController extends ResourceController { 9 10 @Operation.get() 11 Future<Response> restricted( 12 @Bind.header("authorization") String authHeader) async { 13 // only allow requests with valid tokens 14 if (!_isAuthorized(authHeader)) { 15 return Response.forbidden(); 16 } 17 // We are returning a string here, but this could be 18 // a file or data from the database. 19 return Response.ok('restricted resource'); 20 } 21 22 // parse the auth header 23 bool _isAuthorized(String authHeader) { 24 final parts = authHeader.split(' '); 25 if (parts == null || parts.length != 2 || parts[0] != 'Bearer') { 26 return false; 27 } 28 return _isValidToken(parts[1]); 29 } 30 31 // verify the token 32 bool _isValidToken(String token) { 33 const key = Properties.jwtSecret; 34 try { 35 verifyJwtHS256Signature(token, key); 36 return true; 37 } on JwtException { 38 print('invalid token'); 39 } 40 return false; 41 } 42 }
For the sake of space, I am not going to talk about signing in for an already existing user. The process is similar to what we have already done, though, and if you are interested, I've included the code in the GitHub repo:
Save all of your changes and restart the server.
Test with Postman
Set up Postman for the /signup route as we did before (being sure to use a valid password). When you press Send, you should receive a token back in the response body.
Copy the token (without the quote marks). On the /restricted route that we made last time, change the authorization type to Bearer Token. Then paste in the JWT token that you just copied.
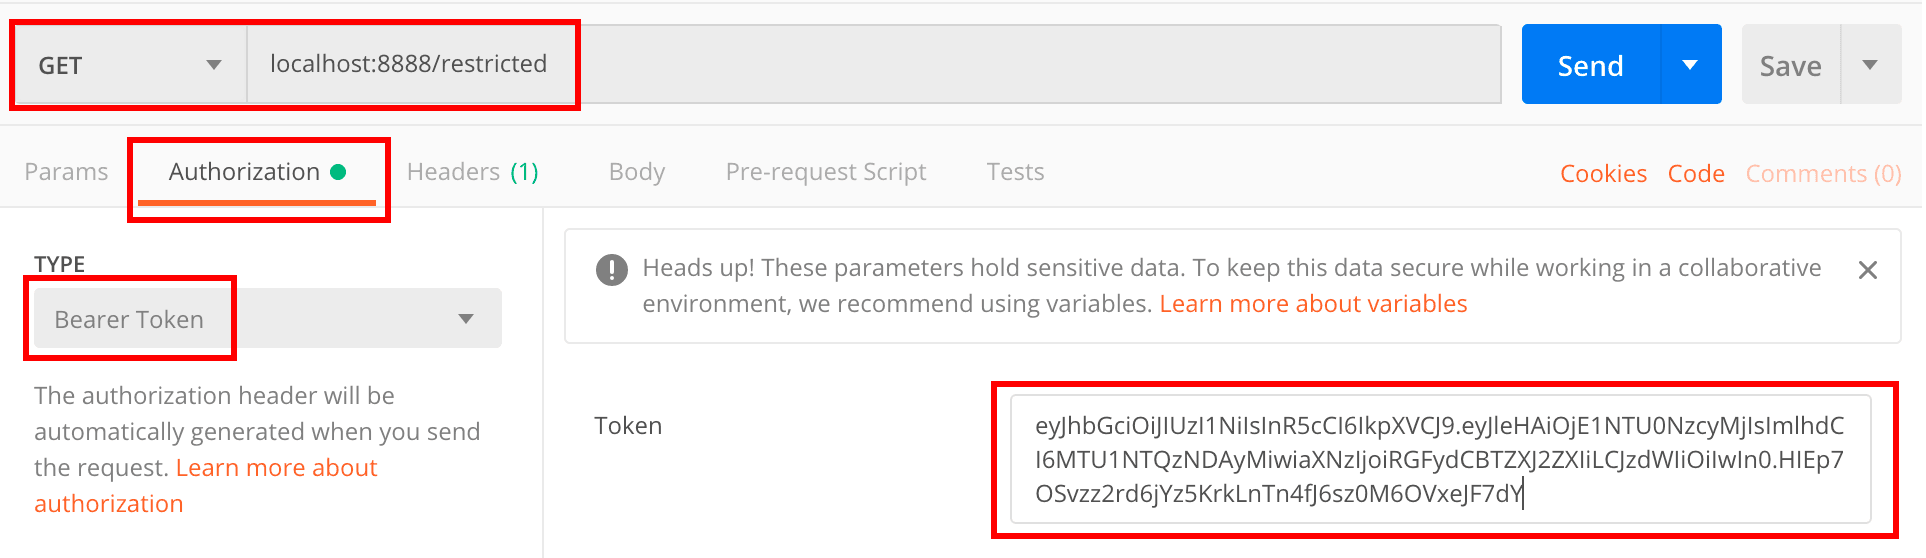
You can decode tokens at the JWT website if you want to check the content.
When you press Send you should see, "restricted resource" as the response. If you change even one character of the token, though, you will get a 403 Forbidden response.
Optional: If you added the /signin route that I mentioned above, you should set the authorization header to Basic Auth and provide an existing username and password:
localhost:8888/signin
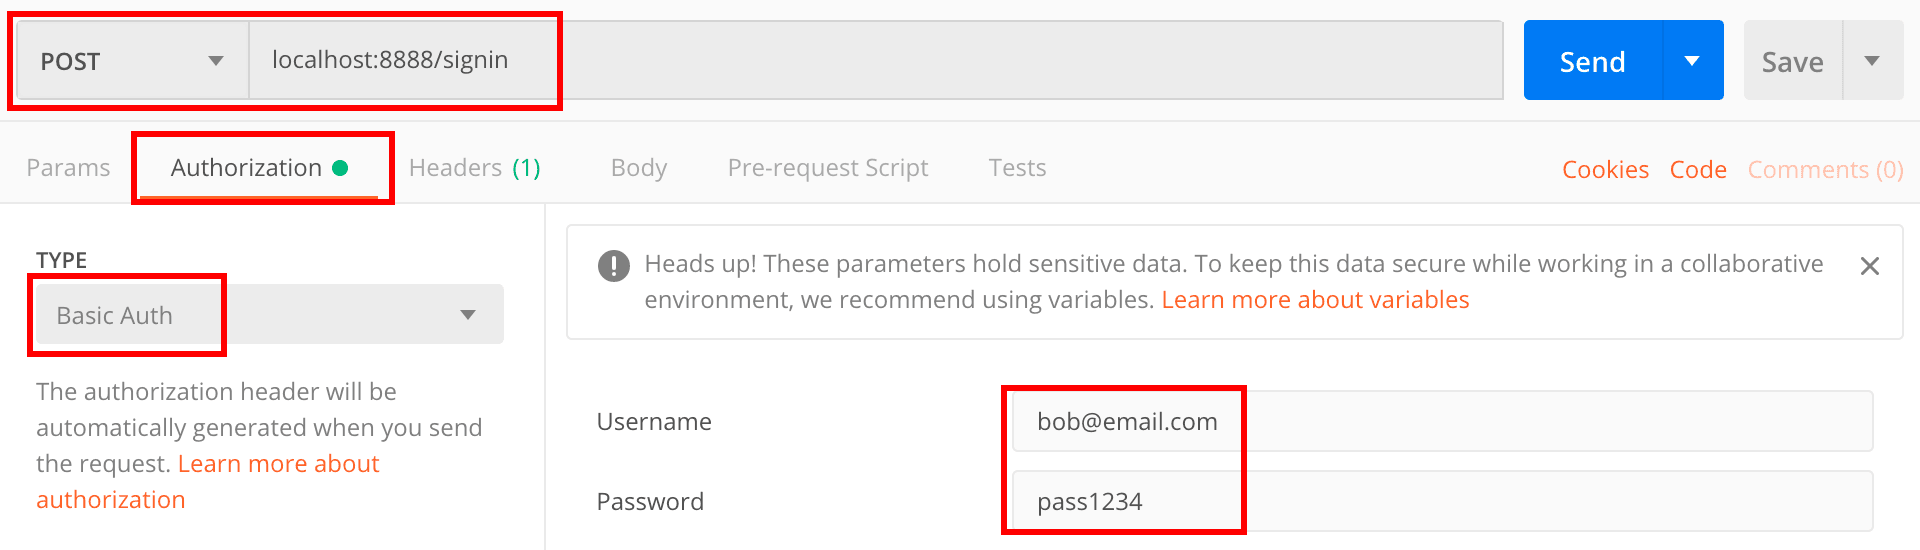
Pressing send should give you a token just like for the /signup route.
Token security
I stressed earlier the need to send all requests and responses using HTTPS. This is just as true for tokens as it is for usernames and passwords. If an attacker gets a hold of a user's token, they can do anything the user can do. An advantage of the token, though, is that it expires after a limited amount of time and can also be invalidated. Read this article for more token related security concerns.
Conclusion
The purpose of this tutorial was to teach you some of the foundational concepts about client authentication and how to do it on a Dart server. We looked at basic authentication with a username and password and also token based authentication, considering security issues along the way.
Although we used the Aqueduct framework for Server Side Dart, we only slightly tapped its true potential. Many of the authentication tasks that we did in this lesson can (and should) be handled automatically by Aqueduct. For example, you can add an AuthServer middleware to your routes. And I didn't even have time to talk about OAuth. In a future tutorial I will cover these topics in more detail. For now I hope you are coming away knowing the basics of authentication on a Dart server.
The code for this tutorial (except for the JWT secret) is on GitHub. Each section has its own branch:
Further reading


© 2026 Pusher Ltd. All rights reserved.
Pusher Limited is a company registered in England and Wales (No. 07489873) whose registered office is at MessageBird UK Limited, 3 More London Riverside, 4th Floor, London, United Kingdom, SE1 2AQ.