- Products

- Developers
- User stories
- Blog
- Pricing

Emoji suggestions in an Angular chat application using sentiment analysis
Introduction
Introduction
Sentiment analysis is the process of computationally identifying and categorizing opinions expressed in a piece of text, especially to determine whether the writer's attitude towards a particular topic, product, etc. is positive, negative, or neutral. Using sentiment analysis, we can suggest emojis to be used as replies to messages based on the context of the received message.
Using Angular, you can extend the template language with your components and use a wide array of existing components, and with Pusher we can enable realtime messaging in the chat using pusher’s pub/sub pattern.
We’ll be building a realtime chat application using Pusher Channels, Angular and the sentiment library for emoji suggestions based on the context of messages received.
Using our application users can get emoji suggestions as replies to received messages while engaging in a chat with a third party.
Here’s a demo of the final product:

Prerequisites
To follow this tutorial a basic understanding of Angular and Node.js is required. Please ensure that you have Node and npm installed before you begin.
We’ll be using these tools to build out our application:
We’ll be sending messages to the server and using the Pushers pub/sub pattern, we’ll listen to and receive messages in realtime. To get started with Pusher Channels, create a free sandbox Pusher account or sign in. Then navigate to the dashboard. Click Create new Channels app, fill out the details, click Create my app, and make a note of the details on the App Keys tab.
Let’s build!
Setup and folder structure
Using the Angular CLI (command line interface) provided by the Angular team, we’ll initialize our project. To initialize the project, first, install the CLI by running npm install @angular/cli in your terminal. NPM is a package manager used for installing packages. It will be available on your PC if you have Node installed.
To create a new Angular project using the CLI, open a terminal and run:
ng new angular-pusher-chat --style=scss
The command is simply telling the CLI to create a new project called angular-pusher-chat and it should make use of the CSS pre-processor SCSS rather than CSS for styling.
Open the newly created folder angular-pusher-chat, and your folder structure should look something like this:
1angular-pusher-chat/ 2 e2e/ 3 node_modules/ 4 src/ 5 app/ 6 app.component.html 7 app.component.ts 8 app.component.css 9 ...
Open a terminal inside the project folder and start the application by running ng serve or npm start. If you open your browser and visit the link http://localhost:4200 you should see the screenshot below if everything went well.
Building our server
Now that we have our Angular application running, let’s build out a basic part of our server.
To do this we’ll need to install Express. Express is a fast, unopinionated, minimalist web framework for Node.js. We’ll use this to receive requests from our Angular application.
To install express, run npm install express in a terminal in the root folder of your project.
Create a file called server.js in the root of the project and update it with the code snippet below
1// server.js 2 3 require('dotenv').config(); 4 const express = require('express'); 5 const bodyParser = require('body-parser'); 6 7 const app = express(); 8 const port = process.env.PORT || 4000; 9 10 app.use(bodyParser.json()); 11 app.use(bodyParser.urlencoded({ extended: false })); 12 app.use((req, res, next) => { 13 res.header('Access-Control-Allow-Origin', '*'); 14 res.header( 15 'Access-Control-Allow-Headers', 16 'Origin, X-Requested-With, Content-Type, Accept' 17 ); 18 next(); 19 }); 20 21 app.listen(port, () => { 22 console.log(`Server started on port ${port}`); 23 });
We referenced three packages that haven’t been installed, body-parser, pusher and dotenv. Install these packages by running the following command in your terminal.
npm i body-parser pusher dotenv
- body-parser is a package used to parse incoming request bodies in a middleware before your handlers, available under the
req.bodyproperty. - dotenv is a zero-dependency module that loads environment variables from a
.envfile into process.env. This package is used so sensitive information like theappIdandsecretaren’t added to our codebase directly. - The dotenv package will load the variables provided in our
.envfile into our environment. - CORS: The calls to our endpoint will be coming in from a different origin, therefore we need to make sure we include the CORS headers (
Access-Control-Allow-Origin). If you are unfamiliar with the concept of CORS headers, you can find more information here.
If you noticed, I added the dotenv package at the start of our file. This is because we need to load the variables as early as possible to make them available throughout the application.
Also, you’ll notice that we installed Pusher library as a dependency. Follow the steps above to create a Pusher account if you haven’t done so already
Let’s create a .env file to load the variables we’ll be needing into the Node environment. Create the file in the root folder of your project and update it with the code below.
1// .env 2 3 PUSHER_APP_ID=<APP_ID> 4 PUSHER_KEY=<PUSHER_KEY> 5 PUSHER_SECRET=<PUSHER_SECRET>
Please ensure you replace the placeholder values above with your Pusher appId, key and secret.
This is a standard Node application configuration, nothing specific to our app.
Sending messages
To enable users send and receive messages, we’ll create a route to handle incoming requests. Update your server.js file with the code below.
1// server.js 2 3 require('dotenv').config(); 4 const express = require('express'); 5 const bodyParser = require('body-parser'); 6 const Pusher = require('pusher'); 7 8 const pusher = new Pusher({ 9 appId: process.env.PUSHER_APP_ID, 10 key: process.env.PUSHER_KEY, 11 secret: process.env.PUSHER_SECRET, 12 cluster: 'eu', 13 encrypted: true, 14 }); 15 16 ... 17 18 app.use((req, res, next) => { 19 res.header('Access-Control-Allow-Origin', '*'); 20 res.header( 21 'Access-Control-Allow-Headers', 22 'Origin, X-Requested-With, Content-Type, Accept' 23 ); 24 next(); 25 }); 26 27 app.post('/messages', (req, res) => { 28 const { body } = req; 29 const { text, id } = body; 30 const data = { 31 text, 32 id, 33 timeStamp: new Date(), 34 }; 35 36 pusher.trigger('chat', 'message', data); 37 res.json(data); 38 }); 39 ...
- We created a
POST /messagesroute which, when hit, triggers a Pusher event. - We used object destructuring to get the body of the request, we also got the
textandidin the request body sent by the user. - The
dataobject contains thetextandidsent by the user. We’ll also added a timestamp to the it. - The trigger is achieved using the
triggermethod which takes the trigger identifier(chat), an event name (message), and a payload(data). - The payload can be any value, but in this case, we have a JS object.
- We still go ahead to respond with an object containing the
datavariable we created.
Sentiment analysis
Sentiment analysis refers to the use of natural language processing, text analysis, computational linguistics, and biometrics to systematically identify, extract, quantify, and study effective states and subjective information. - Wikipedia
You can read up a bit about sentiment analysis using the following links below:
Using sentiment analysis, we’ll analyse the messages sent to determine the attitude of the sender. With the data gotten from the analysis, we’ll determine the emojis to suggest to the user.
We’ll use the Sentiment JavaScript library for analysis. To install this library, open a terminal in the root folder of your project and run the following command.
1npm install sentiment
We’ll update our POST /messages route to include analysis of the messages being sent in. Update your server.js with the code below.
1// server.js 2require('dotenv').config(); 3const express = require('express'); 4const bodyParser = require('body-parser'); 5const Pusher = require('pusher'); 6 7const Sentiment = require('sentiment'); 8const sentiment = new Sentiment(); 9 10... 11 12app.post('/messages', (req, res) => { 13 const { body } = req; 14 const { text, id } = body; 15 const result = sentiment.analyze(text); 16 const comparative = result.comparative; 17 const tone = 18 comparative >= 0 ? (comparative >= 1 ? 'positive' : 'neutral') : 'negative'; 19 const data = { 20 text, 21 id, 22 timeStamp: new Date(), 23 sentiment: { 24 tone, 25 score: result.score, 26 }, 27 }; 28 pusher.trigger('chat', 'message', data); 29 res.json(data); 30}); 31 32...
- Include the sentiment library in the project
result: here, we analyze the message sent in by the user to determine the context of the message.comparative: this is the comparative score gotten after analyzing the message. This score is used to determine if a message ispositive,negativeorneutral.tone: thetonevariable is the context of the message gotten after analysis. This will benegativeif the comparative score is below0,neutralif the score is above0but below1. The tone ispositiveif the comparative score is1and above.- A new object(
sentiment) property is added to the response data containing the message’s tone and score.
You can now start the server by running node server.js in the terminal in the root folder of the project.
Chat view
Let’s begin to build out our chat interface. We’ll create a chat component to hold the chat interface. We’ll create this using the CLI. Run ng generate component chat in a terminal in the root folder of your project.
Update the recently created files as follows:
1// chat.component.html 2 3 <div class="main"> 4 <div class="chat-box"> 5 <div class="message-area"> 6 <div class="message" 7 *ngFor="let message of messages" 8 [ngClass]="getClasses(message.type)"> 9 <p>{{message.text}}</p> 10 </div> 11 </div> 12 <div class="input-area"> 13 <form (submit)="sendMessage()" name="messageForm" #messageForm="ngForm"> 14 <input type="text" name="message" id="message" [(ngModel)]="message"> 15 <button> 16 <span data-feather="send"></span> 17 </button> 18 </form> 19 </div> 20 </div> 21 </div>
In the code snippet above:
- We loop through the available
messagesin the.message-area. - We have a form containing an input element and a submit button.
- We using an icon-set called feather-icons in our project. To include feather-icons in your project, simply add the cdn link in your
index.htmlfile.
1// index.html 2 ... 3 <script src="https://unpkg.com/feather-icons/dist/feather.min.js"></script> 4 </body> 5 ...
Open the chat.component.ts file and update with the code below:
1// chat.component.ts 2 3 import { Component, OnInit } from '@angular/core'; 4 import { HttpClient } from '@angular/common/http'; 5 import { v4 } from 'uuid'; 6 7 declare const feather: any; 8 interface Message { 9 id: string; 10 text: string; 11 timeStamp: Date; 12 type: string; 13 } 14 15 @Component({ 16 selector: 'app-chat', 17 templateUrl: './chat.component.html', 18 styleUrls: ['./chat.component.scss'], 19 }) 20 21 export class ChatComponent implements OnInit { 22 constructor(private http: HttpClient) {} 23 24 messages: Array<Message> = []; 25 message: string = ''; 26 lastMessageId; 27 28 sendMessage() { 29 if (this.message !== '') { 30 // Assign an id to each outgoing message. It aids in the process of differentiat . ing between outgoing and incoming messages 31 this.lastMessageId = v4(); 32 const data = { 33 id: this.lastMessageId, 34 text: this.message, 35 }; 36 37 this.http 38 .post(`http://localhost:4000/messages`, data) 39 .subscribe((res: Message) => { 40 const message = { 41 ...res, 42 // The message type is added to distinguish between incoming and outgoing messages. It also aids with styling of each message type 43 type: 'outgoing', 44 }; 45 this.messages = this.messages.concat(message); 46 this.message = ''; 47 }); 48 49 } 50 } 51 52 // This method adds classes to the element based on the message type 53 getClasses(messageType) { 54 return { 55 incoming: messageType === 'incoming', 56 outgoing: messageType === 'outgoing', 57 }; 58 } 59 60 ngOnInit() { 61 // Initialize feather icons 62 feather.replace(); 63 } 64 }
sendMessage: this method uses the native HttpClient to make requests to the server. The POST method takes a URL and the request body as parameters. We then append the data returned to the array of messages. We make use of a package called uuid to give each message a unique id.
Run npm install uuid in a terminal inside your project’s root folder to install this package.
getClasses : this method generates classes for a message element based on the messageType
In the ngOnInit lifecycle, we initialize [feather](https://feathericons.com), our chosen icon set.
To make use of the HttpClient service, we’ll need to import the HttpClientModule into the app.module.ts file. Also to make use of form-related directives, we’ll need to import the FormsModule. So update your app module file as follows:
1// app.module.ts 2 ... 3 import { ChatComponent } from './chat/chat-component'; 4 import {HttpClientModule} from '@angular/common/http'; 5 import {FormsModule} from "@angular/forms"; 6 7 ... 8 @NgModule({ 9 declarations: [AppComponent, ChatComponent], 10 imports: [BrowserModule, HttpClientModule, FormsModule], 11 providers: [], 12 bootstrap: [AppComponent], 13 }) 14 ...
Styling
Open the chat.component.scss file and update it with the styles below:
1// chat.component.scss 2 3 .main { 4 display: flex; 5 justify-content: center; 6 align-items: center; 7 min-height: 90vh; 8 .chat-box { 9 width: 300px; 10 max-height: 500px; 11 height: 500px; 12 box-shadow: 0 4px 8px 0 rgba(0, 0, 0, 0.12), 0 2px 4px 0 rgba(0, 0, 0, 0.08); 13 border-radius: 3% 3% 0 0; 14 position: relative; 15 padding-bottom: 40px; 16 .message-area { 17 max-height: 450px; 18 height: 450px; 19 overflow: auto; 20 padding: 20px 20px; 21 .message { 22 p { 23 color: white; 24 font-size: 13px; 25 font-weight: bold; 26 margin: 0px; 27 width: 45%; 28 box-shadow: 0 2px 4px 0 rgba(0, 0, 0, 0.1); 29 padding: 7px 10px; 30 margin: 5px 0; 31 } 32 } 33 .message.incoming { 34 display: flex; 35 flex-direction: column; 36 justify-content: flex-start; 37 align-items: flex-start; 38 p { 39 border-radius: 0 11px 11px 11px; 40 background: goldenrod; 41 } 42 } 43 .message.outgoing { 44 display: flex; 45 flex-direction: column; 46 justify-content: flex-end; 47 align-items: flex-end; 48 p { 49 border-radius: 11px 11px 0 11px; 50 background: darkgrey; 51 } 52 } 53 } 54 } 55 }
This first SCSS snippet styles the .chat-area. Including how messages should look. The next snippet will style the input area and the send button.
1// chat.component.scss 2 3 .input-area { 4 position: absolute; 5 bottom: 0; 6 left: 0; 7 width: 100%; 8 height: 40px; 9 form { 10 display: flex; 11 height: 100%; 12 input { 13 width: 85%; 14 border: none; 15 background: rgba(0, 0, 0, 0.08); 16 padding: 5px 10px; 17 color: rgba(0, 0, 0, 0.3); 18 font-size: 14px; 19 font-weight: bold; 20 font-family: 'Titillium Web', sans-serif; 21 &:focus { 22 outline: none; 23 } 24 } 25 button { 26 width: 15%; 27 border: none; 28 background: darkslategray; 29 color: white; 30 display: flex; 31 justify-content: center; 32 align-items: center; 33 cursor: pointer; 34 } 35 } 36 }
Introducing Pusher and sending messages
So far we have an application that allows users send messages but the messages aren’t delivered in realtime. To solve this problem, we’ll include the Pusher library.
Open a terminal in the root folder of the project and install the package by running the following command:
npm install pusher-js
To make the Pusher library available in our application, we’ll add the library as a third party script to be loaded by Angular CLI. All CLI config is stored in .angular-cli.json file. Modify the scripts property to include the link to pusher.min.js.
1// .angular-cli.json 2 ... 3 4 "scripts": [ 5 "../node_modules/pusher-js/dist/web/pusher.min.js" 6 ] 7 ...
Now that Pusher has been made available in our project, we’ll create a Pusher service to be used application wide. The Angular CLI can aid in the service creation. Open a terminal in your project’s root folder and run the following command.
ng generate service pusher
This command simply tells the CLI to generate a service named pusher . Now open the pusher.service.ts file and update it with the code below.
1// pusher.service.ts 2 3 import { Injectable } from '@angular/core'; 4 5 declare const Pusher: any; 6 7 @Injectable() 8 export class PusherService { 9 constructor() { 10 var pusher = new Pusher('<PUSHER_KEY>', { 11 cluster: 'eu', 12 encrypted: true, 13 }); 14 this.channel = pusher.subscribe('chat'); 15 } 16 channel; 17 18 public init() { 19 return this.channel; 20 } 21 }
- First, we initialize Pusher in the constructor.
- The
initmethod returns the Pusher property we created.
NOTE: Ensure you replace the
PUSHER_KEYstring with your actual Pusher key.
To make the service available application wide, import it into the module file.
1// app.module.ts 2 import {PusherService} from './pusher.service' 3 ... 4 5 @NgModule({ 6 .... 7 providers: [PusherService], 8 .... 9 })
We’ll make use of this service in our component, by binding to the message event and appending the returned message into the list of messages. This will be done in the ngOnInit lifecycle.
1// chat.component.ts 2 import { PusherService } from '../pusher.service'; 3 4 ... 5 // Include the PusherService in the component's constructor 6 constructor(private http: HttpClient, private pusher: PusherService){} 7 ... 8 9 ngOnInit() { 10 feather.replace(); 11 const channel = this.pusher.init(); 12 channel.bind('message', (data) => { 13 if (data.id !== this.lastMessageId) { 14 const message: Message = { 15 ...data, 16 type: 'incoming', 17 }; 18 this.messages = this.messages.concat(message); 19 } 20 }); 21 } 22 }
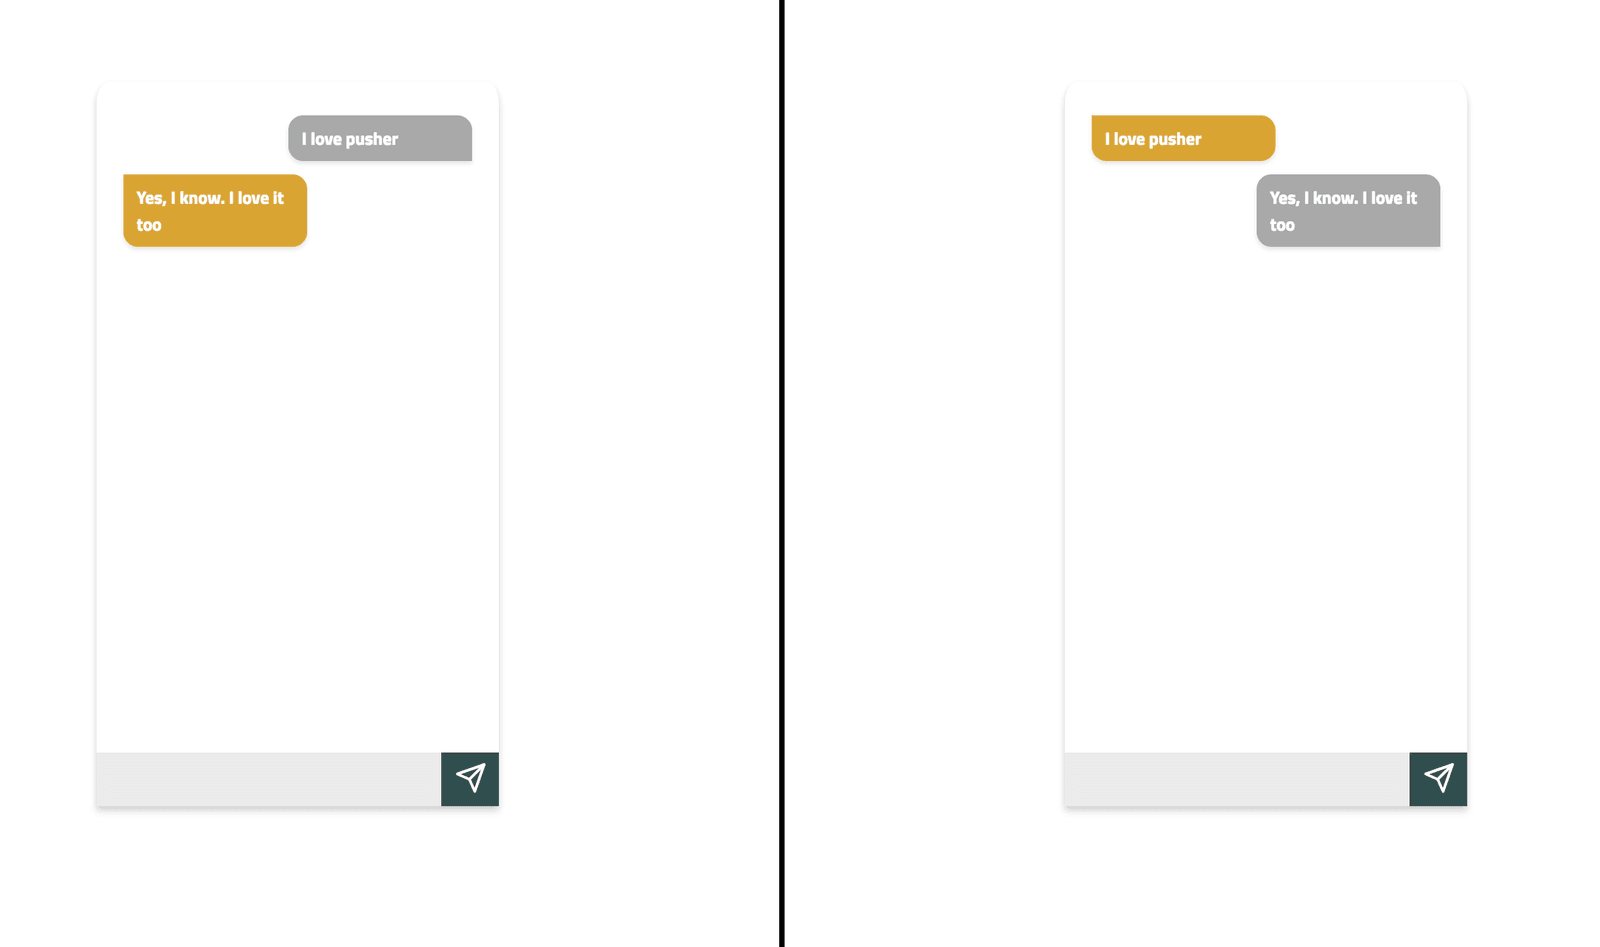
To test the realtime functionality of the application, open two browsers side-by-side and send messages. You should be able to receive a message sent from one browser on the other.
Now let’s place the chat component in the app.component.html file. This will make our chat component available for viewing. Replace the contents of the file with the code below.
1// app.component.html 2 <div> 3 <app-chat></app-chat> 4 </div>
Now we can view our application for the first time, it should currently be able to send messages back and forth in realtime.
Emoji suggestions
To display emoji suggestions during a chat session, we’ll make use of the sentiment param being sent from the server as a response for each message request. The data being sent from the server should be similar to the snippet below.
1{ 2 id: '83d3dd57-6cf0-42dc-aa5b-2d997a562b7c', 3 text: 'i love pusher', 4 timeStamp: '2018-04-27T15:04:24.574Z' 5 sentiment: { 6 tone: 'positive', 7 score: 3 8 } 9 }
Generate an emoji component that will hold the emoji section. This component will handle the display of emojis based on the tone of each message received. We’ll generate a new component using the CLI by running the following command in the terminal.
ng generate component emoji-panel
Replace the contents of the emoji-panel.component.html file with the code snippet below.
1// emoji-panel.component.html 2 3 <div class="emojis" [hidden]="!showEmojis" [attr.aria-hidden]="!showEmojis"> 4 <div class="emoji-list positive" *ngIf="result.tone === 'positive'"> 5 <span class="emoji" *ngFor="let emoji of emojiList.positive; let i = index;" (click)="onClick('positive', i)"> 6 {{codePoint(emoji)}} 7 </span> 8 </div> 9 10 <div class="emoji-list neutral" *ngIf="result.tone === 'neutral'"> 11 <span class="emoji" *ngFor="let emoji of emojiList.neutral; let j = index;" (click)="onClick('neutral', j)"> 12 {{codePoint(emoji)}} 13 </span> 14 </div> 15 16 <div class="emoji-list negative" *ngIf="result.tone === 'negative'"> 17 <span class="emoji" *ngFor="let emoji of emojiList.negative; let k = index;" (click)="onClick('negative', k)"> 18 {{codePoint(emoji)}} 19 </span> 20 </div> 21 </div>
attr.aria-hidden: here we set the accessibility attribute of the element to either true or false based on the showEmojis variable.
1// emoji-panel.component.ts 2 import { Component, OnInit, Input, Output, EventEmitter } from '@angular/core'; 3 4 @Component({ 5 selector: 'app-emoji-panel', 6 templateUrl: './emoji-panel.component.html', 7 styleUrls: ['./emoji-panel.component.scss'], 8 }) 9 10 export class EmojiPanelComponent implements OnInit { 11 constructor() {} 12 @Input() result = {}; 13 @Input() showEmojis: boolean = false; 14 @Output() onEmojiSelect: EventEmitter<string> = new EventEmitter(); 15 16 emojiList = { 17 positive: [128512, 128513, 128536, 128516], 18 neutral: [128528, 128529, 128566, 129300], 19 negative: [128543, 128577, 128546, 128542], 20 }; 21 22 codePoint(emojiCodePoint) { 23 return String.fromCodePoint(emojiCodePoint); 24 } 25 onClick(reaction, index) { 26 const emoji = this.emojiList[reaction][index]; 27 this.onEmojiSelect.emit(emoji); 28 } 29 30 ngOnInit() {} 31 }
emojiList: this is an object containing a list of emojis that’ll be suggested. There’s a list for each message tone.
showEmojis: an input variable from the parent component(chat) to determine the visibility of the emoji panel
onClick: this method takes to parameters. The reaction param is used to select the list of emojis to check for the provided index. The selected emoji is then emitted to the parent component.
1// emoji-panel.component.scss 2 3 .emojis { 4 &[aria-hidden='true'] { 5 animation: slideOutDown 0.7s; 6 } 7 &[aria-hidden='false'] { 8 animation: slideInUp 0.7s; 9 } 10 .emoji-list { 11 display: flex; 12 .emoji { 13 margin: 0 5px; 14 cursor: pointer; 15 } 16 } 17 } 18 @keyframes slideInUp { 19 from { 20 transform: translate3d(0, 100%, 0); 21 visibility: visible; 22 } 23 to { 24 transform: translate3d(0, 0, 0); 25 } 26 } 27 @keyframes slideOutDown { 28 from { 29 transform: translate3d(0, 0, 0); 30 } 31 to { 32 visibility: hidden; 33 transform: translate3d(0, 100%, 0); 34 } 35 }
After creating the emoji-panel component, the next step is to add it to our chat component. Update the chat component with the code snippets below.
1// chat.component.html 2 ... 3 <div> 4 ... 5 <div class="emo-area"> 6 <app-emoji-panel [showEmojis]="showEmojis" [result]="score" (onEmojiSelect)="selectEmoji($event)"></app-emoji-panel> 7 </div> 8 <div class="input-area"> 9 <form (submit)="sendMessage()" name="messageForm" #messageForm="ngForm"> 10 <input type="text" name="message" id="message" [(ngModel)]="message"> 11 <button> 12 <span data-feather="send"></span> 13 </button> 14 </form> 15 </div> 16 </div>
Update the chat.component.scss with the following styles:
1.main{ 2 ... 3 .chat-box{ 4 ... 5 } 6 .emo-area{ 7 position: absolute; 8 bottom: 40px; 9 left: 0; 10 width: 100%; 11 padding: 3px 10px; 12 } 13 .input-area{ 14 ... 15 } 16 }
Open the chat.component.ts file and update it like so:
1// chat.component.ts 2 3 ... 4 messages: Array<Message> = []; 5 message: string = ''; 6 lastMessageId; 7 showEmojis = false; 8 score = { 9 tone: '', 10 score: 0, 11 }; 12 13 sendMessage() { 14 if (this.message !== '') { 15 this.lastMessageId = v4(); 16 this.showEmojis = false; 17 ... 18 } 19 } 20 21 selectEmoji(e) { 22 const emoji = String.fromCodePoint(e); 23 this.message += ` ${e}`; 24 this.showEmojis = false; 25 } 26 ... 27 28 ngOnInit() { 29 feather.replace(); 30 const channel = this.pusher.init(); 31 channel.bind('message', (data) => { 32 if (data.id !== this.lastMessageId) { 33 const message: Message = { 34 ...data, 35 type: 'incoming', 36 }; 37 this.showEmojis = true; 38 this.score = data.sentiment; 39 this.messages = this.messages.concat(message); 40 } 41 }); 42 } 43 ...
selectEmoji : this method appends the selected emoji to the current message and then hides the emoji panel.
In the Pusher event callback, we set the showEmojis property to true. In the same callback, we assign the datas sentiment property to the score variable.
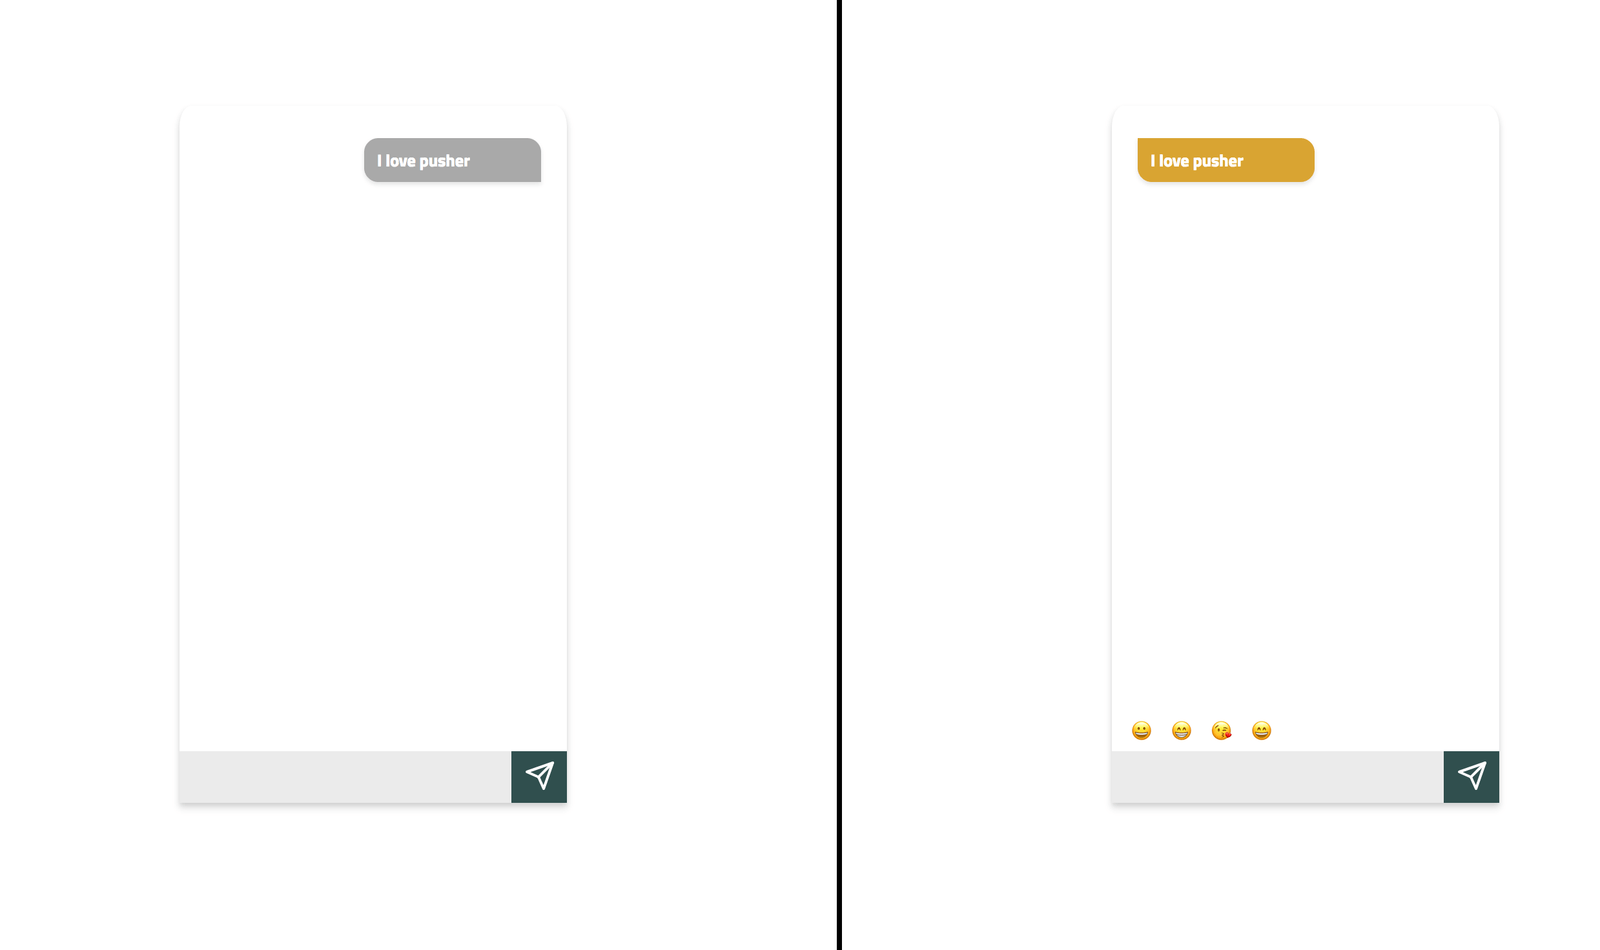
By now our application should provide emoji suggestions for received messages.
NOTE: Both the server(
node server) and the Angular dev server(ng serve) must be running to get the application working. Run both command in two separate terminal sessions if you haven’t done so already.
Conclusion
Using sentiment analysis library, we’ve been able to suggest emojis as replies for received messages and with the help of Pusher our application can send messages back and forth in realtime. You can view the source code for the demo here.


© 2026 Pusher Ltd. All rights reserved.
Pusher Limited is a company registered in England and Wales (No. 07489873) whose registered office is at MessageBird UK Limited, 3 More London Riverside, 4th Floor, London, United Kingdom, SE1 2AQ.