- Products

- Developers
- User stories
- Blog
- Pricing

Publish Android notifications from the Guardian’s API
Introduction
A piece about the New York Times tech team How to Push a Story chronicled the lengths they go to make sure that the push notifications they send are relevant, timely, and interesting.
The publishing platform at the NYT lets editors to put notifications through an approval process, measures the tolerance for the frequency of notifications, and tracks whether users unsubscribe from them.
In this article we are going to build a news notification service. It will publish articles from The Guardian who offer public APIs. We will send push notifications for every news article they publish, and let user users subscribe to their interests so they get notified when news breaks.
Prerequisites
- Experience with the Kotlin programming language. We're going to use for both the backend and frontend of our application.
- Appropriate IDEs. We suggest IntelliJ IDEA and Android Studio.
- Create a free sandbox Pusher account or sign in.
- Free Guardian Open Platform account. Sign up now if you haven’t already done so.
Setting up your Pusher account
To use the Pusher Beams API and SDKs, create a free sandbox account or sign in. Then create a new Beams instance in the dashboard.
Next, on your Overview for your Beams instance, click Open Quickstart to add your Firebase Cloud Messaging (FCM) Server Key to the Beams instance.
After saving your FCM key, you can finish the Quickstart wizard by yourself to send your first push notification, or just continue as we’ll cover this below.
It’s important to make sure that you download and keep the google-services.json file from the Firebase Console as we are going to need this later on.
Once you have created your Push Notifications instance, you will also need to note down your “Instance ID” and “Secret Key” from the Pusher Dashboard, found under the “Keys” section of your Instance settings.
Building the backend
The backend of our system is responsible for recognising that a new news story has been published and broadcasting out push notifications about it. We are going to build this in Kotlin using the Spring Boot framework, as this is a very quick way to get going for server-side Kotlin applications. All of the backend work will be done in IntelliJ.
Head over to https://start.spring.io/ to create our project structure. We need to specify that we are building a Gradle project with Kotlin and Spring Boot 2.0.1 (or newer if available at the time of reading), and we need to include the “Web” and “Cache” components:
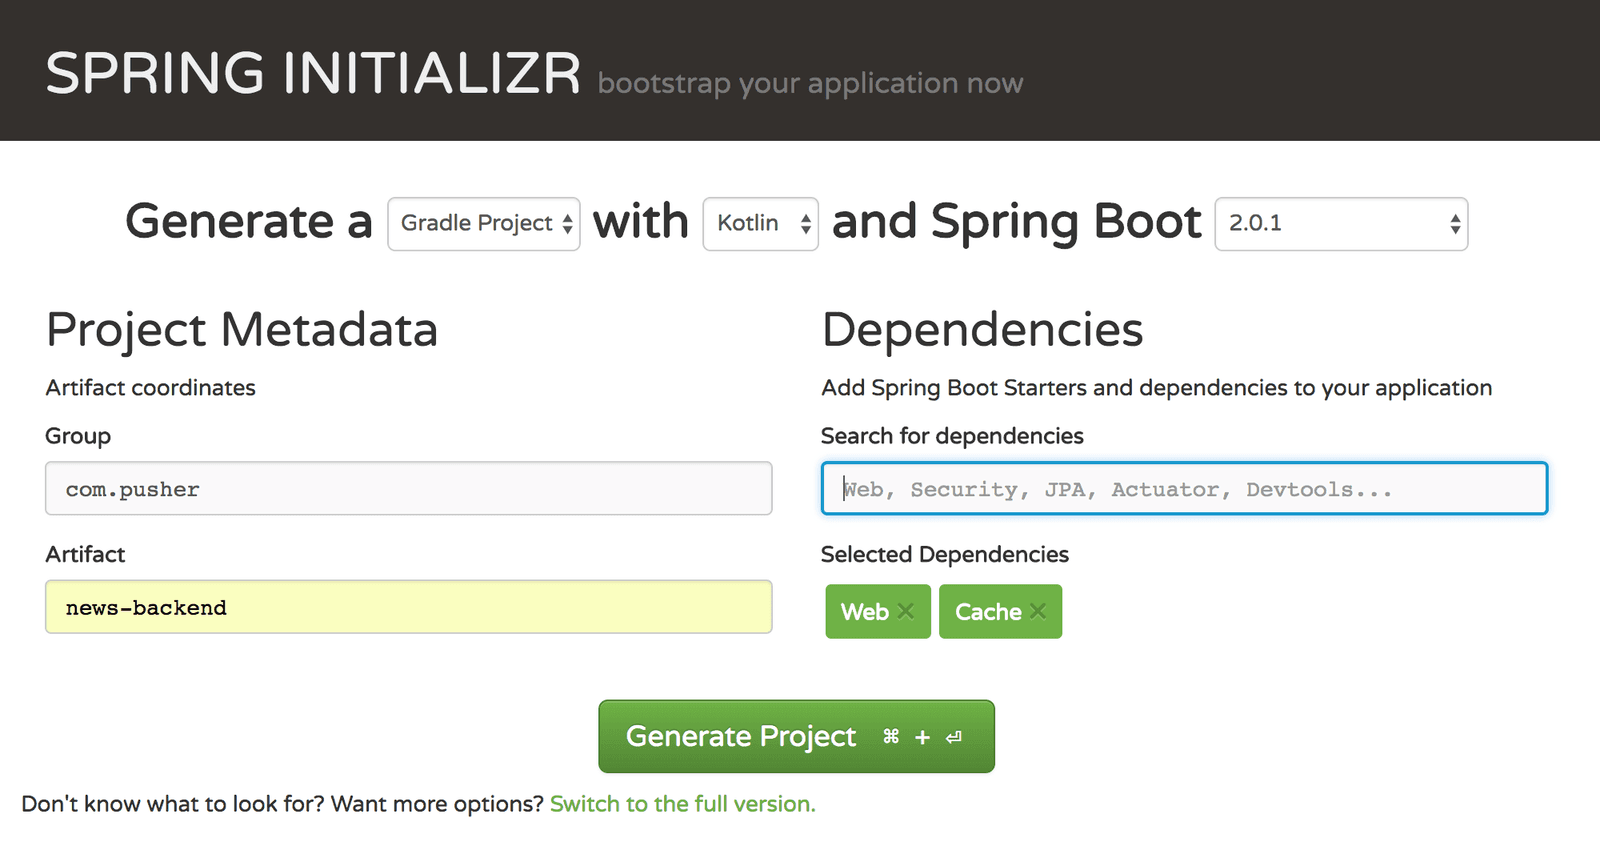
The Generate Project button will give you a zip file containing our application structure. Unpack this somewhere. At any time, you can execute ./gradlew bootRun to build and start your backend server running.
Note: when you run this, the output will appear to stop at 80%. This is because gradle expects to run to completion, whereas we are starting a long-running application here.
Firstly though, we need to add some dependencies. Open up the build.gradle file and add the following to the dependencies section:
1compile 'com.pusher:push-notifications-server-java:0.9.0' 2 runtime 'com.fasterxml.jackson.module:jackson-module-kotlin:2.9.2'
The first of these is the Pusher library needed for triggering push notifications. The second is the Jackson module needed for serialising and deserialising Kotlin classes into JSON.
Now, build the project. This will ensure that all of the dependencies are downloaded and made available and that everything compiles and builds correctly:
1$ ./gradlew build 2 3 > Task :test 4 2018-04-28 09:47:14.913 INFO 41535 --- [ Thread-5] o.s.w.c.s.GenericWebApplicationContext : Closing org.springframework.web.context.support.GenericWebApplicationContext@656af5fa: startup date [Sat Apr 28 09:47:13 BST 2018]; root of context hierarchy 5 6 7 BUILD SUCCESSFUL in 6s 8 5 actionable tasks: 5 executed
Retrieving the list of sections
Our application is going to allow subscription to a number of sections from the news feed provided by The Guardian. This means that we need to offer a list of the sections that can be subscribed to.
In order to do this, we need to create some classes that can represent the response structure from the Guardian API. In this case we are listing sections, so we need to create the following classes under src/main/kotlin/com/pusher/newsbackend:
1data class Section( 2 val id: String, 3 @JsonProperty("webTitle") val title: String 4 ) 5 6 data class SectionResponse( 7 val results: List<Section> 8 ) 9 10 data class SectionPayload( 11 val response: SectionResponse 12 )
Next we’ll create the start of our component for interacting with the Guardian API. Create a new class called GuardianApi as follows:
1@Component 2 open class GuardianApi( 3 @Value("\${guardian.apiKey}") private val apiKey: String 4 ) { 5 private val restTemplate = RestTemplate() 6 7 open fun listSections(): List<Section> { 8 val uri = UriComponentsBuilder.fromUriString("http://content.guardianapis.com/sections") 9 .queryParam("api-key", apiKey) 10 .build() 11 .toUri() 12 13 return restTemplate.getForObject(uri, SectionPayload::class.java) 14 ?.response?.results ?: emptyList() 15 } 16 }
Calls to the listSections() method will now go and retrieve the full list of sections from The Guardian, as represented by our SectionPayload class, and then return the results list from this class.
Note: The presence of the
@Componentannotation means that Spring will automatically find this class during Component Scanning and make it available.
Note: Both the class and method are marked as
open. This will become important in a short while when we introduce caching.
Next we need a controller to actually make the data available to our clients. Create a new class called SectionController as follows:
1@RestController 2 class SectionController( 3 private val api: GuardianApi 4 ) { 5 @RequestMapping("/sections") 6 fun getSections() = api.listSections() 7 }
The only thing we need now is to configure our API key. Add this to the existing src/main/resources/application.properties file, using the value you obtained earlier by registering with The Guardian Open Platform:
guardian.apiKey=<GUARDIAN API KEY HERE>
Note: this value should be put in exactly as it was provided, without any quotes or whitespace present.
At this point, we can start our application and retrieve a list of sections by calling our handler.
Caching of sections
One thing to be careful of whenever you work with a third-party API is any usage limits they have. For example, The Guardian restricts you to:
- Up to 12 calls per second
- Up to 5,000 calls per day
We can help alleviate that by reducing the number of calls we make. The list of sections is going to be relatively static, so why not cache it in our application and dramatically reduce the number of calls going out. Spring makes this really easy as we will see.
Firstly we need some Spring configuration. Create a new class called CachingConfig as follows:
1@Configuration 2 @EnableCaching 3 open class CachingConfig { 4 @Bean 5 open fun cacheManager() = ConcurrentMapCacheManager("sections") 6 }
This enables caching in our application, and creates a cache manager that knows about one cache - “sections”.
Next, add the @Cachable annotation to our listSections() method of the GuardianApi class:
1@Cacheable("sections") 2 open fun listSections(): List<Section> {
At this point, we are now caching the calls to The Guardian API. If you make repeated calls to our handler in quick succession - regardless of whether they come from the same client or not - then we will only make a single call out to The Guardian. This will dramatically cut down on our API usage limits.
Publishing events about new articles
Now that we can have clients get the list of article sections, we want to publish events whenever a new article appears on the Guardian’s API. The process for this will be:
- Periodic task to go and do a search of the Guardian’s API, ordered by oldest first and returning everything since the most recent date we’ve seen
- For every article returned, emit a push notification event about the article, with the interest specified as the section ID.
Clients can then register to receive push notifications filtered by the Section ID, and will automatically receive only notifications that they are interested in.
First then, lets build the classes to represent the API response:
1data class ArticleFields( 2 val headline: String, 3 val trailText: String?, 4 val thumbnail: String? 5 ) 6 7 data class Article( 8 val id: String, 9 @JsonProperty("webUrl") val url: String, 10 @JsonProperty("webPublicationDate") val publicationDate: String, 11 val fields: ArticleFields, 12 val sectionId: String 13 ) 14 15 data class ArticleResponse( 16 val results: List<Article> 17 ) 18 19 data class ArticlePayload( 20 val response: ArticleResponse 21 )
Then we want to be able to actually retrieve the articles. Add the following to GuardianApi:
1open fun listArticles(from: Instant?): List<Article> { 2 val uriBuilder = UriComponentsBuilder.fromUriString("http://content.guardianapis.com/search") 3 .queryParam("api-key", apiKey) 4 .queryParam("rights", "syndicatable") 5 .queryParam("page-size", "50") 6 .queryParam("show-fields", "headline,trailText,thumbnail") 7 .queryParam("order-by", "oldest") 8 .queryParam("order-date", "published") 9 .queryParam("use-date", "published") 10 11 if (from != null) { 12 uriBuilder.queryParam("from-date", from.toString()) 13 } 14 val uri = uriBuilder.build().toUri() 15 16 return restTemplate.getForObject(uri, ArticlePayload::class.java) 17 ?.response?.results ?: emptyList() 18 }
Next we want to be able to send details of articles to Pusher to pass on as push notifications. For this we will create a new ArticleNotifier class as follows:
1@Component 2 class ArticleNotifier( 3 @Value("\${pusher.instanceId}") private val instanceId: String, 4 @Value("\${pusher.secretKey}") private val secretKey: String 5 ) { 6 private val pusher = PushNotifications(instanceId, secretKey) 7 8 fun notify(article: Article) { 9 pusher.publish( 10 listOf(article.sectionId.replace("[^A-Za-z0-9-]".toRegex(), "")), 11 mapOf( 12 "fcm" to mapOf( 13 "data" to mapOf( 14 "url" to article.url, 15 "published" to article.publicationDate, 16 "section" to article.sectionId, 17 "headline" to article.fields.headline, 18 "trailText" to article.fields.trailText, 19 "thumbnail" to article.fields.thumbnail 20 ) 21 ) 22 ) 23 ) 24 } 25 }
We need to change the section ID that we are using for the interest slightly so that it is valid for the Pusher Beams service. An interest can only contain letters, numbers and the characters “_-=@,.:”, whilst some of the section IDs from the Guardian API contain other characters too.
You will also need to add to the application.properties file the credentials needed to access the Pusher API:
1pusher.instanceId=<PUSHER_INSTANCE_ID> 2 pusher.secretKey=<PUSHER_SECRET_KEY>
Note: this value should be put in exactly as it was provided, without any quotes or whitespace present.
Finally, a new component to call the Guardian API and retrieve the articles. This simply calls our GuardianApi class, does some manipulation of the results and then calls our ArticleNotifier for each article. Create a new ArticleRetriever class as follows:
1@Component 2 class ArticleRetriever( 3 private val guardianApi: GuardianApi, 4 private val articleNotifier: ArticleNotifier 5 ) { 6 private var lastDate: Instant? = null 7 8 private val lastSeenIds = mutableSetOf<String>() 9 10 @Scheduled(fixedDelayString = "PT10S") 11 fun retrieveArticles() { 12 val articles = guardianApi.listArticles(lastDate) 13 .filter { !lastSeenIds.contains(it.id) } 14 15 lastSeenIds.clear() 16 lastSeenIds.addAll(articles.map { it.id }) 17 18 lastDate = articles.map { it.publicationDate } 19 .map(Instant::parse) 20 .sorted() 21 .reversed() 22 .first() 23 24 articles.forEach(articleNotifier::notify) 25 } 26 }
Note here that we have an @Scheduled annotation on our method. Spring will automatically call this method at this delay - here we have 10 seconds purely for the purposes of this article. In reality it would be whatever is appropriate for your needs.
We are also keeping track of the most recently seen publication date - so that next time we can request articles newer than it - and the list of IDs that we have seen on the last pass - because the Guardian API includes articles with the same publication date as specified, so we need to filter them out by hand.
Note: in reality these would be kept in a data store so that they can be persisted between restarts, but for now this is good enough.
Finally, we need to actually enable scheduling. This is done by simply adding the @EnableScheduling annotation to the NewsBackendApplication class:
1@SpringBootApplication 2 @EnableScheduling 3 class NewsBackendApplication { 4 5 static void main(String[] args) { 6 SpringApplication.run NewsBackendApplication, args 7 } 8 }
At this point we can start the application up, and it will periodically go to the Guardian API, retrieve the next 50 articles and send push notifications for them all.
Note: we’re not specifying a start date in our application. It just so happens that The Guardian has news articles going back to November 1805, so there will be plenty of examples for us to test with.
In this application, we are broadcasting out notifications of new stories on a third party site. If we wished, we could actually have a site where we author and publish the articles ourselves and this would work just as well. In that case though, we would be able to broadcast the notifications immediately on the article being published instead of polling the remote site for updates.
Now that our backend is complete, we can start and leave it running whilst we build our UI. For this, we simply execute ./gradlew bootRun or run it from inside IntelliJ.
Building the Android application
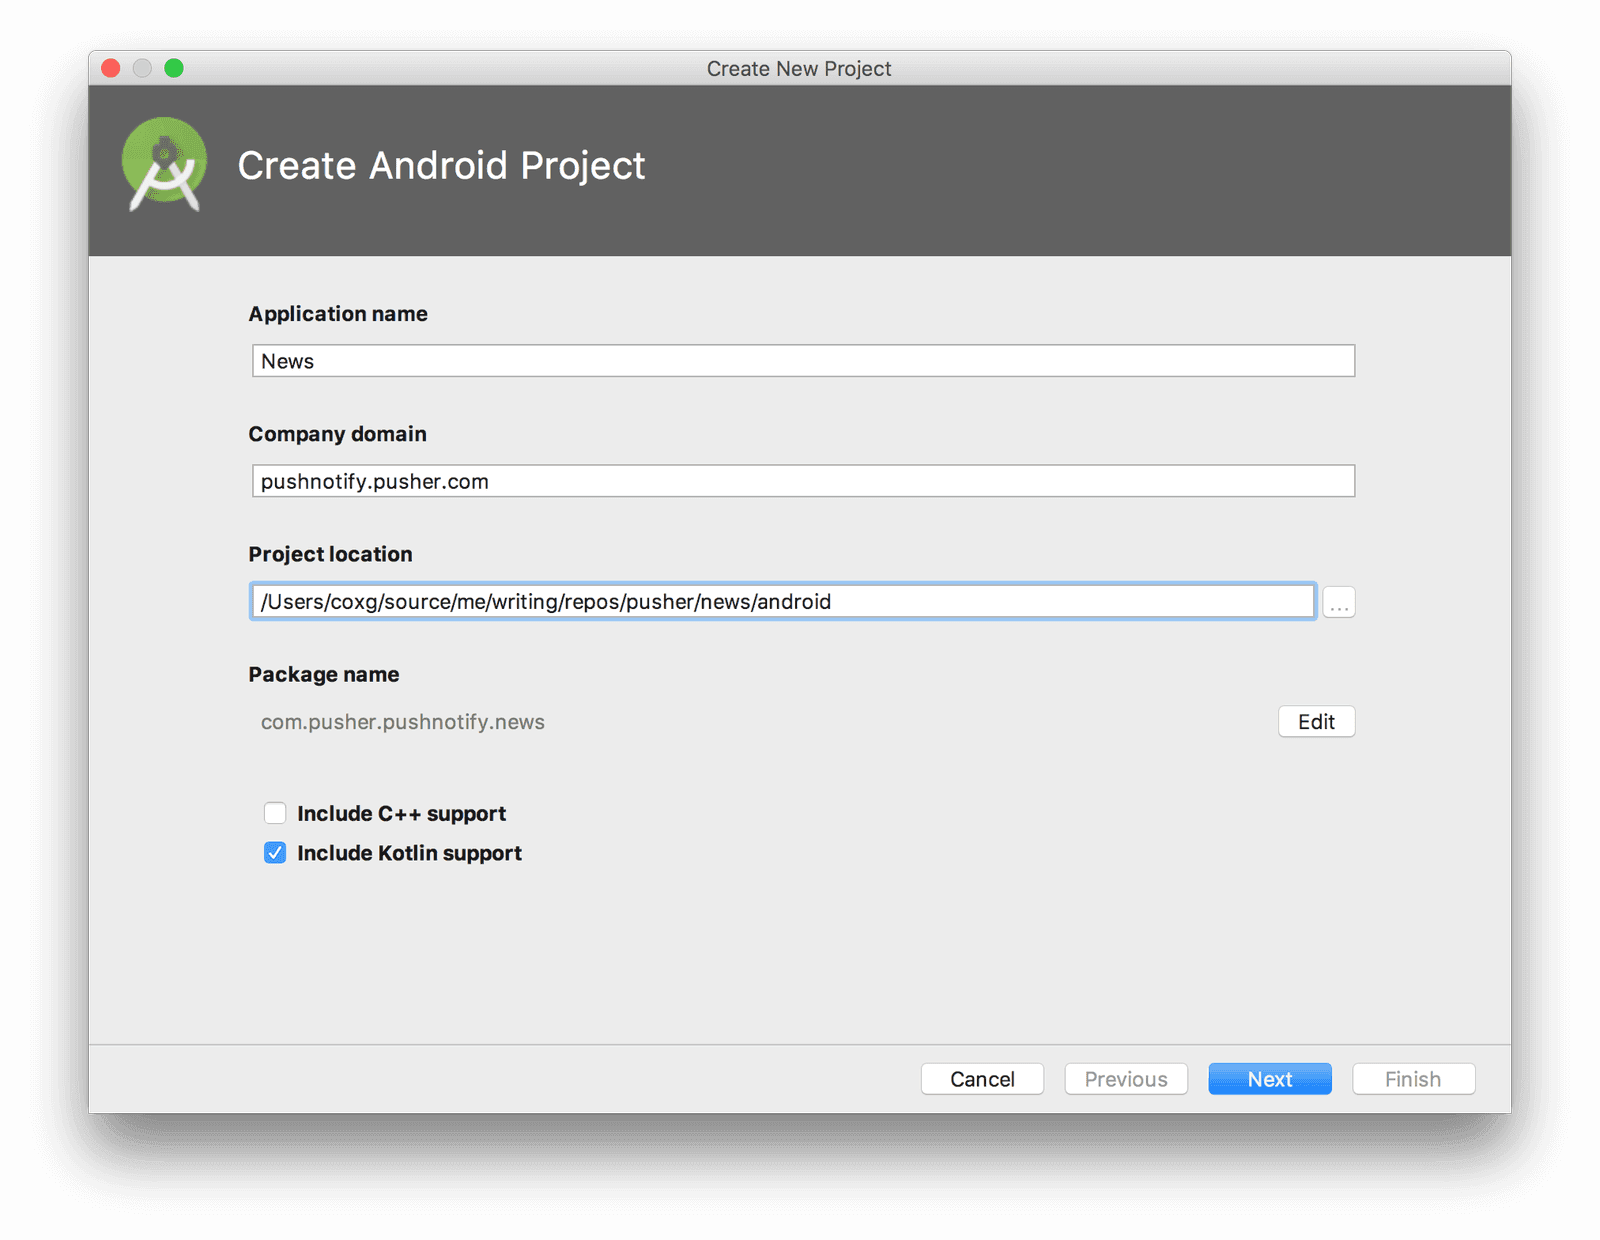
The frontend Android application will also be built in Kotlin, using Android Studio. To start, open up Android Studio and create a new project, entering some appropriate details and ensuring that you select the Include Kotlin support option. Note that the Package name must exactly match that specified when you set up the FCM Server Key earlier.
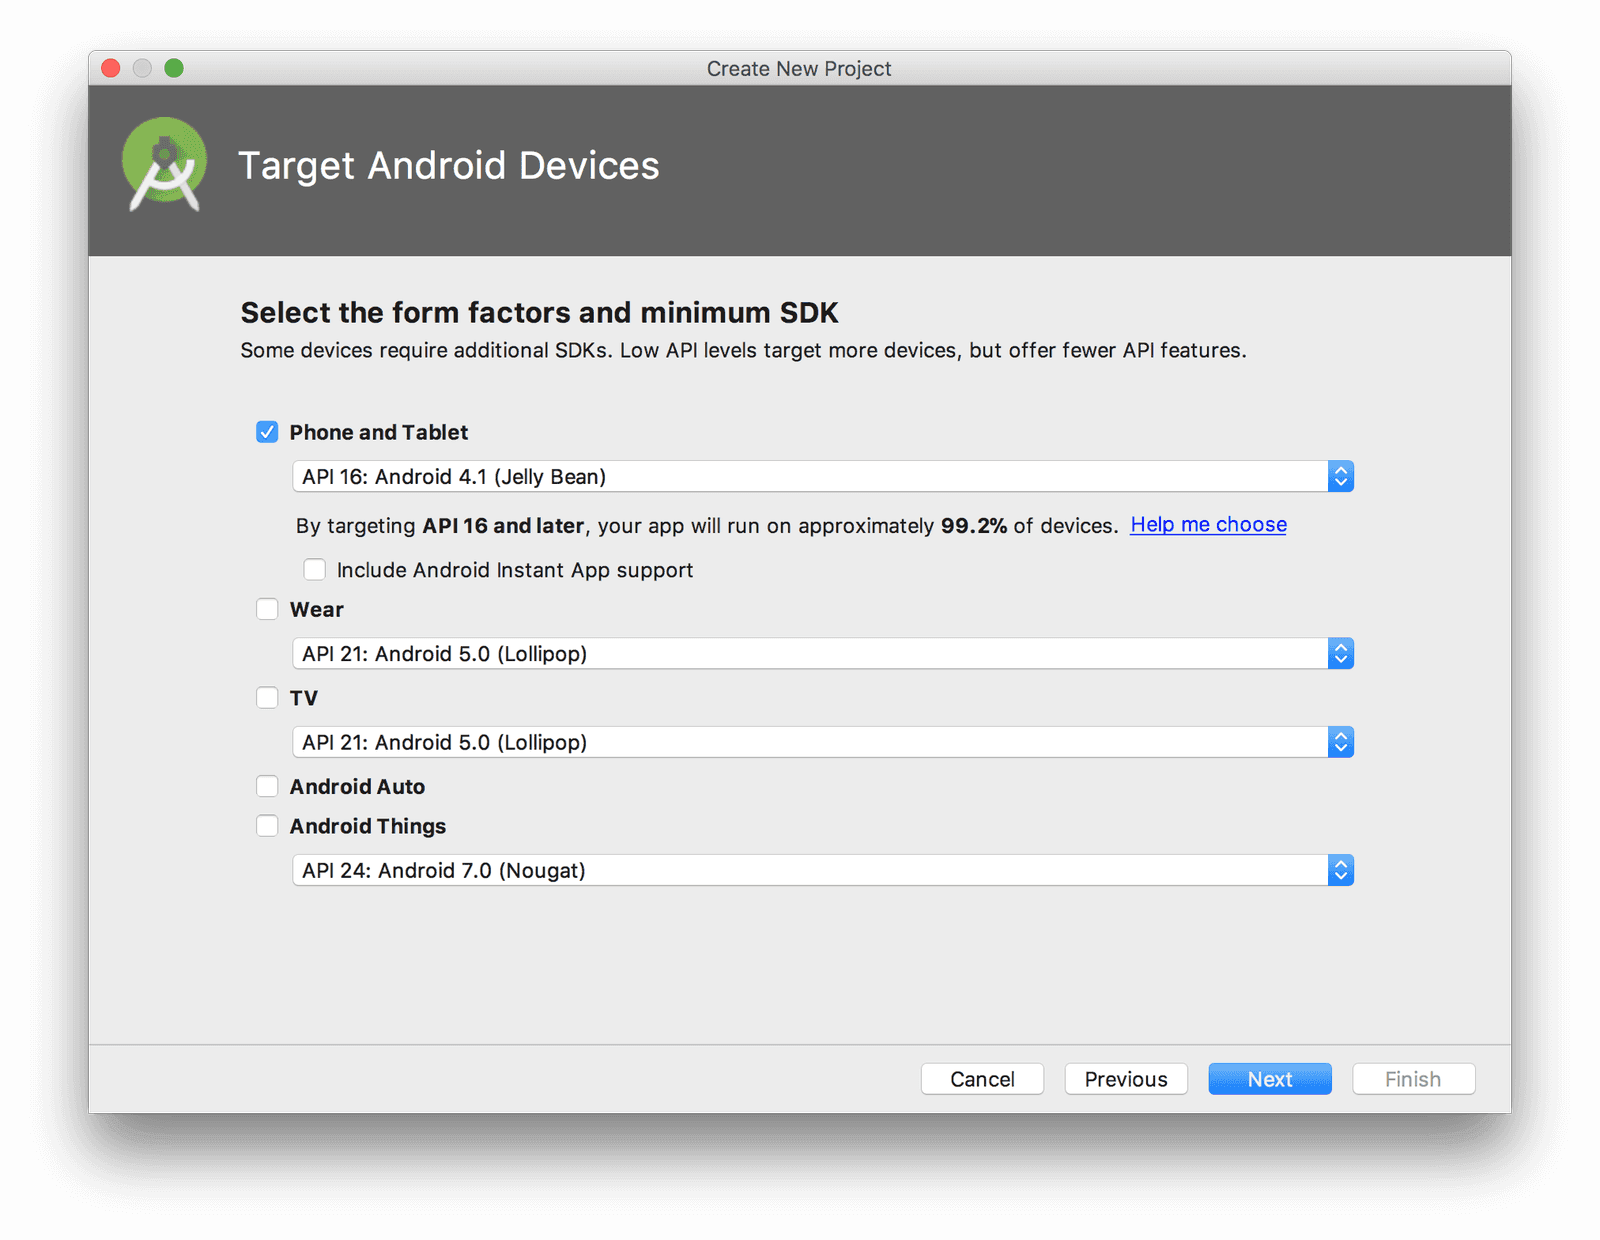
Then on the next screen, ensure that you select support for Phone and Tablet using at least API 16:
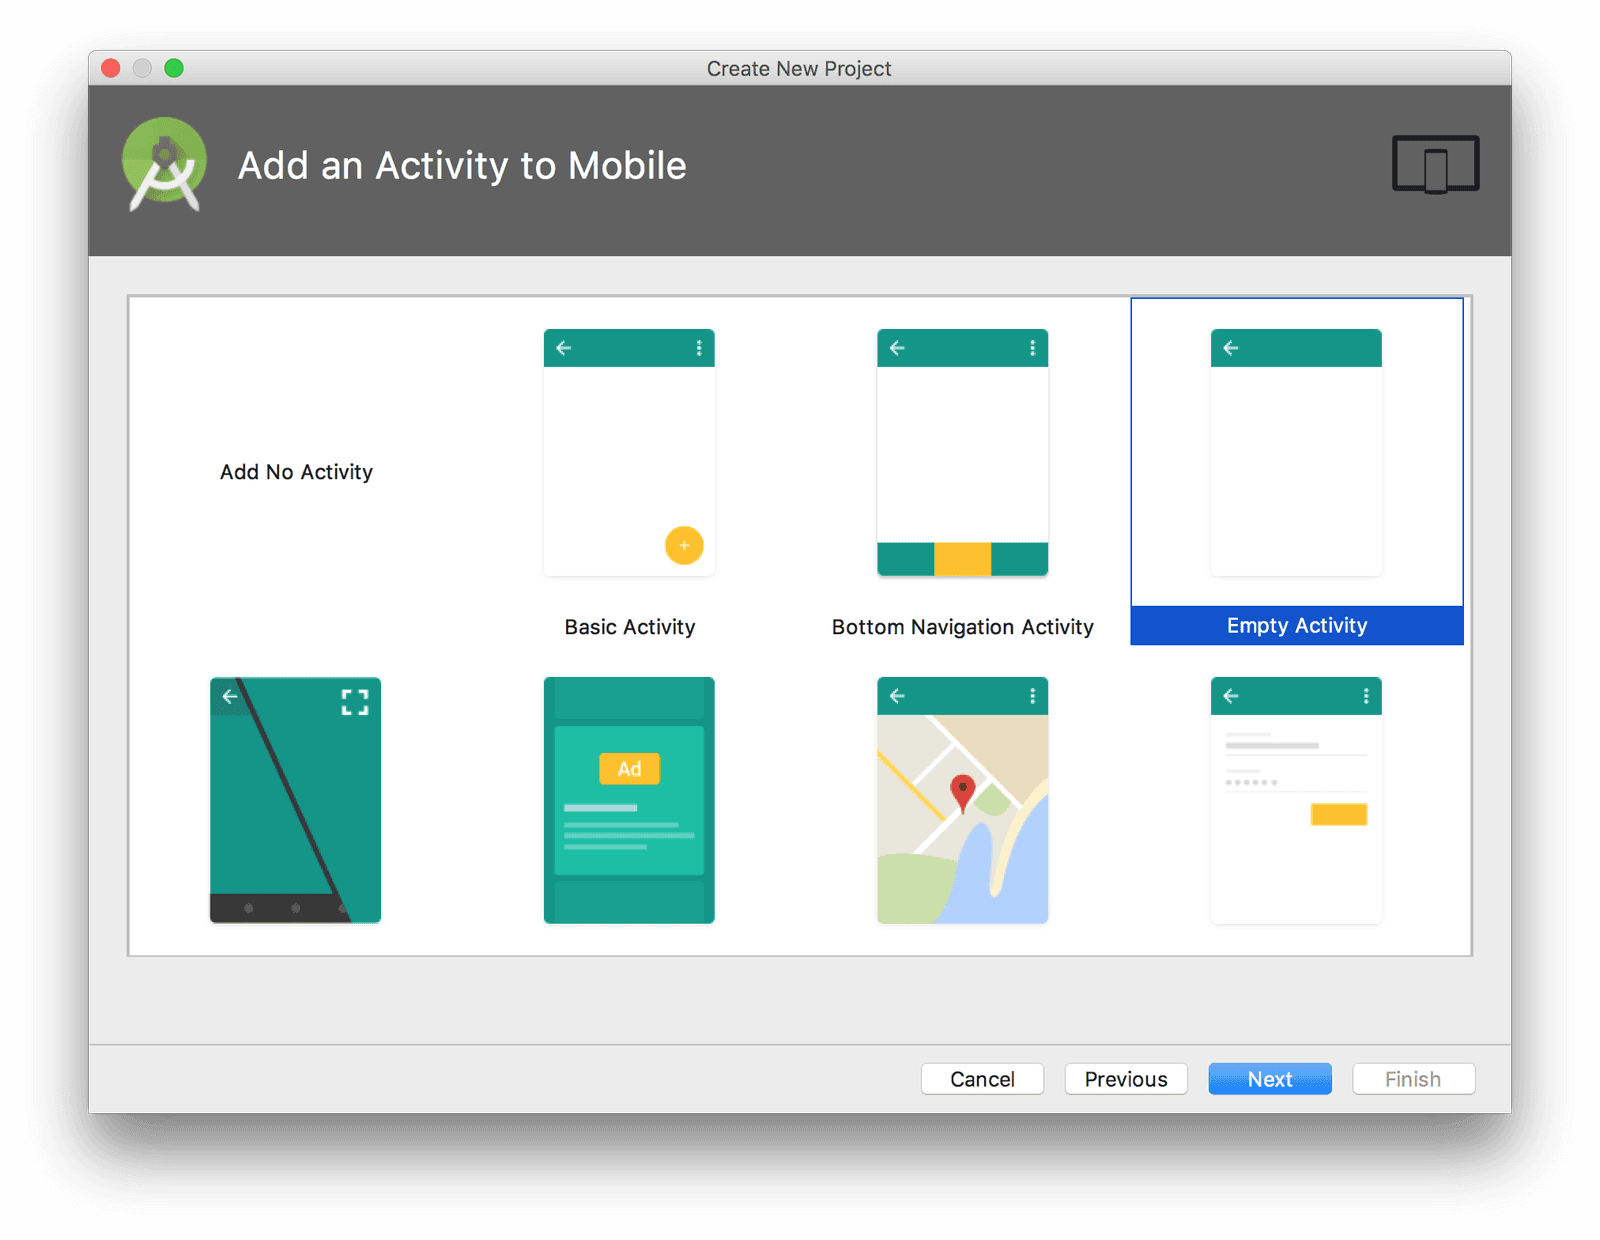
Ensure that an Empty Activity is selected:
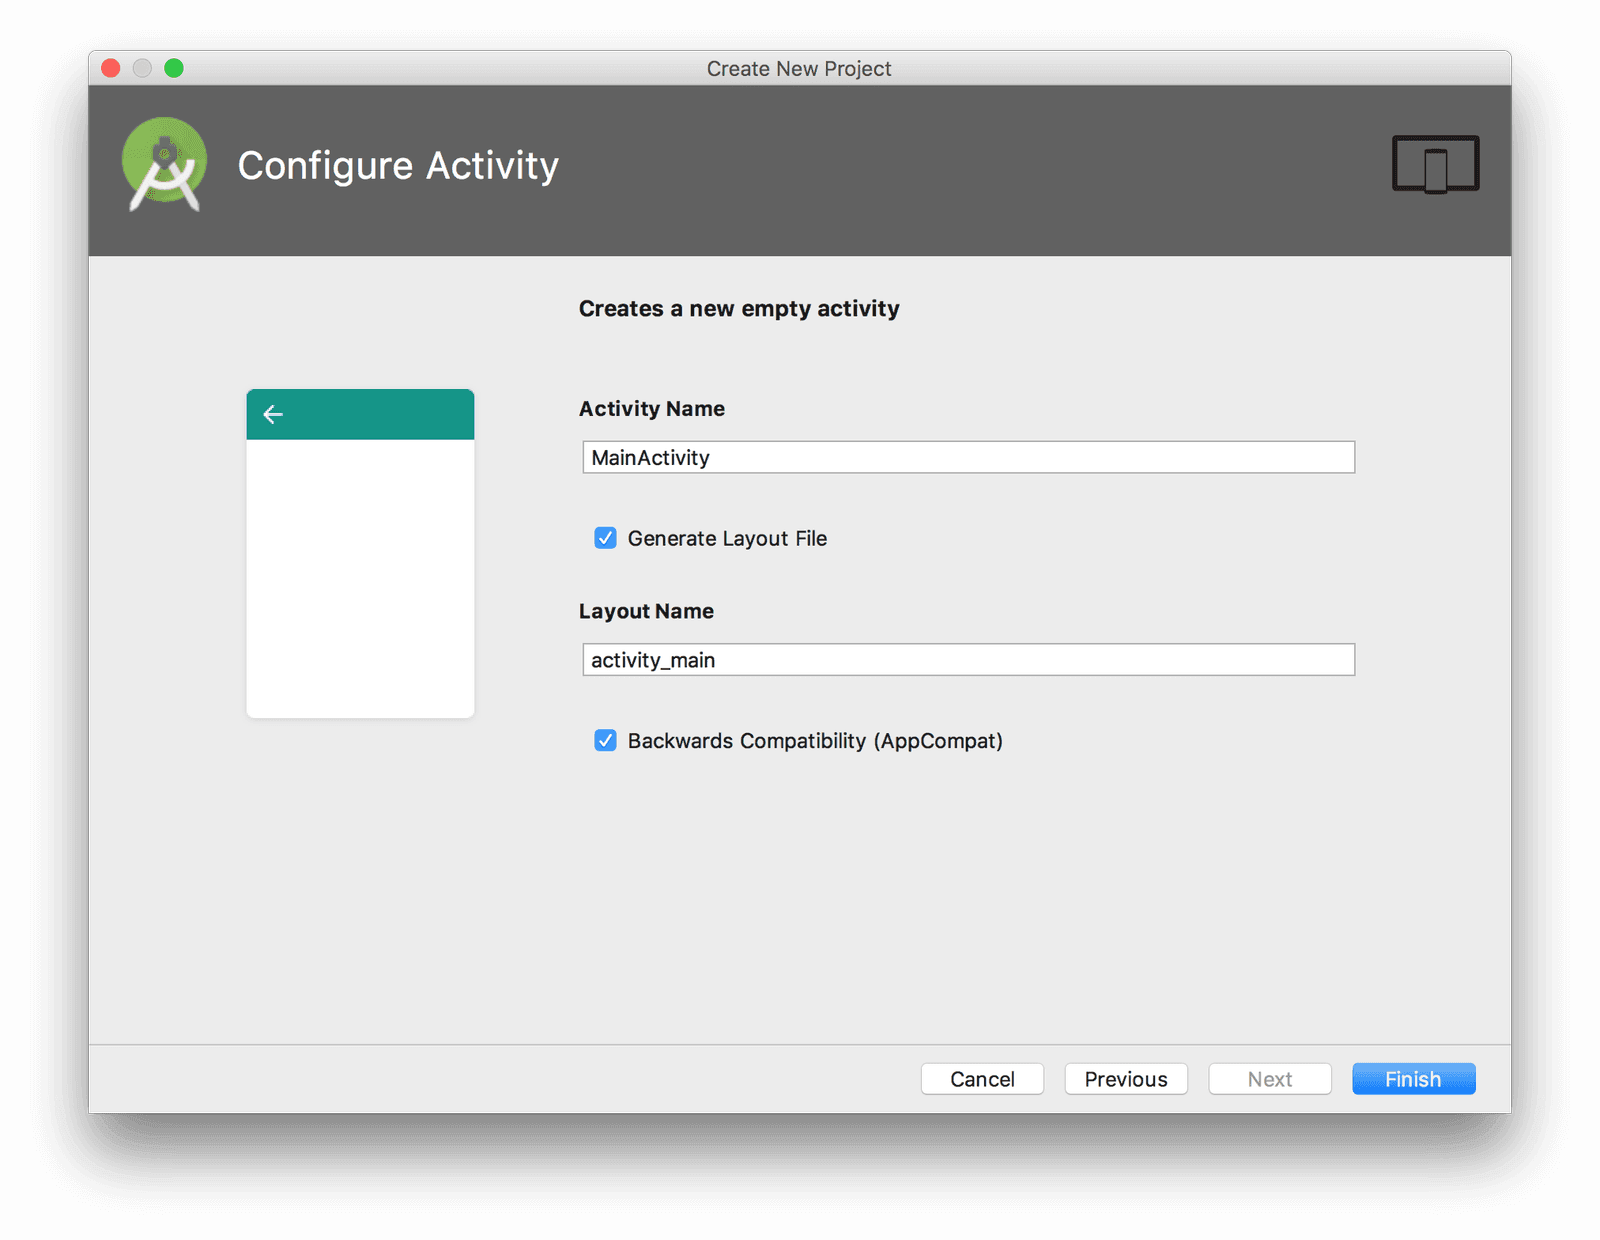
And leave the Activity Name as “MainActivity”:
Next we need to add some dependencies to our project to support Pusher. Add the following to the project level build.gradle, in the existing dependencies section:
classpath 'com.google.gms:google-services:3.2.0'
Then add the following to the dependencies section of the app level build.gradle:
1implementation 'com.google.firebase:firebase-messaging:12.0.1' 2 implementation 'com.pusher:push-notifications-android:0.10.0' 3 4 compile 'com.loopj.android:android-async-http:1.4.9' 5 compile 'com.google.code.gson:gson:2.2.4'
And this to bottom of the app level build.gradle:
apply plugin: 'com.google.gms.google-services'
Next, copy the google-services.json file we downloaded earlier into the app directory under your project. We are now ready to actually develop our specific application using these dependencies.
Finally, we need to add some permissions to our application. Open up the AndroidManifest.xml file and add the following immediately before the <application> tag:
<uses-permission android:name="android.permission.INTERNET"/>
List of sections
Our primary screen in the UI is simply going to be a list of sections provided by our API. The user will then be able to select which of these they are subscribed to, which will then be managed by receiving push notifications on those stories.
Firstly we need our UI layout. Update app/res/layout/activity_main.xml as follows:
1<?xml version="1.0" encoding="utf-8"?> 2 <LinearLayout xmlns:android="http://schemas.android.com/apk/res/android" 3 android:orientation="vertical" 4 android:layout_width="match_parent" 5 android:layout_height="match_parent" 6 android:background="#fff"> 7 <ScrollView 8 android:layout_width="match_parent" 9 android:layout_height="wrap_content"> 10 <LinearLayout 11 android:layout_width="match_parent" 12 android:layout_height="wrap_content" 13 android:orientation="vertical"> 14 15 <TableLayout 16 android:layout_marginTop="10dp" 17 android:id="@+id/table_layout" 18 android:layout_width="match_parent" 19 android:layout_height="wrap_content"> 20 21 <TableRow 22 android:layout_height="wrap_content" 23 android:layout_width="match_parent" 24 android:id="@+id/table_row1" 25 android:padding="10dp"> 26 27 <TextView 28 android:id="@+id/selected" 29 android:fontFamily="serif" 30 android:layout_height="wrap_content" 31 android:layout_width="match_parent" 32 android:layout_weight="1" 33 android:textColor="#000" 34 android:text=""/> 35 <TextView 36 android:id="@+id/name" 37 android:textColor="#000" 38 android:fontFamily="serif" 39 android:layout_height="wrap_content" 40 android:layout_width="match_parent" 41 android:layout_weight="3" 42 android:text="Section"/> 43 44 </TableRow> 45 <View 46 android:layout_height="3dip" 47 android:layout_width="match_parent" 48 android:background="#ff0000"/> 49 </TableLayout> 50 51 <ListView 52 android:id="@+id/records_view" 53 android:layout_width="match_parent" 54 android:layout_height="500dp" 55 android:layout_marginTop="16dp"> 56 </ListView> 57 </LinearLayout> 58 </ScrollView> 59 </LinearLayout>
NOTE: in order to paste this snippet in, the Text tab at the bottom of the screen should be selected.
NOTE: sometimes, copy and paste of the entire file into the Text tab will cause a blank line at the very top. This is invalid XML and needs to be removed.
Now we need a class to represent each entry in this list. Create a new class called SectionEntry as follows:
1data class SectionEntry( 2 val id: String, 3 val webTitle: String, 4 val subscribed: Boolean 5 )
You will notice that this is basically the same as the Section class on the backend. This is not surprising because it represents the same data on the same API.
Next we need a layout to represent a single row in our list. For this, create a new layout resource called app/res/layout/section.xml as follows:
1<?xml version="1.0" encoding="utf-8"?> 2 <LinearLayout xmlns:android="http://schemas.android.com/apk/res/android" 3 android:orientation="horizontal" android:layout_width="match_parent" 4 android:layout_height="match_parent"> 5 <CheckBox 6 android:id="@+id/section_selected" 7 android:layout_height="wrap_content" 8 android:layout_width="match_parent" 9 android:fontFamily="serif" 10 android:layout_weight="3" 11 android:textColor="#000" /> 12 <TextView 13 android:id="@+id/section_name" 14 android:textColor="#000" 15 android:fontFamily="serif" 16 android:layout_height="wrap_content" 17 android:layout_width="match_parent" 18 android:layout_weight="1" 19 android:text="Name"/> 20 </LinearLayout>
This has two entries in it - a checkbox and a section name. We will use the checkbox later on to decide which sections we are subscribed to.
Now we need to be able to render this new layout for each of our sections. For this, create a new class called SectionEntryAdapter as follows:
1class SectionEntryAdapter(private val recordContext: Context) : BaseAdapter() { 2 var records: List<SectionEntry> = listOf() 3 set(value) { 4 field = value 5 notifyDataSetChanged() 6 } 7 8 override fun getView(i: Int, view: View?, viewGroup: ViewGroup): View { 9 val theView = if (view == null) { 10 val recordInflator = recordContext.getSystemService(Activity.LAYOUT_INFLATER_SERVICE) as LayoutInflater 11 12 val theView = recordInflator.inflate(R.layout.section, null) 13 val newSectionViewHolder = SectionViewHolder( 14 theView.findViewById(R.id.section_selected), 15 theView.findViewById(R.id.section_name) 16 ) 17 theView.tag = newSectionViewHolder 18 19 theView 20 } else { 21 view 22 } 23 24 val sectionViewHolder = theView.tag as SectionViewHolder 25 26 val section = getItem(i) 27 sectionViewHolder.name.text = section.webTitle 28 sectionViewHolder.id = section.id 29 sectionViewHolder.selected.isChecked = section.subscribed 30 31 return theView 32 } 33 34 override fun getItem(i: Int) = records[i] 35 36 override fun getItemId(i: Int) = 1L 37 38 override fun getCount() = records.size 39 } 40 41 data class SectionViewHolder( 42 val selected: CheckBox, 43 val name: TextView 44 ) { 45 var id: String? = null 46 }
Finally we just need to get the data into this list. Update MainActivity by adding the following field to the class:
private lateinit var recordAdapter: SectionEntryAdapter
and then initialize this by adding the following to our MainActivity class:
1override fun onResume() { 2 super.onResume() 3 recordAdapter = SectionEntryAdapter(this) 4 val recordsView = findViewById<View>(R.id.records_view) as ListView 5 recordsView.setAdapter(recordAdapter) 6 7 refreshEventsList() 8 }
Next we just need to implement the refreshEventsList method, as follows:
1private fun refreshEventsList() { 2 val client = AsyncHttpClient() 3 client.get("http://10.0.2.2:8080/sections", object : JsonHttpResponseHandler() { 4 override fun onSuccess(statusCode: Int, headers: Array<out Header>, response: JSONArray) { 5 super.onSuccess(statusCode, headers, response) 6 runOnUiThread { 7 val events = IntRange(0, response.length() - 1) 8 .map { index -> response.getJSONObject(index) } 9 .map { obj -> 10 val id = obj.getString("id") 11 SectionEntry( 12 id = id, 13 webTitle = obj.getString("webTitle"), 14 subscribed = false 15 ) 16 } 17 18 recordAdapter.records = events 19 } 20 } 21 }) 22 }
Note: The import for
Headershould becz.msebera.android.httpclient.Header
Note: 10.0.2.2. is the IP Address that the host machine appears when running inside the Android emulator. In reality you will want to use the real host of your service.
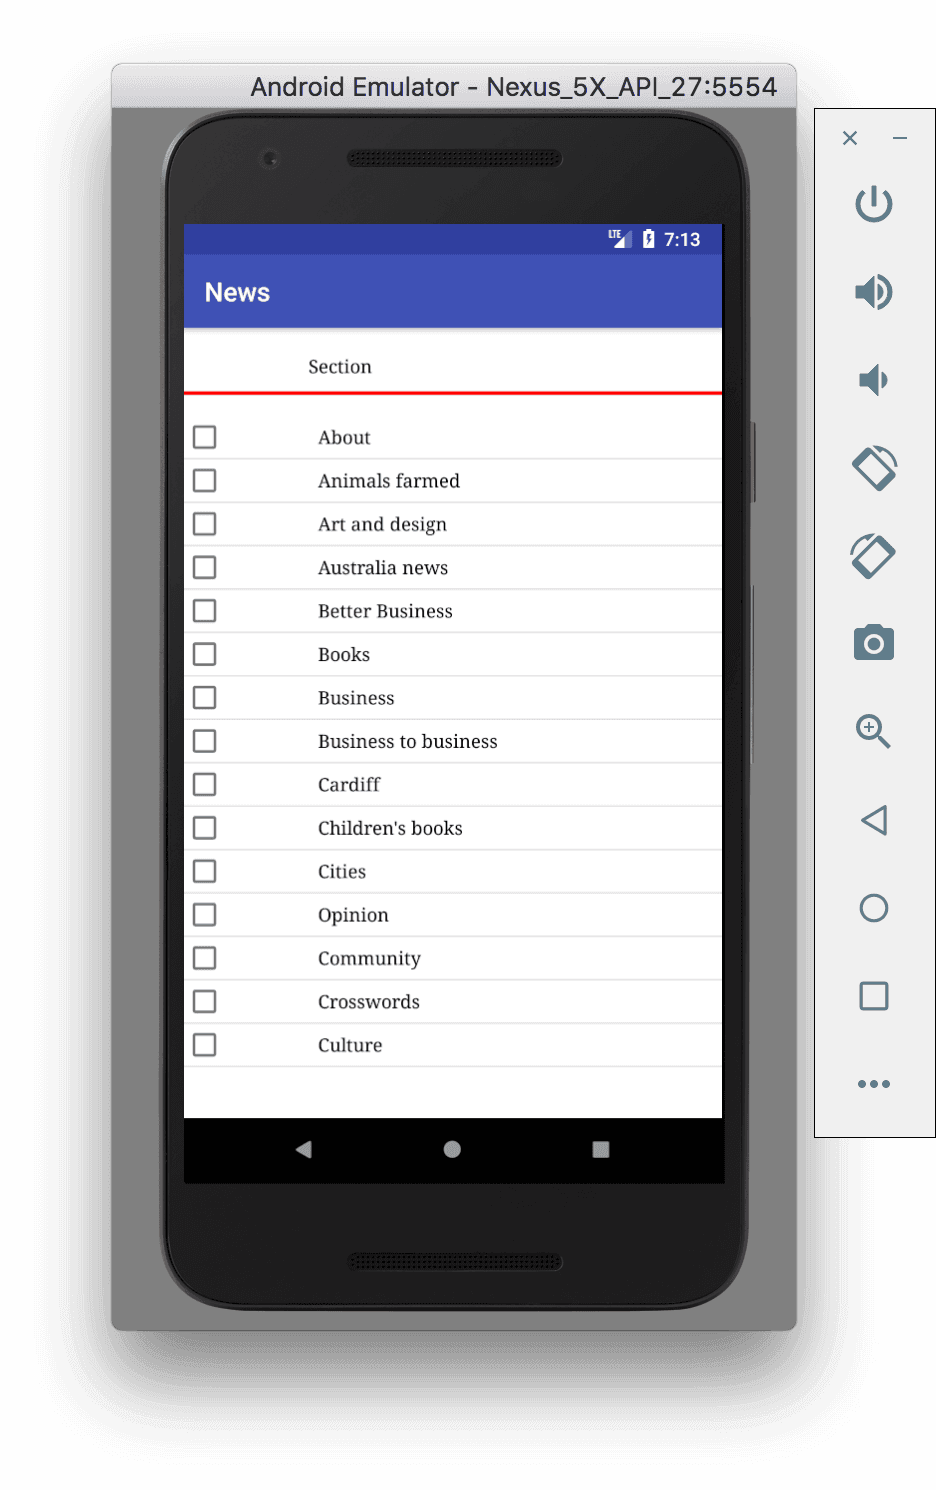
At this point we can start up the Android application and see all of the sections:
Subscribing to notifications
Now that we have a list of notifications, we want to be able to subscribe to them, and to show the list that we are subscribed to.
Firstly we need to register with the Pusher Beams service. This is done by adding the following to the top of the o``nCreate method in MainActivity:
PushNotifications.start(getApplicationContext(), "YOUR_INSTANCE_ID");
Next we want to be able to subscribe and unsubscribe to notifications for the sections as we toggle them. For this, add the following to bottom of the getView method of SectionEntryAdapter:
1sectionViewHolder.selected.setOnCheckedChangeListener { _, isChecked -> 2 if (isChecked) { 3 PushNotifications.subscribe(section.id.replace("[^A-Za-z0-9-]".toRegex(), "")) 4 } else { 5 PushNotifications.unsubscribe(section.id.replace("[^A-Za-z0-9-]".toRegex(), "")) 6 } 7 }
We need to update the section IDs that we use in the Pusher Beams subscriptions in the same way that we did in the actual sending of the notifications.
Finally we need to update our checkboxes to show which sections we have previously subscribed to. We only need to do this when loading the list from the server in the first place - any other time the UI is already correctly in sync. For this, add the following to the top of refreshEventsList in MainActivity:
val subscriptions = PushNotifications.getSubscriptions()
Then we can use it by updating the code lower down in the same method where we are processing the received sections as follows:
1SectionEntry( 2 id = id, 3 webTitle = obj.getString("webTitle"), 4 subscribed = subscriptions.contains(id) 5 )
Note: the change here is to give a real value for the
subscribedparameter.
Displaying notifications
Now that we can subscribe to notifications on different sections, we need to be able to actually receive and display them. In order to do this, we need to add a listener to PushNotifications for every message received. To do this, add the following to MainActivity:
1fun getBitmapfromUrl(imageUrl: String): Bitmap? { 2 return try { 3 val url = URL(imageUrl) 4 val connection = url.openConnection() as HttpURLConnection 5 connection.doInput = true 6 connection.connect() 7 val input = connection.inputStream 8 BitmapFactory.decodeStream(input) 9 } catch (e: Exception) { 10 null 11 } 12 } 13 14 private fun receiveNotifications() { 15 16 val notificationManager = getSystemService(Context.NOTIFICATION_SERVICE) as NotificationManager 17 18 if (Build.VERSION.SDK_INT >= Build.VERSION_CODES.O) { 19 val channel = NotificationChannel("news", 20 "Pusher News", 21 NotificationManager.IMPORTANCE_DEFAULT) 22 notificationManager.createNotificationChannel(channel) 23 } 24 25 var notificationId = 0 26 27 PushNotifications.setOnMessageReceivedListenerForVisibleActivity(this, object : PushNotificationReceivedListener { 28 override fun onMessageReceived(remoteMessage: RemoteMessage) { 29 Log.v("ReceivedMessage", remoteMessage.data.toString()) 30 val headline = remoteMessage.data["headline"] 31 val url = remoteMessage.data["url"] 32 val trailText = remoteMessage.data["trailText"] 33 val thumbnail = remoteMessage.data["thumbnail"] 34 35 val intent = Intent(Intent.ACTION_VIEW) 36 intent.data = Uri.parse(url) 37 val pendingIntent = PendingIntent.getActivity(applicationContext, 0, intent, 0) 38 39 val notification = NotificationCompat.Builder(applicationContext, "news") 40 .setSmallIcon(R.mipmap.ic_launcher) 41 .setContentTitle(headline) 42 .setContentText(trailText) 43 .setLargeIcon(thumbnail?.let { getBitmapfromUrl(it) }) 44 .setVisibility(NotificationCompat.VISIBILITY_PUBLIC) 45 .setPriority(NotificationCompat.PRIORITY_DEFAULT) 46 .setContentIntent(pendingIntent) 47 48 notificationManager.notify(notificationId++, notification.build()) 49 } 50 }); 51 }
Note: The import for
URLshould bejava.net.URL, and the import forNotificationCompatshould beandroid.support.v4.app.NotificationCompat
There is quite a lot going on here, so lets break it down a bit. The method getBitmapFromUrl is a little helper that can take a URL, download the Image that it points to and convert it into an Android Bitmap object. The method receiveNotifications will ensure that the NotificationManager is correctly configured for raising notifications, and then will add a listener to PushNotifications to do the bulk of the work.
This listener is called on every single push notification received, and will raise an Android notification for them. This notification will have the headline and trail text from the push notification, the thumbnail displayed as an image if there is one, and clicking on the notification will then load the full news article in the system web browser.
Finally, add a call to onResume to the receiveNotifiactions method so that we can start to receive and display our push notifications:
1override fun onResume() { 2 super.onResume() 3 recordAdapter = SectionEntryAdapter(this) 4 val recordsView = findViewById<View>(R.id.records_view) as ListView 5 recordsView.setAdapter(recordAdapter) 6 7 refreshEventsList() 8 receiveNotifications() 9 }
Conclusion
This article has shown how to consume details from a third-party API and broadcast them out to your users by utilizing Pusher Beams.
The full source code for this article is available on GitHub. Why not try extending it to allow multiple news sources to be consumed instead? Or to allow specific searches to be performed?


© 2026 Pusher Ltd. All rights reserved.
Pusher Limited is a company registered in England and Wales (No. 07489873) whose registered office is at MessageBird UK Limited, 3 More London Riverside, 4th Floor, London, United Kingdom, SE1 2AQ.