- Products

- Developers
- User stories
- Blog
- Pricing

Writing Realtime apps with Laravel 5 and Pusher
Laravel is one of the most used and loved PHP frameworks, and it it comes many useful features. One of them is an integration to Pusher.
Introduction
This is a guest blog post written by Remo Blaser.
I’m Remo, a passionate Web-developer working for a small agency called WeLoveYou in Switzerland.
Using Laravel and new technologies is my daily business and I love to talk about all these stuff either on my blog, on Twitter or any other site which lets me talk about something.
Laravel is one of the most used and loved PHP frameworks currently out there and it comes many useful features.
One of them is an integration to Pusher and in this blog post we’ll use Pusher to send events in realtime to a frontend, using Laravel 5.
Setting up a Laravel Project
Setting up a Laravel Project is very easy.
First of all, we will create a fresh installation of Laravel by using Composer:
1composer create-project laravel/laravel HelloPusher && cd HelloPusher
Whilst Laravel comes with Pusher support built in, we still need to configure it.
So let’s head into our configuration and open up config/broadcasting.php.
Inside the connection array you will see a pusher driver, ready to be filled with our Pusher credentials
1'pusher' => [ 2 'driver' => 'pusher', 3 'key' => env('PUSHER_KEY'), 4 'secret' => env('PUSHER_SECRET'), 5 'app_id' => env('PUSHER_APP_ID'), 6 'options' => [], 7]
So let’s edit our .env file on the root level of our Project and add this part, replace the x’s with your credentials from your Pusher dashboard:
1PUSHER_KEY=xxxxxxxxxxxxxxxxxxxx 2PUSHER_SECRET=xxxxxxxxxxxxxxxxxxxx 3PUSHER_APP_ID=xxxxxx
Note: If you’re using the EU or AP Cluster, make sure to update the options array in your broadcasting.php config since Laravel defaults to using the US Server. You can use all the options the Pusher PHP Library supports.
Connecting Laravel and Pusher
For Laravel to work with Pusher, we need to get the pusher/pusher-php-server composer-package. So let’s install this first:
1composer require pusher/pusher-php-server
Now we can create an event which we will fire every time we would like to send a notification through Pusher. We can use the artisan tool to create an event for us:
1php artisan make:event HelloPusherEvent
This creates a Event in /app/Events/HelloPusherEvent.php which we now change to fit our needs:
1<?php 2 3namespace App\Events; 4 5use App\Events\Event; 6use Illuminate\Queue\SerializesModels; 7use Illuminate\Contracts\Broadcasting\ShouldBroadcast; 8/** 9 * Just implement the ShouldBroadcast interface and Laravel will automatically 10 * send it to Pusher once we fire it 11**/ 12class HelloPusherEvent extends Event implements ShouldBroadcast 13{ 14 use SerializesModels; 15 16 /** 17 * Only (!) Public members will be serialized to JSON and sent to Pusher 18 **/ 19 public $message; 20 21 /** 22 * Create a new event instance. 23 * 24 * @return void 25 */ 26 public function __construct($message) 27 { 28 $this->message = $message; 29 } 30 31 /** 32 * Get the channels the event should be broadcast on. 33 * 34 * @return array 35 */ 36 public function broadcastOn() 37 { 38 return ['my-channel']; 39 } 40}
Note: Only public members will be Serialized (thanks to the SerializesModels Trait) and sent to Pusher. Protected and private members will be ignored.
Finally, let’s create some Laravel routes to connect our application.
In routes.php create the following routes:
1<?php 2/* 3|-------------------------------------------------------------------------- 4| Application Routes 5|-------------------------------------------------------------------------- 6| 7| Here is where you can register all of the routes for an application. 8| It's a breeze. Simply tell Laravel the URIs it should respond to 9| and give it the controller to call when that URI is requested. 10| 11*/ 12 13Route::get('/', function() { 14 return view('home'); 15}); 16 17Route::get('/pusher', function() { 18 event(new App\Events\HelloPusherEvent('Hi there Pusher!')); 19 return "Event has been sent!"; 20});
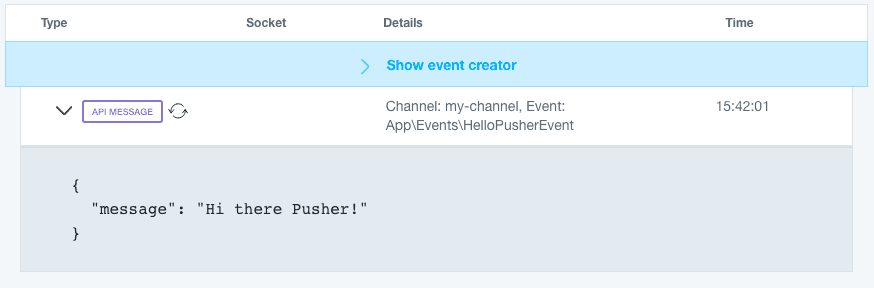
Time to test everything! Visit your Pusher dashboard and load up the debug console for the Pusher application that you’re using for this blog post.
Now start up the built in PHP Server with
1php artisan serve
And visit http://localhost:8000/pusher. After a small wait while the application loads, you should be able to see your message in your dashboard:
Consume Events in JS
Now to the fun part. We will now wait for these events in our Frontend, for this, i’ve created a simple HTML in /resources/views/home.blade.php which looks like this
1<!DOCTYPE html> 2<html> 3 <head> 4 <title>Talking with Pusher</title> 5 <link rel="stylesheet" href="https://maxcdn.bootstrapcdn.com/bootstrap/3.3.5/css/bootstrap.min.css"> 6 </head> 7 <body> 8 <div class="container"> 9 <div class="content"> 10 <h1>Laravel 5 and Pusher is fun!</h1> 11 <ul id="messages" class="list-group"> 12 </ul> 13 </div> 14 </div> 15 <script src="https://cdnjs.cloudflare.com/ajax/libs/jquery/2.1.4/jquery.min.js"></script> 16 <script src="https://js.pusher.com/3.1/pusher.min.js"></script> 17 <script> 18 //instantiate a Pusher object with our Credential's key 19 var pusher = new Pusher('YOUR-KEY', { 20 cluster: 'eu', 21 encrypted: true 22 }); 23 24 //Subscribe to the channel we specified in our Laravel Event 25 var channel = pusher.subscribe('my-channel'); 26 27 //Bind a function to a Event (the full Laravel class) 28 channel.bind('App\\Events\\HelloPusherEvent', addMessage); 29 30 function addMessage(data) { 31 var listItem = $("<li class='list-group-item'></li>"); 32 listItem.html(data.message); 33 $('#messages').prepend(listItem); 34 } 35 </script> 36 </body> 37</html>
Now when you load http://localhost:8000 now we should see the title “Laravel 5 and Pusher is fun!”.
Open up another Tab and make a request to the Pusher URL (http://localhost:8000/pusher). Switch back to the first tab and you should see our message added to our list.

That’s it! In a few minutes we were able to set up Pusher and Laravel and now we’re ready to create our realtime app.
Links


© 2026 Pusher Ltd. All rights reserved.
Pusher Limited is a company registered in England and Wales (No. 07489873) whose registered office is at MessageBird UK Limited, 3 More London Riverside, 4th Floor, London, United Kingdom, SE1 2AQ.