- Products

- Developers
- User stories
- Blog
- Pricing

Why should you use Vue.js when using Laravel
This article provides an overview of how VueJS and Laravel work together. It includes code demos showing different setups, and demonstrates how easy it is to integrate the two.
Introduction
In this guide, we are going to look at what Vue is, how it works with Laravel and why you should use it.
If you have used a recent Laravel version, you would notice it usually comes with Vue bundled in with other tools like Bootstrap and jQuery. You would also notice in Laravel documentation that they gave a small introduction to using Vue components. Is this a sign that Laravel loves Vue?
Prerequisites
- Basic knowledge of PHP and Laravel
- Basic knowledge of JavaScript
- Have PHP setup on your local machine
- Have Composer installed on your local machine
What is Vue.js?
Straight from the horse’s mouth, “Vue is a progressive framework for building user interfaces”. Vue at its core is focused on the view layer only of an application, so integrating with other platforms or existing applications is really easy. You can also use Vue on its own to build sophisticated single page applications.
How does Vue work?
If you have programmed for the web before the era of event-driven frontend JavaScript frameworks, you would understand there are considerable difficulties and inefficiencies that arise from trying to update the Document Object Model (DOM).
To update the DOM directly means you would have to take the page, make the change to a small part of it, then reload the entire DOM so the changes can take effect. If say you are watching a YouTube video and there is a new comment, the entire page would reload and your video would have to start afresh.
Vue tries to solve these challenges by utilizing a virtual DOM to manage the view a user sees. Vue essentially creates a copy of the DOM and stores it. When a change is made to any part of the DOM, it just updates only that section of the DOM without reloading the DOM. This means the comments would update without you even noticing it.
Vue provides reactive and composable view components. Vue responds to events and triggers changes on the DOM instantaneously. Its composable components can be selected and assembled in various combinations to satisfy whatever need arises. You can have components for everything and reuse them however you need.
Why you should use Vue with Laravel
This is one question that you need to take your time to answer. It is important to understand what Vue has to offer and what that means for your work.
We are going to explore a few reasons why you should use Vue with Laravel.
Everything happens on the frontend
Applications on the internet today are event-driven. They are built to ensure users have a seamless experience like they would if they used an application installed on their computer.
Everything now happens on the frontend and users never have to reload a page again (thank you JavaScript).
Reactive components make for an excellent event-driven app
Vue lets you build a full-scale application that is event-driven and has all activity completely handle on the frontend. It also provides composable components that can be used however you wish. Given that it couples nicely with Laravel, you will only need to make a few trips to request data from your Laravel application and make UI changes by switching components without reloading the page.
You can trigger UI changes that are seamless with your Vue frontend, which in turn gives your users an amazing experience. It could be as simple as making a text on your page editable or swapping out an entire component to load up a video requested by a user without reloading the page.
Given Vue’s speed and performance, this happens very fast and smoothly without taking up so much of your computer resources.
Building optimal complex frontend pages
If you think of building an application with parts that need to update frequently, you have no other choice than to make the frontend run completely on JavaScript.
The challenge with vanilla JavaScript or jQuery or other JavaScript libraries that do not have a virtual DOM is that you quickly hit performance issues with the frequency of update increases or the volume of data to track for changes increases significantly. Changes to the DOM will gradually cease to be instantaneous and you begin to experience noticeable performance lags.
When you compose your application with Vue components, each component’s dependencies are automatically tracked during its render, so the system knows precisely which component actually needs to be updated when there is a change in data. This makes all updates to the DOM use minimal resources, thereby improving the overall application efficiency.
Vue is also compatible with state managers like Flux, Redux, and Vuex which are excellent in managing data flow in complex applications. Vue’s utilization of a one-way data binding model also makes state management easier in complex applications.
Single Page Application
I would like to share a personal opinion – Single Page Applications are the greatest thing to happen to the internet in the last decade. It opens up applications to a wider audience of users than was possible before.
When you consider that many internet users outside of some parts of America and Europe have challenges getting on the internet, you begin to appreciate the role single page applications play in delivering a rich web experience to them.
Your entire application assets get loaded once (and most of it cached), all that your application does as the user engages with it is request data which typically requires low bandwidth to fulfill.
Easy to learn and use
Vue is easy to get into. It provides very few options for you as the developer and has a lot abstracted away. You feel like you are writing plain JavaScript when you use Vue and you can make a simple application with plain JavaScript and it remains valid in Vue.
Another great thing about Vue is that your valid HTML is also a valid Vue template. You can keep your CSS external or you can process it with JavaScript depending on your application needs. You can also take advantage of scoped styling, to apply style changes to a single component on the fly without the change affecting other components.
If you are familiar with JavaScript, you can build a non-trivial application with Vue after just one day of reading the documentation.
Basic Vue usage with Laravel
Vue integrates nicely with Laravel. You can create Vue components and use them like you would use regular HTML tags inside your blade file. You can pass props to the component from the output generated when your blade file renders.
To try it out, create a new Laravel installation using the Laravel installer:
1$ laravel new vueapp
If you do not have the Laravel installer, run the following command to get it:
1$ composer global require "laravel/installer"
When this is done, change your working directory into your new Laravel installation:
1$ cd vueapp
Install Vue and other JavaScript libraries your application needs to run:
1$ npm install
Setup your application to reload when you make changes to your js assets:
1$ npm run watch
If you like seeing your changes as you make them, especially since you are learning, then you should definitely
run watchto watch the applications.
Now, open another terminal instance and start the Laravel application server:
1$ php artisan serve
Creating your first Vue Component
Making a Vue component is easy. If you open the resources/assets/js/app.js file, you would see that Vue has already been imported and a sample Vue component created.
You can create your Vue components in many ways. For this guide, we are going to create each component in a separate file in resources/assets/js/components directory to keep things neater. All Vue template files end in .vue extension, so name everyone you create correctly.
Now, create a new file Welcome.vue inside the components directory, and add the following to it:
1<template> 2 <div class="flex-center position-ref full-height"> 3 <div class="content"> 4 <div class="title m-b-md"> 5 Welcome to Vue.js on Laravel 6 </div> 7 <div class="links"> 8 <a href="https://laravel.com/docs">View Laravel Docs</a> 9 <a href="https://vuejs.org/v2/guide/">View Vue Docs</a> 10 <a href="https://laracasts.com">Watch Videos</a> 11 </div> 12 </div> 13 </div> 14 </template> 15 <script> 16 export default {} 17 </script> 18 <style scoped> 19 html, body { 20 background-color: #fff; 21 color: #636b6f; 22 font-family: 'Raleway', sans-serif; 23 font-weight: 100; 24 height: 100vh; 25 margin: 0; 26 } 27 28 .full-height { 29 height: 100vh; 30 } 31 32 .flex-center { 33 align-items: center; 34 display: flex; 35 justify-content: center; 36 } 37 38 .position-ref { 39 position: relative; 40 } 41 42 .top-right { 43 position: absolute; 44 right: 10px; 45 top: 18px; 46 } 47 48 .content { 49 text-align: center; 50 } 51 52 .title { 53 font-size: 84px; 54 } 55 56 .links > a { 57 color: #636b6f; 58 padding: 0 25px; 59 font-size: 12px; 60 font-weight: 600; 61 letter-spacing: .1rem; 62 text-decoration: none; 63 text-transform: uppercase; 64 } 65 66 .m-b-md { 67 margin-bottom: 30px; 68 } 69 </style>
<template> holds the HTML template for the page we are making. If we do not enclose our HTML in the template tag, we would have to specify what the template is, either by linking to an external file or by assigning the entire template content as a variable to Vue.
If we have an external file called MyTemplate.vue, we would need to grab more JavaScript libraries to help us parse and use the external template. This is enough reason not to use external templates.
If you look at the contents enclosed by the <template> tag, you would see that it is just plain HTML markup. The most important part is that this is valid Vue template as well. You would not need to learn new tricks to get started.
We have the script section on the page where we define the entire logic that controls the page. We do not need to define or declare anything to use Vue templates, so we leave it empty.
The last part is the style section. We added a parameter to it – scoped simply to tell Vue “Apply these styles to this component alone. Do not make it available to any other component”.
This means that the changes we made to existing styles and the new styles we added will not be visible outside of this component.
Using the component in your blade file
We have made our first Vue component (I know, it is that easy). To use it in the welcome.blade.php file, we would need to make Vue aware that it exists and give it a name Vue would label it with.
Open the resources/assets/js/app.js file and edit it to the following:
1require('./bootstrap'); 2 3 window.Vue = require('vue'); 4 5 Vue.component('welcome', require('./components/Welcome.vue')); 6 7 const app = new Vue({ 8 el: '#app' 9 });
Next, use the Vue component inside of your resources/views/welcome.blade.php file:
1[...] 2 <meta name="viewport" content="width=device-width, initial-scale=1"> 3 <meta name="csrf-token" content="{{ csrf_token() }}"> 4 5 <title>Laravel</title> 6 7 [...] 8 <body> 9 <div id="app"> 10 <welcome></welcome> 11 </div> 12 <script type="text/javascript" src="js/app.js"></script> 13 </body> 14 [...]
Make sure to edit the file accordingly and include the script tag in it so that your Vue component can be visible on the page
If you set your application to watch for changes to your js assets, then you should see that it already built the entire application and would output compiled successfully in XXXms.
Now, visit http://localhost:8000 on your browser to see your application.

Passing data to the component
Let us assume we want to output the details of the developer of the application, and we cannot know it because only the application can give that detail. We can easily pass the details to the component and have it display it when it renders.
Next, we will pass a title to the component and see what it looks like. Open the welcome blade file located at resources/views/welcome.blade.php and add the following:
1[...] 2 <div id="app"> 3 <welcome :title="'This cool app'"></welcome> 4 </div> 5 [...]
We just passed data into the component by binding the data to a variable we would receive in the component as a property (prop).
Then, open the Welcome.vue file located at resources/assets/js/components/Welcome.vue and add the following to it:
1<template> 2 [...] 3 <div class="title m-b-md"> 4 {{title}} 5 </div> 6 7 [...] 8 </template> 9 10 <script> 11 export default { 12 props : ['title'] 13 } 14 </script>
From the above code, you will see we replaced the Welcome to Vue.js on Laravel with {{title}}. This is the way to output the content of a variable in your Vue template, just like with Laravel blade template.
In the script section, we received a prop using props : ['title'] and the prop we received is what we displayed.

Next, we will pass the title from our application server. Open the routes/web.php file and edit as follows:
1[...] 2 Route::get('/', function () { 3 return view('welcome', 4 [ 5 'title' => "An even cooler way to do the title" 6 ] 7 ); 8 });
Then, edit the welcome.blade.php file as follows:
1[...] 2 <div id="app"> 3 <welcome :title="'{{$title}}'"></welcome> 4 </div> 5 [...]
We just output the content title from the server and pass it directly to the component.

Next, we will add a second page to our application and make a second component. Create a new file resources/assets/js/components/Page.vue and add the following to it:
1<template> 2 <div class="flex-center position-ref full-height"> 3 <div class="content"> 4 <div class="title m-b-md"> 5 {{title}} 6 </div> 7 8 <div class="links"> 9 <span class="subtitle">Name : {{author.name}}</span><br/> 10 <span class="subtitle">Role : {{author.role}}</span><br/> 11 <span class="subtitle">Code : {{author.code}}</span><br/> 12 </div> 13 </div> 14 </div> 15 </template> 16 17 <script> 18 export default { 19 props : ['title', 'author'] 20 } 21 </script> 22 <style scoped> 23 html, body { 24 background-color: #fff; 25 color: #939b9f; 26 font-family: 'Raleway', sans-serif; 27 font-weight: 100; 28 height: 100vh; 29 margin: 0; 30 } 31 .title { 32 font-size: 60px; 33 } 34 .subtitle { 35 font-size: 20px; 36 } 37 .full-height { 38 height: 100vh; 39 } 40 41 .flex-center { 42 align-items: center; 43 display: flex; 44 justify-content: center; 45 } 46 .position-ref { 47 position: relative; 48 } 49 50 .top-right { 51 position: absolute; 52 right: 10px; 53 top: 18px; 54 } 55 .content { 56 text-align: center; 57 } 58 .m-b-md { 59 margin-bottom: 30px; 60 } 61 </style>
Like the first page, we received a second prop that is a json object that contains author information. We have rendered the page with the Author information
Let us make Vue aware of the new component we just created. Open resources/assets/js/app.js file and add the following:
1[...] 2 3 Vue.component('welcome', require('./components/Welcome.vue')); 4 Vue.component('page', require('./components/Page.vue')); 5 6 [...]
Now, create a new file resources/views/page.blade.php and add the following to it:
1<!doctype html> 2 <html lang="{{ app()->getLocale() }}"> 3 <head> 4 <meta charset="utf-8"> 5 <meta http-equiv="X-UA-Compatible" content="IE=edge"> 6 <meta name="viewport" content="width=device-width, initial-scale=1"> 7 <meta name="csrf-token" content="{{ csrf_token() }}"> 8 9 <title>Page</title> 10 11 <link href="https://fonts.googleapis.com/css?family=Raleway:100,600" rel="stylesheet" type="text/css"> 12 </head> 13 <body> 14 <div id="app"> 15 <page :title="'{{$title}}'" :author="{{$author}}"></page> 16 </div> 17 <script type="text/javascript" src="js/app.js"></script> 18 </body> 19 </html>
Finally, open routes/web.php and add a route for loading the page at the end of the file:
1[...] 2 3 Route::get('/page', function () { 4 return view('page', 5 [ 6 'title' => "Page 2 - A little about the Author", 7 'author' => json_encode([ 8 "name" => "Fisayo Afolayan", 9 "role" => "Software Enginner", 10 "code" => "Always keeping it clean" 11 ]) 12 ] 13 ); 14 });
To view our new route, visit http://127.0.0.1:8000/page on your browser.

Building the entire frontend in Vue
So far, we have looked at one way to use Vue and Laravel. When we started this article, we talked about everything running on the frontend and users not having to reload anything. We are going to see how to build a Single Page App (SPA) a user would only have to load once and fetch everything by making API calls.
Installing vue router
Vue router is the Vue tool for building navigation on the frontend application. It would allow you navigate an SPA like you would a regular application. To install vue router, run the following command on your terminal:
1$ npm install vue-router
Exit the
watchprocess we initiated earlier usingctrl + c. We would start watching for changes again after vue router is installed.
Setting up the routes
Now that vue router is installed, we need to define the routes of the application. This will be the guide for switching between the components we have made.
Create a new file resources/assets/js/vueapp.js and edit it as follows:
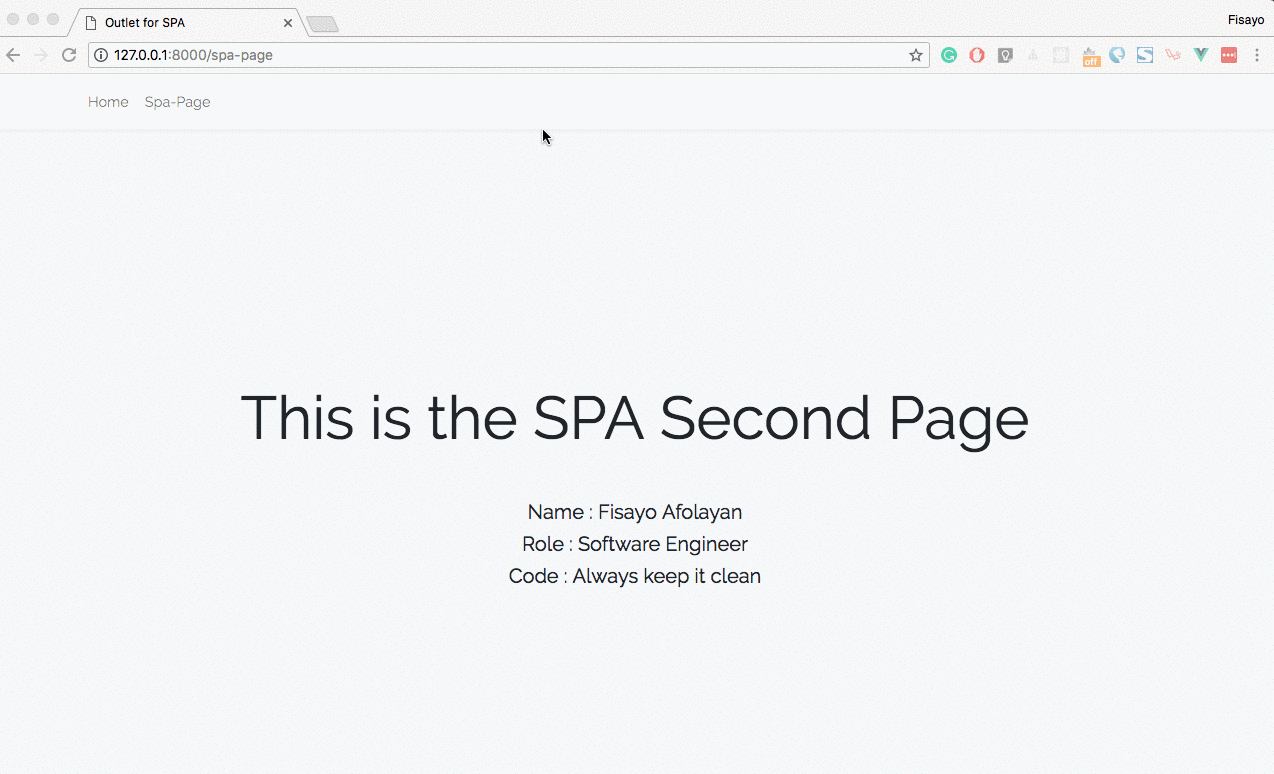
1import Vue from 'vue' 2 import VueRouter from 'vue-router' 3 4 Vue.use(VueRouter) 5 6 import App from './components/App' 7 import Welcome from './components/Welcome' 8 import Page from './components/Page' 9 10 const router = new VueRouter({ 11 mode: 'history', 12 routes: [ 13 { 14 path: '/home', 15 name: 'welcome', 16 component: Welcome, 17 props: { title: "This is the SPA home" } 18 }, 19 { 20 path: '/spa-page', 21 name: 'page', 22 component: Page, 23 props: { 24 title: "This is the SPA Second Page", 25 author : { 26 name : "Fisayo Afolayan", 27 role : "Software Engineer", 28 code : "Always keep it clean" 29 } 30 } 31 }, 32 ], 33 }) 34 const app = new Vue({ 35 el: '#app', 36 components: { App }, 37 router, 38 });
What sorcery was that?
You are already familiar with what import does in JavaScript and how to do it. In the above code, we have imported everything we want to use for our SPA.
Vue.use(VueRouter) – telling vue to use the router package, so it can access all the functionalities of the router and interpret the route we are about to create
const router = new VueRouter – defines the routes our application is going to have. Through the application, the routes definitions will not be changed, so we have to make them constant.
mode – this is the mode we want the router to use in managing the navigation of the application. The default mode is hash mode which uses the URL hash to simulate a full URL so that the page won’t be reloaded when the URL changes. The other is history mode, which leverages the history.pushState API to achieve URL navigation without a page reload.
routes – the routes we would like our application to have.
path – the url to access this route
name – the name we would like to give this route (useful when navigating in-component)
component – the component we want loaded when this route is visited.
props – we are passing props to the component as we mount them
The last part creates the Vue application and defines the parent component the router will use as it’s entry point. In our case, we used the App component as the parent component.
Setting up the parent container
We need to create the App component in resources/assets/js/components directory. Add the following to it:
1<template> 2 <div> 3 <nav class="navbar navbar-expand-md navbar-light navbar-laravel"> 4 <div class="container"> 5 <ul class="navbar-nav"> 6 <router-link :to="{ name: 'welcome' }" class="nav-link">Home</router-link> 7 <router-link :to="{ name: 'page' }" class="nav-link" >Spa-Page</router-link> 8 </ul> 9 </div> 10 </nav> 11 <main> 12 <router-view></router-view> 13 </main> 14 </div> 15 </template> 16 <script> 17 export default {} 18 </script>
Vue will use <router-view> as the outlet for any component we visit as its URL. The <router-link> is responsible for navigating between components. If you notice, we are assigning the name we gave the routes to the to attribute of the route.
Mounting our components
We need to do a few things before we can use our SPA. We need to first set the vueapp.js file to be built. We need to also define the blade file our SPA will use as it’s entry point. Finally, we need to define the route that w enable us to access the SPA.
To set vueapp.js to be built, edit the webpack.mix.js file as follows:
1[...] 2 3 mix.js('resources/assets/js/app.js', 'public/js') 4 .js('resources/assets/js/vueapp.js', 'public/js') 5 .sass('resources/assets/sass/app.scss', 'public/css');
Now, create the file vueapp.blade.php inside the resources/views directory. Edit it as follows:
1<!doctype html> 2 <html lang="{{ app()->getLocale() }}"> 3 <head> 4 <meta charset="utf-8"> 5 <meta http-equiv="X-UA-Compatible" content="IE=edge"> 6 <meta name="viewport" content="width=device-width, initial-scale=1"> 7 <meta name="csrf-token" content="{{ csrf_token() }}"> 8 9 <title>Outlet for SPA</title> 10 11 <link href="https://fonts.googleapis.com/css?family=Raleway:100,600" rel="stylesheet" type="text/css"> 12 <link rel="stylesheet" type="text/css" href="css/app.css"> 13 </head> 14 <body> 15 <div id="app"> 16 <app></app> 17 </div> 18 <script type="text/javascript" src="js/vueapp.js"></script> 19 </body> 20 </html>
Then define the route in routes/web.php file as follows:
1[...] 2 Route::get('/{any}', function(){ 3 return view('vueapp'); 4 })->where('any', '.*');
Now, build the application by running the following command:
1$ npm run prod
Visit the application on http://127.0.0.1:8000/home
Conclusion
In this guide we have looked at what Vue.js can do and how it can work with Laravel. We explored some reasons why you should consider using Vue with Laravel. We also looked at how to use Vue with Laravel, including making a single page application that will run on Laravel.
There is a whole lot you can build with Vue and Laravel. Only the surface was scratched in this article to give you an idea of what is obtainable. Vue is very easy to use and works well with Laravel. You should read the documentation to learn of the cool thing you can build with it.
The source code to the application in this article is available on GitHub.


© 2026 Pusher Ltd. All rights reserved.
Pusher Limited is a company registered in England and Wales (No. 07489873) whose registered office is at MessageBird UK Limited, 3 More London Riverside, 4th Floor, London, United Kingdom, SE1 2AQ.