- Products

- Developers
- User stories
- Blog
- Pricing

Building a Slack clone using Laravel, Tailwind CSS and Vue.js
Recently I’ve shared a tweet about building a Slack clone app in PHP using Laravel, VueJS, TailwindCSS, and Pusher. That got some attention, so I was invited by Pusher itself to blog about using Pusher on it. I’m not going to cover all the steps you can do to build that app here because that \[…\]
Introduction
Recently I’ve shared a tweet about building a Slack clone app in PHP using Laravel, VueJS, TailwindCSS, and Pusher. That got some attention, so I was invited by Pusher itself to blog about using Pusher on it.
I’m not going to cover all the steps you can do to build that app here because that would be a lot of stuff to cover. Instead, I’m going to describe where and how I used the different tools that are mentioned in the post title. Maybe in the future I’ll share a series of articles that cover it and explain the basics of building this.
I got the idea of building a “Slackish” app for our annual retreat at madewithlove – the company I work for – that happened last year in Morroco (awesome place, by the way). I always struggle to decide on what to talk about, so last year I settled on a comparison of how to build the same app using PHP/Laravel and Elixir/Phoenix. For that, I defined a tiny scope: a simple chat app. You can create channels and send messages in those channels. With that, I set down and started hacking the chat app.
First I created it in PHP/Laravel, because I work with it on a daily basis so I’m really familiar with it and its ecosystems. Then in Elixir/Phoenix, I would use the running Laravel app as a comparison for building this one.
Here, however, I’m going to talk specifically about the Laravel version, since it uses Pusher. Here’s an overview of that app:
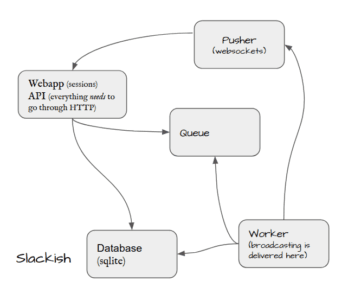
Now you have an overview of the application. Let’s talk about the backend first, then we will jump into the frontend.
Backend
The application was split into two pieces. The first one is the marketing page, which is mainly a Laravel route and a regular Blade template. It outputs the HTML and there is very little logic on it. This route is only for guest users, which means that when the user is already authenticated, they will be redirected to the chat app page instead. You can find the HTML for the marketing page here.
The important aspect of it is the Login with Google button. We are leveraging Laravel’s Socialite package to handle this part. If you are not familiar with the official package, it’s an OAuth client library that you can use to build authentication systems using many Social Providers out there, like Facebook or Google. It allows us to avoid asking for passwords since the authentication flow is handled by the social providers.
When the user authenticates with the social provider, they are redirected back to our application to a specific route where we can run some logic to check if the user is a new one or an existing one. Here are the routes and the LoginController:
routes/web.php:
1Route::get('/auth/{provider}', 'Auth\LoginController@create')->name('auth'); 2Route::get('/auth/{provider}/callback', 'Auth\LoginController@store');
app/Http/Controllers/Auth/LoginController.php:
1<?php 2 3namespace App\Http\Controllers\Auth; 4 5use App\User; 6use Laravel\Socialite\AbstractUser; 7use App\Http\Controllers\Controller; 8use Laravel\Socialite\Facades\Socialite; 9 10class LoginController extends Controller 11{ 12 /** 13 * Create a new controller instance. 14 */ 15 public function __construct() 16 { 17 $this->middleware('guest')->except(['logout', 'index']); 18 } 19 20 /** 21 * @return \Illuminate\Contracts\View\Factory|\Illuminate\View\View 22 */ 23 public function index() 24 { 25 return view('auth.login'); 26 } 27 28 /** 29 * @param string $provider 30 * 31 * @return mixed 32 */ 33 public function create($provider) 34 { 35 return Socialite::driver($provider)->redirect(); 36 } 37 38 /** 39 * @param string $provider 40 * 41 * @return \Illuminate\Http\RedirectResponse 42 */ 43 public function store($provider) 44 { 45 /** @var \Laravel\Socialite\AbstractUser $providerUser */ 46 $providerUser = Socialite::driver($provider)->user(); 47 48 $user = $this->findOrCreate($providerUser); 49 50 auth()->login($user); 51 52 return redirect()->home(); 53 } 54 55 /** 56 * @param \Laravel\Socialite\AbstractUser $providerUser 57 * 58 * @return mixed 59 */ 60 private function findOrCreate(AbstractUser $providerUser) 61 { 62 if ($user = User::where('google_id', $providerUser->id)->first()) { 63 return $user; 64 } 65 66 return User::create([ 67 'google_id' => $providerUser->id, 68 'google_token' => encrypt($providerUser->token), 69 'name' => $providerUser->name, 70 'email' => $providerUser->email, 71 'avatar_path' => $providerUser->getAvatar(), 72 ]); 73 } 74 75 /** 76 * @return \Illuminate\Http\RedirectResponse 77 */ 78 public function logout() 79 { 80 auth()->logout(); 81 82 return redirect()->route('welcome'); 83 } 84}
Great. After we either create or find an existing user, we redirect the user to the chat app itself. But, there is another middleware protection there. Since users can create channels and send messages to these channels, we have to make sure that only specific users can see the created channel, because channels are not public. So we need to scope these channels into something else: a company.
The middleware in the chat app page will check if the current user has a company or not, and if not, it will redirect the user to the create company page where they can enter the company name (that’s the only thing we care about).
Then, while we are creating the company, this makes the perfect moment for also creating the default messaging channel: the #general channel, see the company controller for more details:
1<?php 2 3namespace App\Http\Controllers; 4 5use App\Http\Requests\Companies\CreateCompanyRequest; 6 7class CompaniesController extends Controller 8{ 9 /** 10 * Protects this resource from users that already have companies. 11 */ 12 public function __construct() 13 { 14 $this->middleware('has-company'); 15 } 16 /** 17 * @return \Illuminate\Contracts\View\Factory|\Illuminate\View\View 18 */ 19 public function create() 20 { 21 return view('companies.create'); 22 } 23 24 /** 25 * @param \App\Http\Requests\Companies\CreateCompanyRequest $request 26 * 27 * @return \Illuminate\Http\RedirectResponse 28 */ 29 public function store(CreateCompanyRequest $request) 30 { 31 $request->user()->createCompany($request->name); 32 33 return redirect() 34 ->route('home'); 35 } 36}
It uses a `createCompany method inside the User Eloquent model, which is basically this:
1<?php 2 3namespace App; 4 5use Laravel\Passport\HasApiTokens; 6use Illuminate\Notifications\Notifiable; 7use Illuminate\Foundation\Auth\User as Authenticatable; 8 9class User extends Authenticatable 10{ 11 use Notifiable; 12 use HasApiTokens; 13 14 // other methods and relationhips. 15 16 /** 17 * @param string $companyName 18 */ 19 public function createCompany(string $companyName) 20 { 21 $company = $this->currentCompany()->create([ 22 'name' => $companyName, 23 'owner_id' => $this->id 24 ]); 25 26 $channel = $company->channels()->create([ 27 'name' => 'general', 28 ]); 29 30 $company->update([ 31 'default_channel_id' => $channel->id, 32 ]); 33 34 $this->currentCompany()->associate($company); 35 $this->currentChannel()->associate($channel); 36 $this->save(); 37 } 38}
After that, the user is redirected to the chat app page. If you check the controller, it calls a view without passing anything to it:
1<?php 2 3namespace App\Http\Controllers; 4 5class HomeController extends Controller 6{ 7 /** 8 * Create a new controller instance. 9 */ 10 public function __construct() 11 { 12 $this->middleware('auth'); 13 $this->middleware('company'); 14 } 15 16 /** 17 * Show the application dashboard. 18 * 19 * @return \Illuminate\Http\Response 20 */ 21 public function index() 22 { 23 return view('home'); 24 } 25}
If you open up the home.blade.php view, you will see this:
1@extends('layouts.app') 2 3@section('content') 4 <div id="app"></div> 5@endsection
That’s it, there’s pretty much nothing else in there. Laravel will render this view and also the stylesheets and JavaScript files that the app.blade.php layout defines:
1<!DOCTYPE html> 2<html lang="{{ app()->getLocale() }}"> 3<head> 4 <meta charset="utf-8"> 5 <meta http-equiv="X-UA-Compatible" content="IE=edge"> 6 <meta name="viewport" content="width=device-width, initial-scale=1"> 7 8 <!-- CSRF Token --> 9 <meta name="csrf-token" content="{{ csrf_token() }}"> 10 <meta name="pusher-key" content="{{ config('broadcasting.connections.pusher.key') }}"> 11 12 <title>{{ config('app.name', 'Laravel') }}</title> 13 14 <!-- Styles --> 15 <link href="{{ mix('css/main.css') }}" rel="stylesheet"> 16 <script> 17 @if(auth()->check()) 18 window.Laravel = {!! json_encode([ 19 'company' => [ 20 'id' => auth()->user()->currentCompany->id, 21 'name' => e(auth()->user()->currentCompany->name), 22 ], 23 'user' => [ 24 'id' => auth()->user()->id, 25 'name' => e(auth()->user()->name), 26 ], 27 ]) !!} 28 @endif 29 </script> 30</head> 31<body> 32 <div> 33 @yield('content') 34 </div> 35 36 <!-- Scripts --> 37 <script src="{{ mix('js/app.js') }}"></script> 38</body> 39</html>
The important pieces here are:
- The CSRF-Token meta field, which we will hook it into axios – The HTTP library we will use; and
- The
pusher-keymeta tag, which we will use to configure Laravel Echo. This key is public, so don’t worry about it being leaked, there is an authentication process which we will cover as well.
So, now let’s jump in the frontend aspects.
Frontend
If you notice the tweet date and repository, there is a few months difference between them. That’s because I built the functioning application a few months ago, but it didn’t look like Slack at all. It was using Bootstrap, although it was already working. Then I saw a Slack Clone that Adam Wathan wrote using TailwindCSS, so I thought: hey, I already have a chat application working, maybe I can use that skin. So I did.
The chat application has two main VueJS components, one for the logic and dealing with Vuex methods (which I call a container component) and another one with the visual aspects of it, so all the HTML and DOM events and so on. The visualization component receives all data from the container component via props and also enables some events that the container component can add listeners to.
I did this mainly because I wanted to reuse the same visualization component between the Laravel application and the Phoenix one, and it worked quite well. I only had to write the container components for each of these applications. Let’s see how the Laravel version of it was built:
1<template> 2 <chat-app 3 :messages="messages" 4 :channels="channels" 5 :current-channel="currentChannel" 6 :current-user="user" 7 :current-company="company" 8 @new-message="newMessage" 9 @new-channel="newChannel" 10 @join-channel="joinChannel" 11 @logout="logout" 12 /> 13</template> 14 15<script> 16 import {mapState, mapActions} from 'vuex'; 17 18 import { 19 SEND_NEW_MESSAGE, 20 CREATE_NEW_CHANNEL, 21 LIST_CHANNELS, 22 LOGOUT 23 } from './store/actions'; 24 import ChatApp from './components/ChatApp.vue'; 25 import { NEW_CHANNEL, NEW_MESSAGE, JOINED_CHANNEL } from './store/mutations'; 26 27 28 export default { 29 components: { 30 ChatApp 31 }, 32 computed: mapState([ 33 'messages', 34 'channels', 35 'currentChannel', 36 'user', 37 'company', 38 ]), 39 methods: { 40 ...mapActions({ 41 newMessage: SEND_NEW_MESSAGE, 42 newChannel: CREATE_NEW_CHANNEL, 43 }), 44 joinChannel(channel) { 45 if (this.currentChannel && this.currentChannel.id === channel.id) { 46 return; 47 } 48 49 if (this.currentChannel) { 50 Echo.leave(`channels.${this.currentChannel.id}`); 51 } 52 53 try { 54 Echo.private(`channels.${channel.id}`) 55 .listen('NewMessage', (e) => { 56 this.$store.commit({ 57 type: NEW_MESSAGE, 58 message: e, 59 }); 60 }); 61 62 this.$store.commit({ 63 type: JOINED_CHANNEL, 64 channel 65 }); 66 } catch (e) { 67 console.log(e); 68 } 69 }, 70 logout() { 71 this.$store.dispatch(LOGOUT); 72 } 73 }, 74 mounted() { 75 this.$store.dispatch(LIST_CHANNELS); 76 77 Echo.private(`companies.${window.Laravel.company.id}`) 78 .listen('ChannelCreated', (e) => { 79 this.$store.commit({ 80 type: NEW_CHANNEL, 81 channel: e.channel 82 }); 83 }); 84 } 85 } 86</script>
Let’s dissect the main pieces here:
- Whenever this component is mounted, we dispatch a Vuex action to list the channels, and we also start listening to a private event that is company scoped. This event is triggered by the backend and whenever it happens, clients are notified about it and this callback function is executed, which triggers a new Vuex mutation that adds the new channel to the list (don’t worry, we will see how events are fired to Pusher later on);
- Also, whenever the user triggers the “join channel” event on the visualization component (which is when the user clicks on a particular channel), we are going to listen to another private channel. Don’t get confused with our Channel domain model, the Broadcasting component also has channels, where we listen events on. In this broadcasting channel, we are going to receive messages sent to our domain channels and this callback is going to be executed, committing another Vuex mutation that adds the message to the message list;
Now, you might be wondering how Pusher is configured and used. Let’s discuss this.
Closing the circle
Let’s go back to the backend. First, we have to pull the Pusher SDK via composer. Then, we need to configure the Broadcasting component in Laravel to actually use the Pusher driver. We can do so by using environment variables. Laravel ships with a dotenv approach, so there is a .env.example file which you can copy to .env and this will be loaded into PHP env. We have to define some keys for the Pusher SDK to work:
1BROADCAST_DRIVER=pusher 2PUSHER_APP_ID=SECRET_APP_ID 3PUSHER_APP_KEY=APP_PUBLIC_KEY 4PUSHER_APP_SECRET=APP_SECRET_KEY
You can get your credentials at the Pusher console after you create your account (it’s free to get started. Thanks, Pusher :D). That covers the backend configuration. Now, Laravel Broadcasting component can send events to Pusher which our frontend can listen to. Let’s see the frontend configuration.
Remember the app.blade.php has a pusher-key meta tag? This is used by the resources/assets/js/bootstrap.js file to configure Laravel Echo, see:
1// ... 2import Echo from 'laravel-echo'; 3 4window.Pusher = require('pusher-js'); 5 6window.Echo = new Echo({ 7 broadcaster: 'pusher', 8 key: document.head.querySelector('meta[name="pusher-key"]').content, 9});
You will need the laravel-echo, as well as the pusher-js NPM packages, as you can see here. With that, we are done with the configuration of both the backend and the frontend.
Protecting broadcasting channels
If you look closely at the logic for listening on broadcasting channels in the Laravel Echo usage, we are using the Echo.private() method. This doesn’t magically turn things into private ones. Internally, Echo will send an HTTP request to our backend and ask if the current user (authenticated in the session) has access to the given channel. We can define how this authorization happens per channel in the routes/channels.php. For instance, the first channel we listen to is the company one:
1mounted() { 2 this.$store.dispatch(LIST_CHANNELS); 3 4 Echo.private(`companies.${window.Laravel.company.id}`) 5 .listen('ChannelCreated', (e) => { 6 this.$store.commit({ 7 type: NEW_CHANNEL, 8 channel: e.channel 9 }); 10 }); 11}
This one has a pattern of companies.ID and if you check this same channel in the channels route file, you will find the callback that handles the authorization:
1<?php 2 3use App\{User, Company}; 4 5Broadcast::channel('companies.{company}', function (User $user, Company $company) { 6 if (!$user->currentCompany || !$user->currentCompany->is($company)) { 7 return false; 8 } 9 10 return [ 11 'id' => $user->id, 12 'name' => $user->name, 13 'avatar_path' => $user->avatar_path, 14 ]; 15});
This authorization callback can also be extracted to a class, but a callback function is fine for now. In this authorization callback, you can return :
falseif the user is not authorized to listen to this channel;trueif the user is authorized; or- an array of data, which means “true” and the data is going to be used to identify the current user (socket) in a presence channel, which we are not going to cover here.
So by doing that, our frontend will be authorized to listen to the company channel if the user has access to the company they are trying to listen to. Really neat.
When a user creates a company, our Vuex action will send an HTTP request to our backend, see the Chat service in the resources/assets/js/api folder:
1export function createChannel(channelName) { 2 return axios.post(`/api/channels`, { 3 name: channelName, 4 }); 5}
If you check the routes/api.php file, where we define the API routes, you can see this:
1<?php 2 3use Illuminate\Http\Request; 4use Illuminate\Routing\Router; 5 6Route::middleware('auth:api')->group(function (Router $router) { 7 // ... 8 $router->resource('channels', 'ChannelsController', [ 9 'only' => ['store', 'index'], 10 ]); 11});
When you open the ChannelsController, you can see the interesting part:
1<?php 2 3namespace App\Http\Controllers; 4 5use Illuminate\Http\Request; 6use App\Events\ChannelCreated; 7use App\Http\Resources\ChannelCollection; 8use App\Http\Requests\Channels\CreateChannelRequest; 9 10class ChannelsController extends Controller 11{ 12 /** 13 * @param \Illuminate\Http\Request $request 14 * 15 * @return mixed 16 */ 17 public function index(Request $request) 18 { 19 return ChannelCollection::make($request->user()->currentCompany->channels); 20 } 21 22 /** 23 * @param \App\Http\Requests\Channels\CreateChannelRequest $request 24 * 25 * @return \Illuminate\Http\JsonResponse 26 */ 27 public function store(CreateChannelRequest $request) 28 { 29 $channel = $request->user()->currentCompany->createChannel($request->name); 30 31 broadcast(new ChannelCreated($channel)); 32 33 return response()->json('', 201); 34 } 35}
In the store() method, we are creating the Channel inside the current company of the user, after that, we are broadcasting an event. This is where we are sending a message to Pusher, and if you check this Event name, it matches with the event we are listening to on the frontend:
1Echo.private(`companies.${window.Laravel.company.id}`) 2 .listen('ChannelCreated', (e) => { 3 this.$store.commit({ 4 type: NEW_CHANNEL, 5 channel: e.channel 6 }); 7 });
The event class is simple:
1<?php 2 3namespace App\Events; 4 5use App\Channel; 6use Illuminate\Queue\SerializesModels; 7use Illuminate\Broadcasting\PrivateChannel; 8use Illuminate\Contracts\Broadcasting\ShouldBroadcast; 9 10class ChannelCreated implements ShouldBroadcast 11{ 12 use SerializesModels; 13 14 /** 15 * @var \App\Channel 16 */ 17 public $channel; 18 19 /** 20 * Create a new event instance. 21 * 22 * @param \App\Channel $channel 23 */ 24 public function __construct(Channel $channel) 25 { 26 $this->channel = $channel; 27 } 28 29 /** 30 * Get the channels the event should broadcast on. 31 * 32 * @return \Illuminate\Broadcasting\Channel|array 33 */ 34 public function broadcastOn() 35 { 36 return new PrivateChannel("companies.{$this->channel->company_id}"); 37 } 38}
This is a Laravel event. And here we are implementing a ShouldBroadcast interface, which tells Laravel that this event is going to be sent to our broadcasting driver, which means that this event is also going to be fired in the frontend.
Every public property in this event, will also make it to the frontend, in the object sent to the listener callback. So this means our channel object will get to the JS, which will be added to the channels list and be displayed in the UI.
The broadcastOn() method in the event tells Laravel what is the broadcasting channel that we are sending this event to.
Wrapping up
So I think that’s it. This article was meant to be an overview of how I built Slackish and how you can use Pusher in your Laravel application for realtime goodies.
You can view the full code for the app on github.
I hope this was useful to you, see you next time!


© 2026 Pusher Ltd. All rights reserved.
Pusher Limited is a company registered in England and Wales (No. 07489873) whose registered office is at MessageBird UK Limited, 3 More London Riverside, 4th Floor, London, United Kingdom, SE1 2AQ.