- Products

- Developers
- User stories
- Blog
- Pricing

Realtime applications using Android Architecture Components with Kotlin
Discover more about Android Architecture Components, including how it can neatly structure your application to be robust and maintainable.
Introduction
Android Architecture Components version 1.0.0 has now been released, this means their API’s are now stable and you should be more comfortable with adopting it in your projects.
What are Android Architecture Components?
Android Architecture components (AAC) are a set of Android libraries that help you structure your application in a way that is robust, testable, and maintainable.
In this post, we are going to discuss how to structure an Android Application’s code for realtime updates using Android Architecture Components. We will be talking specifically about using ViewModel and LiveData to build an Android application that will be updating in realtime.
Let’s discuss Architecture
AAC promotes the Model-View-ViewModel (MVVM) architectural pattern in Android applications adopting it. The MVVM model can be illustrated as shown in the image below:
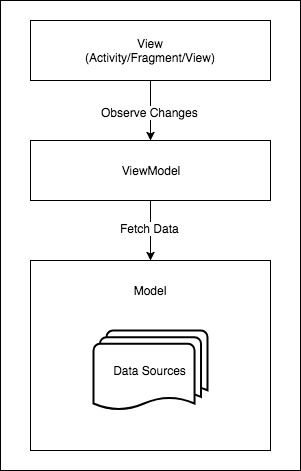
MVVM Architecture
- The View: The View is usually a dummy component. Its sole purpose is to display UI items to the user of the application. It does this by observing changes to its underlying ViewModel and displays those changes to the screen.
- The ViewModel: The ViewModel represents the current state of a View and any update to the ViewModel is propagated to the View for display. The ViewModel observes changes to data from relevant data sources in the Model layer and these changes get propagated to the View for display.
- The Model: The Model layer (also called the Data layer) represents the sources of data that are required to drive the applications business logic. Changes to data are exposed via an observable interface so that other application components can observe and react accordingly.
Now, AAC provides components that make implementing each of the MVVM layers easy. Lets take a quick look at each of the AAC components and how they help in an MVVM Architecture.
The Android Architecture Components
There are four major Architecture Components. Below are brief descriptions of each of these components and how they help in implementing an MVVM architecture.
- Lifecycle: Most of the app components defined in the Android Framework have lifecycles attached to them.
Lifecycleis a class that holds the information about the lifecycle state of a component (like an activity or a fragment) and allows other objects to observe this state. This makes it easy to create objects that react to the state of a component. For example, a GPS location service can observe the state of an activity and stop location updates when the activity is in pause state. - ViewModel: The
ViewModelclass is designed to store and manage UI-related data so that the data survives configuration changes such as screen rotations. This feature makes the class perfect for the ViewModel layer of an application. - LiveData:
LiveDatais an observable data holder class. Unlike a regular observable,LiveDatais lifecycle-aware. This awareness ensuresLiveDataonly updates app component observers that are in an active lifecycle state. This feature makes it quite useful for data communication between the various MVVM layers. - Room:
Roomprovides an abstraction layer over SQLite to allow fluent database access while harnessing the full power of SQLite.Roombecomes quite useful in the data layer for persistence and also providing realtime updates when data changes.
Android Architecture Components for Realtime Applications
Now let’s see how we can apply AAC to building a realtime application.
A key component to developing a realtime application is to have a realtime data layer that is capable of emitting new data that will be observed by the upper layer.
To make this easier, let us walk through a sample application that provides realtime features. The application will be simple. It will have a RecyclerView showing a list of posts that will be updated in realtime as new data is pushed to the application. Below is a video of how the application works:
To follow along, head over to this repository and clone the project. Import the application into Android Studio and let it build. We will be stepping through this codebase to learn more about the AAC.
Before we go through the code, below is an overview of how the codebase is structured:

Realtime Application Architecture
Let’s go through the code from the top layer (the view layer) down to the bottom layer (data layer) and see how the realtime updates are implemented.
PostsActivity (The View Layer)
The PostsActivity.kt file can be found in the com.pusher.realtimearchitecture.presentation package. Its main purpose is to observe changes in the list of posts in the ViewModel and display those changes on a RecyclerView list view. Below is an excerpt of its code:
1... 2 class PostsActivity : AppCompatActivity() { 3 4 private val postsListAdapter by lazy { 5 PostsListAdapter(this) 6 } 7 8 private val postsViewModel: PostsViewModel by lazy { 9 val viewModelFactory = ViewModelFactory(this) 10 val viewModelProvider = ViewModelProviders.of(this, viewModelFactory) 11 viewModelProvider.get(PostsViewModel::class.java) 12 } 13 14 override fun onCreate(savedInstanceState: Bundle?) { 15 super.onCreate(savedInstanceState) 16 setContentView(R.layout.activity_feed) 17 18 postsListView.layoutManager = LinearLayoutManager(this, LinearLayoutManager.VERTICAL, false) 19 postsListView.adapter = postsListAdapter 20 21 postsViewModel.postItems.observe(this, Observer { items -> 22 items?.also { postsListAdapter.items = it } 23 }) 24 } 25 }
In the onCreate() method we set the layout of the views to activity_feed (which contains only a RecyclerView with ID postsListView) and then we set its layout manager and list adapter. Next, we observe changes on the postItems exposed by the postsViewModel. These changes are then passed to the list adapter to update the postsListView items.
postsViewModel is a lazy initialized object of the PostsViewModel class. An instance of the PostsViewModel is obtained using the AAC ViewModelProvider.get() method.
To get the ViewModelProvider attached to an activity, we used the ViewModelProviders.of() static factory method by passing in the activity and a ViewModelFactory object as arguments. The purpose of the ViewModelFactory is to assist the ViewModelsProviders.of() static method in constructing the required ViewModel classes (in this case PostsViewModel). We will explore the ViewModelFactory class in more detail later.
Next, let’s take a look at the PostsViewModel class.
PostsViewModel (The ViewModel Layer)
The PostsViewModel.kt file can also be found in the com.pusher.realtimearchitecture.presentation package:
1package com.pusher.realtimearchitecture.presentation 2 ... 3 class PostsViewModel(fetchPosts: FetchPosts): ViewModel() { 4 5 var postItems = MediatorLiveData<PostItems>() 6 7 init { 8 postItems.addSource(fetchPosts.execute(), { 9 postItems.setValue(it) 10 }) 11 } 12 }
The PostsViewModel has a postItems property which is a MediatorLiveData of PostItems.
A
[MediatorLiveData](https://developer.android.com/reference/android/arch/lifecycle/MediatorLiveData.html)is a subclass ofLiveDatathat can observe other LiveData objects and react to changes in their streams. This makes it easy to pipe data from an Observable Source to a Destination.
Remember that postItems is being observed inside PostsActivity, so PostViewModel fetches posts from the data source using the FetchPosts object and pipes the returned data to be published to all of postItems subscribers.
Note: The
PostItemstype is actually a kotlin alias defined in thecom.pusher.realtimearchitecture.domain.dto.PostItemclass as shown below:
data class PostItem(val title: String, val description: String)
typealias PostItems = List<PostItem>
FetchPosts encapsulates the logic for fetching posts from the data source. It is usually good practice to have classes which perform a particular use case or functionality in your application. This makes it easy to test and re-use the logic anywhere in your application. Below is a code excerpt of the FetchPosts class:
1package com.pusher.realtimearchitecture.domain 2 ... 3 4 class FetchPosts(val postsRepo: PostsRepository) { 5 fun execute(): LiveData<PostItems> { 6 return Transformations.map(postsRepo.fetchPosts(), this::mapModelsToItems) 7 } 8 9 private fun mapModelsToItems(models: PostModels) 10 = models.map { PostItem(it.title, it.description) } 11 }
FetchPosts takes a PostsRepository object as an argument and calls fetchPosts() on the repository. The returned Post model is then converted to PostItem objects to be used by the View layer.
Now let us look at the PostsRepository which is the final layer of our realtime application.
PostsRepository (The Data Layer)
The PostsRepository represents an interface for managing the various post data sources that would drive the application. You would find the interface definition for PostsRepository in the com.pusher.realtimearchitecture.data package. Below is an excerpt of the code:
1interface PostsRepository { 2 fun fetchPosts(): LiveData<PostModels> 3 }
Note:
PostModelsis also a kotlin alias defined incom.pusher.realtimearchitecture.data.dto.PostModel:
data class PostModel(val title: String, val description: String)
typealias PostModel = List<PostModel>
Now, since our Android application is going to have a realtime data source, we created a RealtimePostRepository which is an implementation of the PostRepository:
1package com.pusher.realtimearchitecture.data 2 ... 3 class RealtimePostsRepository(private val realtimeDataSource: PusherPostDataSource) 4 : PostsRepository { 5 override fun fetchPosts() = realtimeDataSource.fetchPosts() 6 }
For the purpose of this tutorial, we will be using Pusher as our realtime data source. Head over to pusher.com and create an application. After successfully creating the Pusher application, some API keys will be generated, you should copy these keys as they will be used later in this tutorial.
So RealtimePostsRepository takes a PusherPostDataSource object as its constructor argument and then delegates calls from RealtimePostsRepository.fetchPosts() to PusherPostDataSource.fetchPosts().
Now let us walk through how PusherPostDataSource is implemented. This class can be found in the com.pusher.realtimearchitecture.data.pusher package:
1package com.pusher.realtimearchitecture.data.pusher 2 3 class PusherPostDataSource(private val lifecycleOwner: LifecycleOwner) 4 : LifecycleObserver { 5 6 init { 7 lifecycleOwner.lifecycle.addObserver(this) 8 } 9 ...
PusherPostDataSource implements the LifecycleObserver interface which is important because we want this data source to be aware of the Lifecycle of Android Components that would be observing the data it would be emitting. Basically, PusherPostDataSource should only be emitting data when the lifecycleOwner is in an active/visible state.
1class PusherPostDataSource(private val lifecycleOwner: LifecycleOwner) 2 : LifecycleObserver { 3 ... 4 companion object { 5 private const val PUSHER_API_KEY = "PUSHER_API_KEY_HERE" 6 private const val PUSHER_APP_CLUSTER = "PUSHER_CLUSTER_HERE" 7 private const val PUSHER_POST_CHANNEL = "posts-channel" 8 private const val PUSHER_NEW_POST_EVENT = "new-posts" 9 } 10 11 private val pusher = Pusher(PUSHER_API_KEY, PusherOptions().setCluster(PUSHER_APP_CLUSTER)) 12 13 private var postModels: PostModels = mutableListOf() 14 private val postsStream = MutableLiveData<PostModels>() 15 ...
Next, we define some constants that will be required by Pusher to broadcast realtime events. Afterward, a pusher object is created using the Pusher API key and configuration options.
Next, we initialize postModels, a list of PostModel‘s to store each of the posts that will be gotten from Pusher’s broadcasts.
We also initialized a MutableLiveData object of PostModels. This will be the data stream that will be exposed to the other layers in the applications.
1class PusherPostDataSource(private val lifecycleOwner: LifecycleOwner) 2 : LifecycleObserver { 3 ... 4 @OnLifecycleEvent(Lifecycle.Event.ON_CREATE) 5 fun onStart() { 6 val channel = pusher.subscribe(PUSHER_POST_CHANNEL) 7 channel.bind(PUSHER_NEW_POST_EVENT) { _, _, data -> 8 val post = Gson().fromJson(data, PusherPostEntity::class.java) 9 postModels = postModels.plus(PostModel(post.title, post.description)) 10 postsStream.postValue(postModels) 11 } 12 } 13 14 fun fetchPosts() = postsStream 15 ... 16 }
Next, we define the onStart() method, which would be run when the lifecycleOwner is entering the STARTED state.
The
[@OnLifecycleEvent](https://developer.android.com/reference/android/arch/lifecycle/OnLifecycleEvent.html)annotation is used to specify when in the Lifecycle of an Android Component a function should be run. For example, in thePusherPostDataSource, the annotation on theonStart()method is used to specify that the method should be run when the component is entering the CREATED state (ie. when the ON_CREATE event is received).
The onStart() method subscribes to the Pusher posts channel and binds to the new-posts events. When a new post is received, the JSON object string representing the PusherPostEntity is deserialized and appended to the lists of postModels. The updated postModels are then broadcasted through the postStream object using its postValue() methods.
Then the fetchPosts() method returns the postsStream object so it can be observed by its calling component.
1class PusherPostDataSource(private val lifecycleOwner: LifecycleOwner) 2 : LifecycleObserver { 3 ... 4 @OnLifecycleEvent(Lifecycle.Event.ON_RESUME) 5 fun onResume() = pusher.connect() 6 7 @OnLifecycleEvent(Lifecycle.Event.ON_PAUSE) 8 fun onPause() = pusher.disconnect() 9 ... 10 }
And finally, we connect the pusher object when the lifecycleOwner object is entering the RESUMED state and disconnect it when the ON_PAUSE event is emitted.
And there you have it, all the layers required to build a realtime MVVM Android Application using Android Architecture Components.
The last thing we would talk about is how all these different layers are connected to each other. All these different layers are constructed and connected to each other in the ViewModelFactory class.
The ViewModelFactory (The Glue)
Remember the ViewModelFactory class which was used in the PostsActivity when creating an instance of a ViewModelProvider? Its major purpose is to configure the PostsViewModel. Its code can be found in the com.pusher.realtimearchitecture.presentation package:
1class ViewModelFactory(private val lifecycleOwner: LifecycleOwner) 2 : ViewModelProvider.Factory { 3 4 override fun <T: ViewModel> create(modelClass: Class<T>): T { 5 if (modelClass.isAssignableFrom(PostsViewModel::class.java)) { 6 val realtimeDataSource = PusherPostDataSource(lifecycleOwner) 7 val realtimeFeedRepository = RealtimePostsRepository(realtimeDataSource) 8 val fetchFeedUseCase = FetchPosts(realtimeFeedRepository) 9 return PostsViewModel(fetchFeedUseCase) as T 10 } 11 throw IllegalArgumentException("Unknown View Model class name") 12 } 13 }
ViewModelFactory takes a LifecycleOwner object as an argument and implements the ViewProvider.Factory interface. It needs to override the create() method of the ViewProvider.Factory interface, which will be called by the ViewModelProvider when an instance of ViewModel is to be instantiated.
In this tutorial, since we only have one ViewModel class of interest (the PostsViewModel class), we check if the modelClass passed to the create() method is a PostsViewModel type, we then construct the PostViewModel dependencies and use those dependencies to create the PostsViewModel object which is then returned from the create() method.
Now you have a fully functional realtime Android Application using Android Architecture Components.
Testing the realtime App
To test the realtime updates in the Android application, there are two possible ways:
- You can head over to the Debug Console of your Pusher Application and then send a
new-postsevent to theposts-channelchannel with the following data:
1{ 2 "title": "This is another post", 3 "description": "Lorem ipsum dolor sit amet. So many things here" 4 }
- The second way to test this is to build a Server that would be broadcasting Pusher events. See here for details of how to implement this in your favorite programming language.
Final Thoughts
We have seen how Android Architecture Components can be used to neatly structure our application to be robust and maintainable. One thing to note is that it is not compulsory to use all the libraries provided in the Architecture Components together. For example, you can decide to use RxJava’s observable streams instead of LiveData or another database library instead of Room.
This means that you are not locked down to the limitation of AAC libraries, for example, RxJava provides better multithreading features out of the box than LiveData does. It also means you can migrate your existing project one step at a time by substituting Architecture Components into each layer.
This article just touches a little on what can be done with Android Architecture Components, but you certainly have enough knowledge by now to understand the logic behind the architecture and the roles of the different Architecture Components. To further increase your knowledge of the Components you can visit the AAC website here to read their documentation and try out the various code labs.
The full code for the sample application in this article can be found here.
So what do you think? Let me know in the comments below what your thoughts are on the Android Architecture Components.


© 2026 Pusher Ltd. All rights reserved.
Pusher Limited is a company registered in England and Wales (No. 07489873) whose registered office is at MessageBird UK Limited, 3 More London Riverside, 4th Floor, London, United Kingdom, SE1 2AQ.