- Products

- Developers
- User stories
- Blog
- Pricing

Exploring Real-time Apps with Angular 2
Exploring building real-time angular 2 apps using Pusher's WebSocket-powered service.
Introduction
Angular 2 is a brand new framework based on Angular 1 that’s currently in developer preview. To get an early sense of the framework as it begins to take shape we’re going to build a real-time Angular 2 app that lets you search Twitter for real-time updates.
Please note that Angular 2 is in its infancy and code may well change over time. We’ll endeavour to keep this post up to date, but please let us know if you find any outdated examples. If you’re feeling eager and would like to skip ahead to the code, you can do so on GitHub. You can also see the app running and try it out for yourself.
Introduction
Our application will allow users to enter search terms and get real-time results back from the Twitter streaming API. To do this we’ll be using the Pusher datasource API community project. This API listens to channel existence webhooks from Pusher and searches Twitter whenever a new channel is occupied, using the name of the channel for the search term. We won’t dive into detail on the server side in this post, but check out the Pusher datasource API README for a detailed explanation.
Getting Started
Angular 2 introduces a lot of new concepts, many of which we’ll see throughout this tutorial. We’ll be following the structure laid out in the Angular 2 quickstart tutorial, so refer to that if you’d like more information on why our app is structured as it is. If you’ve not read through that tutorial first you should, it introduces libraries like TypeScript and SystemJS that are important when building Angular 2 applications.
Building our Real-Time Angular 2 Application
We’ll be starting with the structure from the AngularJS quickstart project. We have all our code contained within src/, including the TypeScript config file, our HTML and the app/ folder which will contain our TypeScript source.
1- package.json 2- node_modules 3- src/ 4 - app/ 5 - app.ts 6 - index.html 7 - tsconfig.json
Angular 2 removes the concept of controllers in favour of components. In Angular 2 everything is a component; the first component we’ll build will be the one that holds our entire application in it. We’ll define our component in src/app/app.ts.
1import { Component, bootstrap } from 'angular2/angular2'; 2 3@Component({ 4 selector: 'my-app', 5 template: '<h1>Hello World</h1>' 6}) 7class AppComponent { 8} 9 10bootstrap(AppComponent);
Then we can update our index.html file to use this component. From the Angular 2 getting started guide you’ll remember that at the top of the HTML file we’re loading Angular, SystemJS and then importing the generated JavaScript file. To have your TypeScript compiled every time you save, run npm run tsc in a tab. This starts the TypeScript compiler and watches for changes, running for each TypeScript file in the app directory and creating the corresponding JavaScript file.
1<html> 2 <head> 3 <title>Angular 2 QuickStart</title> 4 <link rel="stylesheet" type="text/css" href="style.css" /> 5 <script src="../node_modules/systemjs/dist/system.src.js"></script> 6 <script src="../node_modules/angular2/bundles/angular2.dev.js"></script> 7 <script src="https://js.pusher.com/3.0/pusher.min.js"></script> 8 <script> 9 System.config({ 10 packages: {'app': {defaultExtension: 'js'}} 11 }); 12 System.import('app/app'); 13 </script> 14 </head> 15 <body> 16 <my-app></my-app> 17 </body> 18</html>
If you refresh, you’ll see ‘Hello World’ on the screen. You just wrote your first Angular 2 component!
The @Component call is a decorator – you can think of it as “decorating” the AppComponent class with additional properties. By decorating the class using the @Component decorator, we specify that the AppComponent is an Angular component.
We access the methods and properties we need from Angular 2 using the ES6 modules syntax, which you can read more about here.
Our App Component
First, let’s build the template for this component in app/app.html:
1<div id="app"> 2 <div id="search-form"> 3 <form (ng-submit)="newSubscription()"> 4 <input [(ng-model)]="newSearchTerm" placeholder="JavaScript" /> 5 <button>Search</button> 6 </form> 7 </div> 8 <ul id="channels-list"> 9 <li class="channel" *ng-for="#channel of channels"> 10 <h2>Tweets for {{ channel }}</h2> 11 ...tweets will be displayed here in due course... 12 </li> 13 </ul> 14</div>
Note the new syntax for HTML templates and data binding in Angular 2. Our template contains a form for adding a new search term and a list that will be populated with results for each search term.
1import { 2 Component, 3 Attribute, 4 bootstrap, 5 FORM_DIRECTIVES, 6 CORE_DIRECTIVES 7 } from 'angular2/angular2'; 8 9@Component({ 10 selector: 'my-app', 11 templateUrl: 'app/app.html', 12 directives: [FORM_DIRECTIVES, CORE_DIRECTIVES], 13}) 14class AppComponent { 15 private newSearchTerm: string; 16 private channels: String[]; 17 18 constructor() { 19 this.channels = []; 20 } 21 22 public newSubscription() { 23 this.channels.push(this.newSearchTerm); 24 this.newSearchTerm = ''; 25 } 26} 27 28bootstrap(AppComponent);
In app.ts we create newSubscription, which will be called when the user submits the form. We bind to the submit event of the form using the ng-submit directive. To be able to use directives in a component we need to explicitly declare them in the component’s decorator. Because some directives are so commonly used they are grouped together under FORM_DIRECTIVES and CORE_DIRECTIVES. Because our template uses ng-for (a core directive) and ng-submit (a form directive), we need both. FORM_DIRECTIVES contains a list of commonly used directives when working with forms, and CORE_DIRECTIVES contains the core Angular 2 directives; most of which you’ll be familiar with from Angular 1. The app component also has a channels property, which is an array of strings. This will contain all the search terms the user has searched for, which in turn will be used as the names of Pusher channels that will be updated with search results.
Adding Real-time with Pusher
To keep things simple in this tutorial, we’ll just add the Pusher script tag into our index.html file:
1<script src="https://js.pusher.com/3.0/pusher.min.js"></script>
First we need to tell TypeScript that Pusher exists as a global variable, otherwise we’ll get errors from the compiler. Add the line below to the top of app.ts:
1declare var Pusher: any;
Secondly, in the constructor we’ll create a new instance of the Pusher library. You can find your app key from the Pusher dashboard.
1constructor() { 2 this.pusher = new Pusher('YOUR_APP_KEY_HERE'); 3 this.channels = []; 4}
We’re now ready to create the subscription component, which will subscribe to a Pusher channel and be responsible for displaying new tweets.
Subscription Component
This component will take a search term and the Pusher client instance from app.ts. It will then bind to the new_tweet event on the Pusher channel for that search term, and render new tweets onto the screen as they come in from Pusher. To do this we need to update app.html to render the component:
1<ul id="channels-list"> 2 <li class="channel" *ng-for="#channel of channels"> 3 <h2>Tweets for {{ channel }}</h2> 4 <subscription [search]="channel" [pusher]="pusher"></subscription> 5 </li> 6</ul>
Each subscription component will be passed in the channel that it should subscribe to, and the pusher instance. The [search]="channel" syntax we see above denotes that the subscription component takes a search parameter as an expression. Here the "channel" expression is evaluated to return the current channel that we’re looping over in our ng-for loop.
We’ll create the component in a new file, app/subscription.ts. Notice the use of the decorator @Input which denotes that the value is being given to a component, and the life cycle hooks OnInit, OnDestroy and AfterViewChecked. You can find these documented under “Lifecycle Hooks” in the API Preview.
Our subscription.ts component looks like so:
1import { 2 Component, 3 Input, 4 FORM_DIRECTIVES, 5 CORE_DIRECTIVES, 6 AfterViewChecked, 7 OnInit, 8 OnDestroy, 9} from 'angular2/angular2'; 10 11@Component({ 12 selector: 'subscription', 13 templateUrl: 'app/subscription.html', 14 inputs: ['search', 'pusher'], 15 directives: [CORE_DIRECTIVES] 16}) 17export default class SubscriptionComponent implements AfterViewChecked, OnDestroy, OnInit { 18 @Input() search: string; 19 @Input() pusher; 20 public tweets : Object[]; 21 private channel; 22 23 public onInit() { 24 this.subscribeToChannel(); 25 this.tweets = []; 26 } 27 28 private subscribeToChannel() { 29 var encoded = btoa(this.search); 30 this.channel = this.pusher.subscribe(encoded); 31 this.channel.bind('new_tweet', function(data) { 32 this.newTweet(data); 33 }.bind(this)); 34 } 35 36 private newTweet(data: Object) { 37 this.tweets.push(data); 38 } 39 40 public onDestroy() { 41 this.channel && this.channel.unbind(); 42 } 43 44 public afterViewChecked() { 45 var listItem = document.querySelector(".channel-" + this.search); 46 if (listItem) { 47 listItem.scrollTop = listItem.scrollHeight; 48 } 49 } 50}
And our subscription.html is pretty straight forward:
1<ul class="channel-results channel-{{search}}"> 2 <li *ng-for="#result of tweets"> 3 <p>{{ result.tweet.text }} from {{ result.tweet.user.screen_name }}</p> 4 </li> 5</ul>
There’s some important bits to notice in the above code. Firstly, when we subscribe to the channel name using Pusher we first encode it as Base64. The reason for this is that Pusher only allows certain characters to be used in channel names, and we might want our Twitter search query to include other characters. By encoding we avoid this problem, and then the server decodes the name before searching Twitter.
When a new message comes in and the view is updated we need to scroll the window down so that the latest tweets are always displayed and the user doesn’t have to scroll. To do this we can make use of one of the many lifecycle hooks Angular provides. afterViewChecked is run after each time the view has been checked and potentially updated, so it’s the perfect time to perform some DOM manipulation as we know the view is in sync with the data.
You may be wondering why we have to use another lifecycle hook, onInit, to subscribe to our channel, rather than the constructor. We do this because when the constructor is called the component hasn’t been given access to its inputs. Therefore we use the onInit hook, which Angular calls once it has finished setting up the component.
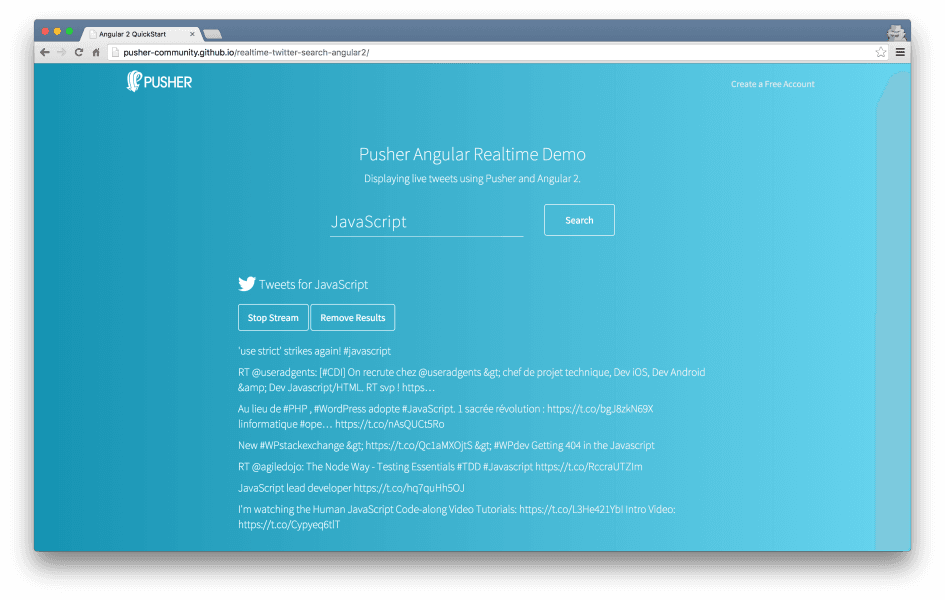
With our subscription component implemented, we have a working live Twitter search! If you’d like to check out the final code and the CSS written to make the app look like the below screenshot, you can find all the code on GitHub, or try the app for yourself.
Conclusion
In this tutorial we built a real-time Angular 2 app that shows a real-time stream of tweets for keyword searches. It demonstrates that whilst Angular 2 may not yet be released or even in beta, that it doesn’t mean you shouldn’t start experimenting with it to see if you enjoy working with the framework. Whilst syntax and features may change, larger aspects such as the move to TypeScript and the use of decorators are here to stay and being familiar with them ahead of the release of Angular 2 is no bad thing. Angular 2 is a definite improvement on Angular 1 and makes it even easier to integrate other services such as Pusher into your application, making it a great fit for real-time. We’d love to hear what you think about Angular 2, so feel free to tweet us with your thoughts.
Further Reading
- Official AngularJS 2 site
- Angular 2 Quickstart tutorial
- Angular 2 API reference
- Is Angular 2 ready?


© 2026 Pusher Ltd. All rights reserved.
Pusher Limited is a company registered in England and Wales (No. 07489873) whose registered office is at MessageBird UK Limited, 3 More London Riverside, 4th Floor, London, United Kingdom, SE1 2AQ.