- Products

- Developers
- User stories
- Blog
- Pricing

Laravel and JWT
This tutorial will guide you through the implementation of JSON Web Token (JWT) authentication in a Laravel application. You will then test the authentication using Postman.
Introduction
In this article, we will look at using JWT to secure our Laravel APIs.
JSON Web Token (JWT) is an open standard that allows two parties to securely send data and information as JSON objects. This information can be verified and trusted because it is digitally signed.
JWT authentication has aided the wider adoption of stateless API services. It makes it convenient to authorise and verify clients accessing API resources. It is a critical part of the authentication system in javascript powered applications.
Prerequisites
- Knowledge of PHP
- Knowledge of Laravel
- Have composer and Laravel installer installed
- Knowledge of git
- Have and know how to use postman
Getting Started
The first thing we are going to do is create a laravel application for testing JWT. If you have the Laravel installer, you can run the following command:
1$ laravel new laravel-jwt
If you do not have the Laravel installer, you can get it by running the following command:
1$ composer global require "laravel/installer"
After creating laravel-jwt, navigate into the directory and install the third-party JWT package we will use. Due to an issue with the published version of tymon/jwt-auth, we are going to install the dev version of the package. Run the following command:
1$ composer require tymon/jwt-auth:dev-develop --prefer-source
Open config/app.php and add the following provider to the providers array:
1[...] 2 Tymon\JWTAuth\Providers\LaravelServiceProvider::class, 3 [...]
Add the following facades to the aliases array:
1[...] 2 'JWTAuth' => Tymon\JWTAuth\Facades\JWTAuth::class, 3 'JWTFactory' => Tymon\JWTAuth\Facades\JWTFactory::class, 4 [...]
You need to publish the config file for JWT using the following command:
1$ php artisan vendor:publish --provider="Tymon\JWTAuth\Providers\LaravelServiceProvider"
When that is done, set the jwt-auth secret by running the following command:
1$ php artisan jwt:secret
If you read other articles out there on JWT, you may see configurations for the published config/jwt.php file. Understand that many of the configurations may be for v0.5. This dev version we used will be compatible with the release of stable v1 of tymon/jwt. Namshi/jwt has been deprecated, so make use of Lcobucci/jwt.
We need to make the User model implement JWT. Open app/User.php file and replace the content with this:
1<?php 2 3 namespace App; 4 5 use Illuminate\Notifications\Notifiable; 6 use Illuminate\Foundation\Auth\User as Authenticatable; 7 use Tymon\JWTAuth\Contracts\JWTSubject; 8 9 class User extends Authenticatable implements JWTSubject 10 { 11 use Notifiable; 12 13 /** 14 * The attributes that are mass assignable. 15 * 16 * @var array 17 */ 18 protected $fillable = [ 19 'name', 'email', 'password', 20 ]; 21 22 /** 23 * The attributes that should be hidden for arrays. 24 * 25 * @var array 26 */ 27 protected $hidden = [ 28 'password', 'remember_token', 29 ]; 30 31 public function getJWTIdentifier() 32 { 33 return $this->getKey(); 34 } 35 public function getJWTCustomClaims() 36 { 37 return []; 38 } 39 }
We have defined the User model to implement JWTSubject. We also defined two methods to return the JWTIdentifier and JWTCustomClaims. Custom claims are used in generating the JWT token.
That concludes the installation of JWT. Let us proceed to set up the rest of our application.
Setup the database
For this guide, we will use an SQLite database. Create the database file as follows:
1$ touch database/database.sqlite
When that is done, open the .env file and edit the database settings. Replace:
1DB_CONNECTION=mysql 2 DB_HOST=127.0.0.1 3 DB_PORT=3306 4 DB_DATABASE=homestead 5 DB_USERNAME=homestead 6 DB_PASSWORD=secret
with
1DB_CONNECTION=sqlite 2 DB_DATABASE=/absolute/path/to/database.sqlite
Laravel comes with default migration for user’s table. We will not need any columns different from what it provides. Run the migrate command to create the table on the database:
1$ php artisan migrate
Our database is ready now.
Create the controllers
We are going to create two controllers for this guide: UserController and DataController.
The UserController will hold all our authentication logic, while the DataController will return sample data.
Create the controllers:
1$ php artisan make:controller UserController 2 $ php artisan make:controller DataController
Open the UserController file and edit as follows:
1<?php 2 3 namespace App\Http\Controllers; 4 5 use App\User; 6 use Illuminate\Http\Request; 7 use Illuminate\Support\Facades\Hash; 8 use Illuminate\Support\Facades\Validator; 9 use JWTAuth; 10 use Tymon\JWTAuth\Exceptions\JWTException; 11 12 class UserController extends Controller 13 { 14 public function authenticate(Request $request) 15 { 16 $credentials = $request->only('email', 'password'); 17 18 try { 19 if (! $token = JWTAuth::attempt($credentials)) { 20 return response()->json(['error' => 'invalid_credentials'], 400); 21 } 22 } catch (JWTException $e) { 23 return response()->json(['error' => 'could_not_create_token'], 500); 24 } 25 26 return response()->json(compact('token')); 27 } 28 29 public function register(Request $request) 30 { 31 $validator = Validator::make($request->all(), [ 32 'name' => 'required|string|max:255', 33 'email' => 'required|string|email|max:255|unique:users', 34 'password' => 'required|string|min:6|confirmed', 35 ]); 36 37 if($validator->fails()){ 38 return response()->json($validator->errors()->toJson(), 400); 39 } 40 41 $user = User::create([ 42 'name' => $request->get('name'), 43 'email' => $request->get('email'), 44 'password' => Hash::make($request->get('password')), 45 ]); 46 47 $token = JWTAuth::fromUser($user); 48 49 return response()->json(compact('user','token'),201); 50 } 51 52 public function getAuthenticatedUser() 53 { 54 try { 55 56 if (! $user = JWTAuth::parseToken()->authenticate()) { 57 return response()->json(['user_not_found'], 404); 58 } 59 60 } catch (Tymon\JWTAuth\Exceptions\TokenExpiredException $e) { 61 62 return response()->json(['token_expired'], $e->getStatusCode()); 63 64 } catch (Tymon\JWTAuth\Exceptions\TokenInvalidException $e) { 65 66 return response()->json(['token_invalid'], $e->getStatusCode()); 67 68 } catch (Tymon\JWTAuth\Exceptions\JWTException $e) { 69 70 return response()->json(['token_absent'], $e->getStatusCode()); 71 72 } 73 74 return response()->json(compact('user')); 75 } 76 }
The authenticate method attempts to log a user in and generates an authorization token if the user is found in the database. It throws an error if the user is not found or if an exception occurred while trying to find the user.
The register method validates a user input and creates a user if the user credentials are validated. The user is then passed on to JWTAuth to generate an access token for the created user. This way, the user would not need to log in to get it.
We have the getAuthenticatedUser method which returns the user object based on the authorization token that is passed.
Now, let us create sample data in the DataController:
1<?php 2 3 namespace App\Http\Controllers; 4 5 use Illuminate\Http\Request; 6 7 class DataController extends Controller 8 { 9 public function open() 10 { 11 $data = "This data is open and can be accessed without the client being authenticated"; 12 return response()->json(compact('data'),200); 13 14 } 15 16 public function closed() 17 { 18 $data = "Only authorized users can see this"; 19 return response()->json(compact('data'),200); 20 } 21 }
Next thing is to make the API routes to test the JWT setup.
Creating our routes
Before we define our API routes, we need to create a JwtM``iddleware which will protect our routes. Run this command via your terminal.
1$ php artisan make:middleware JwtMiddleware
This will create a new middleware file inside our Middleware directory. This file can be located here app/Http/Middleware/JwtMiddleware. Open up the file and replace the content with the following:
1<?php 2 3 namespace App\Http\Middleware; 4 5 use Closure; 6 use JWTAuth; 7 use Exception; 8 use Tymon\JWTAuth\Http\Middleware\BaseMiddleware; 9 10 class JwtMiddleware extends BaseMiddleware 11 { 12 13 /** 14 * Handle an incoming request. 15 * 16 * @param \Illuminate\Http\Request $request 17 * @param \Closure $next 18 * @return mixed 19 */ 20 public function handle($request, Closure $next) 21 { 22 try { 23 $user = JWTAuth::parseToken()->authenticate(); 24 } catch (Exception $e) { 25 if ($e instanceof \Tymon\JWTAuth\Exceptions\TokenInvalidException){ 26 return response()->json(['status' => 'Token is Invalid']); 27 }else if ($e instanceof \Tymon\JWTAuth\Exceptions\TokenExpiredException){ 28 return response()->json(['status' => 'Token is Expired']); 29 }else{ 30 return response()->json(['status' => 'Authorization Token not found']); 31 } 32 } 33 return $next($request); 34 } 35 }
This middleware extends Tymon\JWTAuth\Http\Middleware\BaseMiddleware, with this, we can catch token errors and return appropriate error codes to our users.
Next, we need to register our middleware. Open app/http/Kernel.php and add the following:
1[...] 2 protected $routeMiddleware = [ 3 [...] 4 'jwt.verify' => \App\Http\Middleware\JwtMiddleware::class, 5 ]; 6 [...]
Next, Open routes/api.php and add the content with the following:
1[...] 2 Route::post('register', 'UserController@register'); 3 Route::post('login', 'UserController@authenticate'); 4 Route::get('open', 'DataController@open'); 5 6 Route::group(['middleware' => ['jwt.verify']], function() { 7 Route::get('user', 'UserController@getAuthenticatedUser'); 8 Route::get('closed', 'DataController@closed'); 9 });
We defined all the routes we need to test out JWT. Every route we do not wish to secure is kept outside the JWT middleware.
Use this command to start your server through the terminal:
php artisan serve
Test on postman
Postman is an application that makes API development easy. It provides the necessary environment required to test APIs as you develop them. If you do not have postman, you can get it from here.
Create a user account for testing
Endpoint : 127.0.0.1:8000/api/register
Method: POST
Payload:
name: Test Man
email: test@email.com
password: secret
password_confirmation: secret

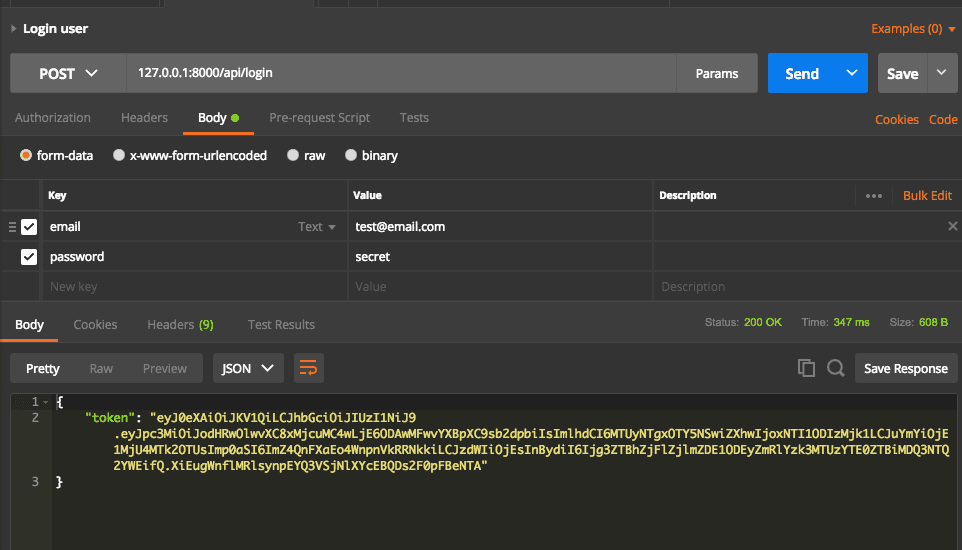
User login
Endpoint : 127.0.0.1:8000/api/login
Method: POST
Payload:
email: test@email.com
password: secret
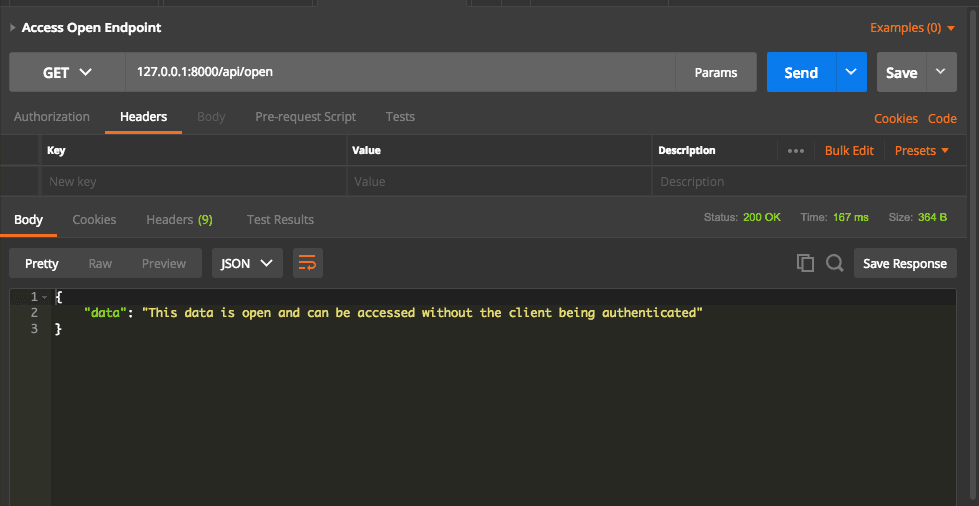
Accessing an unprotected route
Endpoint : 127.0.0.1:8000/api/open
Method: GET
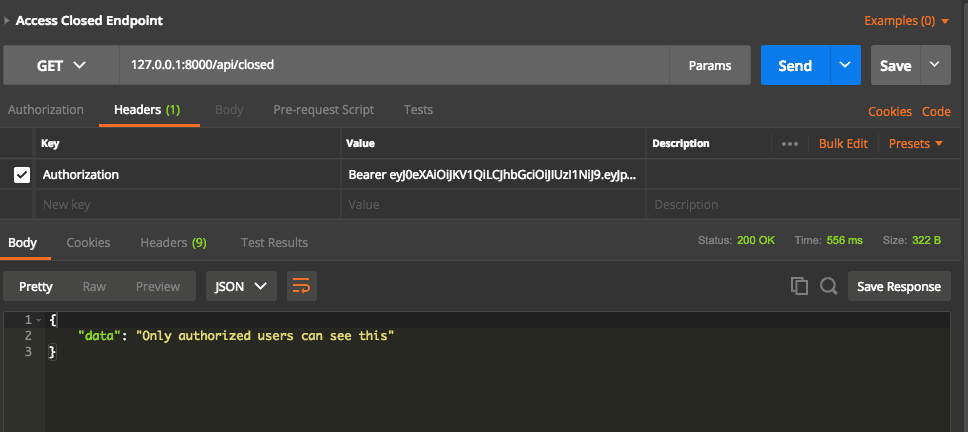
Access a protected endpoint
Endpoint : 127.0.0.1:8000/api/open
Method: GET
Payload:
Authorization: Bearer insert_user_token_here
Try to access the data protected by the middleware using the authorization token.
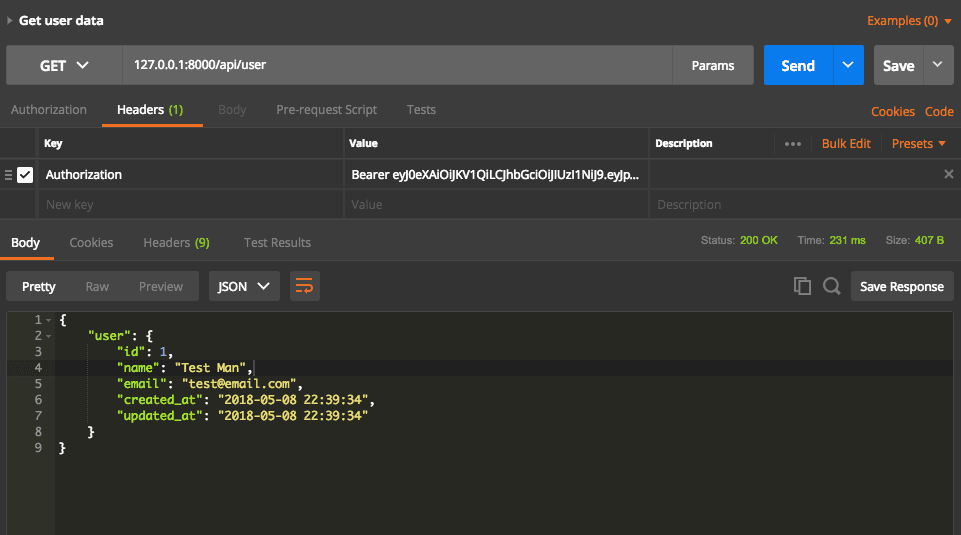
Get the authenticated user data
Endpoint : 127.0.0.1:8000/api/user
Method: GET
Payload:
Authorization: Bearer insert_user_token_here
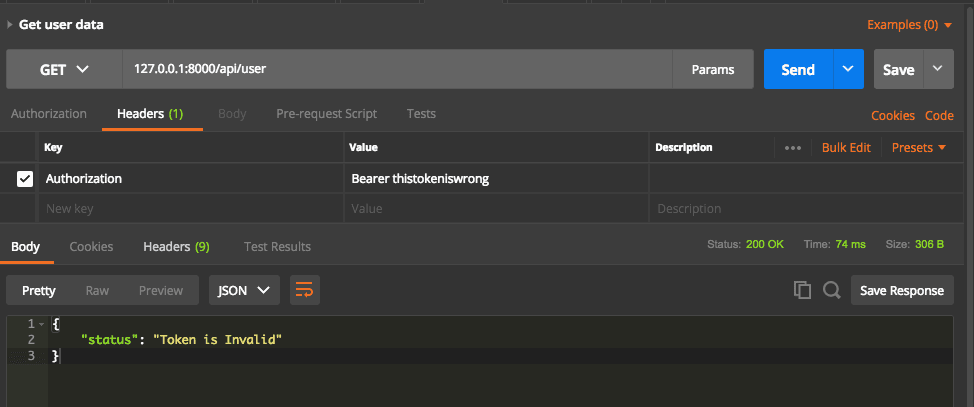
Use invalid token to access a users data
Endpoint : 127.0.0.1:8000/api/user
Method: GET
Payload:
Authorization: Bearer thistokeniswrong
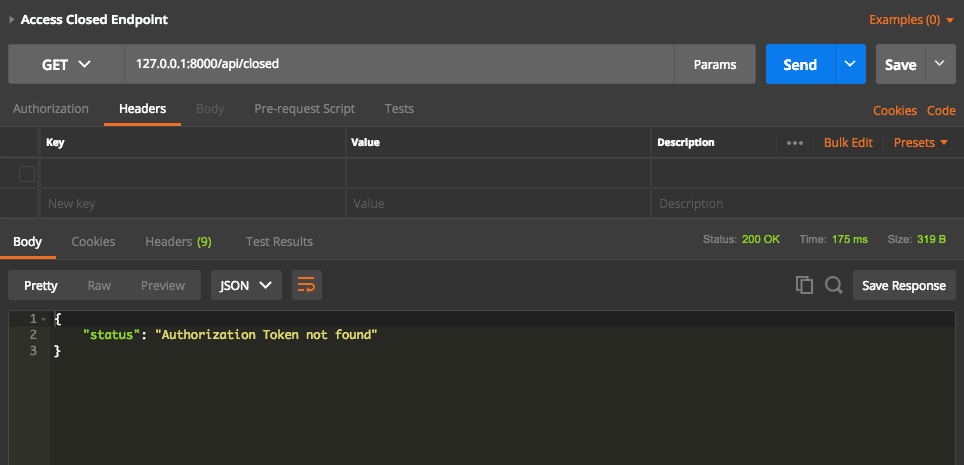
Accessing a protected route without a token
Endpoint : 127.0.0.1:8000/api/closed
Method: GET
Conclusion
In this guide, we have looked JWT and how to use it for our Laravel application. We set up a controller for user authentication and registration. We also defined a method for getting the authenticated user using the generated token. We saw how it is used to secure our APIs and tested the output data using Postman.
You can use JWT to secure your API endpoints that different clients will access. JWT is a convenient way to authenticate users.
The source code to the application in this article is available on GitHub.


© 2026 Pusher Ltd. All rights reserved.
Pusher Limited is a company registered in England and Wales (No. 07489873) whose registered office is at MessageBird UK Limited, 3 More London Riverside, 4th Floor, London, United Kingdom, SE1 2AQ.