- Products

- Developers
- User stories
- Blog
- Pricing

Keeping things private: Authentication vs. Authorization
When building private channels in your app, understanding authentication vs authorization is vital to sending sensitive information to the right users only.
Introduction
Private Channels
One of the great benefits of using Pusher’s APIs is that it is really simple to subscribe to channels that require permission to join. This means that you can use Channels and Beams to safely deliver sensitive messages to the right users only.
This is great for use cases like 1:1 and group chat where you want to restrict the participant list, or personalised notification systems such as order/delivery tracking and in-app notifications where only a specific user should be able to access their orders or notifications.
As an example, imagine you had a chat platform with private group chats such as #supersecretchat. If you were using public channels there would be nothing to stop any user from joining this channel and intercepting all messages even if they weren’t part of the intended audience. By joining a private channel each user must present a valid access token before joining.
Implementing private channels
When you make a subscription to a channel prefixed with a private- an authorizarion step is required to get an access token from your server as shown:
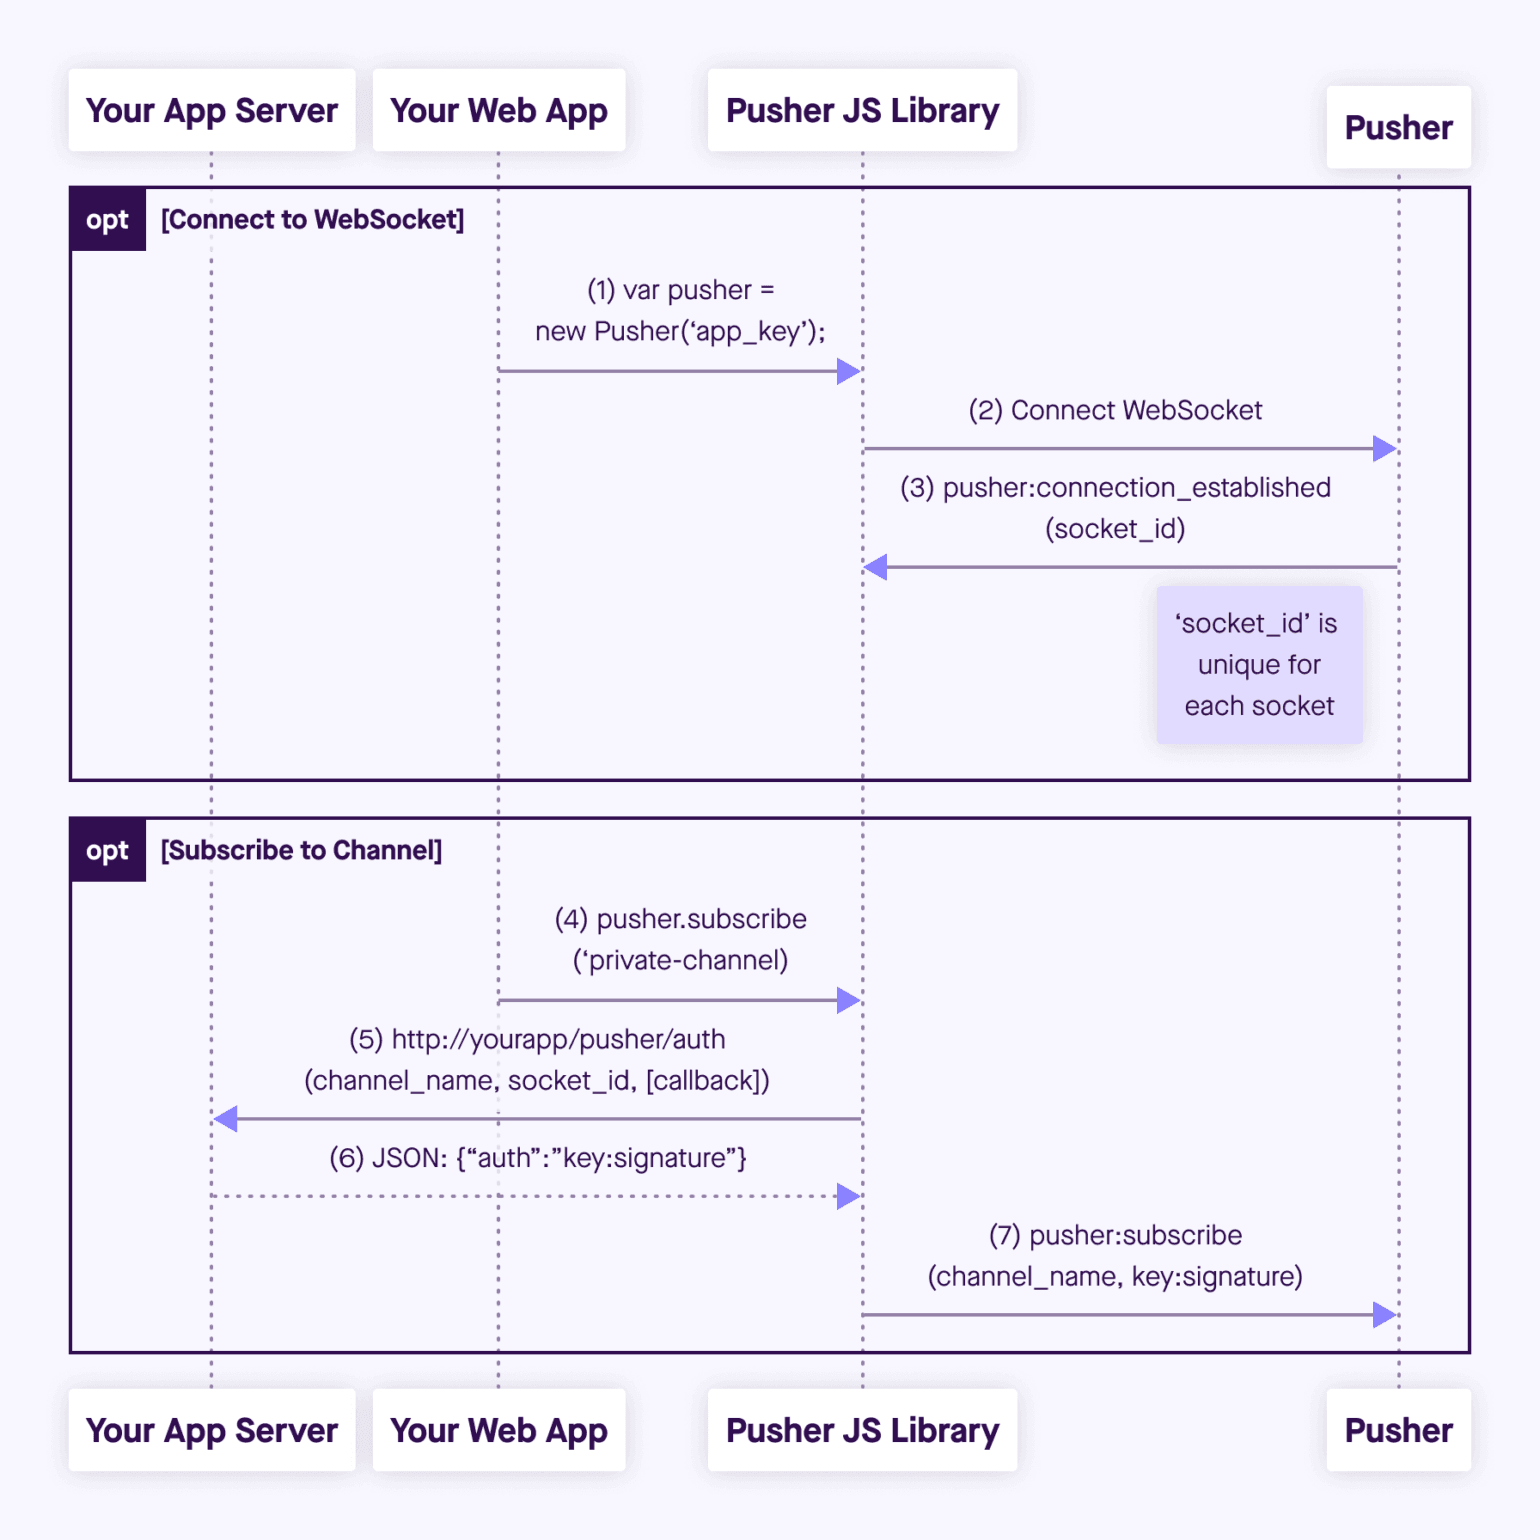
Auth process
When pusher.subscribe(private-channel) is called a callback is made to an authentication endpoint of your choice. This endpoint will check that the user is allowed to join the channel and if so return an access token.
However there are a couple of concepts that are important to understand to make sure that only users with permission can join restricted channels. This is based on authentication vs authorization.
Authentication
Building on from the example above, imagine you had a chat app that required users to register and login using an email and password. A user such as jbloggs@email.com may log in to your app and your server may issue something like a session token so the user can continue to identify themselves without repeatedly having to provide their email and password.
If a user then wanted to join a restricted private channel they would make a callback to your Channels authentication endpoint and provide the session token you had provided to them earlier.
By providing the session token, the user is proving to the authentication endpoint that they are a valid user of your app and have a registered identity. This is what we mean by authentication.
Let’s assume that anyone can register for your chat app but not everyone can join the #supersecretchat channel. It isn’t enough for your app endpoint to issue access tokens to any user with a valid session token. Otherwise users that have not been invited could potentially gain access to the #supersecretchat channel and be privy to information they should not be able to access.
Authorization
This leads on to the next consideration; authorization. Once you have proven that a user has a valid session in your chat app, you then need to look up what channels this user is entitled to participate in.
For example user lets say jbloggs@email.com requests to join #supersecretchat. You have already checked that the session token they have provided is valid and therefore the requesting user is indeed jbloggs.
The next step is to check to see if jbloggs@email.com is a valid participant in #supersecretchat. If they are only at this point would you return an access token for this channel.
Where next?
If you want to explore this concept further you should look at our three part tutorial series where we demonstrate how to set up authentication via Github and an example of authorizing a user to join a user specific channel.
Additionally you should check out our documentation on private channels and authenticating users.


© 2025 Pusher Ltd. All rights reserved.
Pusher Limited is a company registered in England and Wales (No. 07489873) whose registered office is at MessageBird UK Limited, 3 More London Riverside, 4th Floor, London, United Kingdom, SE1 2AQ.