- Products

- Developers
- User stories
- Blog
- Pricing

Introducing the Lucid ORM
In this tutorial, we will take a deep dive into how to use the Lucid ORM for database transactions and replace structure long SQL queries.
Introduction
In this tutorial, we will take a deep dive into how to use the Lucid ORM for database transactions and replace structure long SQL queries.
Depending on the complexity of an application, it can be a hassle to write the SQL queries that retrieve data from a database in realtime; more often, developers would rather use an ORM for database transactions than structure long chains of SQL queries.
? Object-relational mapping (ORM) in computer science is a programming technique for converting data between incompatible type systems using object-oriented programming languages. This creates, in effect, a “virtual object database” that can be used from within the programming language. – Wikipedia
Several MVC frameworks already come with ORMs that allow database querying using Models and powerful query builders; they make it easier to manipulate the data of a given database.
What Is Lucid?
Adonis ships with an ORM called Lucid. It serves as an interface for communication between an application’s Models and the database in use. Lucid implements Active record which enables it to manipulate and store object attributes and data in relational databases.
? Active record is an architectural pattern found in software that stores in-memory object data in relational databases.
Source: Wikipedia
This means each Model in an Adonis application is mapped to a corresponding database table and can manipulate SQL data using readable chains of JavaScript methods.
For example, if we wanted to retrieve all the posts in a blog application, we simply have to write:
1const posts = await Post.all()
It is worthy of note that Lucid works with the Active record convention for naming; this implies that if a Model is called Post, it will automatically be mapped to a posts table in the database or else otherwise stated
? If you want your model to use a database table with a different name you can configure it to do so.
Lucid is very powerful and has a lot of benefits but, in this article, we will consider how to create and effectively use database relationships among tables.
Requirements
To follow along with this tutorial, you’ll need to have these installed:
- Node.js 8.0 or higher
- Npm 3.0 or higher
- Adonis CLI (This command
npm i -g adonis-cli) - A database module driver installed using NPM. (Adonis supports a number of databases and we’ll be using MySQL)
In this tutorial, to demonstrate Lucid ORM, we will create a simple application that represents the relationships between a public garage, drivers and their cars.
? Every day, a public garage has many cars parked inside it. Each of these cars bbelongsto a driver, so a garage ultimately has many cars in it because of the drivers.
It’s also right to say that one garage has many drivers, hence many drivers belong to a garage.
A driver has one car and one car belongs to a driver. Lastly, a garage has many cars through its drivers. See diagram below.
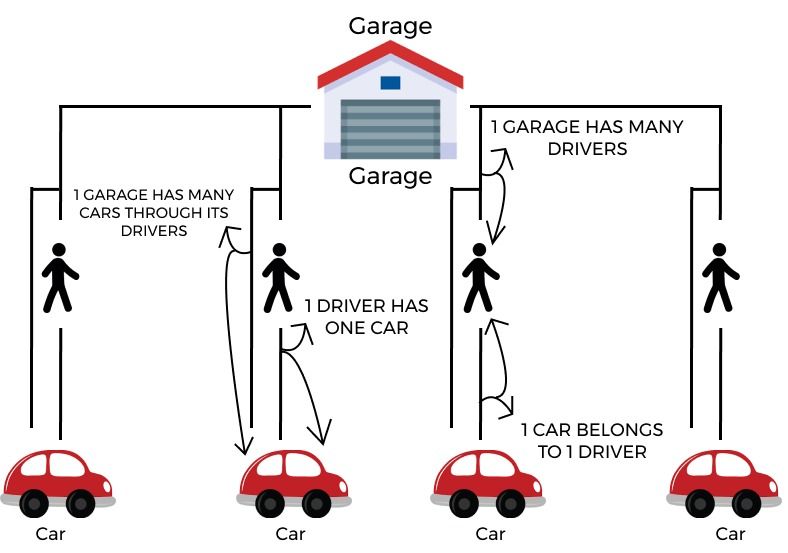
We will be working with a garage, driver and car model throughout this article. These three models will interact with one another over the database relationships created with Lucid ORM.
When you have the requirements stated above, we’ll jump right in.
Creating Models
First, we create a new Adonis application using the adonis CLI:
1adonis new relationships
Next, we’ll create the models using the adonis CLI. Run the commands below in the directory of your Adonis project:
1adonis make:model Garage 2 adonis make:model Driver 3 adonis make:model Car
Each of these commands creates a new file in the app/Model directory. Let’s add some code to the newly created files to define relationships. The migration files will be created in the next section.
In the Garage model, we will add two methods:
- the first method will be called
driversand it will retrieve all the drivers associated with a garage. - the other method will be called
carsand it will retrieve all the cars associated with a garage through drivers.
1const Model = use('Model') 2 3 class Garage extends Model { 4 5 drivers () { 6 return this.hasMany('App/Models/Driver') 7 } 8 9 cars () { 10 return this.manyThrough('App/Models/Driver', 'car') 11 } 12 } 13 14 module.exports = Garage
In the Driver model, we’ll add two methods:
- the first method called
garagewill return the garage that a particular driver belongs to. - the second method called
carswill return the car owned by that driver.
1const Model = use('Model') 2 3 class Driver extends Model { 4 5 garage () { 6 return this.belongsTo('App/Models/Garage') 7 } 8 9 car () { 10 return this.hasOne('App/Models/Car') 11 } 12 } 13 14 module.exports = Driver
Lastly, in the Car model, we’ll add a single method called driver, which will return the driver object a car belongs to.
1const Model = use('Model') 2 3 class Car extends Model { 4 5 driver () { 6 return this.belongsTo('App/Models/Driver') 7 } 8 } 9 10 module.exports = Car
Database Migrations
We will use database migrations to create the database tables for this tutorial. When we run a migration on a database, the tables represented in the migration file are created, altered or dropped within the database in use.
? A database migration is a programmatic representation or blueprint for the relational database schemas.
To enable the relationship methods we defined in the models, we have to include foreign keys to the migration files. The foreign keys we will include are :
– garage_id on the drivers table (the Primary key is id).
– driver_id on the cars table (the Primary key is id).
Run the commands below to create the migration files:
1adonis make:migration garages 2 adonis make:migration drivers 3 adonis make:migration cars
Running each of these commands will prompt you to choose an action. From this prompt, choose Create table option and a new migration file will be included within the database/migrations directory.
We will focus on updating the up() method in the migration files because it holds the table structure definitions.
1// Garage Model Migration 2 const Schema = use('Schema') 3 4 class GaragesSchema extends Schema { 5 up () { 6 this.create('garages', (table) => { 7 table.increments() //primary key id 8 table.string('name', 80).notNullable().unique() // unique name 9 table.timestamps() // created_at, updated_at time stamps 10 }) 11 } 12 13 down () { 14 this.drop('garages') 15 } 16 } 17 18 module.exports = GaragesSchema 19 20 21 // Driver Model Migration 22 'use strict' 23 24 const Schema = use('Schema') 25 26 class DriversSchema extends Schema { 27 28 up () { 29 this.create('drivers', (table) => { 30 table.increments() //primary key id 31 table.string('name', 80).notNullable().unique() // unique name 32 table.integer('garage_id',11).unsigned().references('id').inTable('garages') 33 table.timestamps() 34 }) 35 } 36 37 down () { 38 this.drop('drivers') 39 } 40 } 41 42 module.exports = DriversSchema 43 44 45 // Car Model Migration 46 'use strict' 47 48 const Schema = use('Schema') 49 50 class CarsSchema extends Schema { 51 52 up () { 53 this.create('cars', (table) => { 54 table.increments() //primary key id 55 table.string('brand', 80).notNullable().unique() // unique name 56 table.integer('driver_id',11).unsigned().references('id').inTable('drivers') // foreign key to driver table's id 57 table.timestamps() // created_at, updated_at time stamps 58 }) 59 } 60 61 down () { 62 this.drop('cars') 63 } 64 } 65 66 module.exports = CarsSchema
Finally, we run the migration with this single command:
1adonis migration:run
Seeding the Database
We need data in our database tables to test the application. While database migrations help us build the structure of the tables, database seeding inputs data in our database.
To create a database seed file, we run the following command:
1adonis make:seed
This will create a new directory called seeds and a DatabaseSeeder.js file within it.
We will use Factories to seed our tables, by creating blueprints for our models in the factory.js file in the database directory.
? Consider the
factory.jsfile as the place where we manufacture the dummy data to be inserted into the database.
In the factory.js file, we’ll add
1const Factory = use('Factory') 2 3 Factory.blueprint('App/Models/Garage', (faker) => { 4 return { 5 name: faker.first() 6 } 7 }) 8 9 Factory.blueprint('App/Models/Driver', (faker) => { 10 return { 11 name: faker.first() 12 } 13 }) 14 15 Factory.blueprint('App/Models/Car', (faker) => { 16 return { 17 brand: faker.first() 18 } 19 })
This defines the blueprint for each model. We have also included the
fakerobject, which will generate random data for us whenever we seed our database, e.g. The garage will have a new name on each run. We also askedfakerto generate the brand name for each car for us; faker will assign a random human name (sorry, Honda and Jaguar lovers), as the brand name each time.
In the seeds/DatabaseSeeder.js file, we will instruct adonis to seed the database using the blueprint defined in the factory.js file:
1const Factory = use('Factory') 2 const Garage = use('App/Models/Garage') 3 const Driver = use('App/Models/Driver') 4 const Car = use('App/Models/Car') 5 6 class DatabaseSeeder { 7 async run () { 8 9 // create a Garage_1 variable and assign the first `Garage` model to it 10 11 await Factory.model('App/Models/Garage').create() 12 const Garage_1 = await Garage.find(1) 13 14 // use the `make` keyword to make new instances of `drivers` but do not persist them 15 16 const driver_model_1 = await Factory.model('App/Models/Driver').make() 17 const driver_model_2 = await Factory.model('App/Models/Driver').make() 18 const driver_model_3 = await Factory.model('App/Models/Driver').make() 19 const driver_model_4 = await Factory.model('App/Models/Driver').make() 20 const driver_model_5 = await Factory.model('App/Models/Driver').make() 21 22 // Use the Garage_1 model to persist each of the `driver` models we made 23 24 await Garage_1.drivers().save(driver_model_1) 25 await Garage_1.drivers().save(driver_model_2) 26 await Garage_1.drivers().save(driver_model_3) 27 await Garage_1.drivers().save(driver_model_4) 28 await Garage_1.drivers().save(driver_model_5) 29 30 // create 5 Driver_* variables and assign the newly created Driver models to them 31 32 const Driver_1 = await Driver.find(1) 33 const Driver_2 = await Driver.find(2) 34 const Driver_3 = await Driver.find(3) 35 const Driver_4 = await Driver.find(4) 36 const Driver_5 = await Driver.find(5) 37 38 // use the `make` keyword to make new cars but do not persist them 39 40 const car_model_1 = await Factory.model('App/Models/Car').make() 41 const car_model_2 = await Factory.model('App/Models/Car').make() 42 const car_model_3 = await Factory.model('App/Models/Car').make() 43 const car_model_4 = await Factory.model('App/Models/Car').make() 44 const car_model_5 = await Factory.model('App/Models/Car').make() 45 46 // Use the Driver models to persist each of the car model we made 47 48 await Driver_1.car().save(car_model_1) 49 await Driver_2.car().save(car_model_2) 50 await Driver_3.car().save(car_model_3) 51 await Driver_4.car().save(car_model_4) 52 await Driver_5.car().save(car_model_5) 53 54 } 55 } 56 57 module.exports = DatabaseSeeder
The DatabaseSeeder.js file, when run, will;
– Create a new Garage model.
– Make 5 instances of the Driver model without persisting them.
– Save and associate all the Driver models with the single Garage model.
– Make 5 instances of the Car model but will not persist them.
– Saves and associates each of the Car model with a unique Driver model.
To run the database seeder, we use this command on the terminal:
1adonis seed
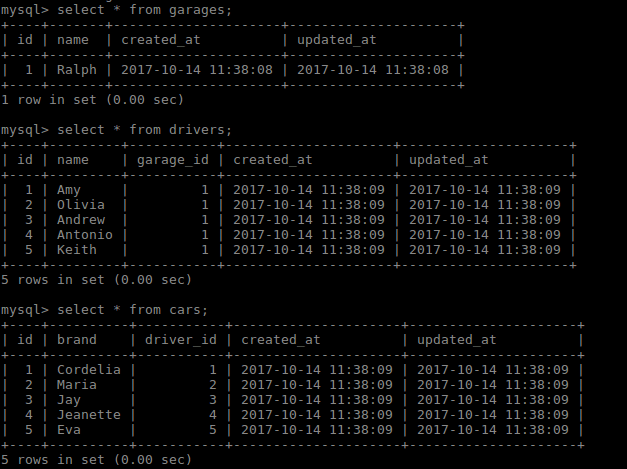
Here’s a sample view of the newly inserted rows:
Retrieving Data Using Model Relationships
Now we can explore the capabilities of the Lucid relationships we set up in the model files. We’ll see how easy it is to retrieve data using the methods we defined.
To retrieve relation Models, we will write define routes in the routes.js file so they all accept an id parameter in the URL. The routes will further find an instance of a Model in the database (using the id) and return its matching relations in JSON format.
1// start/routes.js 2 const Route = use('Route') 3 const Car = use('App/Models/Car') 4 const Garage = use('App/Models/Garage') 5 const Driver = use('App/Models/Driver') 6 7 // Retrieve all drivers associated with the `id` garage 8 Route.get('garage/:id/drivers', async ({ params }) => { 9 const garage = await Garage.find(params.id) 10 return garage.drivers() 11 }) 12 13 // Retrieve all cars associated with the `id` garage 14 Route.get('garage/:id/cars', async ({ params }) => { 15 const garage = await Garage.find(params.id) 16 return garage.cars() 17 }) 18 19 // Retrieves all garages associated with the `id` driver 20 Route.get('/driver/:id/garage', async ({ params }) => { 21 const driver = await Driver.find(params.id) 22 return driver.garage() 23 }) 24 25 // Retrieves a single instance of a car Model associated with the `id` driver. 26 Route.get('driver/:id/car', async ({ params }) => { 27 const driver = await Driver.find(params.id) 28 return driver.car() 29 }) 30 31 // Retrieves a single instance of a driver Model associated with the `id` car 32 Route.get('car/:id/driver', async ({ params }) => { 33 const car = await Car.find(params.id) 34 return car.driver() 35 })
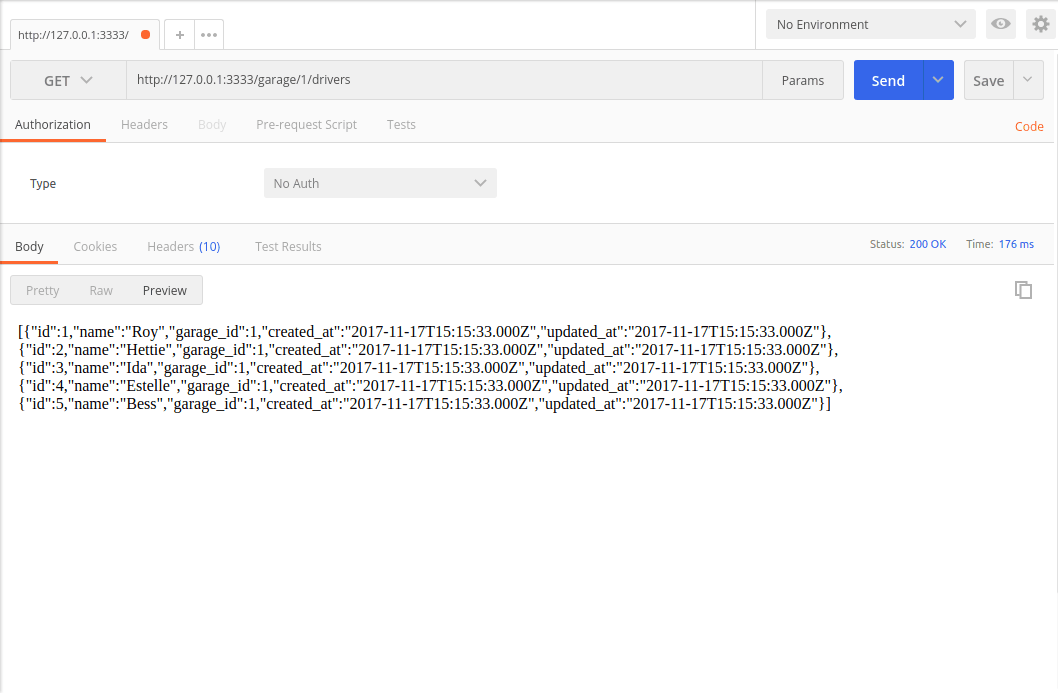
The above code illustrates how you can retrieve results using the Lucid ORM. Here is a screenshot of a sample response from Postman:
Conclusion
With just a few examples, we have seen some of the abilities of the Lucid ORM, though we have barely scratched the surface of its powers. To learn more about Lucid relationships, check out the official documentation here.
If you have questions or feedback, leave them at the comment section below. The code used in this tutorial is also available on GitHub.


© 2026 Pusher Ltd. All rights reserved.
Pusher Limited is a company registered in England and Wales (No. 07489873) whose registered office is at MessageBird UK Limited, 3 More London Riverside, 4th Floor, London, United Kingdom, SE1 2AQ.