Implementing a realtime encoding dashboard with Pusher
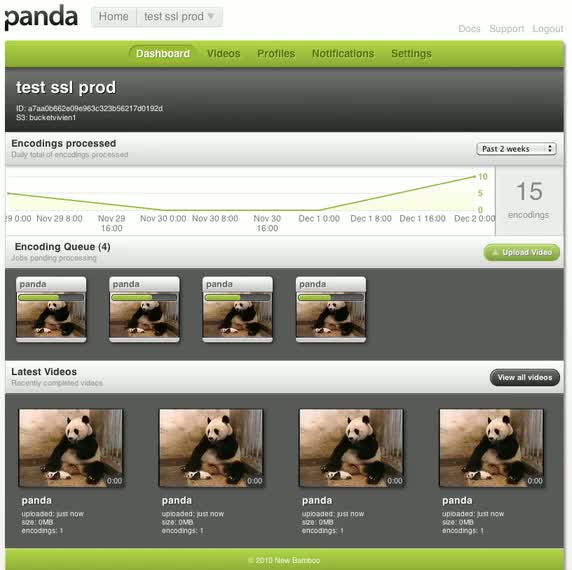
We have recently rolled out a new video encoding dashboard for our users that shows the progress of videos. Because we use Pusher extensively, we thought it would be interesting to show how this was built and how we utilized the service.
Introduction
Guest author Vivien, from our sister product Panda, talks about how they used Pusher in their awesome new realtime encoding dashboard.
Panda makes it easy to add video encoding to your app. We have recently rolled out a new status dashboard for our users that shows the progress of videos. Because we use Pusher extensively, we thought it would be interesting to show how this was built and how we utilized the service.
We have created a screencast of this in action. Videos uploaded by users appear in the encoding queue, and their progress is displayed by progress bars:

User experience enhancement
One of the interesting things we’d like to talk about in our usage of
WebSockets is that we don’t use them as a standalone realtime widget
in our page. Instead the addition of realtime adds an extra layer of
enhancement to our existing pages, which function perfectly well
without them.
Choosing a channel to subscribe to
We chose to use the ids of people’s “encoding clouds” as the channel
names, to filter just the encoding events that the user is interested in. In
our JS we just need to subscribe to all the events that are happening
there. We also needed to use private channels so that information
wouldn’t leak between people’s accounts.
server = new Pusher( pandaPusherKey ) channel = server.subscribe('private-' + Cloud)
Application structure
We use a form of MVC in our dashboard. We use JS-Model for managing state in the client side, and custom view objects. Events fired from the models are bound to in corresponding views. We will skip out on some of the details of the implementation here, particularly the rendering of views, as the part we want to emphasise is how new data is piped into our models via Pusher.
Our Pusher events
We have a number of events that we subscribe to in our dashboard, which are fired at various stages of a video’s lifecycle.
New video (when it is first added to the queue)
When a new video is uploaded to the system, we need it to be added to the ‘queue’ section of our dashboard. This is a simple case of creating a new instance of the video and its encodings and
adding it into the model collection:
1channel.bind('video-new', function (event_data) { 2 // add the local Cloud id to the hash sent from Pusher 3 var video_data = $.extend(event_data.video, {'cloud_id': Cloud}) 4 5 ... // some variable optimisation 6 7 var video = new Video(video_data) 8 video.loadEncodings(encodings_data) 9 10 Video.add(video) 11 Video.trigger('collectionUpdated') 12})
This fires the ‘collectionUpdated’ event on our collection which in turn causes our application to re-render the views to include the new video.
1Video.bind('collectionUpdated', function () { 2 DASH.videoGridView.updateCollection(Video.ready().all().slice(0, 4)) 3 DASH.encodingQueue.updateCollection(Video.encoding().slice(0, 6)) 4})
Each video model is associated to a view object representing the encoding process called EncodingQueueItem. At this point, the EncodingQueueItem binds to several events on the video, so that it can change its state accordingly.
Video created (video has been uploaded to S3 or failed)
When the video has been uploaded to s3, we are now able to preview the video by downloading a screenshot taken from the original video.
1channel.bind('video-created', function (event_data) { 2 var video = Video.find(event_data.video.id) 3 if(video) { 4 video.attr('status', event_data.video.status) 5 video.trigger('created') 6 } 7})
<span style="font-family: Georgia, 'Times New Roman', 'Bitstream Charter', Times, serif; font-size: 13px; line-height: 19px;">This then updates the specific </span><code>EncodingQueueItem</code><span style="font-family: Georgia, 'Times New Roman', 'Bitstream Charter', Times, serif; font-size: 13px; line-height: 19px;"> with a thumbnail of the video.</span>
Video progress (during encoding)
The progress of videos is also sent throughout the transcoding process, and this is relayed to the dashboard via Pusher.
This allows us to create nifty progress bars that update in realtime.
Previously, it would have been a real headache to add such a complex feature, but using Pusher makes it relatively easy.
1channel.bind('encoding-progress', function (event_data) { 2 var encoding = Encoding.find(event_data.encoding.id) 3 if (encoding) { 4 encoding.attr('encoding_progress', event_data.encoding.encoding_progress) 5 encoding.attr('started_encoding_at', event_data.encoding.started_encoding_at) 6 encoding.video().trigger('change') 7 }; 8})
<span style="font-family: Georgia, 'Times New Roman', 'Bitstream Charter', Times, serif; font-size: 13px; line-height: 19px;">The </span><code>EncodingQueueItem</code><span style="font-family: Georgia, 'Times New Roman', 'Bitstream Charter', Times, serif; font-size: 13px; line-height: 19px;"> binds to an event named 'change' which updates the percentage encoded by reading the value from the model.</span>
1EncodingQueueItem = function (video) { 2 var self = this; 3 this.video = video; 4 this.html = template; 5 .... 6 this.video.bind('change', function () { 7 self.html 8 .find('.progress-bar .inner') 9 .animate({width: self.video.percentageEncoded() + '%'}, 200) 10}
Video encoded
We also need to move the video from the ‘video encoding view’ to the ‘video encoded view’ when all encodings of the video are complete.
1channel.bind('video-encoded', function (event_data) { 2 var video = Video.find(event_data.video.id) 3 if (video) { 4 video.trigger('encoded') 5 }; 6})
EncodingQueueItems bind on the event ‘encoded’ to update to animate the progress bar to 100% and refresh the views
1EncodingQueueItem = function (video) { 2 .... 3 this.video.bind('encoded', function () { 4 self.html.find('.progress-bar .inner') 5 .animate({width: '100%'}, 200, function(){ 6 Video.trigger('collectionUpdated') 7 }) 8 .end() 9 }) 10}
Video removed
When a video is removed from the system, we need to remove it from the interface. This is again really easy by following our event convention:
1channel.bind('video-deleted', function (event_data) { 2 var video = Video.find(event_data.video_id) 3 if (video) { 4 Video.remove(video) 5 }; 6})
<span style="font-size: 1.5em; font-family: Georgia, 'Times New Roman', 'Bitstream Charter', Times, serif; line-height: 19px;">Summary</span>
As you can see, it is relatively trivial to add some very rich functionality into an existing interface without much trouble.