How we built Pusher-JS 2.0 Part 2 – Implementation
This part will get more technical and focus more on implementation details - we'll discuss how strategies are represented and evaluated internally.
Introduction
In the previous blog post, I explained some of the design decisions made while we were working on the connection strategy for our new JavaScript client library. This part will get more technical and focus more on implementation details – we’ll discuss how strategies are represented and evaluated internally.
Transports
Currently, Pusher offers WebSocket, Flash and HTTP transports. Internally, we treat these three transports as separate entities, since they all differ in a few areas (e.g., initialization).
Transport managers
Transports have their managers, who watch for disconnections – when connections are unexpectedly terminated too often, they disable used transports. For the time being, WebSockets and Flash are managed together, since they share the same protocol.
Strategies
As mentioned in the previous post, there are many things a strategy has to do:
- check whether a transport is supported in a browser,
- connect using a specific transport,
- retry connection attempts,
- start connecting after a delay,
- try different connections in parallel,
- cache and retrieve transport info from local storage.
While all these responsibilities are very basic, together they can form moderately complex algorithms, which can be difficult to test. Since we’re on a mission to design a strategy which is as reliable as possible, one of our primary goals was to make our software easy to test.
Simple interface
In order to make things simpler, strategies have a minimal interface consisting of two methods.
You can start a connection attempt, by calling connect with a callback that will receive errors and open connections. Also, connect returns a runner which encapsulates the execution state and allows aborting the attempt.
Second method is isSupported, which returns just a boolean telling you whether a strategy is supported by the browser or not.
Types of strategies
After reading the first blog post, you have probably already identified most of the strategies we’re using:
- if – runs a boolean check and chooses one of two of its sub-strategies,
- transport – simple adapter for transports,
- sequential – tries sub-strategies sequentially, supports looping and timeouts,
- delay – runs the sub-strategy after a specified delay,
- best connected – runs sub-strategies in parallel and chooses the best transport,
- first connected – terminates the sub-strategy on first connection,
- cached – uses local storage to cache and retrieve transport info.
Building a tree
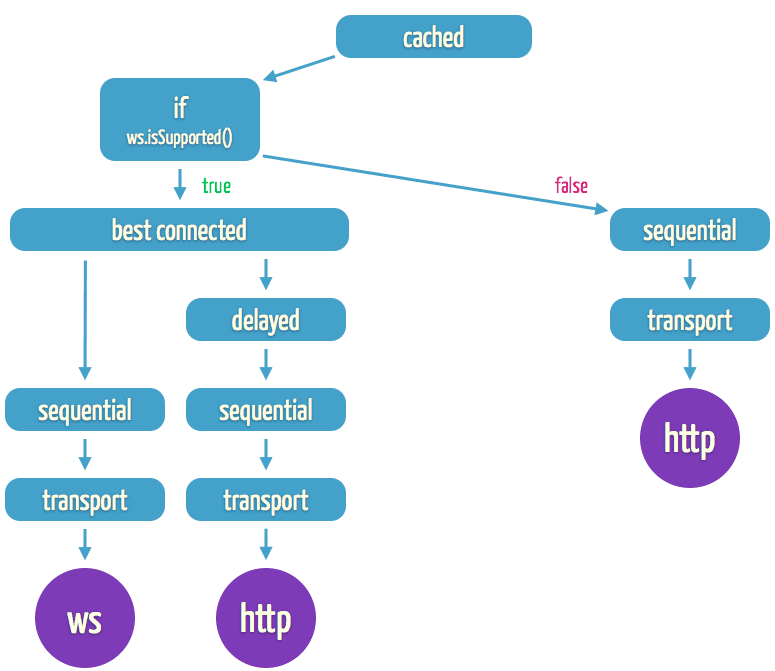
As they say – a picture is worth a thousand words:

Let’s start from the bottom – purple leaf nodes represent transports. One level higher in the hierarchy, you can see transport strategy nodes. These provide the correct interface for their parents to interact with them. Since we want to timeout connection attempts and then retry them, we also wrap all transports with sequential strategies.
For a moment, we’ll skip a few layers and talk about the if strategy. In scenarios where the browser supports WebSockets, we want to start with them and try HTTP after a delay. Otherwise, we start trying HTTP. That’s the reason why we have the if node, which runs isSupported method on WebSocket transport and chooses the optimal strategy.
The true (left) branch of the if node is evaluated when WebSockets are present. We connect in parallel with the best connected node, which calls back every time one of its children yields a connection. As you can see, in this branch we wrap HTTP in a delayed strategy so it’s only attempted if WebSockets are taking a while to connect.
On the other side, we have a branch which is run when WebSocket implementation is missing. There’s no delay, so it tries to connect using the HTTP transport immediately.
Finally, we get to the root of the tree – the cached node. When the data in local storage is present and fresh, it uses the cached transport to establish a connection. If the cache is empty, stale or the transport does not connect anymore, it falls back and runs its sub-strategy.
Summing up
By providing a simple interface, breaking up strategy into smaller parts and encapsulating state carefully, we’re able to construct predictable strategies that are also easy to test. Having them structured as trees will let us modify and expand the client in the future while avoiding massive refactoring.
The next part in this small series of blog posts will cover how we came up with a basic strategy, and gradually improved it, until we reached the point we’re at now.