- Products

- Developers
- User stories
- Blog
- Pricing

How to Publish New Content in Realtime with Bolt and Pusher
Learn how to publish posts in real-time with Bolt and Pusher from a core member of the Bolt team
Introduction
This is a guest post by Phillipp Ohlandt, who is a core member of the Bolt CMS team. You can follow him on Twitter @PhillippOh.
In traditional websites, users are expected to manually reload the page to discover new content, but this is not ideal. That is why modern websites instead push new content to their website as soon as the author hits “Publish”. You’ve probably seen this kind of realtime behaviour before on modern websites like Twitter:

We can easily add this kind of real-time functionality to our own Bolt applications with a little help from Pusher and in this tutorial, I’ll show you how.
Here’s a preview of what we’re going to build with Bolt and Pusher:
Install and configure Bolt
There are a few different ways to install Bolt and they are all well described here. It’s up to you how and where you want to install it so I will continue with the configuration. (Note: Current stable version is v3.1.5)
Now we need a theme. We can use the standard base-2016 theme but it’s not specifically for blogs so I chose clean-blog for this tutorial.
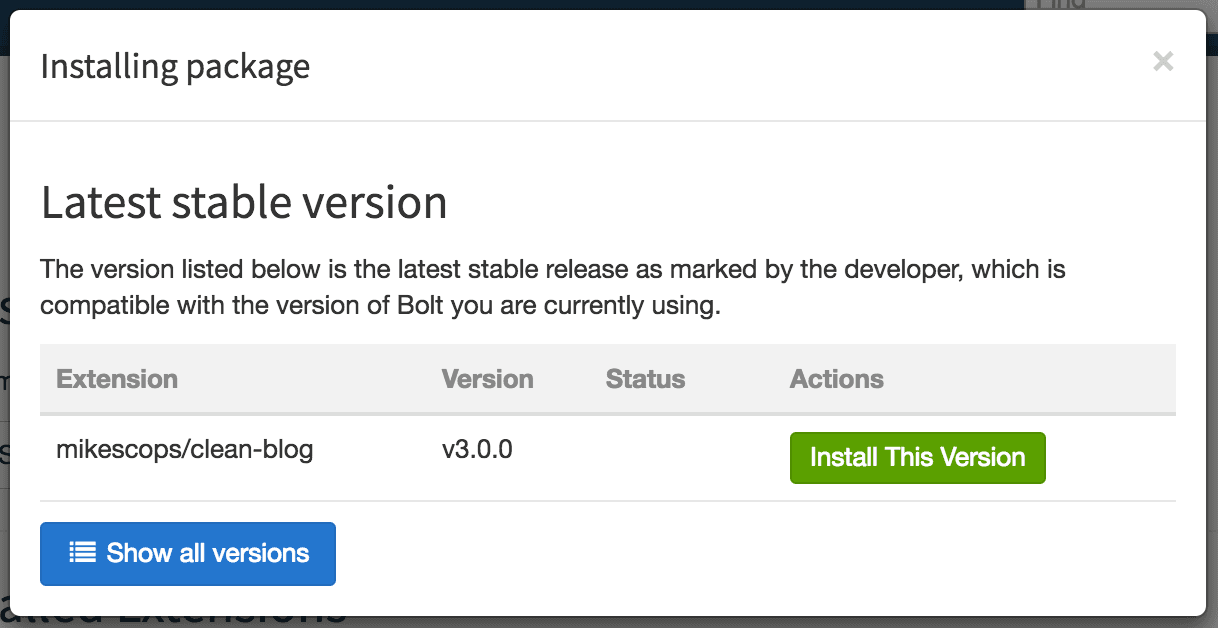
Let’s install it. Go into your Bolt backend and browse to the Extend page. Start typing “clean-blog” into the input field until you see a dropdown with the theme name. Click on it so it fills out the input field. Click on Browse Versions and install the latest stable one.
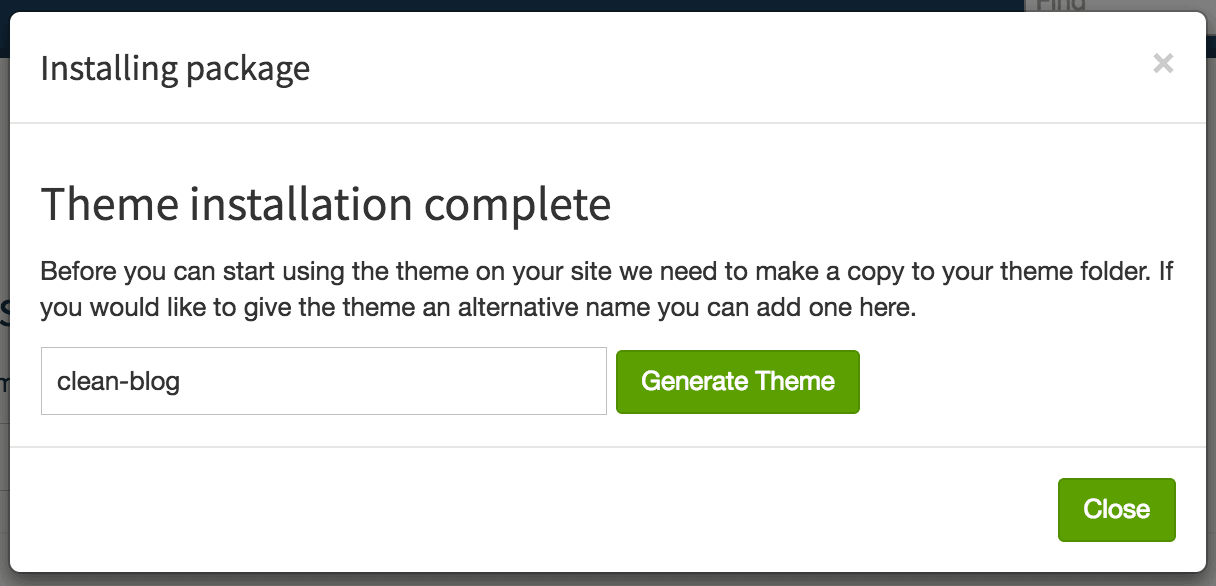
After the installation is done, you will find the theme in the list of Your currently Installed Extensions. If not, reload the page. Before we can go over to the config file, you have to hit the Copy to theme folder button on the list entry.
After the installation is done, Bolt tells us that we need to copy the theme to the theme folder in order to use it. We can let Bolt handle that by clicking on the Generate Theme button.
Time to edit the config file and to tell Bolt to use our new installed theme. Open app/config/config.yml with your favorite editor or browse to Configuration > Main configuration in your Bolt backend.
Here you can change the name of the theme you want to use. You are also free to change some other settings like sitename and payoff.
1sitename: Liveblog 2payoff: With Bolt 3 and Pusher 3 4theme: clean-blog
Enable
To integrate Pusher into our Bolt installation, we can simply use the extension pusher-realtime by - surprise surprise… - me ?!
The installation process is similar to that of the theme. After the installation, you’ll find a button called Edit configuration in the list entry of the extension. This button will open the configuration file for the extension in the backend.
Like the Bolt configuration file, you can also edit it with your favorite editor. The file is located under app/config/extensions/pusherrealtime.ohlandt.yml.
Before we can edit it, you have to create a new App in your Pusher Dashboard.
After you created the Pusher App, you’ll be redirected to the Pusher App Keys page that contains instructions on how to use Pusher and your App Keys on the right side.
After you created the Pusher app, you will be redirected to the Getting Started page. Now we need our app keys which you can find on the App Keys page.
Copy the keys over to the extension configuration file and make sure there is a space between the colon and the value (YAML Syntax). Leave everything else like it is.
Final Changes on the Theme
Our goal is to have a blog that will be updated in real-time when we save a new entry. The clean-blog theme comes with a simple index page that lists all recent posts. Perfect for our Pusher integration.
Go to public/theme/clean-blog in your preferred file manager. Here we will edit two files, index.twig and _head.twig.
index.twig
This file contains the loop that displays our recent entries. We change the number of the loaded entries to 20, display the entry body instead of the teaser, remove the metadata and add the class entries to the parent div. The content area will look like this:
1<div class="container"> 2 <div class="row"> 3 <div class="col-lg-8 col-lg-offset-2 col-md-10 col-md-offset-1 entries"> 4 5 6 {% setcontent records = "entries/latest/20" allowpaging %} 7 {% for record in records %} 8 9 10 <div class="post-preview"> 11 <a href="{{ record.link }}"> 12 <h2 class="post-title"> 13 {{ record.title }} 14 </h2> 15 <h3 class="post-subtitle"> 16 {{ record.body }} 17 </h3> 18 </a> 19 </div> 20 <hr> 21 22 {% endfor %} 23 24 <!-- Pager --> 25 {{ pager() }} 26 27 28 </div> 29 </div> 30</div>
head.twig
In this file, we enable Pusher through a helper function from the pusher-realtime extension I wrote. Then we will listen for the "created" event in the "records" channel and insert new posts into the page. (If you’re unfamiliar with Pusher and the concept behind events and channels, you can read a bit more in their documentation)
Paste the following code right before the </head> HTML tag.
1{{ enable_pusher() }} 2 3<script> 4 (function() { 5 var records = pusher.subscribe('entries'); 6 records.bind('created', function(data) { 7 8 $('.entries').prepend( 9 '<div class="post-preview">' + 10 '<a href="/entry/' + data.record.slug + '">' + 11 '<h2 class="post-title">' + 12 data.record.title + 13 '</h2>' + 14 '<h3 class="post-subtitle">' + 15 data.record.body + 16 '</h3>' + 17 '</a>' + 18 '</div>' + 19 '<hr>' 20 ); 21 22 }); 23 })(); 24</script>
…. And you are done! Your blog homepage will update itself in real-time when you post a new entry. Here’s a reminder of what the final product should look like:
You will find more information about the pusher-realtime extension in the extension’s documentation.
If you have any questions or just want to talk with me about Bolt in combination with Pusher, you can always find me in the Bolt CMS Slack Channel (my username there is phillipp!)


© 2026 Pusher Ltd. All rights reserved.
Pusher Limited is a company registered in England and Wales (No. 07489873) whose registered office is at MessageBird UK Limited, 3 More London Riverside, 4th Floor, London, United Kingdom, SE1 2AQ.