- Products

- Developers
- User stories
- Blog
- Pricing

How to build an Android app using Cordova and VueJS
In this tutorial, we cover how to create an Android app using VueJS and Cordova, converting from JavaScript into an Android app with a single command.
Introduction
In this tutorial, we will cover using Cordova to convert a web app written in Javascript to the Android platform in just a matter of minutes!
Writing a native Android app is not possible for everyone of us. As a web developer, I would have to learn the the Android SDK from ground up, which is too intimidating and a lot of work. Rather, what if I could make a web app and convert it into an Android app? – Sounds good enough to be true?
One of the options would be to embed the web view of your hosted whole web app directly into Android – but it’s not productive! Sometimes, we only need a very limited set of features in our app, or the UI needs to be a bit different to better suit mobile usability and many other such limitations. Embedding a web app in a web view doesn’t always work.
Today, we will create a basic ToDo app for the Android platform by using Cordova to see just how easy it can be.
Installation
Cordova command-line runs on Node and is available to install through npm. We can install Cordova with the following command:
1sudo npm install -g cordova
This will install all the necessary JavaScript libraries through npm.
Next, we need to make sure that the Android SDK is installed on our workstation. The SDK should be installed so as to make Cordova able to convert our JavaScript app into an Android app.
We can install download the latest SDK from this link.
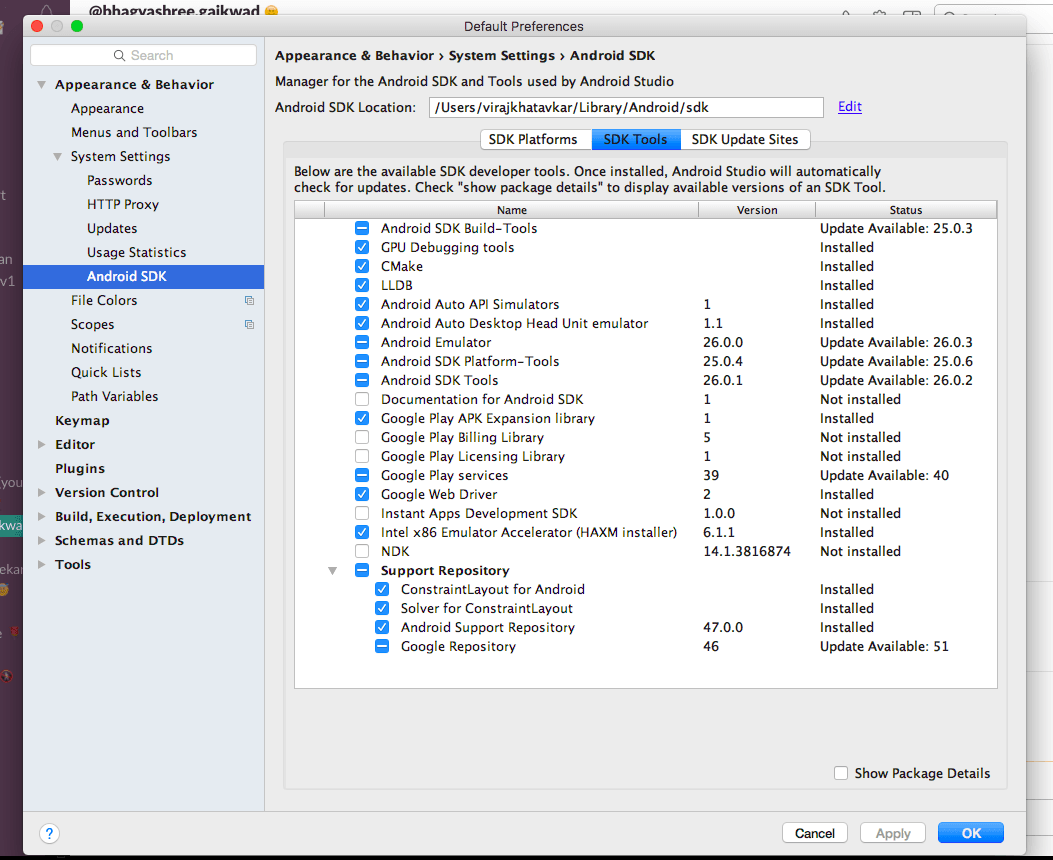
After the SDK installation is completed, we need to download a set of SDK tools. You can do so in the following steps (or see a detailed set of instructions on this link):
- Open Android Studio
- Go to Preferences
- Go to Appearance & Behavior → System Settings → Android SDK
- You can see a list of tools as options to be installed
- Make sure the options shown in the image below are checked
- The download may take quite a bit of time depending on your network connectivity
Create a New Cordova App
Once we complete the installation, we need to first create a new app with Cordova. We can do so with the following command:
1cordova create todo-mobile-app-cordova-vue
Next, cd into the project directory, add a platform, for which you need to create an app. Cordova currently supports the following platforms:
1. Android
2. IOS
3. Blackberry
4. OSX
5. WebOS
6. Windows
7. Browser
We are making an Android app, hence, we will add the android platform:
1cd todo-mobile-app-cordova-vue 2 3 cordova platform add android
ToDo App
We will use Vue to create a ToDo SPA. The intent of this article is to guide on converting JavaScript app into an Android app, hence, we will focus on that and not concentrate on how to build a JavaScript app.
Let us set up our default routes, components and the bootstrap in the resources/assets/js/app.js file:
1/** 2 * First we will load all of this project's JavaScript dependencies which 3 * includes Vue and other libraries. It is a great starting point when 4 * building robust, powerful web applications using Vue. 5 */ 6 7 require('./bootstrap'); 8 9 window.Vue = require('vue'); 10 11 import Vue from 'vue' 12 import VueRouter from 'vue-router' 13 14 // 1. Define route components. 15 // These can be imported from other files 16 let Todo = require('./components/Todo.vue'); 17 18 // 2. Define some routes 19 // Each route should map to a component. The "component" can 20 // either be an actual component constructor created via 21 // Vue.extend(), or just a component options object. 22 const routes = [ 23 { path: '/tasks', component: Todo } 24 ] 25 26 // 3. Create the router instance and pass the `routes` option 27 // You can pass in additional options here, but let's 28 // keep it simple for now. 29 const router = new VueRouter({ 30 routes 31 }) 32 33 Vue.use(VueRouter); 34 35 Vue.component('navigation', require('./components/Navigation.vue')); 36 Vue.component('create-task', require('./components/CreateTask.vue')); 37 38 // 4. Create and mount the root instance. 39 // Make sure to inject the router with the router option to make the 40 // whole app router-aware. 41 window.onload = function () { 42 const app = new Vue({ 43 router 44 }).$mount('#app'); 45 } 46 47 router.push('/tasks');
In the above example, we have set up the application, necessary dependencies and the routes. At the end of the file, we are specifying the route that the application should be redirected to by default.
Next, let’s look into the ToDo Vue component:
1<template> 2 <div class="container"> 3 <div class="row"> 4 <div class="col-sm-12"> 5 <create-task @created="pushTask"></create-task> 6 </div> 7 </div> 8 <div class="row"> 9 <div class="col-sm-12" v-for="task in tasks"> 10 <div class="panel panel-default"> 11 <div class="panel-body"> 12 <div class="pull-left">{{ task.title }}</div> 13 <div class="pull-right"> 14 <button class="btn btn-danger btn-sm" @click.prevent="deleteTask(task)"> 15 Delete 16 </button> 17 </div> 18 </div> 19 </div> 20 </div> 21 </div> 22 </div> 23 </template> 24 <script> 25 export default { 26 data() { 27 return { 28 tasks: [] 29 } 30 }, 31 32 methods: { 33 pushTask(task) { 34 this.tasks.unshift(task); 35 }, 36 37 deleteTask(task) { 38 this.tasks.splice(this.tasks.indexOf(task), 1); 39 } 40 } 41 } 42 </script>
We reference a create-task component as a child in the above component. The above component displays the tasks and deletes them. The create-task component will take care of creating the task:
1<template> 2 <div class="panel panel-default"> 3 <div class="panel-heading">Create Task</div> 4 <div class="panel-body"> 5 <div class="row"> 6 <div class="col-sm-12"> 7 <div class="form-group"> 8 <input type="text" class="form-control" v-model='title' @keyup.enter="createTask"> 9 </div> 10 </div> 11 </div> 12 13 </div> 14 </div> 15 </div> 16 </template> 17 18 <script> 19 export default { 20 data() { 21 return { 22 title: '' 23 } 24 }, 25 26 methods: { 27 createTask() { 28 let task = { 29 title: this.title 30 }; 31 32 this.$emit('created', task); 33 this.title = ''; 34 } 35 } 36 } 37 </script>
You can run the app on browser with following commands:
1cordova platform add browser 2 3 cordova run browser
The below gif demonstrates the working app on the browser:
Converting to Android
Connect your mobile device to laptop or PC. Make sure that the debugging mode is switched on. To run the Android app on your mobile, you can execute the following command:
1cordova run android
It will build and install the apk on your mobile. The app will open on your device and you can play with it.
Alternatively, if you want to run the app on emulator, you can do so with the following command:
1cordova run android --emulator
Configuration
Your app has a config.xml file which serves as an configuration for variety of options:
The name of the app:
1<name>ToDo - Pusher</name>
The description:
1<description> 2 A ToDo app for Pusher using Cordova and Vue 3 </description>
Author information
1<author email="viraj@virajkhatavkar.com" href="https://virajkhatavkar.com"> 2 Apache Cordova Team 3 </author>
Icon for the app:
1<icon src="res/ios/icon.png" platform="ios" width="57" height="57" density="mdpi" />
If you don’t specify a icon, the default icon from Cordova will be used.
You can go over the other configuration options as listed on the link here.
Plugins
Most of the times, we need to interact with native features of our device to be embedded into our app. Cordova gives a very fluent and user-friendly API to achieve the same. Cordova has many plugins available to take care of normal use-cases:
1. Battery Status
2. Camera
3. Console
4. Contacts
5. Device
6. Device Orientation
7. File Transfer
8. GeoLocation
9. Network Information
To add a plugin to your application, you can do so by using a simple command:
1cordova plugin add plugin-name
The above listed are only some of the plugins available. You can see the whole list of available plugins and their working on the official documentation
Conclusion
In this article, we have covered how to create an Android application using Vue and Cordova. We have covered the configuration options necessary to get started, and the example above should help you fill in the gaps and give an overview of some of the other configuration options available to you.
The code is hosted on public Github repository. You can download it for educational purposes. How do you intend to use Cordova? Can you think of any advanced use cases? What are they? Let us know in the comments!


© 2026 Pusher Ltd. All rights reserved.
Pusher Limited is a company registered in England and Wales (No. 07489873) whose registered office is at MessageBird UK Limited, 3 More London Riverside, 4th Floor, London, United Kingdom, SE1 2AQ.