- Products

- Developers
- User stories
- Blog
- Pricing

CSRF in Laravel: how VerifyCsrfToken works and how to prevent attacks
Learn how Laravel's VerifyCsrfToken works, and how CSRF can secure your application against attacks. Build a simple demo app using Laravel and Vue.
Introduction
The technique(s) described in this article are for educational purposes only.
Cyber attacks are nothing new. From the early days of the internet there have been web attacks and the truth is they get more sophisticated every day. Some attacks are made to spy on users, some steal user data, some steal from users.
In this article, we are going to take a look at CSRF, a type of web attack where the attacker tries to hijack requests. In CSRF attacks, the attacker leverages already authenticated users and discreetly makes them send requests to the web server on their behalf. We will see how this is achieved and how Laravel provides you with the tools necessary to mitigate this attack.
Prerequisites
To follow this article you will need:
- Basic understanding of programming concepts.
- Laravel installer installed on your machine.
- Basic knowledge of PHP and the Laravel framework.
- Basic knowledge of the command line.
- SQLite installed on your machine.
What is CSRF?
CSRF stands for Cross Site Request Forgery and it’s a web attack that forces a user to make unintended requests to a web application where they are previously authenticated.
When building web applications, your server would usually be able to accept requests from any client provided the page exists, however, some pages on your server require authentication before being accessed.
A CSRF attack occurs when an authenticated user is tricked into interacting with a page or a script on a foreign website that generates a malicious request to your application server without the knowledge of the user; the server only sees a regular authenticated request and then processes it as normal but in the real sense of things, it is processing it on behalf of the attacker.
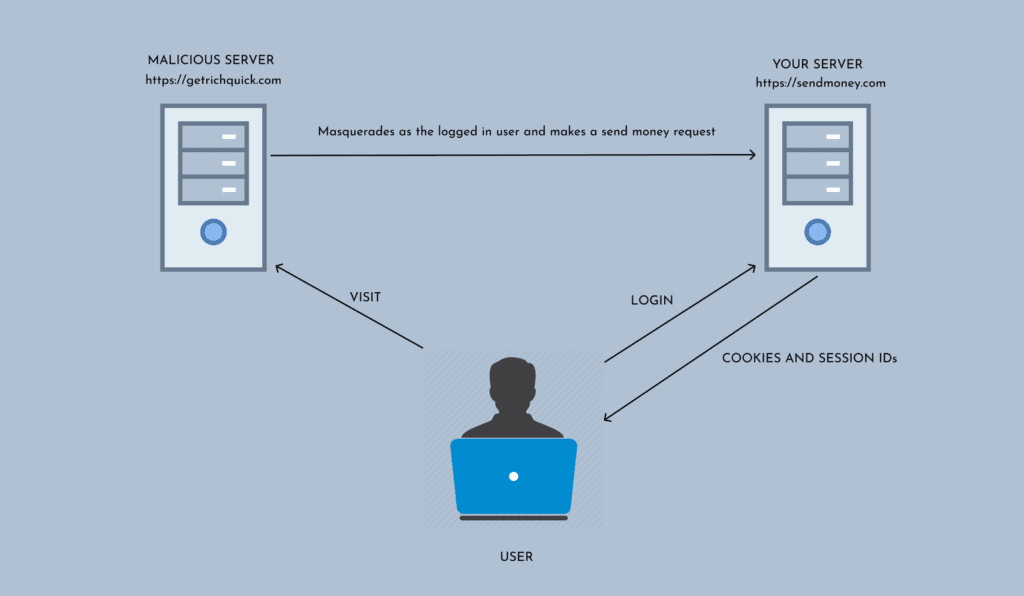
How is a CSRF attack carried out?
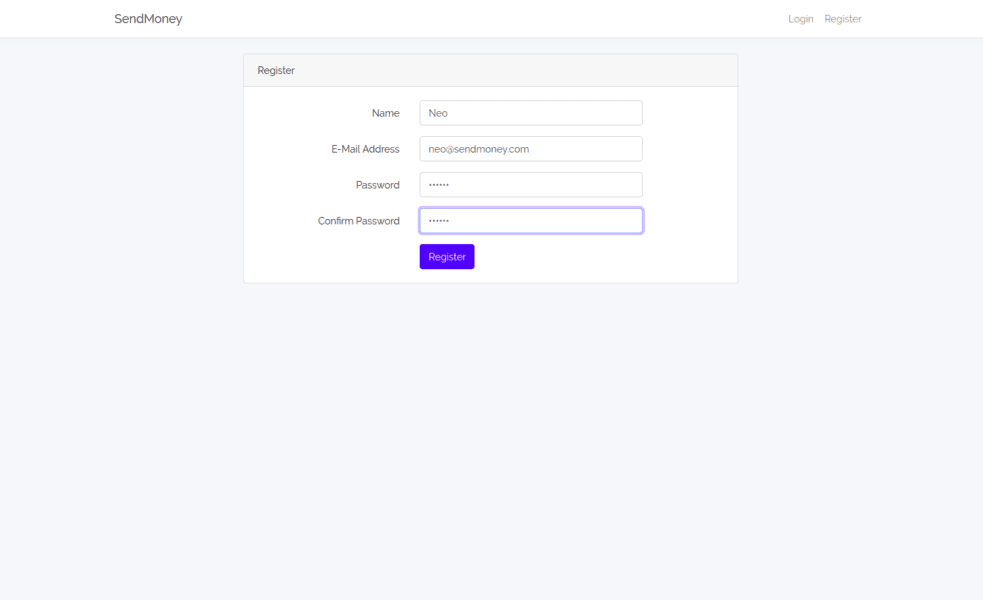
Assume you have an application that is used to send money to friends and for users to send money, they need to be signed in. Assume that the action to send money is also a simple form that looks like the image below:
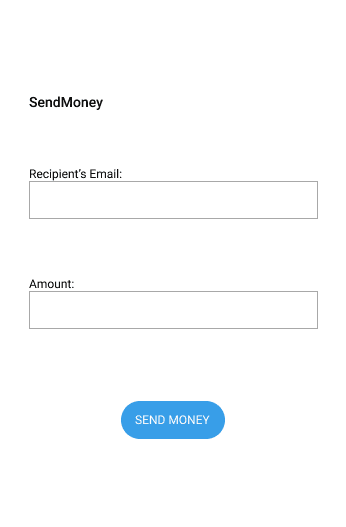
The make-believe form requires the email of the recipient and the amount to be sent. When the send button is clicked, a POST request is made to the application server to send the amount to the recipient.
Everything seems okay and during testing, logged in users can send money to other users, which is what is expected.
How the attack would work
An attacker who wants to hoodwink the system will very likely study the application for a while trying to locate vulnerabilities. They note the URL where the request is sent to and they know it needs to be a POST request with the email of the recipient and the amount you want to send.
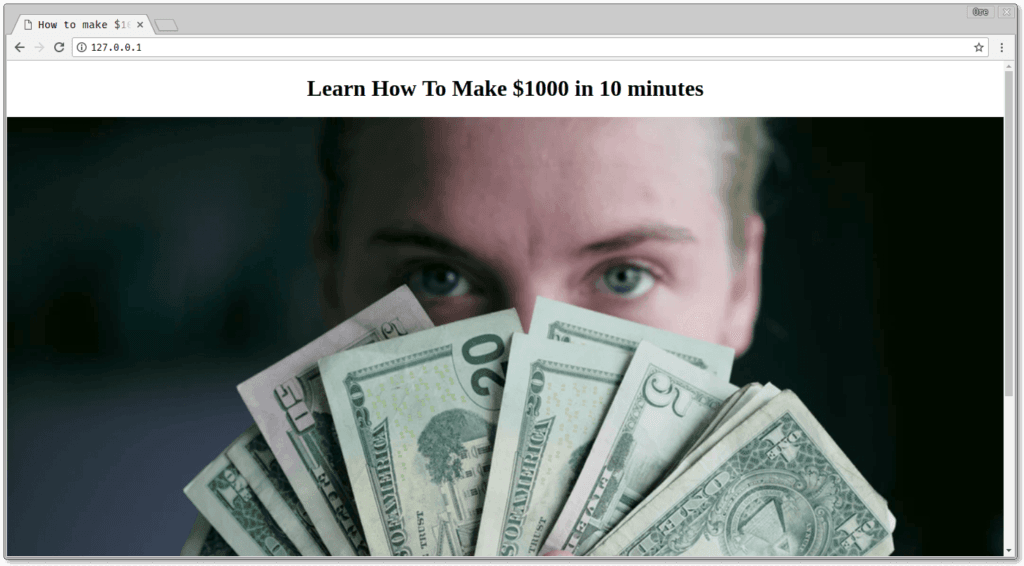
The attacker then creates a program that can be embedded in an image or in the webpage directly and executed when the image is clicked or executed when a link is clicked.
When the script is executed, the server sees it as another regular request made from the logged in user and then processes it. This means that everyone authenticated to the target site visiting the attacker’s site will be open to a CSRF attack and may indeed be sending money they didn’t intend to send.
Carrying out your own CSRF attack
Now, let’s look at how to do a simple CSRF attack on an application. CSRF attacks are more complex than these but for the sake of brevity, we will keep it simple. We are going to make a script that executes when a link is clicked. The script can be as simple as this HTML file
1<html> 2 <head> 3 <title>Sample Attacker</title> 4 </head> 5 <body> 6 7 <!-- interesting image/content --> 8 9 <script type="text/javascript"> 10 var xhttp = new XMLHttpRequest(); 11 xhttp.open("POST", "http://127.0.0.1:8000/sendmoney", true); 12 xhttp.setRequestHeader("Content-type", "application/x-www-form-urlencoded"); 13 xhttp.send("email=neo@sendmoney.com&amount=100"); 14 </script> 15 </body> 16 </html>
As seen above, the script is embedded in the page and is designed to not be detectable by the average user. It uses AJAX to make a POST request to a susceptible page and submit its form. Now all the user has to do is trick you into viewing the webpage and you’d be sending a request down to the website to send money to an attacker.
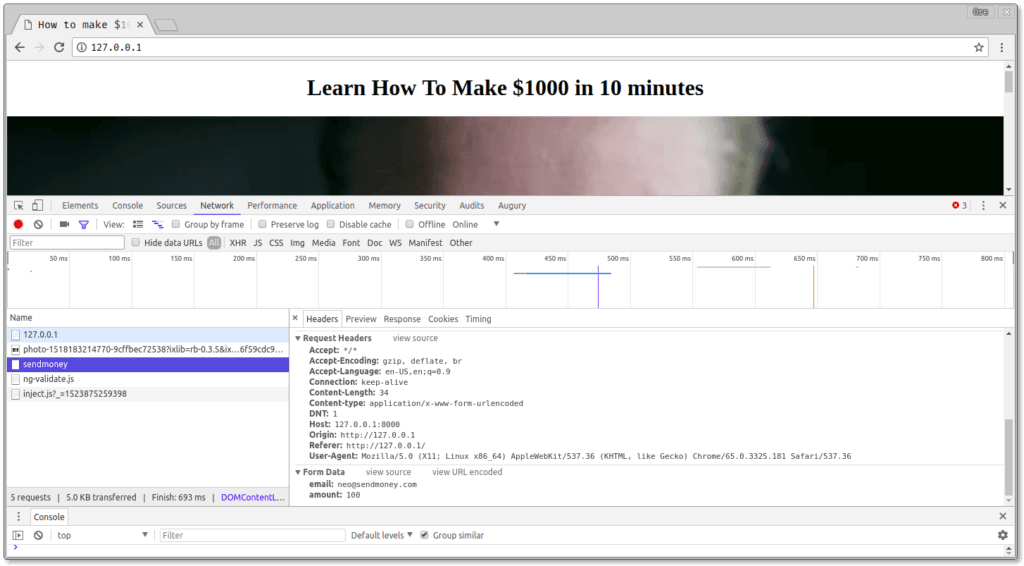
When the page loaded, the request was sent in the background to the server without the knowledge of the user for a money transfer to be processed.
How to protect your Laravel app from CSRF attacks
To protect your application, Laravel uses CSRF tokens. CSRF tokens are strings that are automatically generated and can be attached to a form when the form is created. They are used to uniquely identify forms generated from the server.
The idea behind it is that when the server receives POST requests, the server checks for a CSRF token. If the POST request has a token that matches the active existing CSRF token created by the framework, the form is processed. If not, the form is not processed and an error is sent back to the client making the request.
This token is also generated per request meaning it cannot be reused once it’s used once. Let’s see this in practice.
Creating a Laravel application
To show how to protect your application, let’s make a sample application that allows signed in users send money to friends. Create a new Laravel project by running the command:
1$ laravel new money-sender
Let’s set up authentication. Laravel comes with an optional Auth scaffold that we can use to set up authentication in minutes, let’s use that. Run the command below in the root of the Laravel project you created:
1$ php artisan make:auth
This generates all you will need to authenticate your user, the sign up page, login page, password reset page and a dashboard.
Open the HomeController generated from the Auth scaffolding and replace the contents with the following:
1<?php 2 3 namespace App\Http\Controllers; 4 5 use Illuminate\Http\Request; 6 use Illuminate\Support\Facades\Auth; 7 8 class HomeController extends Controller 9 { 10 public function __construct() 11 { 12 $this->middleware('auth'); 13 } 14 15 public function index() 16 { 17 $user = Auth::user(); 18 19 return view('home', ['user' => $user]); 20 } 21 }
Laravel comes with a User model in the application. Let’s update this. Open the app/User.php file where the User model class is stored and replace the contents with the following:
1<?php 2 3 namespace App; 4 5 use Illuminate\Notifications\Notifiable; 6 use Illuminate\Foundation\Auth\User as Authenticatable; 7 8 class User extends Authenticatable 9 { 10 use Notifiable; 11 12 protected $hidden = ['password', 'remember_token']; 13 14 protected $fillable = ['name', 'email', 'password', 'balance']; 15 16 public function charge(int $amount) 17 { 18 return $this->update(['balance' => $this->balance - $amount]); 19 } 20 21 public function grant(int $amount) 22 { 23 return $this->update(['balance' => $this->balance + $amount]); 24 } 25 26 }
Above we added two methods, first is charge which charges a user and grant which adds balance to a user.
Creating our application’s migrations
Migrations are a way to make and keep track of the changes made to the database your application is connected to. When you create a new Laravel application, you have a users table migration by default in your application.
Let’s update the migration to include a balance field. Open the create_users_table migration file in the database/migrations directory and replace the contents with the following:
1<?php 2 3 use Illuminate\Support\Facades\Schema; 4 use Illuminate\Database\Schema\Blueprint; 5 use Illuminate\Database\Migrations\Migration; 6 7 class CreateUsersTable extends Migration 8 { 9 public function up() 10 { 11 Schema::create('users', function (Blueprint $table) { 12 $table->increments('id'); 13 $table->string('name'); 14 $table->string('email')->unique(); 15 $table->string('password'); 16 $table->integer('balance')->default(5000); 17 $table->rememberToken(); 18 $table->timestamps(); 19 }); 20 } 21 22 public function down() 23 { 24 Schema::dropIfExists('users'); 25 } 26 }
The
up()function is called when this migration is run anddown()is called to revert changes made by theup()method.The user
balancewas set to 5000 by default for testing purposes of the application. This means that every user signing up has a balance of 5000.
Before we run the migration we need to connect our application to a database. In this article, we will be using SQLite. As part of the prerequisites mentioned earlier, you need SQLite installed on your machine.
Create a new empty file database.sqlite in the database directory.
Next, open the .env file in the root of your project and replace the following lines:
1DB_CONNECTION=mysql 2 DB_DATABASE=homestead 3 DB_USERNAME=username 4 DB_PASSWORD=password
With
1DB_CONNECTION=sqlite 2 DB_DATABASE=/full/path/to/database.sqlite
Run the command below in your terminal to start the database migration:
1$ php artisan migrate
Creating our application’s controller
To handle the send money action, create a new controller by running the command:
1$ php artisan make:controller SendMoneyController
This creates a new SendMoneyController file in your app/Http/Controllers directory. Open this file and replace the contents with the following:
1<?php 2 3 namespace App\Http\Controllers; 4 5 use App\User; 6 use Illuminate\Http\Request; 7 8 class SendMoneyController extends Controller 9 { 10 public function __construct() 11 { 12 $this->middleware('auth'); 13 } 14 15 public function send(Request $request) 16 { 17 $data = $request->validate([ 18 'email' => 'required|email', 19 'amount' => 'required|numeric' 20 ]); 21 22 $sender = auth()->user(); 23 $recipient = User::where('email', $data['email'])->first(); 24 25 $sender->charge($data['amount']); 26 $recipient->grant($data['amount']); 27 28 return redirect()->action('HomeController@index') 29 ->withStatus("${$data['amount']} sent to {$recipient->name}"); 30 } 31 }
When a request is received, the controller validates the request parameters, then the transfer is made.
Creating the send form
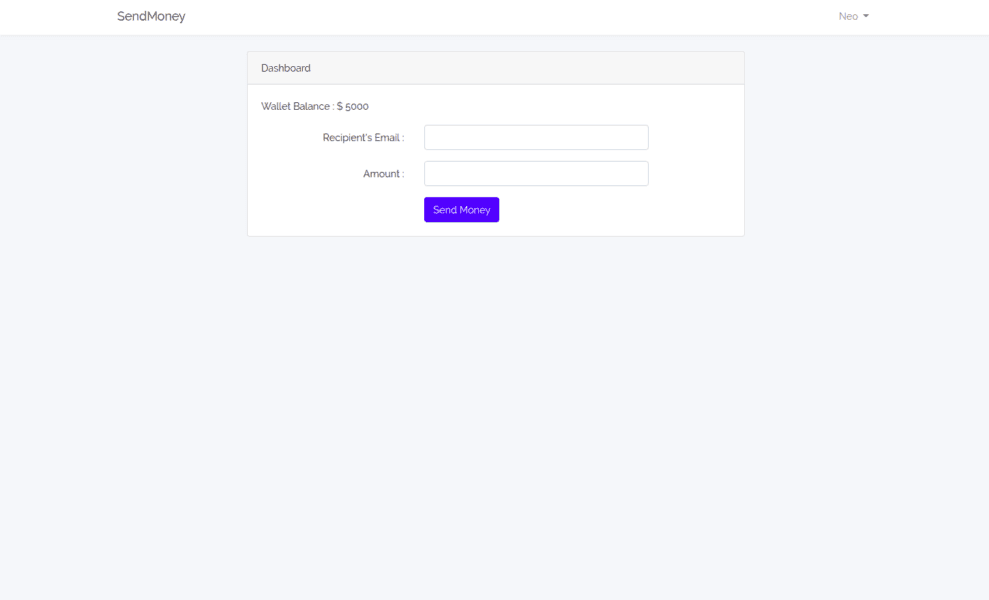
Let’s create the form to send money. Open the resources/views/home.blade.php file and replace the contents with he following:
1@extends('layouts.app') 2 @section('content') 3 <div class="container"> 4 <div class="row justify-content-center"> 5 <div class="col-md-8"> 6 <div class="card"> 7 <div class="card-header">Dashboard</div> 8 <div class="card-body"> 9 @if (session('status')) 10 <div class="alert alert-success"> 11 {{ session('status') }} 12 </div> 13 @endif 14 <p>Wallet Balance : $ {{ $user->balance}}</p> 15 <form action="{{ url('/sendmoney')}}" method="post"> 16 <div class="form-group row"> 17 <label for="email" class="col-md-4 col-form-label text-md-right">Recipient's Email :</label> 18 <div class="col-md-6"> 19 <input id="email" type="email" class="form-control" name="email" required autofocus> 20 </div> 21 </div> 22 <div class="form-group row"> 23 <label for="amount" class="col-md-4 col-form-label text-md-right">Amount :</label> 24 <div class="col-md-6"> 25 <input id="amount" type="numeric" class="form-control" name="amount" required autofocus> 26 </div> 27 </div> 28 <div class="form-group row mb-0"> 29 <div class="col-md-6 offset-md-4"> 30 <button type="submit" class="btn btn-primary"> 31 Send Money 32 </button> 33 </div> 34 </div> 35 </form> 36 </div> 37 </div> 38 </div> 39 </div> 40 </div> 41 @endsection
Above we have the view for the dashboard for a logged in user.
Using the CSRF token
Laravel already prevents itself from CSRF attacks by default whether you do anything or not. So, if you make a request without adding the CSRF Token, the request will be rejected.
If you go to the file app/Http/Kernel.php you will see the VerifyCsrfToken middleware defined:
1<?php 2 3 [...] 4 5 class Kernel extends HttpKernel 6 { 7 [...] 8 9 protected $middlewareGroups = [ 10 'web' => [ 11 [...] 12 \App\Http\Middleware\VerifyCsrfToken::class, 13 [...] 14 ], 15 16 [...] 17 ]; 18 19 [...] 20 }
If you go to the app/Providers/RouteServiceProvider.php file you’ll see that in the mapWebRoutes() method the web group middleware is added to all web routes. This means that by default Laravel will check for a valid CSRF token using the VerifyCsrfToken class.
? You can disable this functionality by commenting out the
VerifyCsrfTokenclass from the list of classes in themiddlewareGroupsarray in theapp/Http/Kernel.phpfile.
Back to our example form, if you fill the form and hit the Send Money button, you’ll get an error page because the CSRF token is missing. To add the CSRF token to the form, you need to update the home.blade.php to add a @csrf blade directive as seen below:
1[...] 2 <form action="{{ url('/sendmoney')}}" method="post"> 3 @csrf 4 [...] 5 </form> 6 [...]
? Blade directives are defined shortcuts or functions which expand to longer functions. It can help us abstract logic away from the blade views. Read more about blade directives.
When the @csrf blade directive is used, an input tag of type='hidden``' is added to the form. The value will be the CSRF token which will be sent as part of the form data when the form is submitted.
How the VerifyCsrfToken works
When a POST request is made, the VerifyCSRFToken middleware handles the request. This middleware is a part of Laravel and its class extension is defined here: app/Http/Middleware/VerifyCsrfToken.php.
1<?php 2 3 namespace App\Http\Middleware; 4 5 use Illuminate\Foundation\Http\Middleware\VerifyCsrfToken as Middleware; 6 7 class VerifyCsrfToken extends Middleware 8 { 9 /** 10 * The URIs that should be excluded from CSRF verification. 11 * 12 * @var array 13 */ 14 protected $except = [ 15 // 16 ]; 17 }
We can see from the above, that is VerifyCsrfToken class extends the Illuminate\Foundation\Http\Middleware\VerifyCsrfToken class. This is where the full logic for the VerifyCsrfToken token is defined.
Let’s take a quick look at a couple of methods in it to see how it works.
1[...] 2 /** 3 * Handle an incoming request. 4 * 5 * @param \Illuminate\Http\Request $request 6 * @param \Closure $next 7 * @return mixed 8 * 9 * @throws \Illuminate\Session\TokenMismatchException 10 */ 11 public function handle($request, Closure $next) 12 { 13 if ( 14 $this->isReading($request) || 15 $this->runningUnitTests() || 16 $this->inExceptArray($request) || 17 $this->tokensMatch($request) 18 ) { 19 return $this->addCookieToResponse($request, $next($request)); 20 } 21 throw new TokenMismatchException; 22 } 23 [...]
The method handle() takes the incoming request and checks if:
- The incoming request is a
POSTrequest. - The request was not generated from a unit test.
- The route visited was not exempted by the developer in the
exceptarray. - The token is correct.
If all these criteria are not met, then a TokenMismatchException is raised and is sent to the user.
Custom CSRF token error handling
The error Laravel returns is not quite ideal for many applications and you may want to display a custom error page. To do this, you will need to update the render() method in the app/Exceptions/Handler.php file. This file as the name suggests handles exceptions in your application.
Update the render() method as seen below:
1[...] 2 3 public function render($request, Exception $exception) 4 { 5 if( $exception instanceof TokenMismatchException){ 6 return response() 7 ->view('errors.401', ['error' => 'Page expired, go back and try again'], 401); 8 } 9 10 return parent::render($request, $exception); 11 } 12 13 [...]
Above we checked if the exception being handled is TokenMismatchException and override the response first before Laravel does.
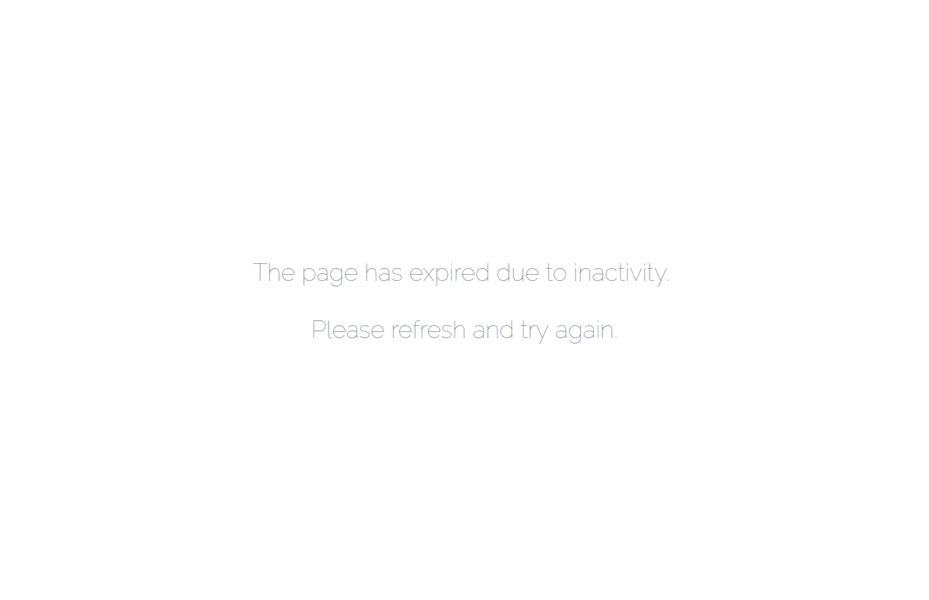
Create the error view file 401.blade.php in the resources/views/errors directory and add the code below:
1@extends('layouts.app') 2 3 @section('content') 4 <div class="container"> 5 <div class="row justify-content-center"> 6 <div class="col-md-8"> 7 <div class="card"> 8 <div class="card-header">Error</div> 9 <div class="card-body"> 10 @if ($error) 11 <div class="alert alert-danger"> 12 {{ $error }} 13 </div> 14 @endif 15 </div> 16 </div> 17 </div> 18 </div> 19 </div> 20 @endsection
Now, when a request is made without a CSRF Token, this is the result:
Looks a lot better.
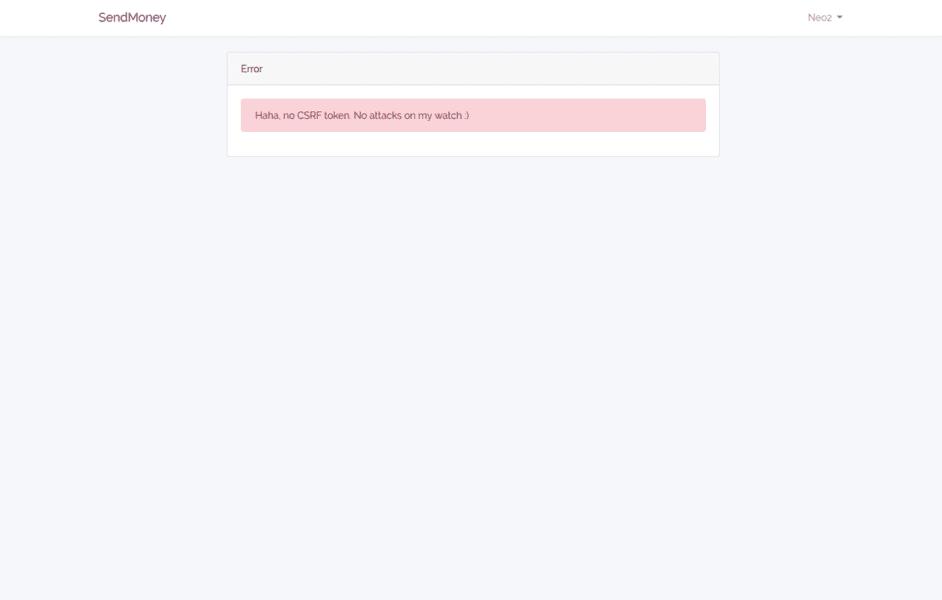
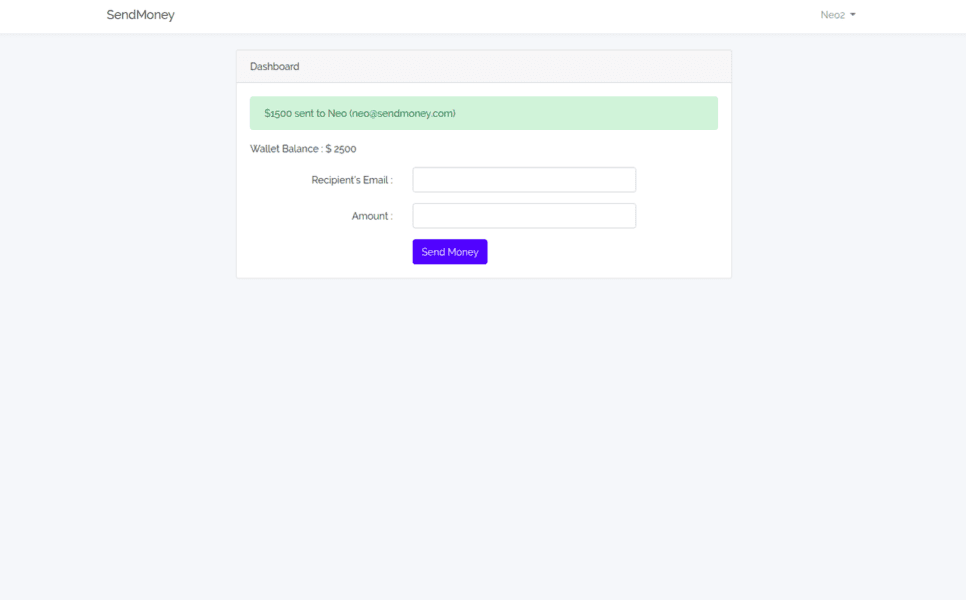
When the CSRF token is added to the view and money is sent, we get the response:
Conclusion
In this article, we took a critical look at CSRF attacks, the damage they can cause if not checked and how to prevent CSRF attacks in your Laravel applications.
The source code for this article is available on Github.


© 2026 Pusher Ltd. All rights reserved.
Pusher Limited is a company registered in England and Wales (No. 07489873) whose registered office is at MessageBird UK Limited, 3 More London Riverside, 4th Floor, London, United Kingdom, SE1 2AQ.