- Products

- Developers
- User stories
- Blog
- Pricing

Creating your first Facebook Messenger bot
Create a skeleton for a Facebook Messenger bot using Lumen and PHP and have it respond with a hard-coded message.
Introduction
This blog post was written under the Pusher Guest Writer program.
When Facebook announced its Messenger bot platform, I am sure a lot of developers could easily see how well the platform could work for them. This article is going to be a guide on how you can easily create your own Facebook Messenger bot.
The bot will basically be a webhook that responds to queries submitted to it. Anytime someone sends your Facebook Page a message, it will respond appropriately with what you want it to respond with. This article will cover mainly how to create the bot and have it respond with a hard-coded message. How you get it to be smarter is up to you.
Getting started
We are going to be creating the bot using the popular PHP framework, Lumen which is basically a light version of Laravel. However, since Facebook communicates to your webhook using HTTP, you can use any language and any framework you wish to use, provided you can receive and send requests.
Setting up your code
To start a new Lumen project, you need to use lumen new projectname, then open the code in your favorite editor.
We want to create one endpoint but two methods that respond to the endpoint depending on the HTTP request type: one for GET and one for POST. The GETwould be used to verify with Facebook that you indeed own the domain and have appropriate access, while the POST would be used to respond to the messages sent to your bot.
Open the routes definition file (./routes/web.php) and add the following routes:
1$app->get('/webhook', 'BotController@verify_token'); 2$app->post('/webhook', 'BotController@handle_query');
Now we need to create the BotController where we will define the methods. Create a ./app/Http/Controllers/BotController.php file and copy in the contents:
1<?php 2 3namespace App\Http\Controllers; 4 5use Illuminate\Http\Request; 6 7class BotController extends Controller { 8 9 /** 10 * The verification token for Facebook 11 * 12 * @var string 13 */ 14 protected $token; 15 16 public function __construct() 17 { 18 $this->token = env('BOT_VERIFY_TOKEN'); 19 } 20 21 /** 22 * Verify the token from Messenger. This helps verify your bot. 23 * 24 * @param Request $request 25 * @return \Illuminate\Http\Response|\Laravel\Lumen\Http\ResponseFactory 26 */ 27 public function verify_token(Request $request) 28 { 29 $mode = $request->get('hub_mode'); 30 $token = $request->get('hub_verify_token'); 31 32 if ($mode === "subscribe" && $this->token and $token === $this->token) { 33 return response($request->get('hub_challenge')); 34 } 35 36 return response("Invalid token!", 400); 37 } 38 39 /** 40 * Handle the query sent to the bot. 41 * 42 * @param Request $request 43 * @return \Illuminate\Http\Response|\Laravel\Lumen\Http\ResponseFactory 44 */ 45 public function handle_query(Request $request) 46 { 47 $entry = $request->get('entry'); 48 49 $sender = array_get($entry, '0.messaging.0.sender.id'); 50 // $message = array_get($entry, '0.messaging.0.message.text'); 51 52 $this->dispatchResponse($sender, 'Hello world. You can customise my response.'); 53 54 return response('', 200); 55 } 56 57 /** 58 * Post a message to the Facebook messenger API. 59 * 60 * @param integer $id 61 * @param string $response 62 * @return bool 63 */ 64 protected function dispatchResponse($id, $response) 65 { 66 $access_token = env('BOT_PAGE_ACCESS_TOKEN'); 67 $url = "https://graph.facebook.com/v2.6/me/messages?access_token={$access_token}"; 68 69 $data = json_encode([ 70 'recipient' => ['id' => $id], 71 'message' => ['text' => $response] 72 ]); 73 74 $ch = curl_init($url); 75 curl_setopt($ch, CURLOPT_POST, 1); 76 curl_setopt($ch, CURLOPT_POSTFIELDS, $data); 77 curl_setopt($ch, CURLOPT_HTTPHEADER, ['Content-Type: application/json']); 78 $result = curl_exec($ch); 79 curl_close($ch); 80 81 return $result; 82 } 83}
Let us explain a little what is happening in the class above:
In the constructor, we have defined the token we will be using for the requests we will be making. We will set this value later in our .env file. The verify_token method is where we will be verifying the token sent to us by the Messenger API. Facebook will be sending us a hub_verify_token in the payload and we will compare this to the token we have set locally. If there is a match, we will return the hub_challenge sent from the API.
The handle_query will be the method that receives the messages sent to the chat bot and responds. This is where most of the logic should be done. The method uses a dispatchResponse method to send a POST request to the Messenger API.
Now you need to create an .env file in the root of the project. This is where we will store the secret credentials.
1APP_ENV=local 2APP_DEBUG=true 3APP_KEY= 4APP_TIMEZONE=UTC 5 6BOT_VERIFY_TOKEN="INSERT_TOKEN_HERE" 7BOT_PAGE_ACCESS_TOKEN="INSERT_ACCESS_TOKEN_HERE" 8 9DB_CONNECTION=mysql 10DB_HOST=127.0.0.1 11DB_PORT=3306 12DB_DATABASE=homestead 13DB_USERNAME=homestead 14DB_PASSWORD=secret 15 16CACHE_DRIVER=file 17QUEUE_DRIVER=sync
You can add a random value to BOT_VERIFY_TOKEN now but the BOT_PAGE_ACCESS_TOKEN will be provided to you by Facebook later. Close the file. That’s all for now.
Exposing your application to the web
Now we have created the application but we can only access it locally, however, Facebook requires that you must have a web accessible URL and also it must have HTTPS. We therefore have to expose our current application to the web so the Facebook verifier can access the page.
To expose the application to the internet, we will be using a tool called ngrok. This tool will basically tunnel your localhost so that it is available to the world. Neat. Since we are using Lumen, we are going to be using Valet which is a light web server and it comes with ngrok installed. So, we would start our web server if not already started, then share it using Valet.
1$ valet link projectname 2$ valet share
The valet link command just makes it so you can access your project with the projectname.dev locally and the valet share command just uses ngrok to tunnel your local server to the world.
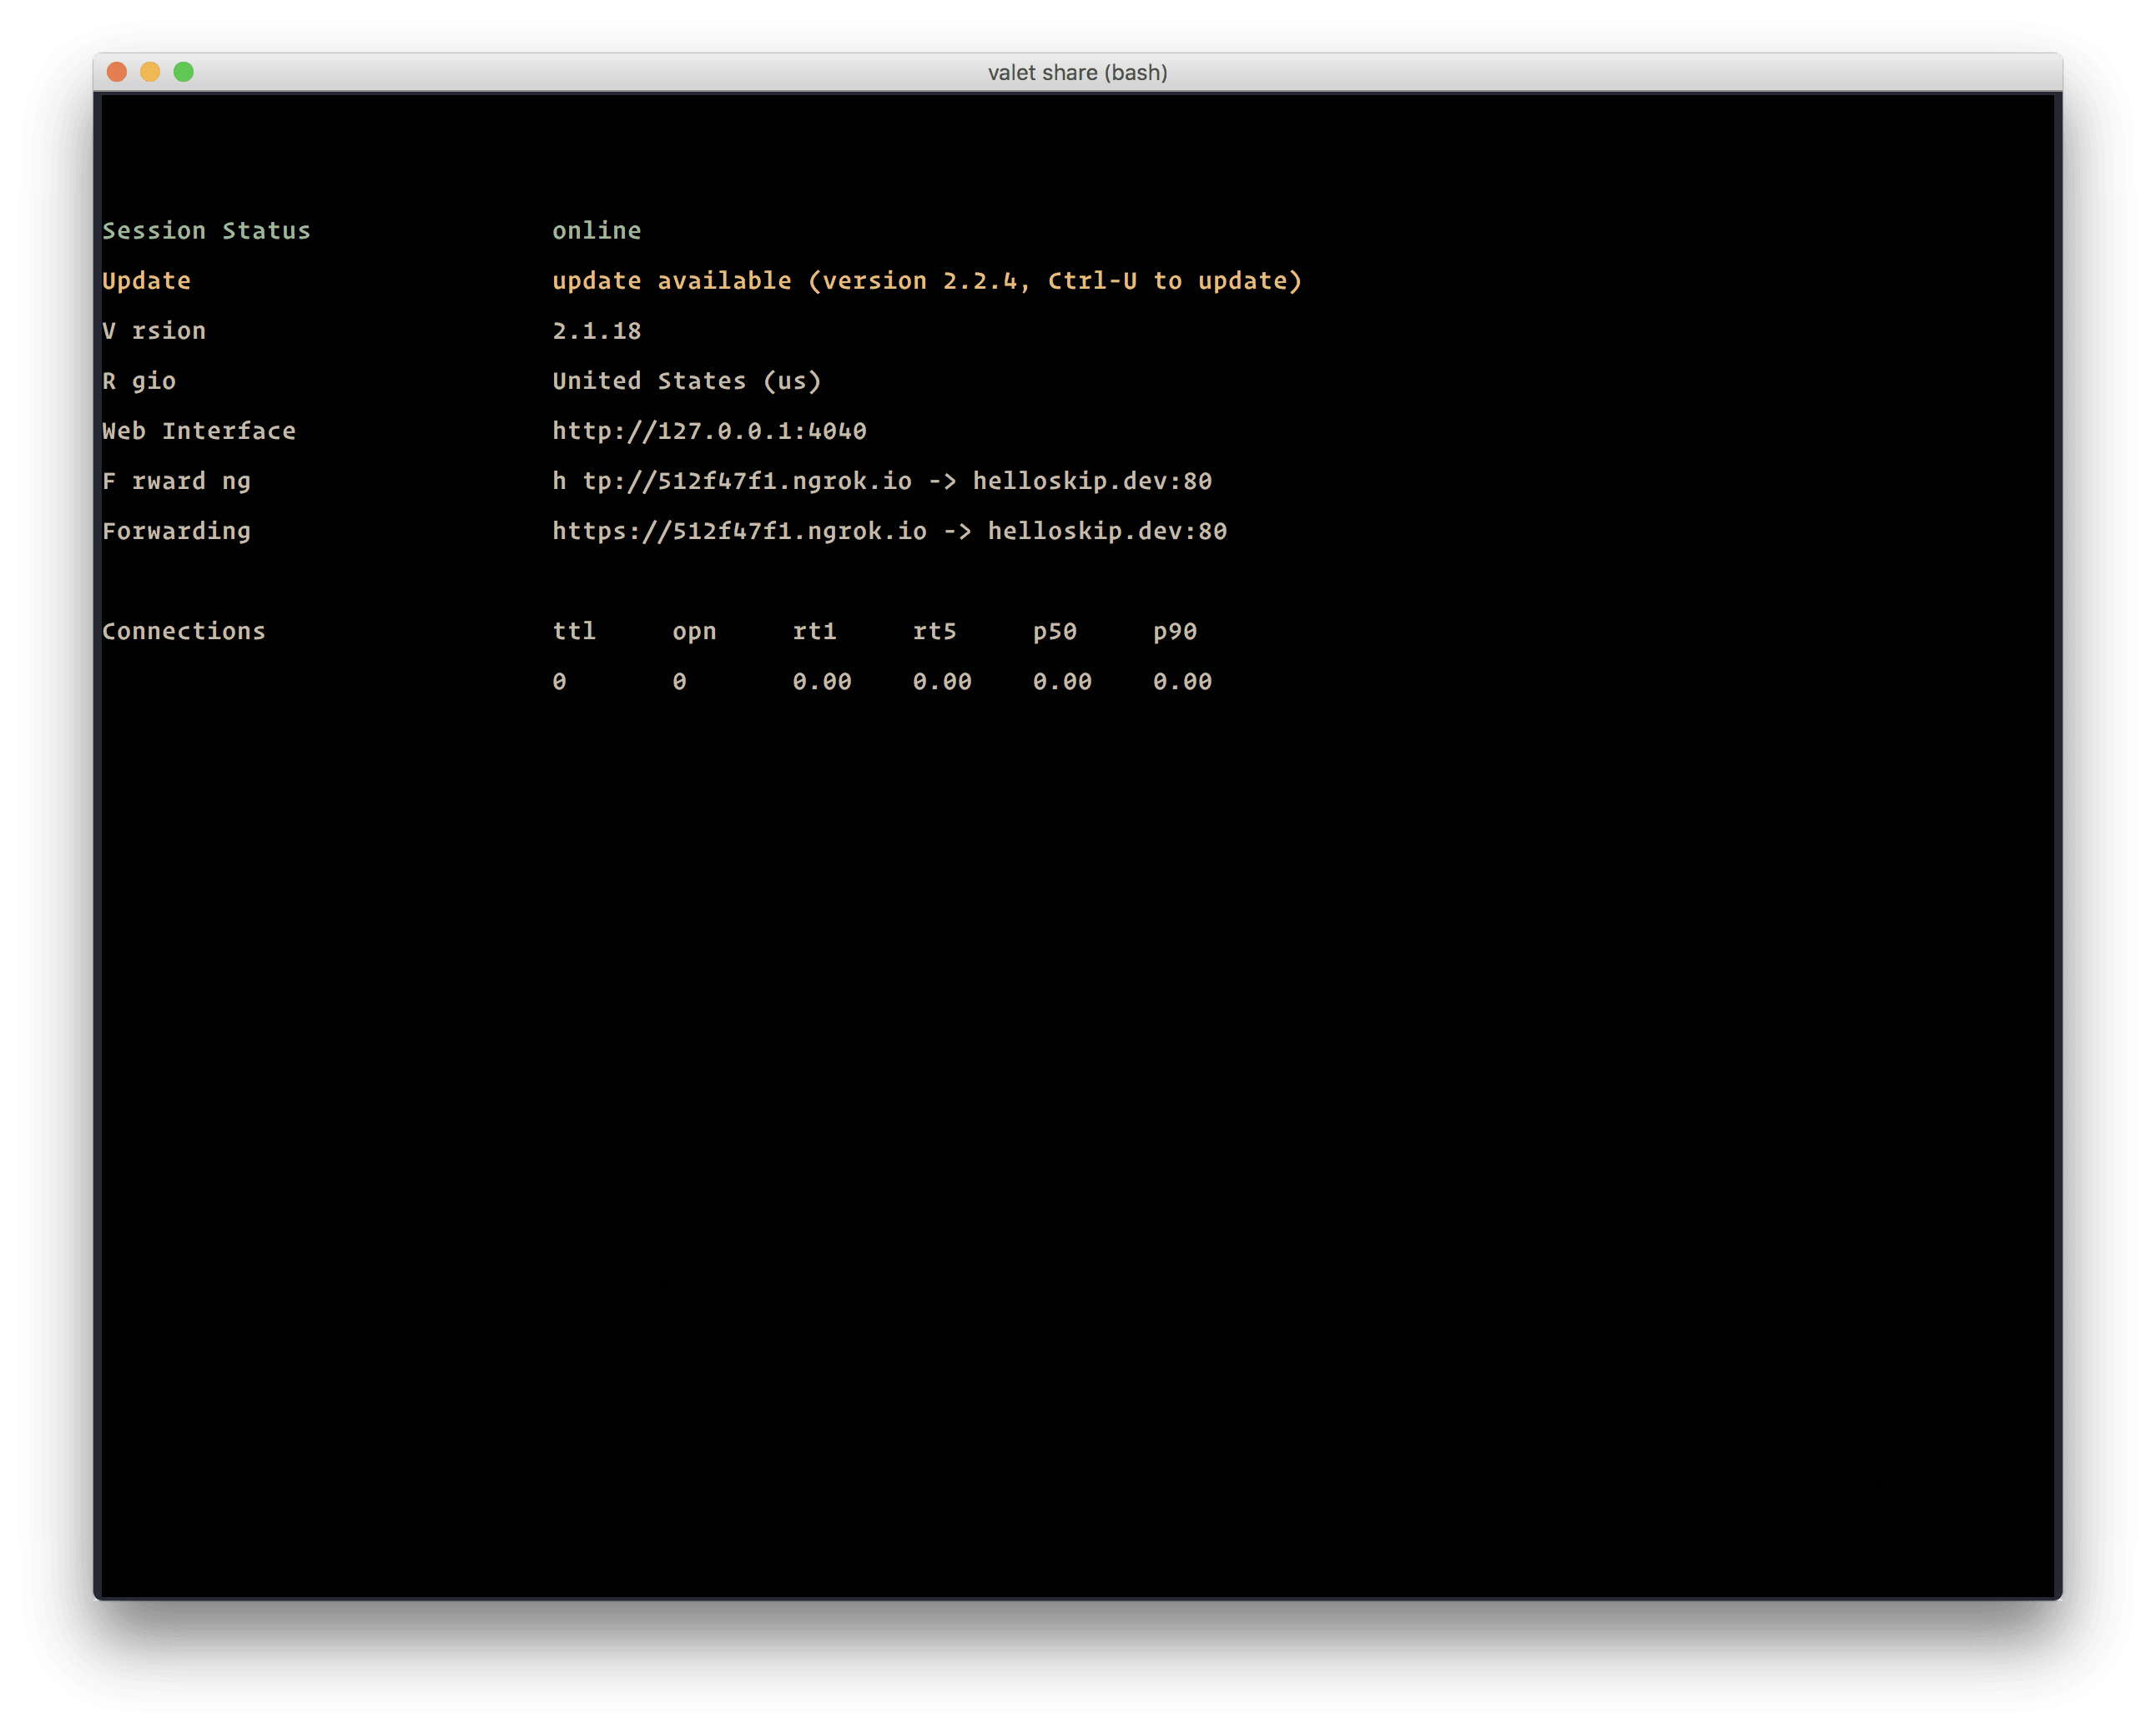
Now if we visit the URL that ngrok has provided us we should see our application running. Cool.
Note: To stop ngrok, press ctrl+c on your keyboard. However, running the
valet sharecommand will generate another random url for you by default.
Create a Facebook App and Page
The first step would be to create a Facebook App and page or you can use existing ones. If you are going to be creating a new page then go here and start creating a new Facebook Page.
Once you have created your page, you now need to create an application for your Page. Go to Facebook Developers. Look for a link that helps you create a new application. Then you can fill the form to create your Facebook application. Great.
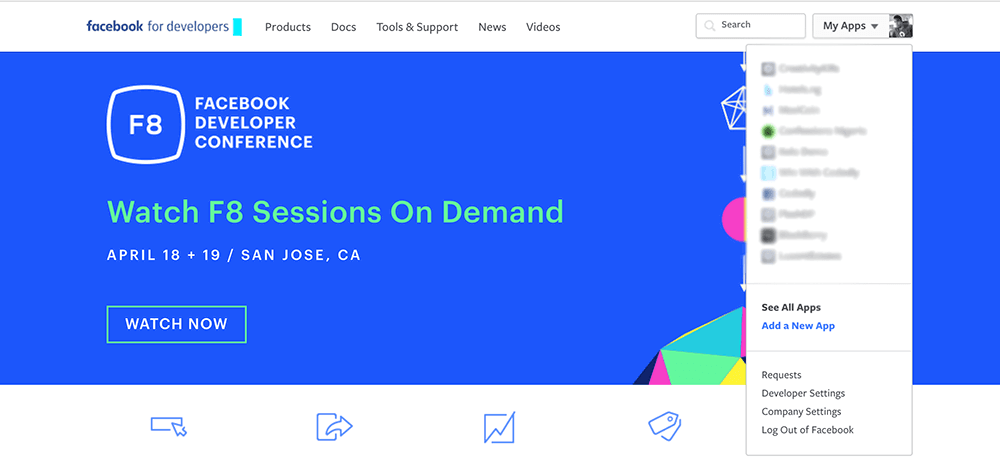
Now in the pop up fill in the details of the application you want to create. You should be redirected to the ****App Dashboard**** of the application you just added. In there, go to the Product Settings, click “Add Product” and select “Messenger.”.
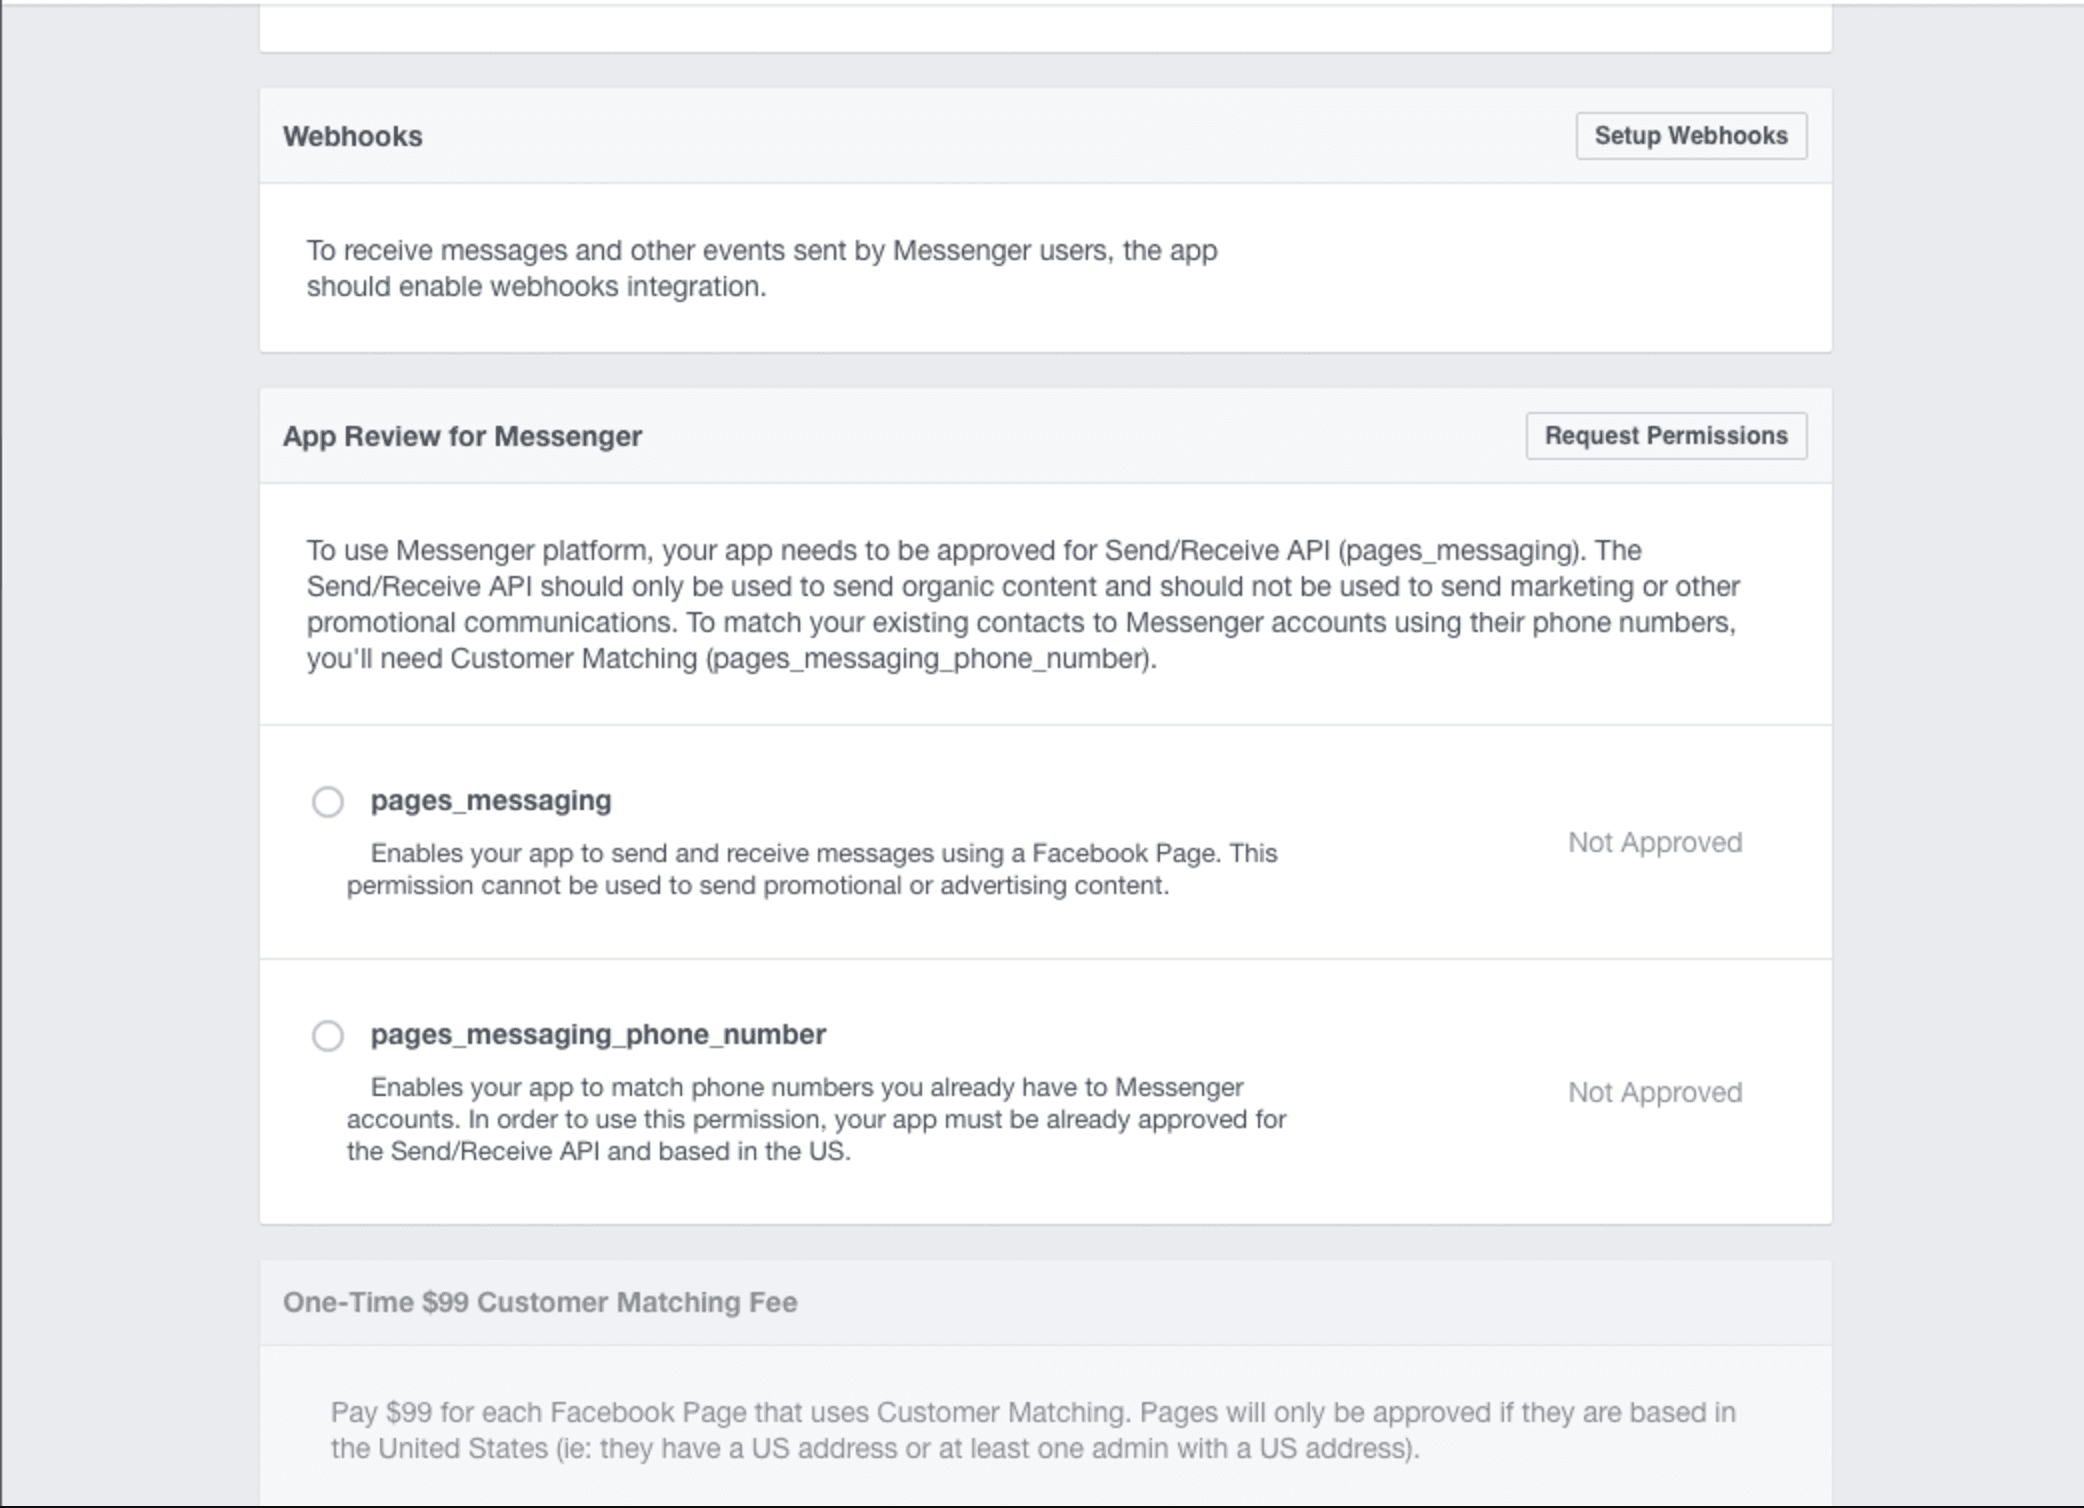
Setting up your Facebook Messenger webhooks
Now, click on “Setup Webhooks”, it should be an option available to you.
You should see a new pop up:
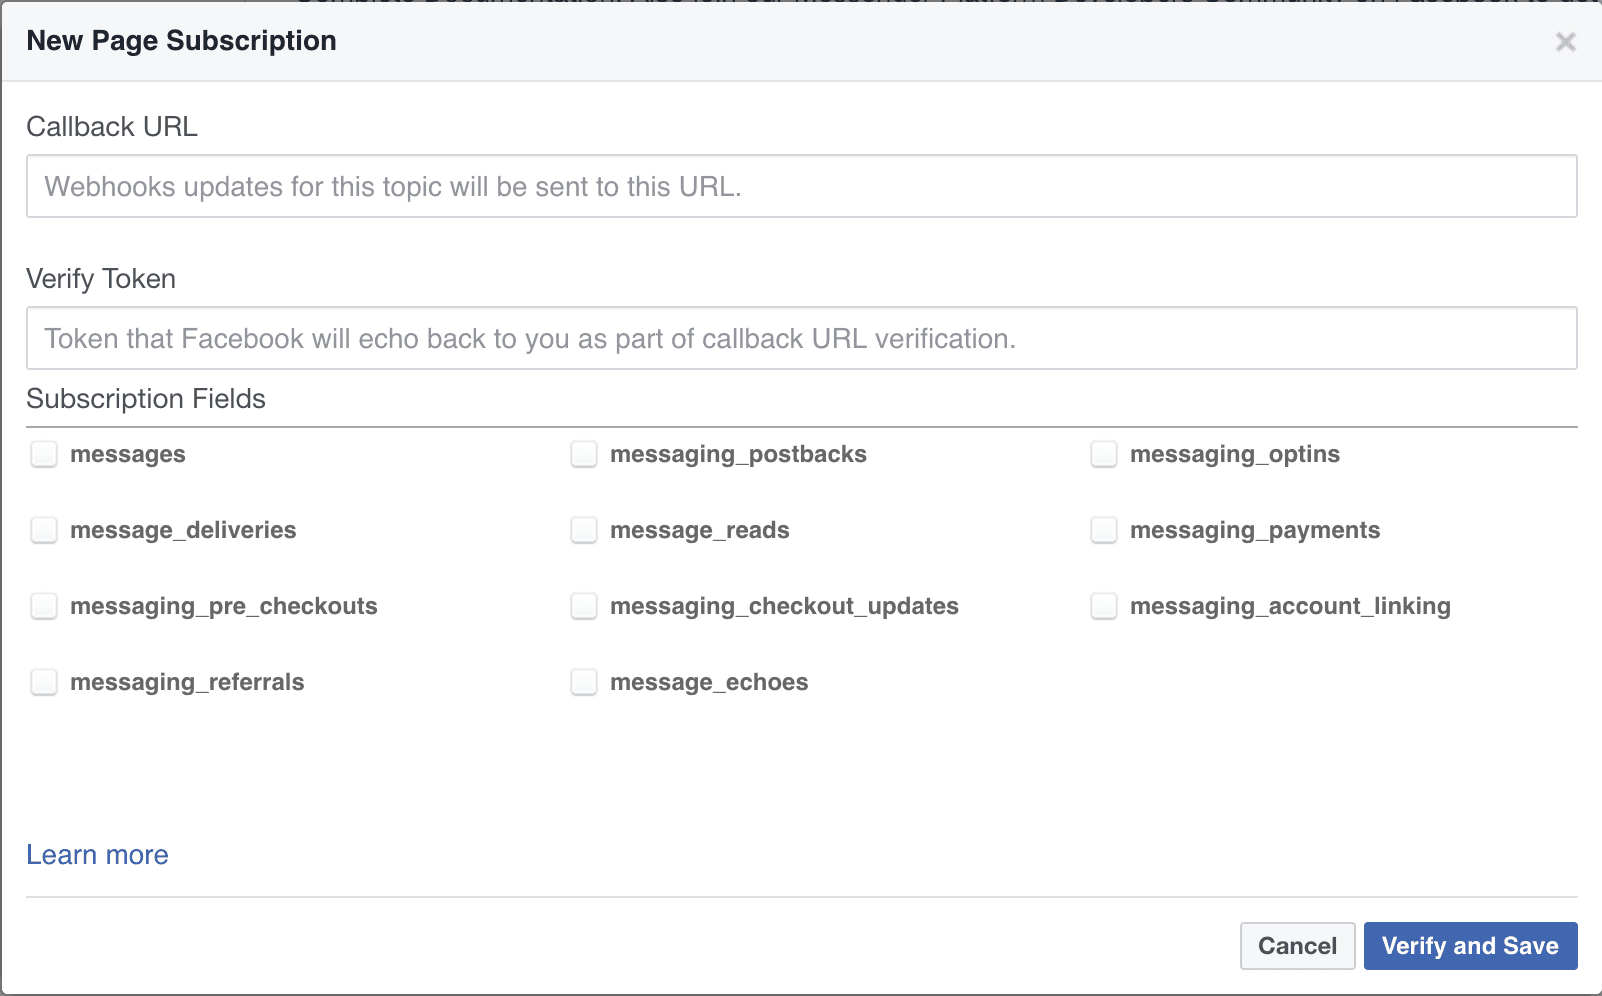
In the popup, enter a URL for a webhook (for example, we can use our ngrok URL as the webhook; the one provided in the screenshot was https://512f47f1.ngrok.io/webhook). Now, enter the verify token that you added to your .env file earlier, then select messages and messaging_postbacks under Subscription Fields.
For your webhook URL, use the URL that ngrok provided (the HTTPS version). Click Verify and Save in the New Page Subscription to call your webhook with a GET request. Your webhook should respond with the hub_challenge provided by Facebook if the hub_verify_token provided matches with the one stored on your server.
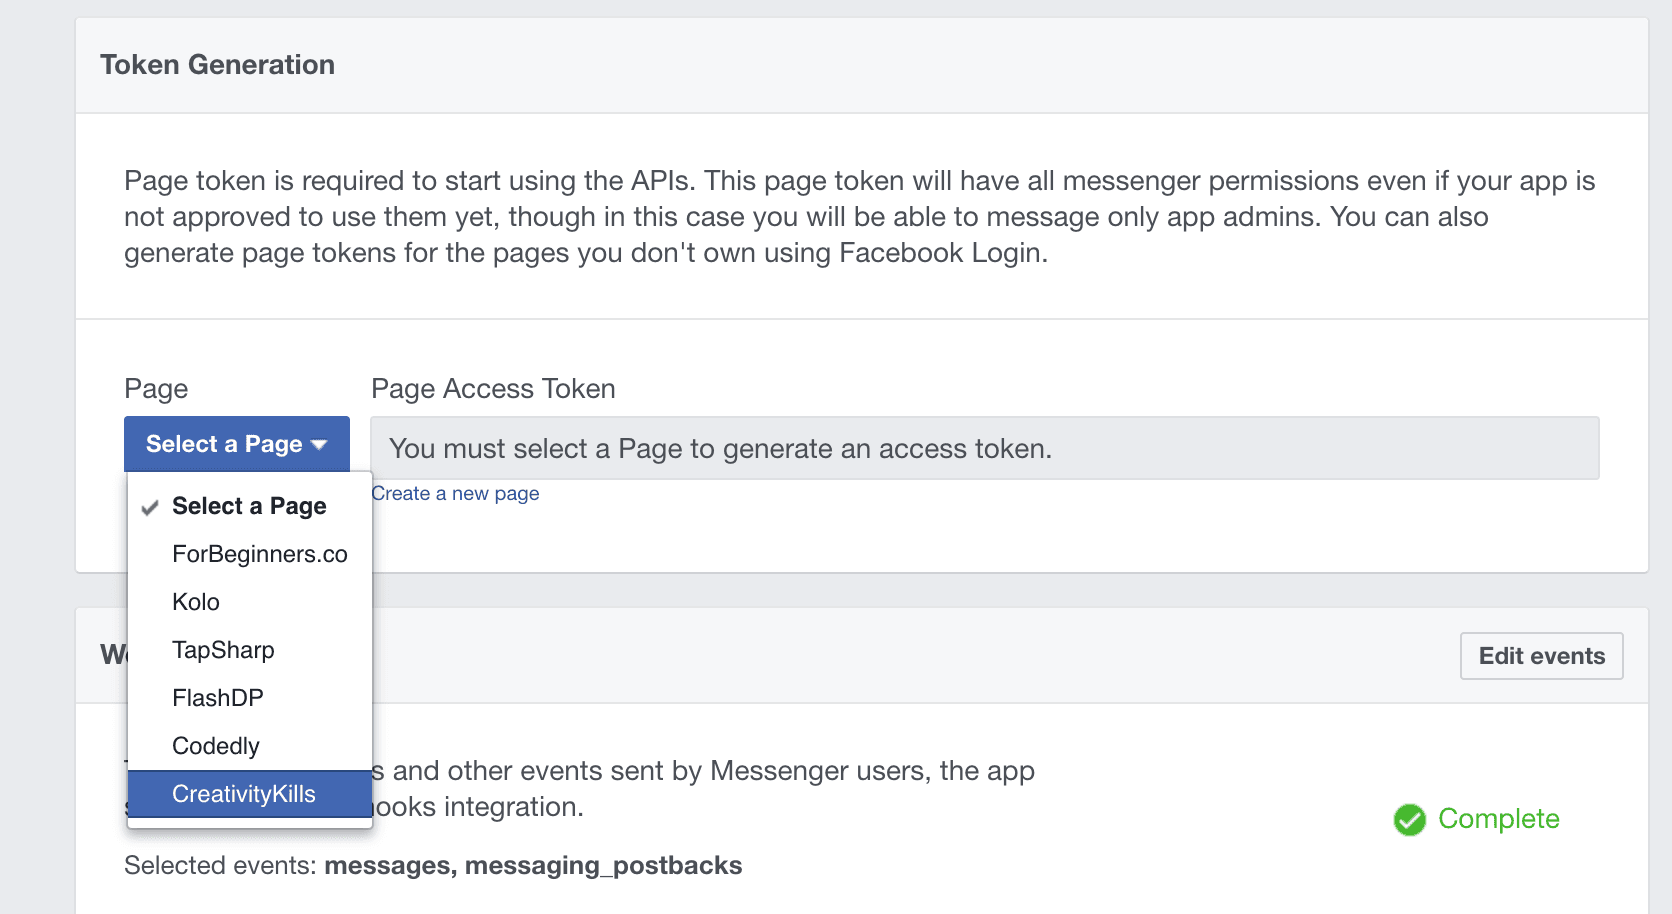
Get a Page Access Token
To get an access token, one that you will add to the BOT_PAGE_ACCESS_TOKENvalue in your .env file, use the Token Generation section of the Messenger settings page. Select the page you want to authorize and then follow the prompt and grant the application permission if you haven’t already. The page should now display an access token; take this and set it in the .env file.
Get a Page Access Token
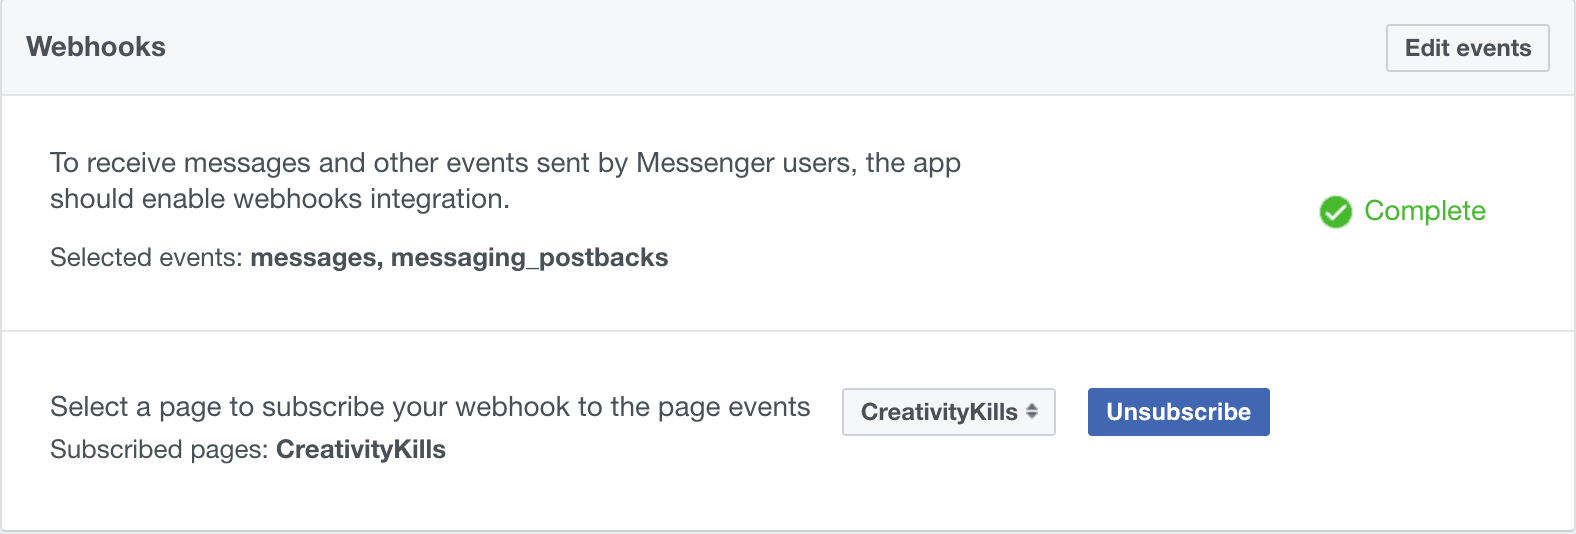
Now we need to subscribe to the Messenger events so that when they happen, Facebook will send us a payload with the details we need to process the event query. Click on select a page in the Webhooks section of the Messenger settings page, select the page and select the events you would like to subscribe to. You can always edit the events you are subscribed to at any time.
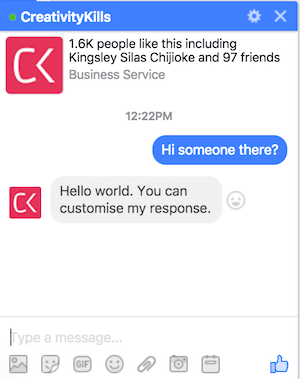
Testing it out
Now that you have completed the set up of your messenger bot, head on over to your page and then in the page, send the bot a message. If you have done everything correctly, you should receive a response from the bot.
Conclusion
We have been able to create the skeleton for a Facebook messenger bot using PHP. This barely scratches the surface of what your new Messenger bot can actually do. For exercise, try to use the wit.ai service to create a smarter bot for your page.
If you have any questions or feedbacks on the article, please leave them as a comment below. You can find the source code to the article on GitHub.


© 2026 Pusher Ltd. All rights reserved.
Pusher Limited is a company registered in England and Wales (No. 07489873) whose registered office is at MessageBird UK Limited, 3 More London Riverside, 4th Floor, London, United Kingdom, SE1 2AQ.