- Products

- Developers
- User stories
- Blog
- Pricing

Create an anonymous public iOS chat app
In this article we are going to demonstrate how to create a public anonymous chat application on iOS.
Introduction
In this article we are going to demonstrate how to create a public anonymous chat application on iOS. This will hopefully show you how easy it can actually be to create your very own chat application and also how you can use Pusher to integrate some real-time functionality into it.
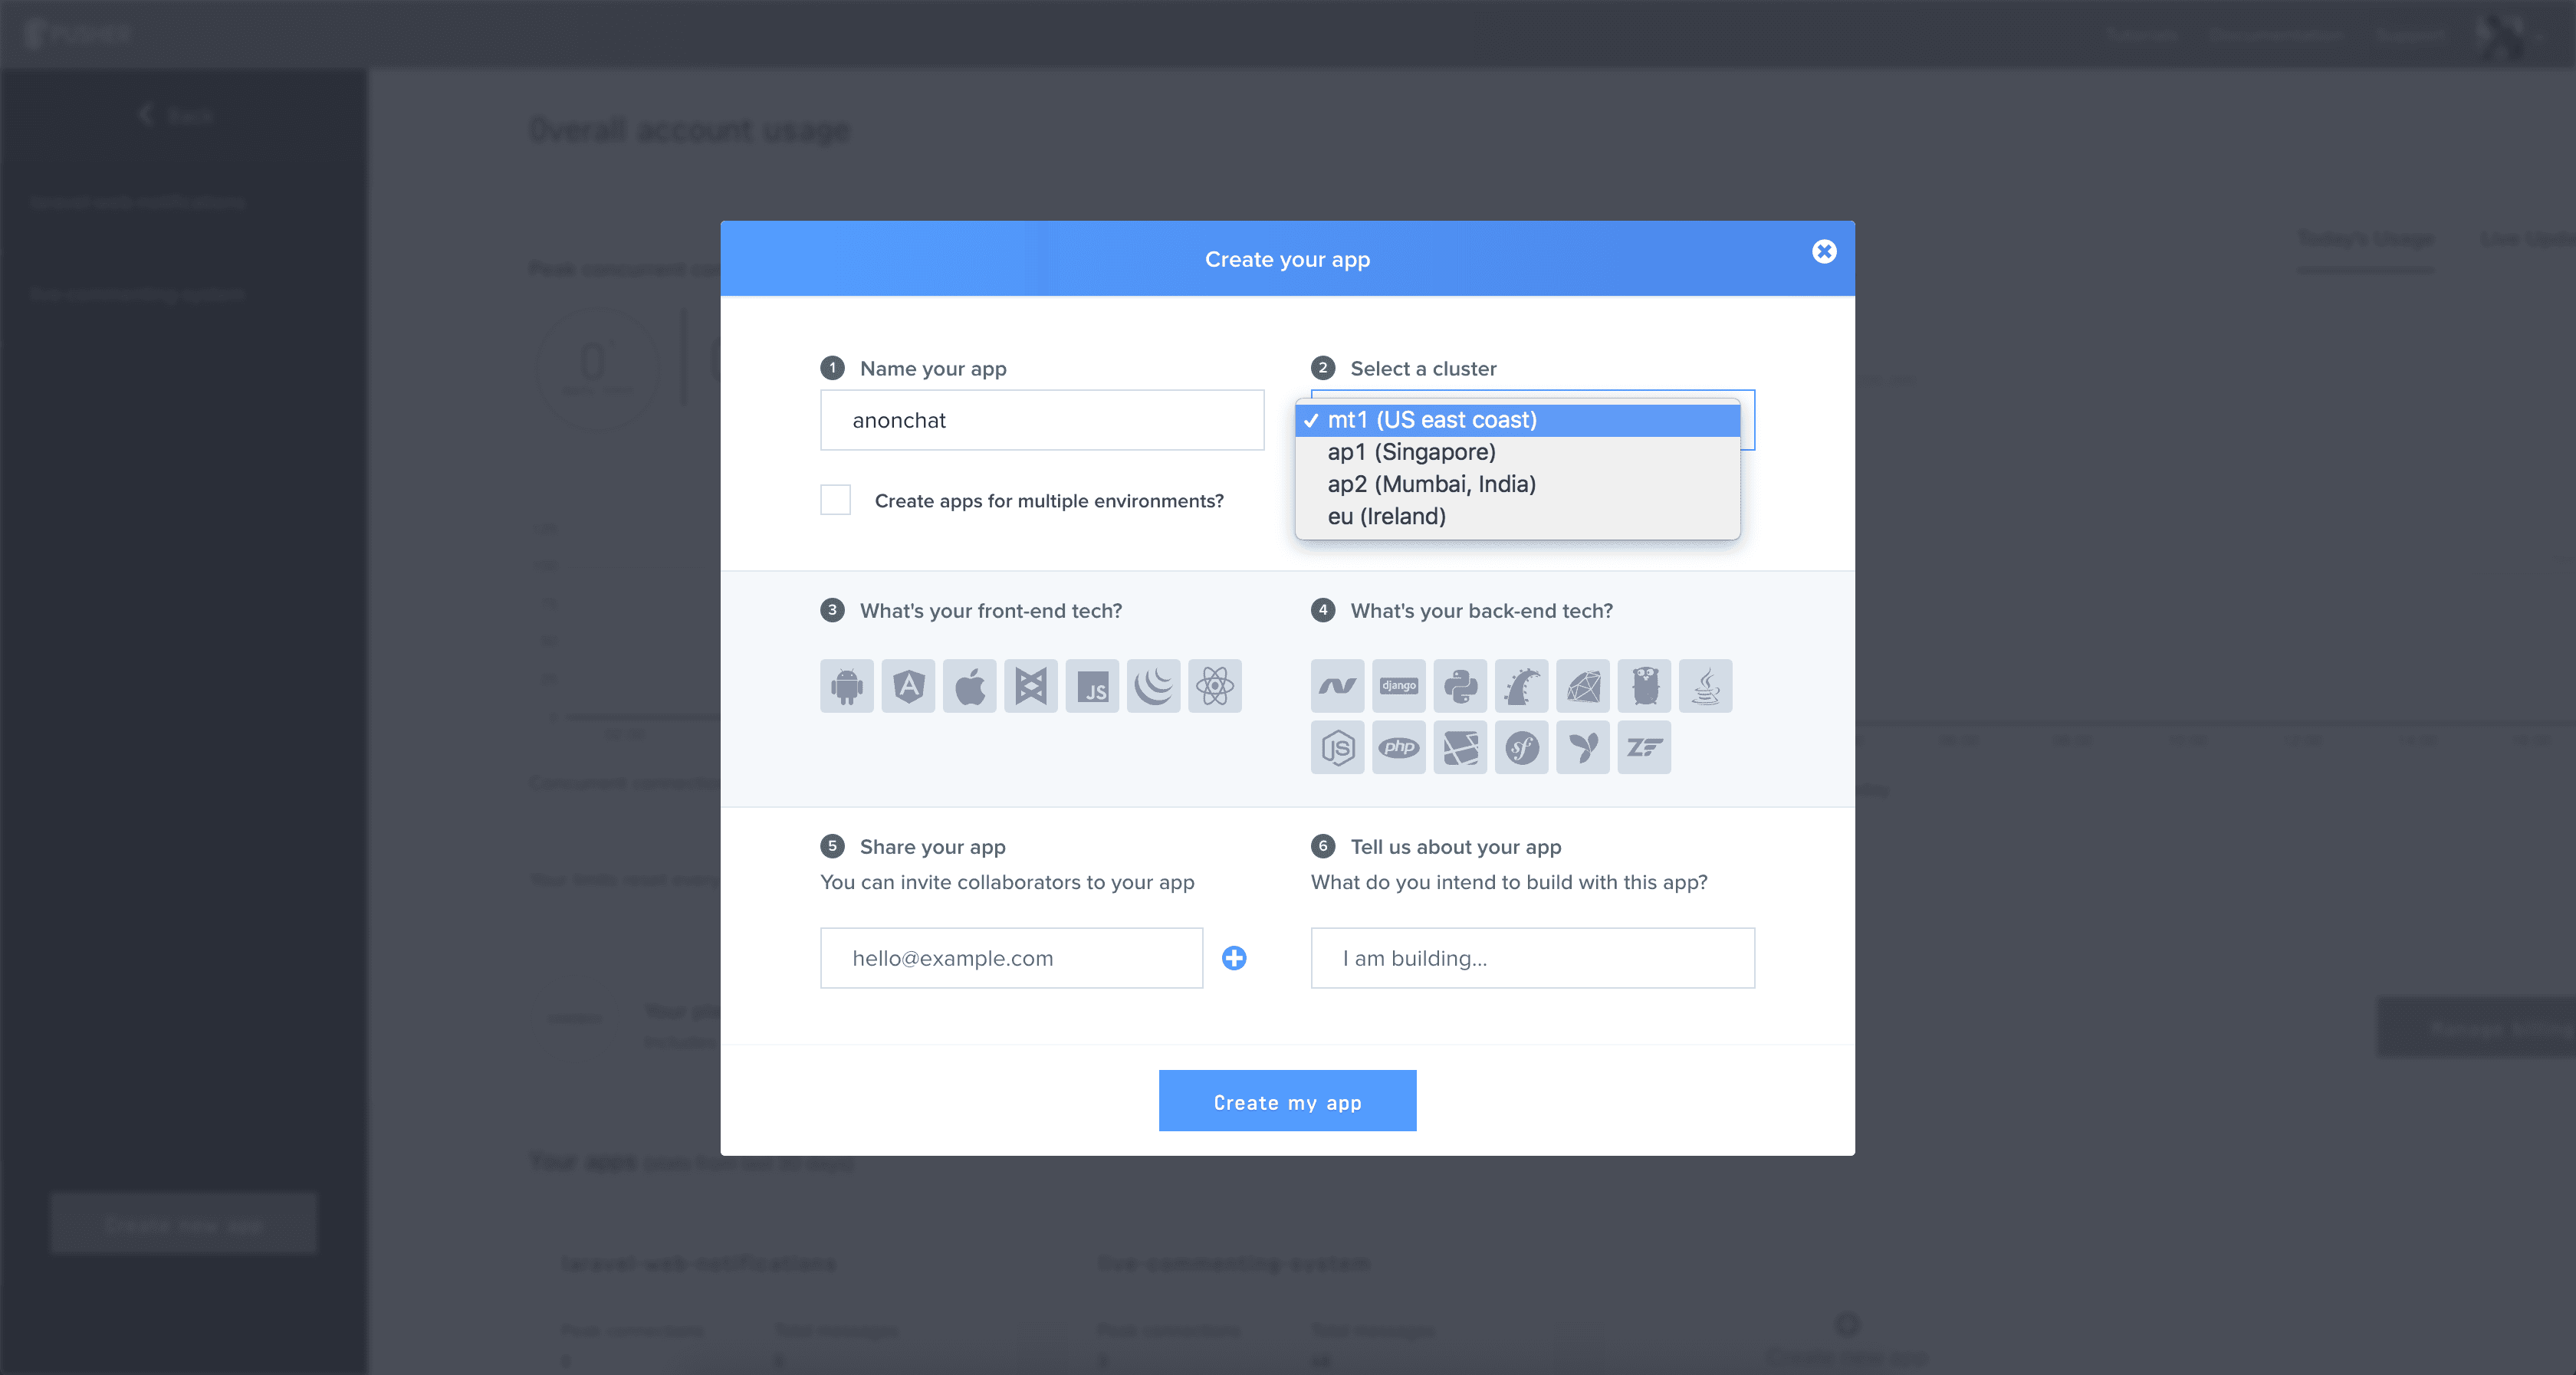
This article assumes you already have a working knowledge on Swift and XCode. You will also need to have a Pusher application set up. You can get a free Pusher account by clicking here.
When you are creating a pusher application, don’t forget to select a cluster and make sure it is the same cluster used when defining the keys in your application
What we will be building
Our application will be a highly ephemeral application that does not save state. We will be using Pusher to send the messages and listen for new ones on the application. We will also build a web app using Node to be the server side app that handles the Pusher event triggers.
Setting up your project
The first thing you will need to do is create a new XCode project. When you have created a new project we will use Cocoapods to manage the dependencies the application might currently have. If you have not done so already, install Cocoapods on your machinne.
1$ gem install cocoapods
Now to use Cocoapods in our application, cd to the code directory and run pod init
This will create a Podfile and this is where we will define our dependencies for the application.
Open the Podfile in your text editor of choice and replace with the content below:
1# Uncomment the next line to define a global platform for your project 2platform :ios, '9.0' 3 4target 'anonchat' do 5 # Comment the next line if you're not using Swift and don't want to use dynamic frameworks 6 use_frameworks! 7 8 # Pods for anonchat 9 pod 'Alamofire' 10 pod 'PusherSwift' 11 pod 'JSQMessagesViewController' 12end
After you are done, run the command pod install and this will download the dependencies specified in the Podfile. When this is complete, close XCode (if open) and then open the .xcworkspace file that is in the root of your project folder.
Creating the necessary views
For login, we have decided to keep it simple. Since this is an anonymous chat application, we will generate the username for the user internally.
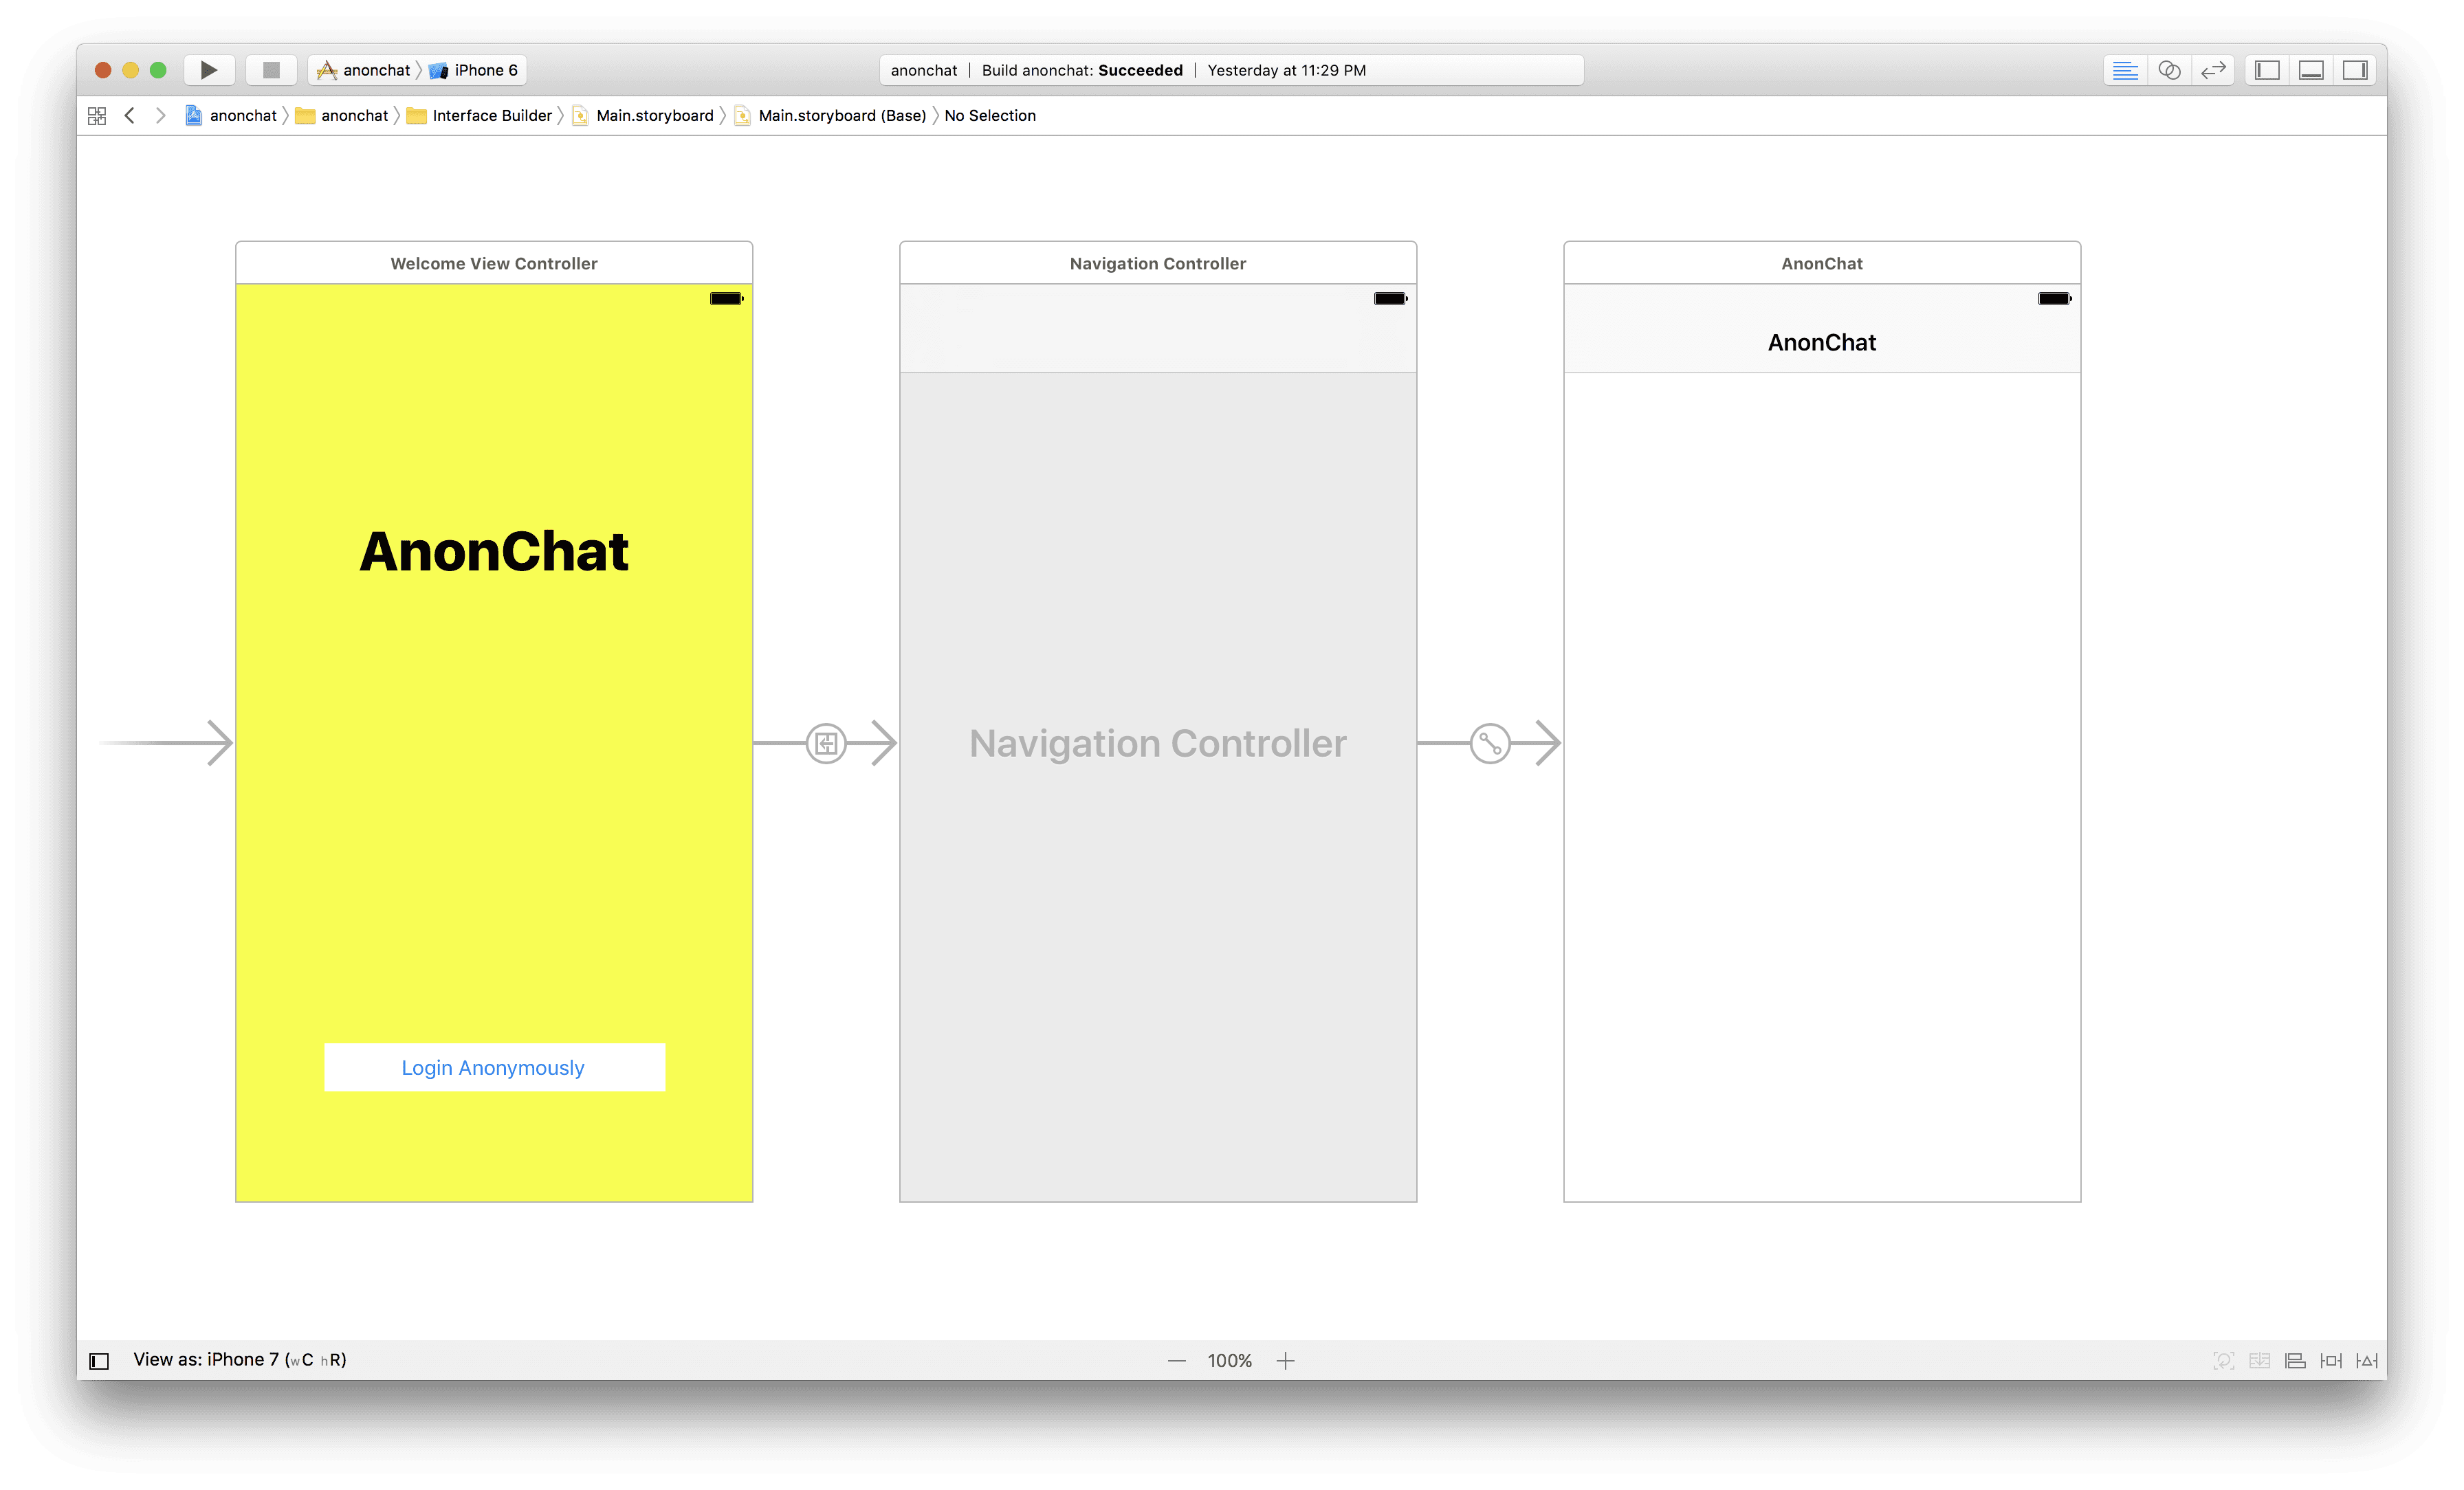
Create the login view using the storyboard interface builder. Below you can see what I have created using the builder. The “Login anonymously” button would be the trigger to push the next controller in.
The next controller is a navigation controller. This will be the one loaded after the login button is clicked. This in turn has a root controller which is out ChatViewController and this extends the JSQMessagesViewController which will give us the chat-like interface automatically. Neat right?
Here is the storyboard after all the pieces have been assembled:
Coding the logic into the views
Now that we have created the views and interface necessary to work with the application, we need to write some code. Create a ChatViewController and associate it to the chat view that we created above.
Now we need to extend the ChatViewController so we will enjoy the goodness our JSQMessagesViewController provides. We will also need to import all the dependencies we need at the top:
1import UIKit 2import Alamofire 3import PusherSwift 4import JSQMessagesViewController 5 6class ChatViewController: JSQMessagesViewController { 7}
Now let us start adding functionality to the controller.
First, we want to add a messages array that will contain all the messages in this current session. Then we will create a Pusher instance that will listen for new messages and then append the message to the messages array.
1import UIKit
2import Alamofire
3import PusherSwift
4import JSQMessagesViewController
5
6class ChatViewController: JSQMessagesViewController {
7 var messages = [JSQMessage]()
8 var pusher : Pusher!
9
10 override func viewDidLoad() {
11 super.viewDidLoad()
12
13 listenForNewMessages()
14 }
15
16 private func listenForNewMessages() {
17 let options = PusherClientOptions(
18 host: .cluster("PUSHER_CLUSTER")
19 )
20
21 pusher = Pusher(key: "ENTER_PUSHER_KEY_HERE", options: options)
22
23 let channel = pusher.subscribe("chatroom")
24 let _ = channel.bind(eventName: "new_message", callback: { (data: Any?) -> Void in
25
26 if let data = data as? [String: AnyObject] {
27 let author = data["sender"] as! String
28
29 if author != self.senderId {
30 let text = data["text"] as! String
31 self.addMessage(senderId: author, name: author, text: text)
32 self.finishReceivingMessage(animated: true)
33 }
34 }
35 })
36 pusher.connect()
37 }
38
39 private func addMessage(senderId: String, name: String, text: String) {
40 if let message = JSQMessage(senderId: senderId, displayName: name, text: text) {
41 messages.append(message)
42 }
43 }
44}
So above in the viewDidLoad method, we called listenForNewMessages which does as it is titled and listens for new Pusher events/messages. Then it calls the addMessage method which appends to the messages array.
The next thing we want to do is customise our chat interface using the JSQMessagesViewController class we are currently extending.
First we will define some properties in the ChatViewController class:
1var incomingBubble: JSQMessagesBubbleImage! 2var outgoingBubble: JSQMessagesBubbleImage!
Next, we will customise the interface in the viewDidLoad:
1override func viewDidLoad() {
2 super.viewDidLoad()
3
4 inputToolbar.contentView.leftBarButtonItem = nil
5
6 incomingBubble = JSQMessagesBubbleImageFactory().incomingMessagesBubbleImage(with: UIColor.jsq_messageBubbleBlue())
7 outgoingBubble = JSQMessagesBubbleImageFactory().outgoingMessagesBubbleImage(with: UIColor.jsq_messageBubbleGreen())
8
9 collectionView!.collectionViewLayout.incomingAvatarViewSize = CGSize.zero
10 collectionView!.collectionViewLayout.outgoingAvatarViewSize = CGSize.zero
11
12 automaticallyScrollsToMostRecentMessage = true
13
14 collectionView?.reloadData()
15 collectionView?.layoutIfNeeded()
16
17 listenForNewMessages()
18}
We will also continue customising the interface by overriding some of the methods provided by the JSQMessagesViewController. Let’s add these methods to our ChatViewController
1override func collectionView(_ collectionView: JSQMessagesCollectionView!, messageDataForItemAt indexPath: IndexPath!) -> JSQMessageData! {
2 return messages[indexPath.item]
3}
4
5override func collectionView(_ collectionView: UICollectionView, numberOfItemsInSection section: Int) -> Int {
6 return messages.count
7}
8
9override func collectionView(_ collectionView: JSQMessagesCollectionView!, messageBubbleImageDataForItemAt indexPath: IndexPath!) -> JSQMessageBubbleImageDataSource! {
10 let message = messages[indexPath.item]
11 if message.senderId == senderId {
12 return outgoingBubble
13 } else {
14 return incomingBubble
15 }
16}
17
18override func collectionView(_ collectionView: JSQMessagesCollectionView!, avatarImageDataForItemAt indexPath: IndexPath!) -> JSQMessageAvatarImageDataSource! {
19 return nil
20}
21
22override func didPressSend(_ button: UIButton, withMessageText text: String, senderId: String, senderDisplayName: String, date: Date) {
23 postMessage(name: senderId, message: text)
24 addMessage(senderId: senderId, name: senderId, text: text)
25 self.finishSendingMessage(animated: true)
26}
27
28private func setupOutgoingBubble() -> JSQMessagesBubbleImage {
29 let bubbleImageFactory = JSQMessagesBubbleImageFactory()
30 return bubbleImageFactory!.outgoingMessagesBubbleImage(with: UIColor.jsq_messageBubbleBlue())
31}
32
33private func setupIncomingBubble() -> JSQMessagesBubbleImage {
34 let bubbleImageFactory = JSQMessagesBubbleImageFactory()
35 return bubbleImageFactory!.incomingMessagesBubbleImage(with: UIColor.jsq_messageBubbleGreen())
36}
Next we have to automatically generate the username for the user so in the viewDidLoad method let’s add the following:
1let n = Int(arc4random_uniform(1000))
2
3senderId = "anonymous" + String(n)
4senderDisplayName = senderId
This will create a username ‘anonymous’ plus a random number between 0 and 999. That should suffice for now.
The final piece of the puzzle now is adding the postMessage method which will post the message to our Node application backend. That application will send the message down to Pusher and it will be ready for pick up by any listener on that Pusher channel.
1private func postMessage(name: String, message: String) {
2 let params: Parameters = ["sender": name, "text": message]
3
4 Alamofire.request(ChatViewController.API_ENDPOINT + "/messages", method: .post, parameters: params).validate().responseJSON { response in
5 switch response.result {
6
7 case .success:
8 // Succeeded, do something
9 print("Succeeded")
10 case .failure(let error):
11 // Failed, do something
12 print(error)
13 }
14 }
15}
We will also have to define this property ChatViewController.API_ENDPOINT
1static let API_ENDPOINT = "http://localhost:4000";
We will be using local host but if you already have it online that is great too.
Building the backend Node application
Now that we are done with the iOS and XCode parts, we can create the NodeJS back end for the application. We are going to be using Express, so that we can quickly whip something up.
Create a directory for the web application and then create two new files:
1// index.js 2var path = require('path'); 3var Pusher = require('pusher'); 4var express = require('express'); 5var bodyParser = require('body-parser'); 6 7var app = express(); 8 9var pusher = new Pusher({ 10 appId: 'PUSHER_APP_ID', 11 key: 'PUSHER_APP_KEY', 12 secret: 'PUSHER_APP_SECRET', 13 cluster: 'PUSHER_APP_CLUSTER', 14 encrypted: true 15}); 16 17app.use(bodyParser.json()); 18app.use(bodyParser.urlencoded({ extended: false })); 19 20app.post('/messages', function(req, res){ 21 var message = { 22 text: req.body.text, 23 sender: req.body.sender 24 } 25 pusher.trigger('chatroom', 'new_message', message); 26 res.json({success: 200}); 27}); 28 29app.use(function(req, res, next) { 30 var err = new Error('Not Found'); 31 err.status = 404; 32 next(err); 33}); 34 35module.exports = app; 36 37app.listen(4000, function(){ 38 console.log('App listening on port 4000!') 39})
and packages.json
1{ 2 "main": "index.js", 3 "dependencies": { 4 "body-parser": "^1.16.0", 5 "express": "^4.14.1", 6 "path": "^0.12.7", 7 "pusher": "^1.5.1" 8 } 9}
Now run npm install on the directory and then node index.js once the npm installation is complete. You should see App listening on port 4000! message.
Testing the anonymous chat application
Once you have your local node webserver running, you will need to make some changes so your application can talk to the local webserver.
In the info.plist file, make the following changes:
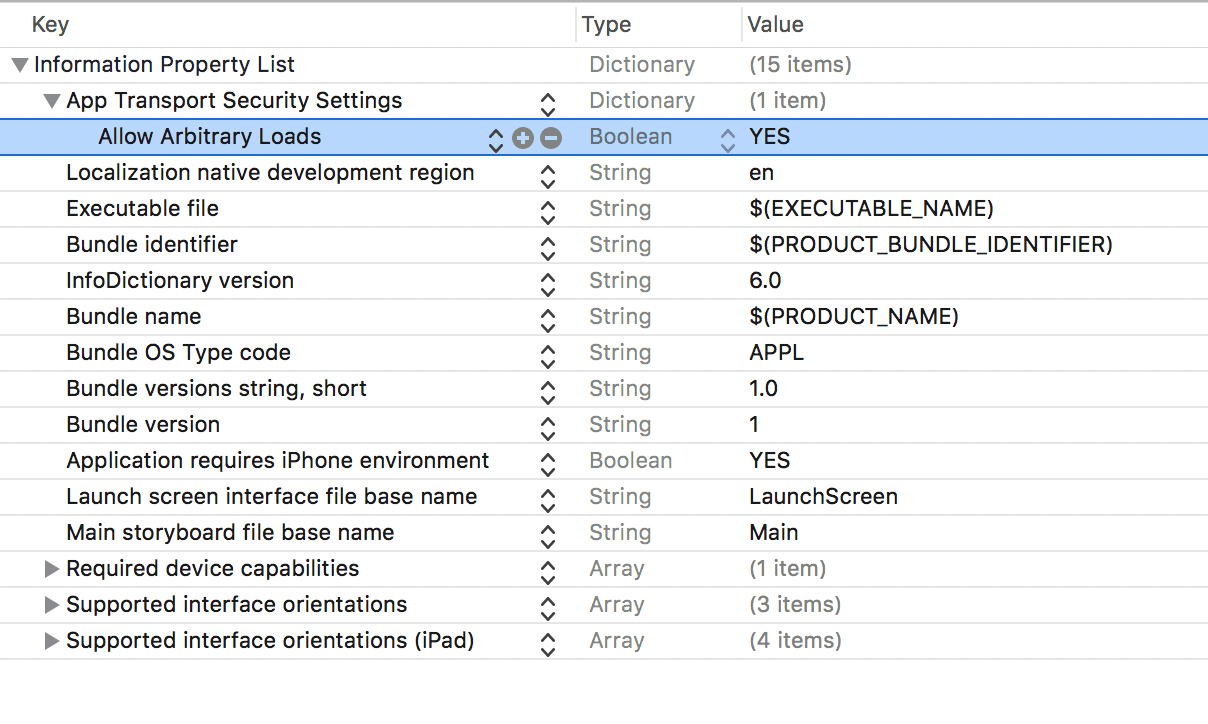
With this change, your application can now talk directly with your local web application.
Conclusion
We have created an application that works as a public chat application on iOS using Swift and Pusher. If you want to, you could expand this application to have a who’s typing feature and a delivery status.
Have a question or feedback on the article? Please ask below in the comment section. The repository for the application and the Node backend is available here.


© 2026 Pusher Ltd. All rights reserved.
Pusher Limited is a company registered in England and Wales (No. 07489873) whose registered office is at MessageBird UK Limited, 3 More London Riverside, 4th Floor, London, United Kingdom, SE1 2AQ.