- Products

- Developers
- User stories
- Blog
- Pricing

Continuous releases with GitHub Actions
Find out how we used GitHub Actions to automate our release process, replacing rigorous process and removing headaches for the team.
Introduction
At Pusher we maintain many SDKs for developers to easily integrate with our realtime API services. These SDKs of course require maintenance and regular updates which need to be released and published to various registries.
There are lots of little things going in to such a release process and even the smallest items are vital. Even with rigorous processes and checklists it’s easy to forget to update the changelog, bump the version and so on. These are some of the problems we’ve seen:
- Merging a code change but forgetting to release it
- Forgetting to add or update version, changelog, etc., causing several useless patch-releases
- Engineers needing to create accounts with various package registries or use shared credentials
- Onboarding and documentation had to be produced for each release procedure
Not only did this waste our time, but it had the potential to cause frustrations to users of the SDKs, which is something we never want to risk. With this in mind we decided to automate the process as much as possible and offload some of the responsibility to the bots. In this post we will walk through how our new release process works.
Adding Labels
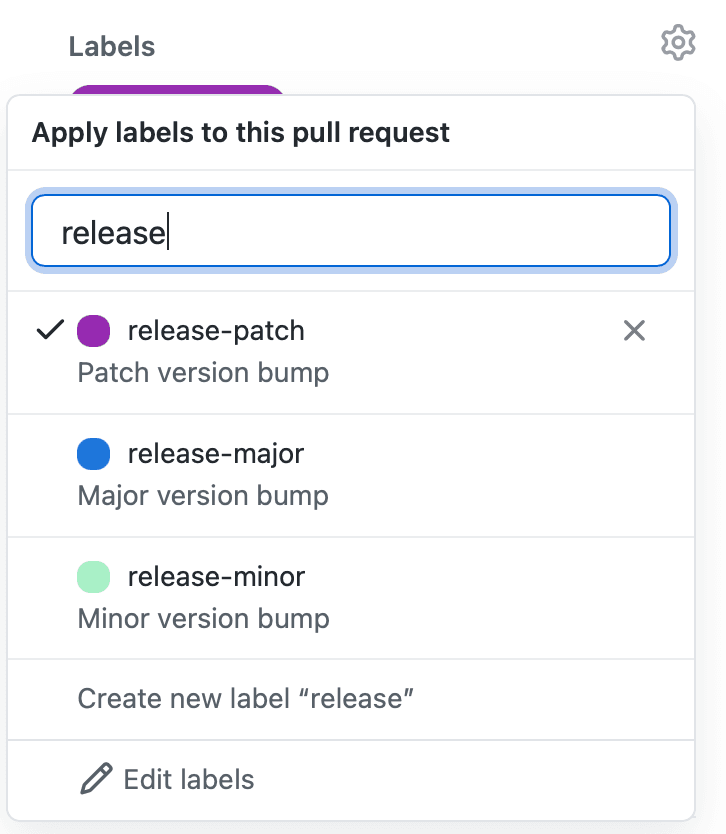
The first problem we want to solve is versioning. It’s important that every change is versioned and the users are informed about the change. We use semantic versioning to tell our users how the change affects them — a major version bump means it might break the user’s application if they update.
We host all our code on GitHub and use Pull Requests for code reviews and Actions for continuous integration and testing. By leveraging labels we can “mark” the release as either major, minor or patch.
Actions integrates nicely with Pull Requests, making it easy to interact with these labels. We simply check the value of github.event.label.name like so:
1name: Release 2 3on: 4 pull_request: 5 types: [ labeled ] 6 7jobs: 8 prepare-release: 9 steps: 10 - name: Set major release 11 if: ${{ github.event.label.name == 'release-major' }} 12 run: echo "RELEASE=major" >> $GITHUB_ENV 13 - name: Set minor release 14 if: ${{ github.event.label.name == 'release-minor' }} 15 run: echo "RELEASE=minor" >> $GITHUB_ENV 16 - name: Set patch release 17 if: ${{ github.event.label.name == 'release-patch' }} 18 run: echo "RELEASE=patch" >> $GITHUB_ENV
This defines 3 “steps”, each setting an environment variable for use in the next steps. Actions have several triggers on Pull Requests and in this case types: [labeled] ensures there is a label on the PR and the action is triggered every time a label is added.
We don’t worry about the reviewer setting several labels, we just pick the “lesser” one. The final steps in the Action needs one of these labels, so we add a step to abort the Action if no labels are found:
1- name: Check release env 2 run: | 3 if [[ -z "${{ env.RELEASE }}" ]]; 4 then 5 echo "You need to set a release label on PRs to the main branch" 6 exit 1 7 else 8 exit 0 9 fi
Setting up Git
GitHub Actions already has the credentials to pull and push code to and from your repository, but the official checkout Action makes the repo end up in so-called “headless mode”. The repo also won’t have a user configured and both of these issues means you can’t easily commit code in the action. That’s easily solved with a few git commands though:
1- name: Setup git 2 run: | 3 git config user.email "pusher-ci@pusher.com" 4 git config user.name "Pusher CI" 5 git fetch 6 git checkout ${{ github.event.pull_request.head.ref }}
Here we have used a shared email account for the commit which will be used to set the author and committer of the code.
Bumping the version
Now we can get the latest version published and “bump” it using the label value we just defined. In this example, we fetch the latest version from NPM and bump it using a commandline tool called semver-tool:
1- name: Bump version 2 run: | 3 export CURRENT=$(npm show @pusher/push-notifications-server | grep latest | cut -d':' -f 2 | xargs) 4 export NEW_VERSION=$(semver bump ${{ env.RELEASE }} $CURRENT) 5 echo "VERSION=$NEW_VERSION" >> $GITHUB_ENV
Actually updating the version depends on the language and frameworks used. In this case we are using Node and need to update the version in a few files:
1- name: Prepare update 2 run: | 3 sed -i "s|\"version\": \"[^\"]*\"|\"version\": \"${{ env.VERSION }}\"|" package.json 4 sed -i "s|const SDK_VERSION = '[^']*'|const SDK_VERSION = '${{ env.VERSION }}'|" push-notifications.js 5 sed -i "s|'pusher-push-notifications-node [^']*'|'pusher-push-notifications-node ${{ env.VERSION }}'|g" __tests__/*.js
Since we have already set up git, pushing these changes just follows the normal flow:
1- name: Commit changes 2 run: | 3 git add package.json push-notifications.js __tests__/*.js 4 git commit -m "Bump to version ${{ env.VERSION }}" 5 - name: Push 6 run: git push
Updating the CHANGELOG
So far we have only showed how to update the version and make some simple updates to files, but making sure the changelog is updated with relevant and useful context of the updates is essential. We decided to standardize our Pull Request descriptions to include the updates to the changelog using a Pull Request template:
`## Description
Add a short description of the change. If this is related to an issue, please add a reference to the issue.
1## Description 2 3Add a short description of the change. If this is related to an issue, please add a reference to the issue. 4 5## CHANGELOG 6 7* [CHANGED] Describe your change here. Look at CHANGELOG.md to see the format.
Storing this file as pull_request_template.md in the repo’s root means new pull requests will be pre-filled with these sections. Now it’s easier to remember to write the updates and check them as part of the review process.
In our actions we can access this description and add them to the changelog automatically:
1- name: Prepare CHANGELOG 2 run: | 3 echo "${{ github.event.pull_request.body }}" | csplit -s - "/##/" 4 echo "# Changelog 5 6 ## ${{ env.VERSION }} 7 " >> CHANGELOG.tmp 8 grep "^*" xx01 >> CHANGELOG.tmp 9 grep -v "^# " CHANGELOG.md >> CHANGELOG.tmp 10 cp CHANGELOG.tmp CHANGELOG.md
Note that the changelog needs to have a very specific format, in this case they consist of subsections with the version followed by bullet lists. It’s best to manage the changelog through Action only.
Publishing the changes
The final step, after the pull request has been merged, is to publish the changes. In our case this involves creating a Release in Github as well as publishing the new version to one or more package registries. To add a bit more context to the release, we add the newly added notes from the changelog:
1- name: Prepare description 2 run: | 3 csplit -s CHANGELOG.md "/##/" {1} 4 cat xx01 > CHANGELOG.tmp 5 - name: Prepare tag 6 run: | 7 export TAG=$(head -1 CHANGELOG.tmp | cut -d' ' -f2) 8 echo "TAG=$TAG" >> $GITHUB_ENV 9 - name: Create Release 10 uses: actions/create-release@v1 11 env: 12 GITHUB_TOKEN: ${{ secrets.GITHUB_TOKEN }} 13 with: 14 tag_name: ${{ env.TAG }} 15 release_name: ${{ env.TAG }} 16 body_path: CHANGELOG.tmp
Publishing the changes to a registry like NPM is simple, as it will use the version from the files we’ve already updated:
1publish-npm: 2 needs: build 3 runs-on: ubuntu-latest 4 steps: 5 - uses: actions/checkout@v2 6 - uses: actions/setup-node@v2 7 with: 8 node-version: 10.x 9 registry-url: https://registry.npmjs.org/ 10 - run: yarn install 11 - run: yarn publish 12 env: 13 NODE_AUTH_TOKEN: ${{secrets.NPM_TOKEN}}
And that’s it. With a few simple steps we’ve automated the mechanical process of releasing our SDKs, making it a few clicks of a button. This means no more finished work left in the pipeline, and a lot more time to spend on new features and API updates.
If you are looking for inspiration to implement release automation for your own repository, here’s the code used in this post.


© 2026 Pusher Ltd. All rights reserved.
Pusher Limited is a company registered in England and Wales (No. 07489873) whose registered office is at MessageBird UK Limited, 3 More London Riverside, 4th Floor, London, United Kingdom, SE1 2AQ.