- Products

- Developers
- User stories
- Blog
- Pricing

Handling connectivity errors in Android apps with Kotlin
This tutorial will guide you through building a simple Android app using Kotlin. The app will respond to internet connectivity errors, detecting when the device goes online or offline, and displaying an error page if needed.
Introduction
In this article, we will see how we can monitor internet connection changes. When the phone is online, we will fetch data from an API, otherwise, we will display an error page. Here’s what we want to create:
Many applications require an internet connection to either fetch or save data. However, it’s normal for internet connection to be lost every now and then. As a developer, it falls to you to make sure the user has a smooth experience when using our applications and the internet connection is lost.
Prerequisites
In other to follow the tutorial, you need the following:
- Android Studio (version >= 3.x recommended). Download here.
- Basic knowledge of Kotlin.
Building our application
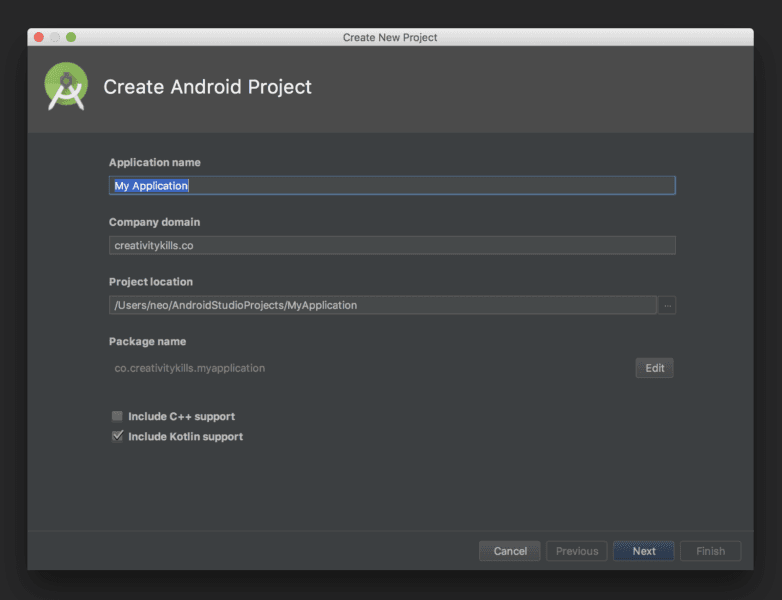
Launch Android Studio and create a ‘New Project…’ using the wizard. You should choose the “Basic Activity” template and select your preferred target, we are using (API 26: Android 8.0). You should also enable Kotlin support for the project.
Asides the usual dependencies that come with a new project, we need to add some dependencies. One of the dependencies we need to add is Retrofit. Retrofit is a client for making HTTP calls.
Open your build.gradle file and add the following dependencies:
1implementation 'com.android.support:design:27.1.1' 2 implementation 'com.squareup.retrofit2:retrofit:2.3.0' 3 implementation 'com.squareup.retrofit2:converter-scalars:2.3.0'
Sync the gradle file so that the dependencies will be downloaded.
Next, we will request two permissions:
- Internet permission – to gain access to make network calls
- Network state – to check the network state of a device so that we know when we have an internet connection or not.
Open your AndroidManifest.xml file and add the permissions like so:
1<manifest xmlns:android="http://schemas.android.com/apk/res/android" 2 package="com.example.android.internetconnectivity"> 3 4 <uses-permission android:name="android.permission.ACCESS_NETWORK_STATE"/> 5 <uses-permission android:name="android.permission.INTERNET"/> 6 7 [...] 8 9 </manifest>
When there is a network connection, we will fetch data from an API. Let’s set up an interface to hold the endpoints we will access. Create a new Kotlin file named ApiService and paste this:
1import retrofit2.Call 2 import retrofit2.http.GET 3 4 interface ApiService { 5 @GET(".") 6 fun getFeeds(): Call<String> 7 }
For this demo, we are only going to access one endpoint, which is equivalent to our base URL. It’s for this reason we used a dot instead of the usual /some-url in the @GET annotation.
When these items are fetched, we will display the items in a list. We, therefore, need a RecyclerView in the layout and a matching adapter. Create a new Kotlin file named RecyclerAdapter and paste this:
1import android.support.v7.widget.RecyclerView 2 import android.view.LayoutInflater 3 import android.view.View 4 import android.view.ViewGroup 5 import android.widget.TextView 6 7 class RecyclerAdapter : RecyclerView.Adapter<RecyclerAdapter.ViewHolder>() { 8 9 private var list = ArrayList<String>() 10 11 fun setItems(newList: ArrayList<String>){ 12 this.list = newList 13 this.notifyDataSetChanged() 14 } 15 16 override fun getItemCount() = list.size 17 18 override fun onCreateViewHolder(parent: ViewGroup, viewType: Int): ViewHolder { 19 val view = LayoutInflater.from(parent.context) 20 .inflate(android.R.layout.simple_list_item_1, parent, false) 21 22 return ViewHolder(view) 23 } 24 25 override fun onBindViewHolder(holder: ViewHolder, position: Int) { 26 holder.textView.text = list[position] 27 } 28 29 inner class ViewHolder(itemView: View?): RecyclerView.ViewHolder(itemView) { 30 var textView: TextView = itemView!!.findViewById(android.R.id.text1) 31 } 32 33 }
The adapter handles the display of items on a list. It has some overridden methods like:
getItemCount– to tell the size of the list to be populated.onCreateViewHolder– used to choose a layout for a list row.onBindViewHolder– to bind data to each row depending on the position, etc.
Next, we will update the layout of our MainActivity‘s activity_main.xml file like so:
1<?xml version="1.0" encoding="utf-8"?> 2 <android.support.constraint.ConstraintLayout 3 xmlns:android="http://schemas.android.com/apk/res/android" 4 xmlns:app="http://schemas.android.com/apk/res-auto" 5 xmlns:tools="http://schemas.android.com/tools" 6 android:layout_width="match_parent" 7 android:layout_height="match_parent" 8 tools:context=".MainActivity"> 9 10 <android.support.v7.widget.RecyclerView 11 android:layout_width="match_parent" 12 android:layout_height="match_parent" 13 android:id="@+id/recyclerView" 14 app:layout_constraintBottom_toBottomOf="parent" 15 app:layout_constraintLeft_toLeftOf="parent" 16 app:layout_constraintRight_toRightOf="parent" 17 app:layout_constraintTop_toTopOf="parent" /> 18 19 <ImageView 20 android:id="@+id/imageView" 21 android:layout_width="match_parent" 22 android:layout_height="wrap_content" 23 android:src="@drawable/no_internet_connection" /> 24 25 </android.support.constraint.ConstraintLayout>
The layout contains a RecyclerView for our list items and an ImageView to show an error message.
We also need an error message image. Once you have an image, rename the file to no_internet_connection and save it to your drawable folder: NameOfProject/app/src/main/res/drawable.
For us to monitor when the connectivity changes, we need broadcast receivers. Broadcast receivers are components that allow you to register and listen to Android system and application events. Usually, the Android system sends broadcast events when various system events occur and your app needs to register to get these events.
Let’s register a listener to be triggered when the internet connection is online or offline. Open your MainActivity file and paste the following code:
1import android.content.BroadcastReceiver 2 import android.content.Context 3 import android.content.Intent 4 import android.content.IntentFilter 5 import android.net.ConnectivityManager 6 import android.support.v7.app.AppCompatActivity 7 import android.os.Bundle 8 import android.support.v7.widget.LinearLayoutManager 9 import android.util.Log 10 import android.view.View 11 import kotlinx.android.synthetic.main.activity_main.* 12 import okhttp3.OkHttpClient 13 import org.json.JSONObject 14 import retrofit2.Call 15 import retrofit2.Callback 16 import retrofit2.Response 17 import retrofit2.Retrofit 18 import retrofit2.converter.scalars.ScalarsConverterFactory 19 20 21 class MainActivity : AppCompatActivity() { 22 23 private val arrayList = ArrayList<String>() 24 private val adapter = RecyclerAdapter() 25 private val retrofit = Retrofit.Builder() 26 .baseUrl("https://api.reddit.com/") 27 .addConverterFactory(ScalarsConverterFactory.create()) 28 .client(OkHttpClient.Builder().build()) 29 .build() 30 31 private var broadcastReceiver: BroadcastReceiver = object : BroadcastReceiver() { 32 override fun onReceive(context: Context, intent: Intent) { 33 val notConnected = intent.getBooleanExtra(ConnectivityManager 34 .EXTRA_NO_CONNECTIVITY, false) 35 if (notConnected) { 36 disconnected() 37 } else { 38 connected() 39 } 40 } 41 } 42 43 override fun onCreate(savedInstanceState: Bundle?) { 44 super.onCreate(savedInstanceState) 45 setContentView(R.layout.activity_main) 46 setupRecyclerView() 47 } 48 49 }
Above, we initialized some variables:
arrayList– we will add fetched items to this list.adapter– this is the instance of the adapter class.retrofit– a Retrofit instance.broadcastReciever– this instance implements theonRecievecallback. This callback method is called when the system has notified us of a change in the network connection. In the callback, we then check to know the connectivity status thereby calling either a privateconnectedordisconnectedfunction.
After creating the broadcast receiver, we have to register it to get updates and unregister if there are no more activities. To do this, add the following functions to the code above in the MainActivity:
1override fun onStart() { 2 super.onStart() 3 registerReceiver(broadcastReceiver, IntentFilter(ConnectivityManager.CONNECTIVITY_ACTION)) 4 } 5 6 override fun onStop() { 7 super.onStop() 8 unregisterReceiver(broadcastReceiver) 9 }
In the onCreate function, we set up our RecyclerView by calling the setupRecyclerView. Create a private function in the MainActivity class and set it up like this:
1private fun setupRecyclerView(){ 2 with(recyclerView){ 3 layoutManager = LinearLayoutManager(this@MainActivity) 4 adapter = this@MainActivity.adapter 5 } 6 }
Remember we mentioned the connected and disconnected functions earlier in this post. We will now add them to the class. Add them to the MainActivity file like so:
1private fun disconnected() { 2 recyclerView.visibility = View.INVISIBLE 3 imageView.visibility = View.VISIBLE 4 } 5 6 private fun connected() { 7 recyclerView.visibility = View.VISIBLE 8 imageView.visibility = View.INVISIBLE 9 fetchFeeds() 10 }
The disconnected function is called when there is no network connection. It hides the RecyclerView and shows the ImageView. The connected function is called when there is an active internet connection. It shows the RecyclerView, hides the ImageView, and finally calls the fetchFeeds function.
Next, in the same file, paste the following code:
1private fun fetchFeeds() { 2 retrofit.create(ApiService::class.java) 3 .getFeeds() 4 .enqueue(object : Callback<String> { 5 override fun onFailure(call: Call<String>, t: Throwable) { 6 Log.e("MainActivityTag", t.message) 7 } 8 9 override fun onResponse(call: Call<String>?, response: Response<String>) { 10 addTitleToList(response.body()!!) 11 } 12 13 }) 14 }
This function calls the API to get data. When the call is successful, we have another function that helps us add the title of the posts gotten from the endpoint to our list and then to our adapter. Create a function named addTitleToList and set it up like so:
1private fun addTitleToList(response: String) { 2 val jsonObject = JSONObject(response).getJSONObject("data") 3 val children = jsonObject.getJSONArray("children") 4 5 for (i in 0..(children.length()-1)) { 6 val item = children.getJSONObject(i).getJSONObject("data").getString("title") 7 arrayList.add(item) 8 adapter.setItems(arrayList) 9 } 10 }
We manually parsed the JSON here to get the title. When you ‘Run’ the app, you should have this:
Conclusion
In this post, we have learned how to monitor network changes using broadcast receivers. We saw how we register and unregister for broadcasts sent by the Android system. You have gained some valuable knowledge on handling network errors in your app. You can play around the repo here and feel free to drop your feedback.
The source code to the GitHub repo is here.


© 2026 Pusher Ltd. All rights reserved.
Pusher Limited is a company registered in England and Wales (No. 07489873) whose registered office is at MessageBird UK Limited, 3 More London Riverside, 4th Floor, London, United Kingdom, SE1 2AQ.