- Products

- Developers
- User stories
- Blog
- Pricing

Code splitting with webpack dynamic import in React
This post is a practical approach to the concept of code splitting in frontend apps with React. We will learn why the code splitting concept exists, its advantages and how you can employ the concept in your React apps.
Introduction
This post is a practical approach to the concept of code splitting in frontend apps with React. We will learn why the code splitting concept exists, its advantages and how you can employ the concept in your React apps. We will also compare scenarios where splitting was employed and where it wasn’t so as to get a clearer understanding of why code splitting is so important.
In case you are still wondering on why you should care about this, then load speed is one concern to consider. To give the user a feeling of a more responsive network request, you need to start with reducing the size of data they have to download as much as possible. 51% of mobile internet users say that they’ve encountered a website that crashed, froze, or received an error.
What gets in the way of learning code splitting most times is the confusion that two features in webpack are trying to contradict each other. They are asset bundling and code splitting. Before we dive into splitting, let’s get this confusion out of your way.
What you need to know
The only knowledge required to get on with this article is fundamentals of:
- JavaScript
- React
- webpack
Asset bundling
This is actually why tools like webpack and browserify existed in the first place. The first thing that comes to your mind when you hear their names is “asset bundling”. Bundling is the act of merging your browser assets into one file so that the amount of HTTP requests and calls to the server are reduced.
For example I could have a math.js file and an index.js file just for structure. The math.js file defines a method that computes values while the index.js is where the method is called:
math.js
1export const add = (a, b) => a + b 2 export const subtract = (a, b) => a - b
index.js
1import { add, subtract } './math.js' 2 3 const a = 5; 4 const b = 3; 5 6 console.log(add(a,b)) 7 console.log(subtract(a,b))
When we run index.js through a bundler like webpack, it recursively resolves all of the dependencies and merge them into a single file that could be called bundle.js:
1const add = (a, b) => a + b 2 const subtract = (a, b) => a - b 3 4 const a = 5; 5 const b = 3; 6 7 console.log(add(a,b)) 8 console.log(subtract(a,b))
Just like I mentioned, this approach helped reduce the trips we make to a server, hence an attempt to optimize experience.
The problem with bundling
Unfortunately, this simple example I gave is not even close to being a real use case. When building real apps, we have tons of files that depend on other files which in turn depend on another set of files and so on. When we bundle all of them, we end up with an alarmingly large code base.
There is always a high chance that this large code base we end up with, is not going to be used once or even at all. But yet, we make the user wait (poor 3G users) till the download is completed before processing the code and rendering.
Usually, what you want is to download only the needed code when the user needs it but the tough question is: how do you split the code and filter what is needed at a given time? This is where code splitting comes in.
Code splitting
Code splitting is a feature that helps you add split points in your code based on the user journey. These split points are then downloaded when the user embarks on the related journey or is about to.
For example, your split points can be routes where you download each route code when the user visits or wants to visit a route. The split point can also be a component or function that does a heavy computation. You can render other parts of a page and then asynchronously load the heavy component while providing a good pending user experience.
Since HTTP v2 is becoming more popular, code splitting now has more opportunity to shine better as HTTP v2 favors multiple smaller asset downloads to a bundled heavy download.
Let’s see an example that makes use of routes as split points. We will build the app without splitting and measure, then we’ll add code splitting, measure it again and let the metrics judge which is better.
Create a React app
Start with creating a React app using the create-react-app CLI tool:
1## Install the CLI tool if you don't already have it 2 npm install -g create-react-app 3 4 ## Create a new React project 5 create-react-app react-router-code-splitting
Install the following dependencies to the new React app:
1## cd into the folder 2 cd react-router-code-splitting 3 4 ## Install dependencies 5 npm install --save react-router-dom react-loadable react-spinkit
We will go into the details of what each dependency is but here is a short note on them:
react-router-domis the React Router for the browser or DOM environment. We will use this to set up routing in the app.react-loadableis a library that makes code splitting in React easy to work with.react-spinkitis a loading component library for React
Update src/index.js to set up the router:
1//... 2 import { BrowserRouter as Router } from 'react-router-dom'; 3 4 ReactDOM.render( 5 <Router> 6 <App /> 7 </Router>, 8 document.getElementById('root') 9 );
Create two components to serve as the pages for our routes named home and about:
src/Home.js
1import React from 'react'; 2 const Home = () => ( 3 <div> 4 <h2>Home page</h2> 5 <p>Lorem ipsum dolor sit amet, consectetur a....</p> 6 </div> 7 ) 8 export default Home;
src/About.js
1import React from 'react'; 2 const About = () => ( 3 <div> 4 <h2>About page</h2> 5 <p>Lorem ipsum dolor sit amet, consectetur ....</p> 6 <p>Lorem ipsum dolor sit amet, consectetur ....</p> 7 </div> 8 ) 9 export default About;
They are simple components that are expected to render a title and some lorem text to the browser.
Next import these components in src/App.js so as to use them for the routes:
1import { Route, Switch, Link } from 'react-router-dom'; 2 import Home from './Home'; 3 import About from './About';
We are also importing Route, Switch, and Link from the router library. We will use this components to create routes and link to them. We will do this in the App.js render method:
1render() { 2 return ( 3 <div className="App"> 4 <p> 5 <Link to="/">Home</Link> | 6 <Link to="/about">About</Link> 7 </p> 8 <Switch> 9 <Route path="/" exact component={Home} /> 10 <Route path="/about" component={About} /> 11 </Switch> 12 </div> 13 ); 14 }
When you start the app with npm start you should see this at localhost, port 3000:

Measuring download speed
Let’s simulate a slow 3G connection and then reload the page to see the download speed of the bundled asset.
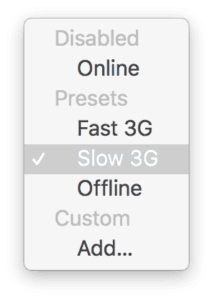
Open the dev tools and go to the Network tab. Click the online select box and change it to Slow 3G:
Reload the page and monitor the bundle.js file:
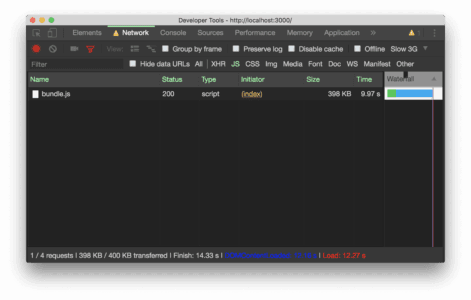
The time column shows that it took approximately 10 seconds to download the file on a slow 3G network. This is a basic app — imagine what happens when it’s a really large app with a lot of code files.
Splitting route code
If we introduce split points at the routes level, the browser will only download code needed by that route and not all the bundled code. We will use the react-loadable and react-spinkits libraries to achieve this.
Replace the Home and About import lines with the following:
1import Loadable from 'react-loadable'; 2 import Spinner from 'react-spinkit'; 3 4 const Loading = () => <Spinner name="double-bounce" />; 5 6 const Home = Loadable({ 7 loader: () => import('./Home'), 8 loading: Loading 9 }); 10 11 const About = Loadable({ 12 loader: () => import('./About'), 13 loading: Loading 14 });
Loadable takes an object as an argument. The object must be passed a value for the loader and loading properties. The loader is the component we want to load asynchronously. It is achieved using the [dynamic](https://developers.google.com/web/updates/2017/11/dynamic-import) [](https://developers.google.com/web/updates/2017/11/dynamic-import) [import](https://developers.google.com/web/updates/2017/11/dynamic-import) method. loading is the component that Loadable will show while waiting for the loader component to get ready. The common use case here is to show a loading UI which you can achieve with react-spinkit.
Reload the browser once more:
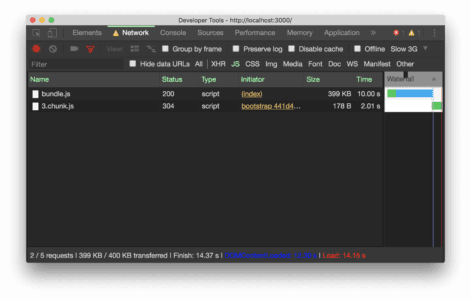
You will see that the bundle.js takes almost the same time to download and then introduces another chunk of file which stores the code for the current route, ./. The bundle file now contains only code that are shared among all the components. You will start noticing the effect when we add more routes like a contact page. The bundle size will remain the same and then we can load other routes in.
Add a Contact component in the src folder named Contact.js:
1import React from 'react'; 2 const Contact = () => ( 3 <div> 4 <h2>Contact page</h2> 5 <p>Lorem ipsum dolor sit amet, consectetur adipisicing elit. Quae incidunt quam ratione rem quaerat, porro quidem voluptates vel, ipsum tenetur ea odit veritatis numquam deserunt impedit? Possimus hic deleniti provident.</p> 6 ... 7 </div> 8 ) 9 export default Contact;
Load the component in the App.js file:
1const Contact = Loadable({ 2 loader: () => import('./Contact'), 3 loading: () => Loading 4 });
Then add a route that renders the component as well as a link that points to it:
1<div className="App">
2 <p>
3 <Link to="/">Home</Link> |
4 <Link to="/about">About</Link> |
5 <Link to="/contact">Contact</Link>
6 </p>
7 <Switch>
8 <Route path="/" exact component={Home} />
9 <Route path="/about" component={About} />
10 <Route path="/contact" component={Contact} />
11 </Switch>
12 </div>
Measure again and you will see that the bundle size remains the same while we load the routes:
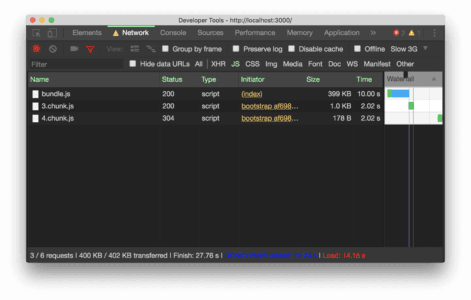
Note that most times, the bundle file will be cached since it hardly changes. The only speed you would have to worry about is that of the smaller chunks that are representing each of the routes we created in this project
Conclusion
Performance is the web trend these days and if you want to stay competitive with your web product, you need to make sure that the app is fast or at least your users perceive it as being fast. Code splitting is one way to boost your app’s performance among other things like PWA which you should check out. You can download the source code for this example from Github.


© 2026 Pusher Ltd. All rights reserved.
Pusher Limited is a company registered in England and Wales (No. 07489873) whose registered office is at MessageBird UK Limited, 3 More London Riverside, 4th Floor, London, United Kingdom, SE1 2AQ.